Table of Contents >> Show >> Hide
Recessed lighting has become a popular choice in modern home design, adding both functionality and beauty to spaces. Whether you’re renovating your living room, kitchen, or bathroom, installing recessed lighting can create a dramatic effect that enhances the mood and ambiance. But how do you go about installing these lights yourself? Let’s dive into the steps to achieve a professional, polished look with recessed lighting that will transform your space.
Why Choose Recessed Lighting?
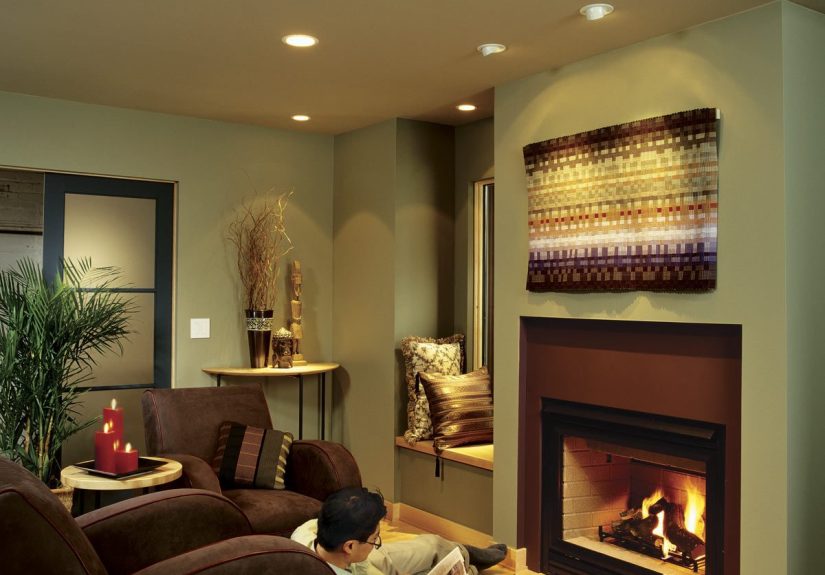
Recessed lighting, also known as can lights or downlights, is designed to sit flush with the ceiling, creating a sleek, minimalist look. It’s ideal for areas where you want to maximize headroom or avoid bulky fixtures that can make a room feel cramped. When installed correctly, recessed lighting can provide even, soft lighting that enhances the architectural features of your home, casts a cozy glow, or highlights art pieces or focal points.
But beyond aesthetics, recessed lighting is incredibly versatile. You can control the direction of the light, adjust brightness, and even change the color temperature for different effects. Whether you want subtle task lighting for reading or bold, dramatic lighting for a dining room, recessed lights give you the flexibility to customize your lighting style to suit the mood of any occasion.
Planning Your Recessed Lighting Installation
Before you start installing recessed lighting, careful planning is key to achieving the perfect effect. Here are some considerations to help you plan your installation:
- Room Function: Think about the primary use of the room. For example, in a kitchen, you might need brighter, focused lighting, while in a living room, a softer, more atmospheric effect might be more appropriate.
- Placement: The placement of recessed lights is crucial for the right effect. Typically, you’ll want to space lights about 4 to 6 feet apart for even illumination. Avoid placing them directly over furniture or in the path of your walkways, as this can create distracting shadows.
- Lighting Type: Choose between different types of recessed lights, such as adjustable (or eyeball) lights, fixed lights, or accent lighting. Each type provides a different lighting angle and effect, so consider what works best for your space.
- Power and Circuitry: Ensure that your electrical system can handle the load. Most recessed lights require a 15-amp or 20-amp circuit, and it’s essential to verify that the wiring and breaker are appropriately sized for the task.
Tools and Materials You’ll Need
Installing recessed lighting is a manageable DIY project if you have the right tools. Here’s a list of materials and tools you’ll need for the job:
- Recessed lighting kits (including housings and trims)
- Measuring tape
- Electrical tape
- Pencil for marking placement
- Power drill
- Drywall saw or keyhole saw
- Wire stripper
- Screwdriver
- Voltage tester
- Electrical wire (usually 12/2 or 14/2 gauge wire)
- Junction box (if necessary)
Step-by-Step Guide to Installing Recessed Lighting
Step 1: Turn Off the Power
Safety first! Before starting any electrical work, turn off the power to the room from the circuit breaker. Use a voltage tester to make sure there is no electricity running through the wiring.
Step 2: Mark the Light Placement
With your measurements in hand, mark the locations where you want to install the lights. As mentioned earlier, space them evenly, and avoid placing them over furniture or areas where you might need to avoid shadows.
Step 3: Cut Holes for the Recessed Lights
Using your marked locations, use a drywall saw to cut holes for the housings. The size of the hole should match the specifications provided with your recessed lighting kits. Take care to avoid cutting any structural beams or wires within the ceiling as you work.
Step 4: Install the Electrical Wiring
Now, it’s time to wire the lights. Run the electrical wire from the power source to each light. For safety, make sure to leave enough slack to connect the wires to the light fixtures later. Use wire strippers to expose the wires and ensure the connections are secure. If needed, connect the wires to a junction box and then continue wiring to each individual recessed light housing.
Step 5: Install the Recessed Light Housings
Once the wiring is in place, insert the light housing into the ceiling holes. Depending on the type of housing, you may need to secure it using screws or clips that are part of your recessed lighting kit. Make sure each housing is securely fastened and flush with the ceiling.
Step 6: Make the Electrical Connections
Now, it’s time to make the electrical connections. Twist the exposed wires from the light housing with the corresponding wires from your electrical systemtypically, black (live), white (neutral), and green or copper (ground). Use wire nuts to twist the connections and secure them in place.
Step 7: Attach the Trim and Light Bulbs
Once the wiring is secure, attach the trim to the housing. The trim often has a spring-loaded mechanism that makes installation quick and easy. After attaching the trim, insert the bulbs (typically LED bulbs for energy efficiency and longer lifespan). Ensure the bulbs fit snugly within the housing to avoid any gaps.
Step 8: Test the Lights
Before finishing the job, turn the power back on and test your new recessed lights. If everything is working correctly, your lights should shine brightly and evenly across the room.
Additional Tips for Dramatic Effect
To achieve the best dramatic lighting effect, consider the following tips:
- Use Dimmable Lights: Dimmable recessed lights give you the flexibility to control the intensity of the lighting, making it easy to adjust the ambiance from bright and energetic to soft and intimate.
- Experiment with Lighting Angles: If you’ve chosen adjustable recessed lights, experiment with different angles to highlight architectural features or create interesting shadows and contrasts.
- Layer Your Lighting: Combine recessed lighting with other forms of lighting, such as pendant lights, chandeliers, or wall sconces, to create a multi-dimensional effect.
- Use Different Bulb Colors: For added drama, try using different color temperatures or RGB LED bulbs that allow you to change colors and create unique lighting effects throughout the day or evening.
Conclusion
Installing recessed lighting yourself can be a rewarding DIY project that transforms your home into a well-lit, stylish sanctuary. By following the proper steps, taking safety precautions, and planning your light placement carefully, you can create the perfect lighting effect for any room. Whether you’re aiming for a subtle glow or a bold, dramatic statement, recessed lighting allows you to control the ambiance with ease. With just a little effort, you’ll be able to enjoy the beauty and versatility of this modern lighting solution for years to come!
Now that you have a step-by-step guide, it’s time to roll up your sleeves and get started. Happy lighting!
Experience with Installing Recessed Lighting
As a DIYer, I can tell you that installing recessed lighting may sound intimidating at first, but it’s a manageable and enjoyable project. I recently installed recessed lights in my living room to create an inviting atmosphere. Initially, I was concerned about cutting into the ceiling, but the precision and care required made the task less daunting. The biggest challenge for me was wiring the lights correctlyensuring that all connections were safe and secure was critical. However, once everything was in place, the result was stunning. The lighting instantly elevated the room’s look, creating soft, ambient lighting perfect for evening relaxation. The dramatic effect was precisely what I was aiming for!
If you’re unsure about the wiring aspect or need more personalized advice, consider hiring a professional for assistance. But for those who love DIY projects, installing recessed lighting can be a satisfying experience that adds value and beauty to your home.
SEO Tags