Table of Contents >> Show >> Hide
- Why Chalk Markers Work So Well for Storage Tubs
- What You’ll Need
- Before You Write: Pick a Label Strategy
- Step-by-Step: Label Your Storage Tubs With Chalk Markers
- Make the System Actually Work (Not Just Look Cute)
- Chalk Marker Label Design Tips That Save Your Sanity
- Fixes, Erasing, and “Oops” Moments
- Where Chalk Markers Shineand Where They Don’t
- Practical Label Examples for Common Storage Zones
- FAQ
- Real-World Experiences People Have With Chalk-Marker Bin Labels (Extra ~)
- Conclusion
- SEO Tags
Storage tubs are supposed to make life easier. And yet, somehow, they always end up becoming
mysterious plastic sarcophagi labeled “Stuff” (which is not a categoryit’s an accusation).
If you’ve ever opened a bin expecting holiday lights and found… pool noodles, welcome.
Here’s a simple upgrade that feels oddly satisfying: label your storage tubs with chalk markers.
You get bold, readable labels that look clean and intentional, but you can still change them later
without peeling off half a sticker and your dignity.
Why Chalk Markers Work So Well for Storage Tubs
Chalk markers (often called “liquid chalk” markers) write like a marker but act like a tidy, grown-up
version of chalk. On the right surfaces, they’re easy to read, quick to dry, and easy to wipe off when
your organization system evolves from “seasonal décor” to “why do we own seven throw blankets?”
The sweet spot: non-porous storage tubs
Most storage tubs are plastic, which is typically non-porous. That’s good news: chalk marker ink usually
sits on the surface instead of soaking in, so you can erase it with a damp cloth when you want to rename a
bin or correct a spelling error before your future self judges you.
It’s flexible (because your life is flexible)
Labeling systems fail when they’re too fragile. If a label system requires a printer, a special app, and a
sacrificial offering, it’s not going to survive the chaos of real life. Chalk markers let you update labels
fastno redesign, no reprinting, no sticky residue museum on your bins.
What You’ll Need
- Chalk markers (fine tip for neat writing; bold tip for garage-distance readability)
- Clean cloths (microfiber is great; paper towels work)
- Warm water (and optional mild dish soap)
- Rubbing alcohol (optional, for stubborn residuespot test first)
- Painter’s tape or removable label frames (optional, for a crisp label area)
Before You Write: Pick a Label Strategy
You can absolutely write directly on the tub. But if you want the best results (and fewer “why is my label
floating over this weird ribbed texture?” moments), choose one of these strategies first:
Option A: Write directly on the tub
Best for smooth-sided bins, quick labeling, and people who enjoy immediate gratification (most of us).
Option B: Create a “label zone” with tape
Put painter’s tape down to form a rectangle, write inside the rectangle, then peel the tape for clean edges.
This is the DIY equivalent of giving your label a haircut and a job interview suit.
Option C: Use a removable label holder or tag
If your bins are textured, dusty (garage life), or handled a lot, a clip-on tag or label holder can protect
your writing and keep everything consistent.
Step-by-Step: Label Your Storage Tubs With Chalk Markers
1) Clean the surface (this is not optional, sorry)
Wipe the label area with warm water and a little mild soap if needed. Oils from hands, dust, and that
mysterious garage film can cause skipping, fading, or ink that refuses to behave. Dry completely.
2) Test in a sneaky spot
Not all plastics are identical. Test the marker on the back or bottom of one tub. Let it dry for a minute.
Then wipe it off with a damp cloth. If it erases cleanly, you’re golden. If it ghosts (leaves faint residue),
you can still use chalk markersjust plan to label on a smoother spot, a tape “label zone,” or a tag.
3) Activate your marker (aka the “why isn’t it writing?” phase)
Many chalk markers need a quick shake and a few presses of the tip (pumping) to get the ink flowing. Do this
on scrap paper first so you don’t accidentally baptize your tub with a surprise ink blob.
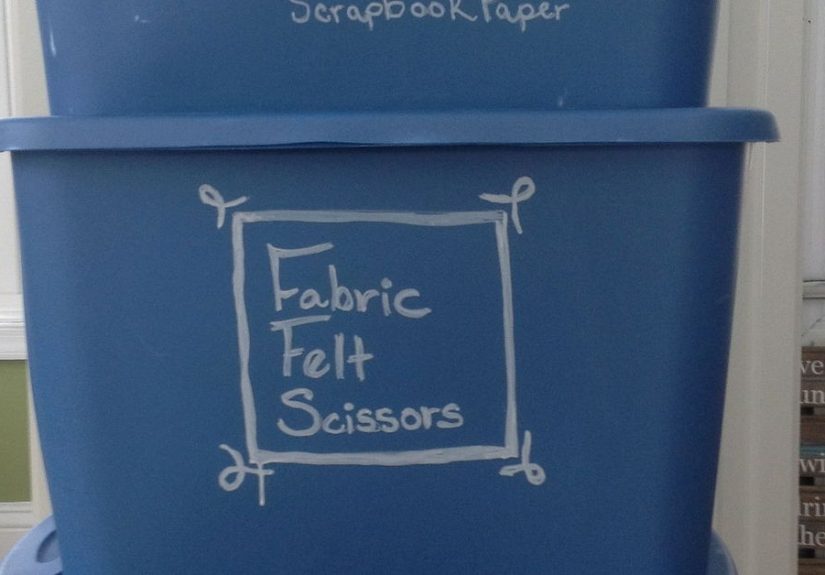
4) Write big, write simple
Labels should be readable from the distance you will realistically stand at. For closet bins, that might be
one step back. For garage storage, that might be “from the driveway while holding three grocery bags and a
bad attitude.”
Good label examples:
- “Holiday Decor” (not “Holiday Decor Including But Not Limited To Wreaths”)
- “Camping Gear”
- “Kids: Art Supplies”
- “Cables + Chargers” (aka the bin that multiplies when you’re not looking)
5) Let it dry, then do a smudge check
Chalk marker ink typically dries quickly, but give it a beat. Lightly touch a corner. If it smears, wait
another minute. Once dry, it’s usually more resistant to casual smudgingespecially on smooth plastic.
6) Label more than one side
The fastest way to make labels useless is placing them where you can’t see them. If bins stack, label the
front and the lid (or top edge). If bins slide on shelves, label the side that faces out. Your goal: identify
the bin without moving five other bins like you’re auditioning for a storage-themed escape room.
Make the System Actually Work (Not Just Look Cute)
Start with categories, not containers
Before labeling, define your categories. Aim for “wide enough to be flexible” and “specific enough to be useful.”
Too broad: “Misc.” Too narrow: “Leftover gift bags from 2019.” A practical middle: “Gift Wrap.”
Use consistent wording
Pick a format and stick to it. Example:
- Room first: “Kitchen: Small Appliances”
- Or category first: “Holiday: Halloween”
Consistency makes scanning easyand it prevents the chaos of having one bin labeled “Tools,” another labeled
“Garage Stuff,” and a third labeled “Hammers???” (the question marks are where systems go to die).
Color-code lightly (emphasis on lightly)
Color can be a shortcut: one color for seasonal items, another for kids’ stuff, another for household supplies.
The trick is to keep it simple. If your color system requires a legend, a spreadsheet, and an interpretive dance,
it’s too much.
Add a “detail line” only when needed
If you have multiple bins in the same category, add a second line:
- “Holiday Decor” / “Ornaments”
- “Holiday Decor” / “Lights”
- “Holiday Decor” / “Tabletop”
Chalk Marker Label Design Tips That Save Your Sanity
Use mixed-case letters (they’re easier to read)
ALL CAPS can look bold, but it’s harder to scan quickly. Title Case or mixed case is friendlier on the eyes.
Give your letters breathing room
Crowded labels are the organizational equivalent of whispering. Leave margins. Space your words. Let your label
be loud without being messy.
Consider simple icons
A tiny snowflake for winter items. A tent for camping. A paintbrush for crafts. Icons help kids (and tired adults)
find the right bin fast.
Fixes, Erasing, and “Oops” Moments
Everyday erasing
On many smooth, non-porous plastics, a damp cloth is enough to remove chalk marker ink. If your labels are fresh,
they usually wipe off cleanly with water.
For stubborn marks or “ghosting”
If ink has sat for a long time, or if the plastic is slightly textured, you might see residue. Try these in order:
- Warm water + mild dish soap (gentle and often effective)
- Marker-specific cleaner (made to remove chalk marker residue)
- Rubbing alcohol (spot test first; plastics vary)
- Melamine sponge (magic-eraser style) (use gentle pressure; it’s mildly abrasive)
Important: Avoid harsh solvents unless you know your plastic can handle them. Some removers can
cloud, soften, or dull plastic surfaces. Always test a small hidden area first.
Where Chalk Markers Shineand Where They Don’t
Great for:
- Closet bins and under-bed storage
- Seasonal tub rotations (holiday, summer gear, school supplies)
- Pantry-style bin labels (especially when you like to rename categories as habits change)
- Temporary sorting while decluttering (“Donate,” “Keep,” “Relocate,” “Why Do I Own This”)
Not ideal for:
- Rough, porous, or unfinished surfaces (ink can become difficult to remove)
- Outdoor bins exposed to constant rain/sun without protection
- High-friction handling areas where labels get rubbed constantly
If you need labels that survive extreme conditions (humidity, heat, constant movement), consider putting the
chalk marker label on a removable tag or inside a clear label holder.
Practical Label Examples for Common Storage Zones
Garage
- “Auto: Fluids + Filters”
- “Tools: Hand Tools”
- “Tools: Fasteners”
- “Yard: Gloves + Twine”
Closet
- “Winter Accessories”
- “Travel Gear”
- “Extra Linens”
- “Shoes: Off-Season”
Kids’ Stuff
- “Art Supplies”
- “Building Toys”
- “Dress-Up”
- “School Keepsakes”
FAQ
Will chalk marker labels rub off if I touch the bins a lot?
Once dry, chalk markers typically resist light smudging on smooth plastic, but constant rubbing can wear them
down. If you handle bins daily, consider a label holder or place the label where hands don’t constantly scrape it.
Can I use chalk markers on textured tubs?
You can, but textured plastic may cause skipping while writing and may leave faint residue when erased. A tape
“label zone” or removable tag usually performs better on textured surfaces.
Do chalk markers become permanent?
They can be difficult to remove from porous or rough materials. On many non-porous plastics, they’re designed to
wipe off with water, but always test first.
How long do labels last?
In low-friction areas (closets, shelves), labels can last months. In garages or high-humidity areas, expect faster
wearand enjoy the upside: updating a label takes seconds instead of an entire sticker-removal saga.
Real-World Experiences People Have With Chalk-Marker Bin Labels (Extra ~)
The first thing many people notice is how quickly labeling shifts from “a chore” to “a weirdly soothing hobby.”
You start with one tubmaybe the infamous “holiday” binand suddenly you’re standing in front of a bin tower
like a museum curator. Not because anyone asked you to. Because it finally feels good to know where things live.
A common experience: the instant feedback loop. You label a tub “Cables + Chargers,” step back, and your
brain immediately goes, “Ah. Peace.” Then you realize you have three more tubs that are basically also “Cables + Chargers,”
and chalk markers save you from pretending that won’t happen. You can rename the bins as you discover what you truly own:
“Cables + Chargers,” “Old Cables,” and “Cables I’m Afraid to Throw Away.”
People also tend to get bolder with categories once they see the system working. Instead of “Kids Toys,” bins become
“Building Toys,” “Art Supplies,” and “Games.” The magic isn’t the markerit’s the clarity. When a kid (or spouse, or
future-you on a Tuesday) can put something away without asking where it goes, the system starts maintaining itself.
That’s the dream: an organization setup that doesn’t require you to be the household search engine.
In garages and basements, the big win is readability. Labels that you can read from a few feet away reduce the “bin shuffle,”
where you pull out three tubs, open two, and discover the third is the one you needed. Chalk markers encourage bigger writing,
clearer words, and less over-explaining. Many folks learn quickly that a simple label like “Camping Gear” beats a detailed label
like “Camping Gear (But Not The Stove Because We Lost It In 2021).” If you truly need detail, people often add a tiny second line:
“Camping Gear / Cooking,” “Camping Gear / Sleeping,” and so on.
Another very relatable moment: the first correction. You misspell something. Or you label a tub “Halloween” and realize it’s actually
half Halloween and half fall décor (because pumpkins refuse to stay in their lane). With chalk markers, you don’t have to commit to a
bad label forever. You wipe it, rewrite it, and move onno scraping adhesive, no ripping paper labels, no “I’ll fix it later”
prophecy. This low-stakes editability is why chalk-marker labeling tends to stick as a habit.
Finally, there’s the style factor. People who thought they “didn’t care about aesthetics” often discover they absolutely dojust not
enough to spend a weekend designing labels. Chalk markers hit that sweet spot: neat enough to look intentional, flexible enough to change,
and simple enough to keep up. The result isn’t perfection. It’s a home where you can find your stuff without starting a scavenger hunt.
And honestly? That’s luxury.
Conclusion
Labeling storage tubs with chalk markers is one of those rare home hacks that’s both practical and oddly satisfying. You get labels that are
bold and readable, yet easy to update as your categories change. Start with a few high-impact bins (seasonal décor, cables, kids’ supplies),
keep your labels simple and consistent, and place them where you can actually see them. Your future self will thank youprobably while holding
exactly the thing you needed, on the first try.