Table of Contents >> Show >> Hide
- Why French Provincial Nightstands Are Perfect for a Metallic Makeover
- Picking the Right Metallic Look: Glam, Not Gimmicky
- Before You Start: A Quick Reality Check (and a Pep Talk)
- Tools and Materials Checklist
- Step-by-Step: Metallic Painted French Provincial Nightstands
- 1) Remove hardware and label everything
- 2) Clean like you mean it
- 3) Safety check: test for lead if it’s an older painted piece
- 4) Repair damage and smooth the surface
- 5) Prime for adhesion (this is the “secret grown-up step”)
- 6) Apply the metallic paint in thin, patient coats
- 7) Add a second metallic (optional, but highly recommended)
- 8) Optional depth: glazing or antiquing for a vintage vibe
- 9) Seal it (because nightstands get touched… constantly)
- 10) Reassemble and upgrade hardware
- Troubleshooting: Common Metallic Paint Problems (and Fixes)
- Styling Ideas: Make Metallic Provincial Look Designer, Not Costume
- Time and Cost: What to Expect
- Conclusion: The Glow-Up Your Bedroom Didn’t Know It Needed
- Real-World Experiences and Lessons Learned (500 Extra Words)
There are two kinds of nightstands in this world: the ones you buy because you love them, and the ones you “adopt” because they were lonely on Facebook Marketplace
and you’re convinced you can fix them with confidence, caffeine, and a paintbrush you definitely didn’t clean last time.
French Provincial nightstands fall into a third category: the ones that look like they should come with a tiny crown and a dramatic backstory. They’re curvy. They’re ornate.
They have details that basically whisper, “I was made to be fabulous… please stop storing old receipts in me.”
If you’ve ever seen the classic “Metallic Painted French Provincial Nightstands” makeover vibe, you know the twist: take traditional, timeworn elegance and give it a glam,
reflective metallic finishwithout turning your bedroom into a sci-fi casino. This guide walks you through the full process in a practical, no-drama way (okay, less drama).
Why French Provincial Nightstands Are Perfect for a Metallic Makeover
The style already loves drama
French Provincial pieces typically feature curved legs, carved accents, and furniture “jewelry” like ornate pulls and decorative trim. Metallic finishes love raised details because
they catch light, create dimension, and make the carved parts look intentionallike you planned this look instead of panic-painting at 11:47 p.m.
Metallic can modernize without erasing the vintage charm
A lot of furniture makeovers accidentally erase what made the piece special. Metallic paint (when done thoughtfully) can keep the romantic silhouette while pushing it into a more
modern, “boutique hotel” direction. Think “antique shape, updated attitude.”
Picking the Right Metallic Look: Glam, Not Gimmicky
Choose a metallic that plays well with your room
Metallic finishes range from subtle satin shimmer to full-on mirror-like flash. For nightstands, the sweet spot is usually a refined metallic (nickel, champagne, soft gold,
antique bronze) that complements your lighting and bedding. If your room is warm and creamy, champagne tones feel cozy. If your room leans coolgray, white, navynickel and pewter
look crisp.
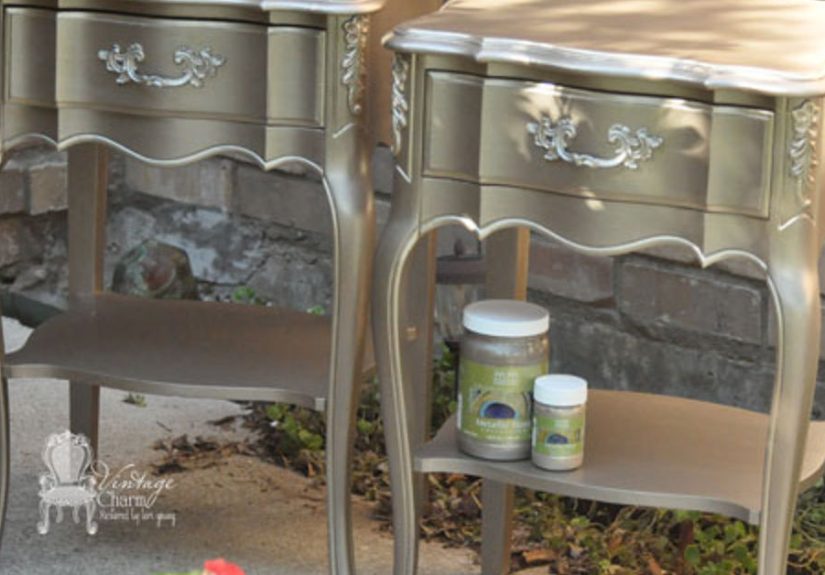
Two-tone metallic is the secret sauce
One of the prettiest approaches for French Provincial nightstands is a two-tone metallic finish: a primary metallic color on most surfaces and a second metallic used to highlight
carved edges, trim, and drawer details. The contrast doesn’t have to be loudjust enough to make the details “pop” when light hits them.
Paint types that work beautifully for this project
- Water-based metallic paint (often used by decorative painters): smooth application, brush/roller friendly, layered depth.
- Metallic spray paint: great for quick coverage, but can be tricky on ornate shapes if you spray too heavy.
- Metallic wax or buffing paste: best for accents and highlights, not full coverage on high-touch surfaces.
Before You Start: A Quick Reality Check (and a Pep Talk)
Metallic finishes are honest. Like, painfully honest. They highlight dings, brush marks, and uneven prep the way overhead lighting highlights that one dusty baseboard you forgot
existed. The good news? If you do the prep well, the finish can look shockingly professional.
Tools and Materials Checklist
- Drop cloth or cardboard to protect your workspace
- Screwdriver (for removing pulls and hardware)
- Cleaner/degreaser (or a grease-cutting dish soap + warm water)
- Sandpaper or sanding sponge (medium and fine grits)
- Tack cloth or microfiber cloth
- Bonding primer (especially if the piece is glossy, sealed, or stained)
- Metallic paint (and possibly a second metallic for highlights)
- Foam roller (small) and quality angled brush for details
- Optional: deglosser (“liquid sandpaper”) for tricky finishes
- Topcoat (water-based polyurethane/polycrylic or another compatible clear finish)
- Optional upgrades: new knobs/pulls, wood filler, glazing medium for antiquing
Step-by-Step: Metallic Painted French Provincial Nightstands
1) Remove hardware and label everything
Take off knobs, pulls, back plates, and anything else removable. If you have two nightstands with multiple drawers, label the drawers (painter’s tape on the inside is perfect).
French Provincial pieces sometimes have drawers that only fit their original openingslike picky cats with very specific chairs.
2) Clean like you mean it
Furniture collects invisible grime: body oils, old polish, dust, and mystery residue from decades of “just set it there for a second.” Clean every surface, especially around
handles and drawer fronts. Rinse if needed, and let it dry fully. Skipping this step is how you end up with paint that peels off in emotionally devastating ribbons.
3) Safety check: test for lead if it’s an older painted piece
If your nightstands are older and have existing paint, consider testing before sandingespecially if you don’t know the history. Lead dust is not the kind of “vintage charm”
anyone wants. If you suspect lead, avoid dry sanding and use safer methods (or consult a pro). At minimum, work outside or in a very well-ventilated area and use proper
protective gear.
4) Repair damage and smooth the surface
Check for loose veneer, chipped corners, deep scratches, or gouges. Fill dings with wood filler, let it cure, then sand smooth. On carved details, use a sanding sponge so you
don’t flatten the charm out of the piece.
If the surface is glossy or sealed, do a light scuff sand to dull the shine. You’re not trying to remove the finishyou’re just giving primer something to grip. If sanding is a
pain in the scrollwork, a deglosser can help (follow label directions and ventilate well).
5) Prime for adhesion (this is the “secret grown-up step”)
French Provincial nightstands are often sealed, stained, or previously painted. A bonding primer helps your metallic finish stick and prevents bleed-through from old stains.
Apply a thin, even coat. Let it dry fully, then lightly sand with a fine grit to knock down texture. Wipe clean.
If the piece has knots, heavy stains, or that “old furniture smell,” you may want a stronger stain-blocking primer. The goal is a smooth, uniform base so your metallic coat looks
silky rather than “sparkly oatmeal.”
6) Apply the metallic paint in thin, patient coats
Metallic paint looks best when it’s built up slowly. Use a small foam roller for flat areas (sides, tops, drawer faces) and a high-quality brush for details and grooves.
Work in sections and keep a wet edge to avoid lap marks.
Pro tip: Metallic pigments can settle. Stir oftenlike, “every time you blink” oftenso the color stays consistent from the first drawer to the last.
7) Add a second metallic (optional, but highly recommended)
This is where French Provincial details really shine. Use a second metallic tone to highlight carved trim, edges, and decorative flourishes. You can do this two ways:
- Detail brush method: carefully paint the raised details for a crisp, intentional contrast.
- Dry brush method: wipe most paint off the brush, then lightly skim raised areas for a soft, antique-like shimmer.
If you want the “glamorous but not brand-new” look, dry brushing is your best friend. It adds depth without making the piece look like it was dipped in liquid jewelry.
8) Optional depth: glazing or antiquing for a vintage vibe
If your metallic looks a little too fresh, a light glaze can soften it. A tinted glaze (often a soft brown/gray) settled into crevices can emphasize carving and create that
“collected over time” feel. Apply lightly, wipe back gently, and stop before it looks muddy. The point is to add shadow, not sadness.
9) Seal it (because nightstands get touched… constantly)
Nightstands deal with water glasses, lotion bottles, phone chargers, and the occasional late-night snack situation you refuse to talk about. A protective topcoat improves
durability and makes the surface easier to clean.
A water-based clear coat is often preferred over paint because it stays clearer and is less likely to yellow. Apply thin coats, and avoid over-brushingclear coats can get
streaky if you fuss with them too much. Let the piece cure fully before heavy use. Dry-to-touch is not the same as “ready for a lamp that weighs as much as a small dog.”
10) Reassemble and upgrade hardware
Reinstall the original hardware for a classic look, or swap it for something updated. French Provincial pieces can handle elegant crystal knobs, sleek modern pulls, or warm brass
accents depending on your room style. Hardware is the fastest way to steer the final vibe: romantic, modern glam, vintage cottage, or “Paris apartment in a movie.”
Troubleshooting: Common Metallic Paint Problems (and Fixes)
Problem: Brush marks or streaks
Metallic paints are more sensitive to application texture. Use thinner coats, a foam roller on flat areas, and lightly sand between coats (fine grit) once fully dry.
Also make sure you’re not painting over dustdust turns metallic finishes into accidental sandpaper.
Problem: Paint won’t stick or scratches easily
This usually points to prep: leftover polish, oily residue, or not using a primer designed for slick surfaces. Clean thoroughly, scuff sand, and use a true bonding primer.
Let each layer dry and curerushing is basically sponsoring the peeling.
Problem: Metallic looks “flat” or uneven
Stir frequently and apply consistent coats. Consider a second coat for richer depth. Two-tone highlighting can also add dimension without needing a mirror-shiny finish.
Problem: Topcoat changes the look
Some clears can slightly shift sheen. Test your topcoat on the back or inside of a drawer first. If you love the raw metallic sheen, choose a compatible clear that preserves it
and apply thin, even coats.
Styling Ideas: Make Metallic Provincial Look Designer, Not Costume
- Balance the shine: Pair metallic nightstands with matte linens, woven textures, or a soft rug.
- Repeat the metal: Echo the metallic tone in a lamp base, mirror frame, or picture frames so it looks intentional.
- Keep the top tidy: Metallic finishes look best when the styling isn’t clutteredthink tray, lamp, one book stack, one small plant.
- Mix metals thoughtfully: Nickel nightstands can still work with brass hardware elsewhere if you repeat each metal at least twice in the room.
Time and Cost: What to Expect
If you’re painting two nightstands, plan for a weekend where you do a lot of waiting (drying time) punctuated by bursts of productivity (sanding, painting, re-coating). Most
makeovers involve:
- Cleaning and prep: 1–3 hours (more if repairs are needed)
- Priming: 1–2 hours plus dry time
- Painting: 2–4 hours total across multiple coats
- Topcoating: 1–2 hours plus cure time
Cost depends on what you already own. Metallic paint and a quality bonding primer can be the biggest line items, but the payoff is a high-end look without high-end price.
Conclusion: The Glow-Up Your Bedroom Didn’t Know It Needed
Metallic painted French Provincial nightstands are the perfect blend of classic curves and modern sparkle. When you clean thoroughly, prep carefully, prime smart, and build your
metallic finish in thin coats, you get a result that feels custom and elevatednot “spray-painted in a hurry behind the garage.”
And the best part? Every time light hits those carved edges, you’ll get that tiny, irrational thrill of knowing you turned “old and tired” into “glam and hired.”
(Hired by your bedroom, obviously.)
Real-World Experiences and Lessons Learned (500 Extra Words)
People who tackle metallic nightstand makeovers tend to have the same emotional journey: excitement, confidence, mild chaos, then a proud little victory lap around the room.
Here are the most common “I wish someone told me that” experiences that come up again and againso you can skip the heartbreak and go straight to the bragging.
First: metallic paint is not a “one thick coat fixes everything” situation. Many DIYers learn (the hard way) that thick coats don’t dry evenly, especially on
ornate French Provincial details. Instead of looking luxurious, heavy paint can pool in carved corners and make the scrollwork look clogged. Thin coats feel slower in the moment,
but they’re the difference between “designer finish” and “melted candle aesthetic.” If you’re impatient, schedule something else while coats drylaundry, a snack, existential
dreadwhatever keeps you from poking the paint to “see if it’s ready.”
Second: prep is where the project is won. Nightstands are high-touch, which means they’re also high-grease. Even if a piece looks clean, it may have a film of
old furniture polish that repels paint like it’s doing a public service. DIYers often say the turning point was using a real degreaser and then scuff sanding just enough to dull
the surface. Once they did thatand used a bonding primerthe paint stopped scratching off at the slightest insult.
Third: two-tone metallic is the easiest way to look fancy without having to be perfect. A lot of people start with one metallic shade and worry it looks “flat.”
When they add a second tonelike a softer champagne highlight over a nickel basethe carved trim suddenly looks intentional and expensive. It’s also forgiving: if your base coat
has a tiny flaw, the highlight work distracts the eye with texture and depth. That’s not cheating; that’s strategy.
Fourth: topcoat choices can make or break your happiness. DIYers sometimes skip sealing because the piece “feels dry,” then get surprised when a water ring shows
up under a glass or the finish scuffs from a charger dragging across the top. Others seal too aggressively and over-brush the clear coat, creating streaks. The most successful
approach is gentle: thin coats, minimal fussing, and enough cure time that you’re not setting a lamp down like it’s a speed test.
Finally: styling matters more than people expect. Metallic nightstands look best when you keep the surrounding decor calmsoft bedding, neutral walls, warm
textures, and a lamp that doesn’t compete for attention. Many DIYers find that once they swap hardware (even just to a cleaner, updated shape), the whole piece feels more
“boutique” and less “rescued.” That hardware change is the tiny detail that makes the makeover look finishedlike putting on shoes before you leave the house.
The real lesson? This makeover is absolutely doable, but it rewards patience. If you treat it like a quick craft, it may look like a quick craft. If you treat it like a mini
renovationprep, prime, thin coats, protectyou’ll end up with nightstands that look like they came from a curated shop, not your garage.