Table of Contents >> Show >> Hide
- Why Bright Green Works on an Old Wood Dresser
- Before You Paint: Inspect the Dresser Like a Detective
- How to Prep an Old Wood Dresser for Paint
- The Best Primer for a Bright Green Dresser
- Choosing the Right Bright Green Paint
- How to Paint the Dresser for a Smooth Finish
- Should You Add a Protective Topcoat?
- Styling Ideas for a Bright Green Dresser
- Common Mistakes to Avoid
- Is It Worth Painting an Old Dresser?
- My Experience With Painting an Old Wood Dresser Bright Green
- Conclusion
- SEO Tags
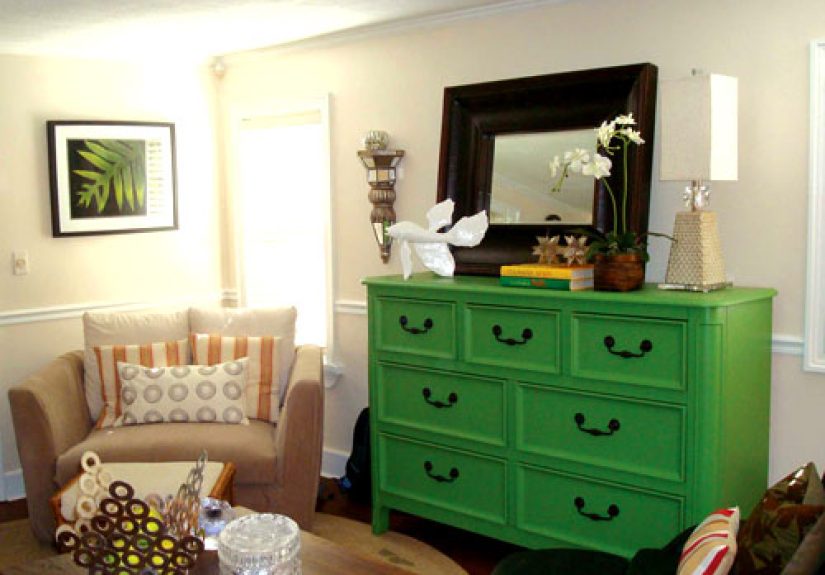
There are two kinds of people in this world: those who look at an old wood dresser and see “bulky brown storage,” and those who see “future star of the room.” If you’re here, congratulationsyou belong to the second group, the one with vision, ambition, and probably a faint dusting of sanding residue on a T-shirt somewhere. Painting an old wood dresser bright green is one of the easiest ways to turn a tired piece of furniture into something playful, modern, and gloriously impossible to ignore.
Bright green is not a shy color. It does not whisper. It kicks open the door, announces itself, and somehow makes everything around it look more interesting. On the right dresser, it can feel vintage, fresh, artsy, tropical, mid-century, farmhouse-with-a-wink, or “I found this at a boutique and absolutely did not.” The secret is not just choosing a bold color. The secret is getting the prep and paint process right so the finish looks intentional instead of accidental.
This guide walks through the full project, from checking the dresser’s condition and prepping the wood to choosing the best paint, applying a smooth finish, and letting the piece cure properly. Whether your dresser came from your grandmother, a thrift store, a garage sale, or that corner of your house where furniture goes to think about its mistakes, you can give it a bright green comeback story.
Why Bright Green Works on an Old Wood Dresser
Old dressers usually have what new flat-pack pieces can’t fake: solid structure, real wood details, deep drawers, and enough personality to survive several decades of questionable decorating trends. A bright green finish wakes up those details. Trim looks crisper. Curves feel more sculptural. Flat drawer fronts suddenly look graphic and clean.
Green also plays nicely with more styles than people expect. A citrusy lime green feels daring and modern. A grassy bright green leans cheerful and garden-inspired. An emerald-leaning bright green looks richer and more dramatic. Even in a neutral room, a green dresser can act like functional art. It stores socks, yes, but it also says, “Someone with excellent taste lives here.”
If your dresser has beautiful original wood grain and you feel a tiny pang of guilt about painting it, that’s normal. But if the surface is scratched, stained, patched, faded, or already covered with a failing finish, paint can be a smart rescue instead of a crime scene. A bold color does not erase the dresser’s history. It gives it a second chapter.
Before You Paint: Inspect the Dresser Like a Detective
Before you crack open that glorious can of green paint, study the dresser carefully. Is it solid wood, veneer, laminate, or a mix? Are the drawers sturdy? Are there loose joints, chipped corners, water marks, deep scratches, or mysterious sticky spots left behind by previous owners who apparently stored syrup?
Check for peeling paint or flaking finish. If the dresser was painted long ago and might date back to the pre-1978 era, be careful. Older painted surfaces can involve lead-related risks if you start sanding or scraping aggressively. In that case, proceed cautiously and test or get expert guidance before disturbing old paint layers. Safety is a lot more stylish than a disaster.
Remove the drawers, knobs, pulls, and any removable hardware. Put screws into labeled bags. This feels unnecessarily organized until you are later holding a handle in one hand, three mismatched screws in the other, and a deeply offended expression on your face.
How to Prep an Old Wood Dresser for Paint
Step 1: Clean Like You Mean It
Paint hates grime. Wax, polish, grease, hand oils, and general household funk will ruin adhesion faster than almost anything else. Start by vacuuming dust from crevices, drawer tracks, carved details, and corners. Then wash the dresser with a degreasing cleaner or a mild cleaning solution that cuts through residue without soaking the wood. Wipe it down with a clean damp cloth and let it dry completely.
This step sounds boring, which is exactly why people rush it. Don’t. A dresser can look clean and still be carrying years of invisible polish buildup. If you skip proper cleaning, the paint may fisheye, peel, or dry unevenly. That is not character. That is sabotage.
Step 2: Make Repairs Before the Pretty Part
Once the dresser is clean, fix the flaws. Tighten wobbly hardware. Glue loose veneer if possible. Fill nail holes, dings, gouges, and cracks with a paintable wood filler. Let it dry fully, then sand it smooth so it blends into the surrounding surface. If a drawer sticks, now is the time to deal with it. Paint is not a mechanical repair strategy.
Minor imperfections often disappear beautifully under paint, but major surface damage does not magically become charming once it turns green. Prep is what separates “wow, that looks custom” from “wow, something happened here.”
Step 3: Sand or Degloss the Finish
If the dresser has a glossy varnish, old polyurethane, or slick factory finish, you need to dull that surface so primer and paint can grip. In many cases, a light but thorough sanding is enough. Focus on scuffing the finish rather than stripping the dresser down to bare wood unless the old finish is failing badly.
For flat areas, a sanding block or orbital sander can speed things up. For edges, grooves, trim, and carved details, hand sanding gives better control. Many DIY painters start with a medium grit to scuff the surface, then move to a finer grit for smoothing. Always sand with a light hand and wipe away dust thoroughly afterward.
If you’re working with veneer, be especially careful. Veneer is thin. Sand with the confidence of a professional and the restraint of someone defusing a bomb. Too much enthusiasm can sand straight through the top layer.
The Best Primer for a Bright Green Dresser
Primer is the unsung hero of painted furniture. When you’re going from dark stained wood to bright green, primer matters even more. It helps paint stick, improves coverage, and reduces the number of topcoats needed. It can also block stains and wood tannins from sneaking through and ruining your fresh finish with yellow or brown blotches.
For old wood furniture, a bonding primer or stain-blocking primer is usually a smart choice. If the dresser has knots, tannin-rich wood, or a history of mysterious discoloration, lean toward a stain-blocking product. If the finish is slick or hard to grip, choose a bonding primer designed for difficult surfaces.
White primer is often the best base under bright green paint because it keeps the color lively instead of muddy. If your chosen green is especially vivid, the difference can be dramatic. Paint over a dark brown dresser without priming, and the green may look dull, uneven, or like it gave up halfway through the project.
Choosing the Right Bright Green Paint
You have options, and each one comes with its own vibe.
Latex or Acrylic Furniture Paint
This is the most common choice for DIY furniture projects. It is widely available, easy to clean up, and beginner-friendly. A high-quality acrylic or enamel-style furniture paint can create a durable finish with fewer brush marks than cheaper wall paint.
Chalk-Style Paint
Chalk-style paint is popular because it adheres well and often gives a velvety, matte look. It’s great if you want a softer, artistic finish. However, for a bright green dresser that will see regular use, you may want extra protection with wax or a topcoat depending on the product and finish you choose.
Cabinet and Trim Paint
If durability is a priority, cabinet and trim paints are excellent candidates. These formulas are often designed to dry harder and smoother, making them a strong choice for dressers, nightstands, and desks.
As for sheen, satin and semi-gloss are usually the sweet spot. Satin feels soft and modern while still being washable. Semi-gloss is a bit more reflective and durable. Flat paint can look beautiful, but it tends to show wear faster on furniture.
How to Paint the Dresser for a Smooth Finish
Use the Right Tools
A combination of a high-quality angled brush and a small foam or fine-finish roller works well for many dressers. Use the brush for corners, trim, and details. Use the roller for broad flat surfaces like drawer fronts, tops, and sides. This combo helps reduce visible brush strokes without sacrificing control.
Apply Thin Coats
This is the golden rule. Thin coats win. Thick coats sag, pool, and leave drips that dry into tiny monuments of regret. Load your brush or roller lightly and spread the paint evenly. Work in the direction of the wood grain when possible, and watch edges carefully for drips.
Let the first coat dry fully according to the paint label. Then lightly sand if needed to knock down dust nibs or texture, wipe clean, and apply the next coat. Most bright green finishes over primer need two coats, though some shades may benefit from a third for full saturation and depth.
Paint Drawers Separately
Lay drawers flat while painting their fronts. This helps prevent runs and lets you focus on smooth coverage. You do not always need to paint the sides of the drawers unless they show when closed or you want a full-color moment every time someone reaches for socks.
Don’t Rush Reassembly
Dry and cured are not the same thing. A dresser can feel dry to the touch and still be soft enough to scratch, dent, or stick. Give it time before reinstalling hardware, sliding drawers in and out repeatedly, or setting heavy decor on top. Patience may not be exciting, but it is cheaper than repainting.
Should You Add a Protective Topcoat?
Sometimes yes, sometimes no. It depends on the paint you use and how the dresser will be used. Many modern furniture and cabinet paints are durable enough on their own once fully cured. But if the dresser will live in a high-traffic area, a kid’s room, or a place where spills, bumps, and enthusiastic drawer-slamming are common, a topcoat can add insurance.
Choose a clear finish that is compatible with your paint. Water-based polycrylic-style topcoats are popular because they are relatively clear and easy to use. Make sure the paint is thoroughly dry first. Test your topcoat on a hidden area if you’re worried about changing the color or sheen. Bright green deserves protection, not a cloudy surprise.
Styling Ideas for a Bright Green Dresser
Once your dresser is painted, you can keep it simple or go full design nerd. Gold or brass hardware looks sharp against bright green and adds warmth. Black hardware creates a crisp, graphic contrast. Natural wood knobs can soften the look and make it feel more organic.
Want extra personality? Line the drawer interiors with patterned paper. Paint only the outer shell bright green and leave the drawer sides natural. Add striped or botanical wallpaper behind the dresser. Or keep the rest of the room calm and let the dresser be the main character, because frankly, it earned the role.
Common Mistakes to Avoid
Skipping Primer
On some furniture projects, people get away with it. On an old wood dresser painted bright green, skipping primer is asking for weak coverage and possible stain bleed. It is a gamble with bad odds.
Painting Over Wax or Polish
If the dresser has years of furniture polish on it, paint adhesion will suffer. Clean thoroughly first, even if you are impatient to move on.
Using Thick Coats
Thick paint does not save time. It creates drips, long dry times, and rough texture. Thin and even always looks more professional.
Ignoring Cure Time
A freshly painted dresser is fragile during early use. Hardware can stick. Decor can leave rings. Drawers can rub and mar the finish. Let the coating harden properly before treating the dresser like it has completed its transformation.
Is It Worth Painting an Old Dresser?
Absolutelyif the piece is structurally sound and you want a custom look for less than the cost of buying new furniture. Painting an old wood dresser bright green is part restoration, part design experiment, and part highly satisfying revenge against boring furniture. You get to keep the quality of an older piece while making it fit your current style.
It also gives you something mass-produced furniture often lacks: a story. Your dresser becomes more than storage. It becomes the thrift-store miracle, the hand-me-down glow-up, the weekend project that turned out weirdly amazing, the piece guests always ask about.
My Experience With Painting an Old Wood Dresser Bright Green
The first time I painted an old wood dresser bright green, I was convinced the project would be quick. You know, one of those “Saturday morning start, Saturday afternoon reveal, Sunday basking in compliments” situations. That was adorable. By lunchtime, I had removed the hardware, discovered three different old finishes hiding on the same piece, and learned that old dresser drawers apparently collect dust in geological layers.
Still, once the cleaning and sanding started, the project became oddly satisfying. There is something deeply therapeutic about taking a piece that looks tired and dragging it, gently but firmly, toward a better future. Under the grime and scratches, the dresser had great lines. The drawers were solid. The shape had charm. It didn’t need pity. It needed purposeand, as it turned out, a fantastic shade of green.
I chose a bright green that sat somewhere between fresh-cut grass and “that expensive boutique chair you pretend not to want.” The primer stage looked underwhelming, like all worthwhile prep work does. But then the first coat went on, and suddenly the dresser stopped being a project and started becoming a personality. The color bounced light around the room. The carved drawer trim popped. Every pass of the brush made the piece feel less like forgotten furniture and more like a deliberate design decision.
Of course, there were humbling moments. One drawer front tried to collect drips along the bottom edge like it was building a tiny paint cave. I missed a patch near the back leg and only noticed after admiring my “finished” work from several dramatic angles. And I learned, the hard way, that paint that feels dry is not always ready for eager hands, reattached knobs, or decorative objects that weigh as much as a bowling ball.
But the best part came later, when the dresser was fully cured and back in place. The room changed. Not subtly. The green dresser had energy. It made nearby neutrals look sharper and softer at the same time. Plants loved it. Brass hardware loved it. Sunlight absolutely showed off for it. Even boring everyday habitslike opening a drawer to look for a T-shirtfelt slightly more glamorous.
What surprised me most was how much the piece still felt old in the best way. The paint didn’t erase its age. It highlighted it. The dresser kept its sturdy build, its deep drawers, its old-house soul. It just stopped apologizing for being brown and started acting like art with storage.
That experience changed how I see old furniture. Not every piece should be painted, and not every room needs a bright green dresser. But some projects reward bold choices. When the structure is good and the color is right, paint can reveal a piece instead of hiding it. It can turn something neglected into something joyful. And honestly, there are few home projects more satisfying than stepping back, seeing that final coat dry, and realizing you just transformed a sad old dresser into the brightest thing in the room.
Conclusion
Painting an old wood dresser bright green is not just a color choice. It is a commitment to making furniture fun again. With the right prep, a reliable primer, thin coats of quality paint, and enough patience to let the finish cure, you can create a piece that looks polished, personal, and full of life. The process may involve dust, labels on zip bags, and at least one moment of wondering why you started. But the result is worth it: a dresser that feels custom, cheerful, and far more expensive than it probably was.
So go ahead and rescue that old dresser. Sand it, prime it, paint it, and let it become the bright green legend your room didn’t know it needed.