Table of Contents >> Show >> Hide
- Why a Pressure Cooker Makes Turkey Breast So Juicy
- Pick Your Turkey Breast: Bone-In vs. Boneless
- Food Safety and Thawing (Unsexy, Necessary, Worth It)
- The Flavor Plan: Season Like You Mean It
- Pressure Cooker Turkey Breast Recipe (With Easy Gravy)
- Cook Time Guide (Use This as a Starting Point)
- How to Crisp the Skin (Because We Deserve Nice Things)
- Make Gravy Right in the Pot
- Slicing and Serving Ideas
- Troubleshooting: Fixes for Common Turkey Breast Problems
- Leftovers: Keep Them Safe (and Actually Tasty)
- Real-World “Kitchen Notes” People Learn After Making This a Few Times
If roasting a whole turkey feels like running a marathon in oven mitts, a pressure cooker turkey breast is your cheat code.
You get tender, sliceable turkey (plus gravy!) without babysitting a bird for half a day. The best part: this method is
practically built for smaller gatherings, weeknight “I want turkey sandwiches tomorrow” plans, and anyone whose oven is already
booked by pies, casseroles, or that one pan of stuffing you refuse to share.
This guide walks you through a reliable pressure cooker turkey breast recipe, explains why it works, and gives
you a cook-time framework that keeps you flexible. The real MVP is a meat thermometerbecause turkey doesn’t care what your timer says.[1]
Why a Pressure Cooker Makes Turkey Breast So Juicy
Pressure cooking is basically controlled steam magic. The sealed environment reduces moisture loss, while the high-heat steam
cooks the meat efficiently. Turkey breast is naturally lean, so it dries out faster than dark meat. A pressure cooker helps
by keeping the cooking environment humid and by shortening the time your turkey spends in the “drying out” zone.
What You’re Trading Off
- Pro: Faster cook time, less oven space, consistent results.
- Con: Skin won’t get crisp in the pot (but we’ll fix that in a minute).
- Con: Turkey breast size matterssome cuts are too tall for smaller pots.
Pick Your Turkey Breast: Bone-In vs. Boneless
Both work, but they behave a little differently:
-
Bone-in, skin-on (often 4–6 lb): More “holiday-style” presentation and typically better flavor.
It may need trimming to fit comfortably in a 6-quart cooker, and it’s easier to crisp the skin afterward. -
Boneless, netted roast (often 2–4 lb): Easy to fit, easy to slice. Because it’s tightly rolled,
the center can take a bit longer to heat through than you’d expect for the weight.
Food Safety and Thawing (Unsexy, Necessary, Worth It)
Turkey is considered safe when the thickest part reaches 165°F.[1] If you’re thawing:
- Fridge thaw: Plan about 24 hours per 4–5 pounds in a refrigerator at 40°F or below.[2]
- Cold-water thaw: About 30 minutes per pound (keep it cold and cook immediately after).[3]
Also: skip washing raw turkey. It doesn’t “clean” the birdit can splash bacteria around your sink and counters.
Keep it simple: pat dry, season, and sanitize surfaces afterward.
The Flavor Plan: Season Like You Mean It
Turkey breast needs confidence. The easiest way to get it is a bold rub + aromatic cooking liquid. Here are two smart options:
Option A: Herb-Butter Under the Skin (Best for Bone-In)
If your turkey breast has skin, loosen it gently and rub a seasoned butter mixture underneath. That butter melts into the meat
while it cooks, and it helps the skin brown later.
Option B: “Turkey Rub” + Quick Sear (Best for Boneless or Skinless)
Searing isn’t required, but it adds a roasty vibe and makes the finished turkey taste less like it arrived by teleportation.
A fast brown on the outside builds flavor you can’t fake with gravy (though gravy is still invited).
Pressure Cooker Turkey Breast Recipe (With Easy Gravy)
Ingredients
- 1 turkey breast (2–6 lb; bone-in or boneless), fully thawed
- 1–2 tbsp olive oil (for searing) or 2 tbsp butter
- 1 cup low-sodium chicken broth (or turkey broth)
- 1 onion, quartered
- 2 celery stalks, cut into big chunks
- 2 carrots, cut into big chunks
- 3–5 garlic cloves, smashed
- 1 tsp kosher salt (plus more to taste)
- 1 tsp black pepper
- 2 tsp paprika (smoked paprika is great here)
- 1 tsp dried thyme (or 1 tbsp fresh)
- 1 tsp dried sage (or 1 tbsp fresh)
- 1 tsp onion powder (optional, but helpful)
- 1 tsp garlic powder (optional, but helpful)
- Optional: 1 lemon (zest + wedges), 2 sprigs rosemary
For the gravy
- 1–2 tbsp butter (optional but delicious)
- 2–3 tbsp cornstarch
- 2–3 tbsp cold water (to make a slurry)
- Salt and pepper to taste
Step-by-step instructions
-
Pat dry and season. Pat the turkey breast dry with paper towels. Mix salt, pepper, paprika, thyme, sage,
and any optional powders. Rub all over the turkey. If skin-on, try to get some seasoning under the skin too. -
Sear (recommended). Set the pressure cooker to sauté. Add oil or butter. Brown the turkey 3–4 minutes per side
(work in batches if needed). Remove to a plate. -
Build the base. Add broth to the pot and scrape up browned bits (that’s flavor, not “burnt drama”).
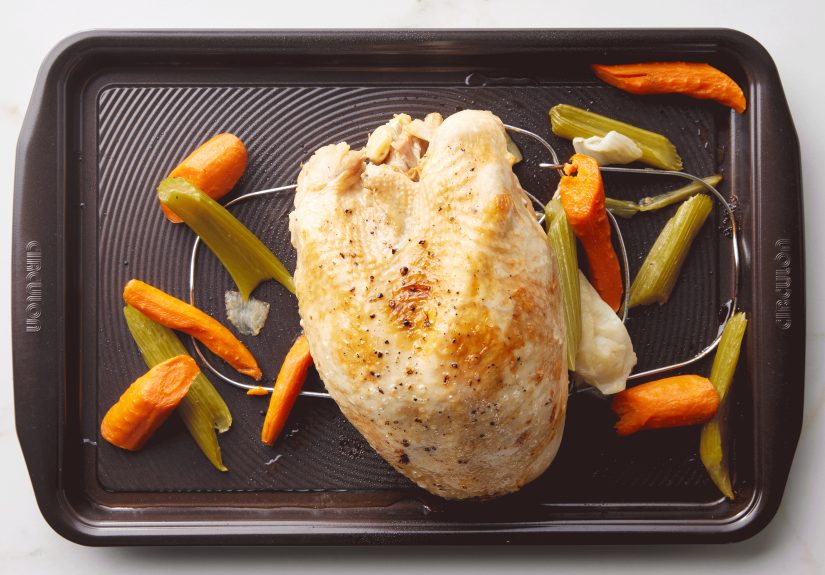
Add onion, celery, carrots, and garlic. Place a trivet/rack on top if you have one. -
Set the turkey in place. Put the turkey breast on the trivet (or directly on the aromatics if needed).
Skin-side up if there’s skin. - Pressure cook. Lock the lid, set to High Pressure, and choose a cook time from the guide below.
-
Release pressure safely. Let the pot naturally release for 10–20 minutes (depending on size),
then vent any remaining pressure. Open the lid away from your face. -
Check temperature, then rest. Insert a thermometer into the thickest part of the breast.
You’re aiming for 165°F for safety.[1] Transfer turkey to a cutting board and rest 10–20 minutes
before slicing (resting keeps it juicy).
Cook Time Guide (Use This as a Starting Point)
Pressure cookers vary, turkey breasts vary, and “2.5 pounds” can mean anything from a neat little boneless roast to a bone-in
piece shaped like a boulder. So treat times as a framework, then let your thermometer make the final call.
General timing rules people use
- Bone-in breast: about 5–6 minutes per pound at High Pressure is a common approach.[4]
- Boneless breast: about 5–6 minutes per pound can work, but netted/rolled roasts may need a bit more to heat the center.
Practical time examples
- 2–3 lb boneless, netted: ~22–25 minutes High Pressure + 10–15 minutes natural release (check temp)
- 4–5 lb bone-in: ~25–32 minutes High Pressure + 15–20 minutes natural release[5]
- 6 lb bone-in: ~36 minutes High Pressure + 10 minutes natural release is one published approach[6]
If it’s under 165°F: Put it back in, pressure cook 3–6 minutes more, then do a short natural release (5–10 minutes) and recheck.
Turkey breast is forgiving in small incrementswhat ruins it is blasting past the finish line by 20 degrees.
How to Crisp the Skin (Because We Deserve Nice Things)
If your turkey breast has skin and you want that golden, “I definitely roasted this for hours” look:
- Oven broil: Put the cooked, rested turkey on a sheet pan and broil 2–6 minutes, watching closely.
- Air fryer: Air fry skin-side up at a high temp for a few minutes until crisp (do this after resting).
- Crisp lid / combo cooker: If you have one, use it briefly after pressure cooking.
Make Gravy Right in the Pot
While the turkey rests, your pressure cooker is holding a pot of intensely turkey-ish broth. Let’s turn it into gravy.
Quick gravy method
- Remove the trivet and aromatics. Strain the liquid if you want smooth gravy.
- Turn on sauté. Simmer the liquid 5–10 minutes to concentrate flavor.
- Optional: whisk in 1–2 tbsp butter for richness.
- Mix cornstarch + cold water (start with 2 tbsp each). Whisk into simmering liquid.
- Simmer 1–3 minutes until thick. Add more slurry if needed. Season to taste.
Gravy tip: If your liquid is salty, don’t “fix” it with more salt. Fix it by adding unsalted broth or a splash of water,
then re-thicken if needed.
Slicing and Serving Ideas
Slice against the grain for tender pieces. Serve with gravy, obviouslybut also consider:
- Thanksgiving-for-two plates: mashed potatoes + green beans + cranberry sauce
- Meal prep bowls: turkey + roasted sweet potatoes + sautéed greens
- Sandwich strategy: thick slices, mayo, cranberry, and a little stuffing (this is not a drill)
Troubleshooting: Fixes for Common Turkey Breast Problems
“It’s cooked, but it’s dry.”
- Slice only what you need and keep the rest whole (less exposed surface area).
- Serve with gravy (this is why gravy has job security).
- Next time: shorten cook time slightly and rely on temp checks + small add-on cook bursts.
“My turkey isn’t at 165°F yet.”
- Pressure cook 3–6 minutes more and recheck.
- Make sure you’re temping the thickest part without touching bone.
- If it’s a tightly rolled boneless roast, expect the center to laggive it time and verify again.
“The pop-up thermometer says it’s done.”
Pop-up timers can be unreliable. Use a real thermometer to confirm doneness.[7]
Leftovers: Keep Them Safe (and Actually Tasty)
Refrigerate leftovers within two hours and store in shallow containers so they cool quickly.[8]
Turkey breast is great cold, but bacteria also love room temperaturedon’t host a party for them.
Real-World “Kitchen Notes” People Learn After Making This a Few Times
Here’s the kind of experience-based wisdom that tends to show up after you cook turkey breast in a pressure cooker more than once
the stuff you’d text a friend while holding a carving knife and feeling oddly powerful.
First: fit matters more than weight. Two turkey breasts can weigh the same and still behave totally differently in the pot.
A boneless netted roast is compact, like a tidy little football. A bone-in breast can be wide and tall, and suddenly you’re doing
geometry at the counter: “If I angle it 17 degrees, will the lid close?” If the lid barely closes, don’t force itswap to a larger cooker
or choose a smaller breast next time. Many home cooks find bone-in breasts around the 4–5 pound range are the sweet spot for a 6-quart unit,
while bigger ones are happier in an 8-quart.
Second: resting is not optional if you want slices that stay juicy. People often assume resting is just a fancy-chef suggestion,
like “use tweezers to place herbs.” But turkey breast is lean, and when it’s hot, juices are moving. Give it 10–20 minutes and it slices cleaner,
tastes more tender, and doesn’t flood your cutting board like a tiny savory waterfall. If you’re craving crisp skin, do the crisping step after
restingor do a quick broil right before serving, then rest briefly again.
Third: seasoning needs to be bolder than you think. Pressure cooking doesn’t evaporate and concentrate surface seasoning the same way roasting does.
That means a timid pinch of salt can taste like… well, like you were nervous about salt. A balanced rub (salt, pepper, paprika, herbs) plus aromatics in the broth
makes a noticeable difference. And if you’re doing herb butter under the skin, most cooks report it’s the simplest “wow” upgrade for bone-in breastsespecially when
you broil at the end and the skin turns glossy and golden.
Fourth: the cook-time debate is real. You’ll see recipes calling for 5 minutes per pound, 6 minutes per pound, or “25 minutes, trust me.”
In practice, experienced pressure-cooker turkey people tend to treat time as a starting bid, not the final sale. They pick a reasonable time for the cut,
choose a release style that matches the size (often a natural release window), and then let the thermometer decide. That approach prevents the two classic problems:
undercooked centers (common with rolled boneless roasts) and dry edges (common when the cook time is too aggressive).
Fifth: the gravy is where you can really make it yours. Some folks keep it clean and classic. Others go full “holiday aromatherapy” with lemon,
rosemary, and a little black pepper. If the broth tastes slightly bland, simmer it longer. If it tastes too strong, add a splash of unsalted broth. If it tastes
“fine but not exciting,” whisk in a little butter at the end. The beauty is that you can adjust quickly while the turkey rests, and the end result feels like
you planned everythingrather than sprinting around the kitchen whispering, “Why did I volunteer to cook?”
Bottom line: once you nail your preferred seasoning and learn how your cooker behaves, this becomes one of those recipes you can do confidently on autopilot.
And that’s the dreamholiday-level turkey with weeknight-level effort.