Table of Contents >> Show >> Hide
- Why Side Leg Raises Matter
- The Benefits of Side Leg Raises
- Side Leg Raises Two Ways
- Which Version Is Better?
- Form Tips That Make a Huge Difference
- Common Mistakes to Avoid
- Best Variations to Keep the Exercise Effective
- How Many Reps and Sets Should You Do?
- When to Use Side Leg Raises in a Workout
- Who Should Be Careful With Side Leg Raises?
- Side Leg Raises vs. Clamshells
- Sample Mini Routine Using Side Leg Raises
- Real-World Experiences With Side Leg Raises
- Conclusion
- SEO Tags
Some exercises look so simple that they almost insult you. Side leg raises are one of them. You lie down or stand up, lift a leg, and think, “That’s it?” Then about 12 reps later, your outer hip starts sending strongly worded feedback. That is the magic of side leg raises. They are simple, accessible, and surprisingly effective for building strength in the hip abductors, especially the gluteus medius and gluteus minimus.
If you want stronger hips, better lower-body stability, and an exercise that fits into nearly any workout plan, side leg raises deserve a spot in your routine. They require little to no equipment, work for beginners, and can be made tougher with smart variations instead of gym-bro drama. Better yet, they can help support the muscles that keep your pelvis stable when you walk, climb stairs, run, or balance on one leg.
In this guide, you’ll learn two ways to do side leg raises, the biggest form mistakes to avoid, the best variations for different fitness levels, and practical tips to make every rep count. At the end, you’ll also find real-world experiences and observations related to this move, because exercise advice is nice, but knowing what it actually feels like in everyday life is even better.
Why Side Leg Raises Matter
Side leg raises are a form of hip abduction exercise. In plain English, that means you move your leg away from the center of your body. The main muscles doing the work are the gluteus medius and gluteus minimus, which sit on the outer part of your hips. These muscles help stabilize your pelvis, support good movement mechanics, and assist with activities like walking, stepping sideways, and controlling knee alignment.
That matters more than people realize. Weak hip abductors can contribute to sloppy movement patterns, especially during squats, lunges, running, and single-leg balance work. If your knees cave in, your pelvis wobbles, or your lower back tries to “help” every time your hips get lazy, side leg raises can be a useful corrective strength exercise.
They are also a great option for people who want a low-impact move that targets the hips without heavy loading. That makes them popular in general fitness, warm-ups, rehab-style programs, and home workouts.
The Benefits of Side Leg Raises
- Strengthen the outer hips: This is the big one. Side leg raises train the hip abductors directly.
- Improve pelvic stability: Stronger outer hips help keep your pelvis level when you stand or move on one leg.
- Support better exercise form: Hip strength can carry over to squats, step-ups, lunges, and running mechanics.
- Require minimal equipment: Body weight is enough to get started, though bands and ankle weights can increase difficulty.
- Fit many fitness levels: Beginners can start with slow bodyweight reps, while advanced exercisers can add resistance or tempo work.
- Work well in short routines: You can tack them onto a leg day, core day, warm-up, or mobility session without reorganizing your whole life.
Side Leg Raises Two Ways
There are two classic ways to do side leg raises: side-lying and standing. Both train the same general movement pattern, but they feel different and have slightly different benefits.
1) Side-Lying Side Leg Raise
This version is the most focused. Because you are supported by the floor, it is easier to isolate the outer hip muscles and pay attention to form. If your goal is to really feel your glutes and hip abductors working, start here.
How to do it:
- Lie on one side with your body in a straight line.
- Bend your bottom arm and rest your head on it, or use a small pillow for support.
- Keep your bottom leg bent slightly for balance, or leave it straight if that feels comfortable.
- Straighten your top leg and stack your hips so one is directly over the other.
- Flex your top foot and point your toes forward, not up toward the ceiling.
- Lift your top leg slowly until it reaches about 30 to 45 degrees.
- Pause briefly at the top without rolling backward.
- Lower with control. Do not let gravity do the whole job.
Best for: isolating the gluteus medius, beginners, home workouts, and anyone who wants to improve mind-muscle connection.
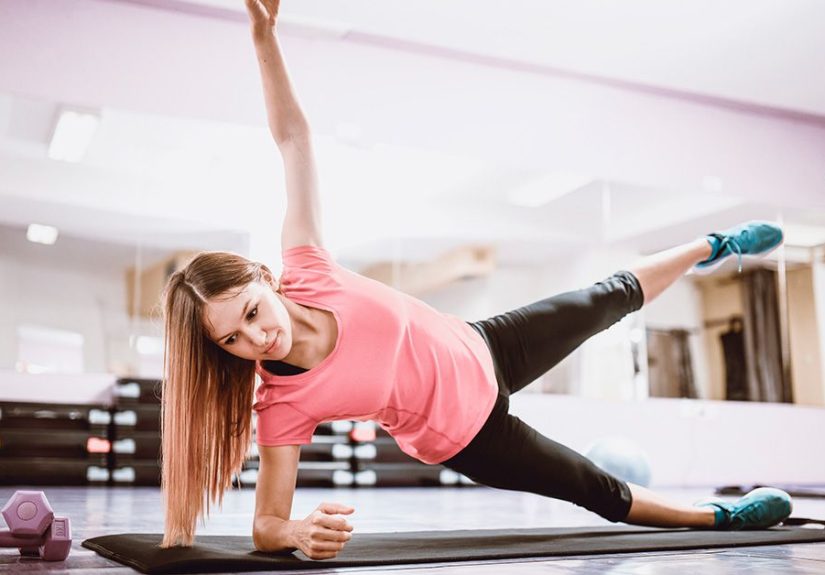
2) Standing Side Leg Raise
The standing version adds a balance challenge. Your moving leg still performs hip abduction, but your standing side also has to work to stabilize your body. That makes this variation more functional for everyday movement, sports, and balance training.
How to do it:
- Stand tall beside a wall, chair, or countertop for light support.
- Shift your weight into one leg while keeping your torso upright.
- Straighten the opposite leg and gently lift it out to the side.
- Keep your toes facing forward and avoid turning the leg outward.
- Raise only as high as you can without leaning your trunk.
- Pause, then lower the leg slowly back to the starting position.
- Finish all reps on one side, then switch.
Best for: improving balance, standing hip stability, athletic carryover, and people who do not love floor exercises.
Which Version Is Better?
Neither version is universally “better.” It depends on your goal.
- Choose side-lying leg raises if you want better muscle isolation, more control, and an easier way to clean up your form.
- Choose standing side leg raises if you want to challenge balance, train posture, and make the move feel more like real-life movement.
For many people, the smartest approach is to use both. Start with the side-lying version to build awareness and strength, then use the standing version to teach your hips to do that work while you’re upright and moving through space like a normal human.
Form Tips That Make a Huge Difference
With side leg raises, tiny changes matter. A few degrees of rotation can completely shift the feel of the exercise.
Keep Your Toes Pointing Forward
This cue helps you avoid letting the front of the hip take over. If your toes turn up toward the ceiling, the movement often becomes less about the outer hip and more about compensating with other muscles.
Do Not Lift Too High
Higher is not better. Once your pelvis starts tilting or your lower back joins the party, the exercise stops being a clean side leg raise and turns into interpretive dance. Stop at a range you can control.
Move Slowly
Momentum is sneaky. Swinging the leg may make the rep look dramatic, but it reduces muscular control. Lift for about one to two seconds, pause, and lower for two to three seconds.
Brace Your Core
A lightly engaged core helps keep your pelvis and spine steady. Think “ribs down, belly gently tight” instead of sucking in your stomach like you are posing for a photo you didn’t ask for.
Stack the Hips
For side-lying leg raises especially, keep the top hip directly over the bottom hip. Rolling backward is the most common cheat. If needed, do the exercise with your back close to a wall to keep yourself honest.
Common Mistakes to Avoid
- Leaning the torso: In standing side leg raises, leaning sideways makes the move easier but less effective.
- Rolling the hips open: In side-lying raises, this shifts tension away from the target muscles.
- Using speed instead of control: Fast reps often mean weak control at the top and sloppy lowering.
- Lifting too high: Your range should be clean, not theatrical.
- Ignoring pain: Muscle fatigue is normal. Sharp hip, groin, knee, or lower-back pain is not.
Best Variations to Keep the Exercise Effective
Once regular side leg raises start feeling manageable, variations can keep the exercise fresh and challenging.
Bent-Knee Side Leg Raise
This beginner-friendly version shortens the lever and can make the move feel more stable. It is useful for people who struggle to control a fully straight leg.
Isometric Hold Side Leg Raise
Lift the leg and hold it at the top for 3 to 10 seconds before lowering. This variation builds control and makes your outer hip light up in a very memorable way.
Banded Side Leg Raise
Place a loop band above the knees or around the ankles. This adds resistance throughout the range of motion. Start light, because bands have a way of humbling even confident people.
Ankle-Weight Side Leg Raise
Adding ankle weights increases load and is best for people who already own the bodyweight version with solid form. Keep the motion slow and controlled.
Pulsing Side Leg Raise
At the top of the movement, perform small pulses for 10 to 20 reps. Great for a finishing burn, terrible for anyone hoping this exercise would stay easy forever.
Side Leg Circles
Lift the leg and make tiny circles in one direction, then the other. This can challenge endurance and coordination in the hip stabilizers.
Standing Cable or Band Hip Abduction
This is a more gym-style progression of the standing side leg raise. Resistance stays consistent, and you can progress more precisely over time.
How Many Reps and Sets Should You Do?
That depends on your goal, but these guidelines work well for most people:
- Beginners: 1 to 2 sets of 8 to 12 reps per side
- General strength and stability: 2 to 3 sets of 10 to 15 reps per side
- Muscular endurance or burnout finishers: 2 to 3 sets of 15 to 20 reps per side
You can add side leg raises to your routine two to three times per week, depending on overall training volume. If your hips are still extremely sore, give them time to recover before piling on more reps just because your workout app is feeling aggressive.
When to Use Side Leg Raises in a Workout
- In a warm-up: Great before lower-body workouts, walks, hikes, or runs.
- During a strength session: Pair them with bridges, squats, step-ups, or clamshells.
- As accessory work: Use them after larger lifts to target hip stability.
- In a rehab-style routine: They can fit into low-impact programs focused on hip control and glute strength.
A simple lower-body combo might include glute bridges, side leg raises, bodyweight squats, and standing calf raises. That gives you a practical mix of glutes, hips, thighs, and ankle support without needing a truckload of equipment.
Who Should Be Careful With Side Leg Raises?
Side leg raises are generally low impact, but that does not mean they are right for absolutely everyone in every situation. Use caution if you have:
- Sharp hip or groin pain
- Recent lower-body surgery
- Acute lower-back pain
- A current muscle strain or injury affecting the hips or thighs
- Balance issues that make the standing version unsafe
If you are recovering from an injury or dealing with persistent pain, check with a qualified healthcare professional or physical therapist before adding new exercises. “Feel the burn” is fine. “Why does my hip feel weird in a bad way?” is your cue to stop.
Side Leg Raises vs. Clamshells
This is a common question, and the answer is delightfully unexciting: both are useful. Clamshells emphasize external rotation and can help teach hip control, while side leg raises are a more direct hip abduction exercise. If your outer hips are weak, using both in the same program can make sense.
A smart progression might look like this:
- Clamshells for awareness and activation
- Side-lying side leg raises for strength
- Standing side leg raises or band walks for functional stability
Sample Mini Routine Using Side Leg Raises
Beginner Hip Stability Circuit
- Glute bridges: 12 reps
- Side-lying side leg raises: 10 reps each side
- Standing side leg raises: 10 reps each side
- Bodyweight squats: 12 reps
Repeat 2 to 3 rounds, resting 30 to 45 seconds between exercises as needed.
Progression Option
- Banded clamshells: 15 reps each side
- Banded side-lying leg raises: 12 reps each side
- Standing band hip abductions: 12 reps each side
- Lateral band walks: 10 steps each direction
This creates a focused outer-hip workout that feels modest on paper and deeply personal in your glutes.
Real-World Experiences With Side Leg Raises
People often underestimate side leg raises the first time they try them. The movement looks tiny, controlled, and almost suspiciously polite. Then somewhere around rep 9 or 10, the outer hip starts to burn, and suddenly the exercise has your full attention. That experience is incredibly common. Because the gluteus medius does not always get enough direct work in everyday life, even fit people are surprised by how quickly fatigue kicks in.
Desk workers often report that side leg raises make them notice muscles they forgot existed. After long hours of sitting, the hips can feel stiff, sleepy, and generally unmotivated. Side leg raises can wake that area up. At first, the movement may feel awkward, and it is common to compensate by rolling the hips backward or lifting too high. Once form improves, many people say the exercise feels more precise and less like random flailing on a yoga mat.
Runners and walkers sometimes describe a different kind of experience. They may not feel side leg raises strongly in the first few reps, but over time they notice better control during hills, single-leg balance, and longer workouts. The change is often subtle at first. It is not usually a fireworks moment. It is more like realizing your hips feel steadier when you go upstairs, your knees track better during lunges, or your stride feels less sloppy late in a run.
Beginners also tend to have an emotional journey with the standing version. On day one, it can feel like a balance exercise disguised as a leg exercise. The body wants to lean, twist, or hold on for dear life. That is normal. With practice, standing side leg raises usually become smoother, and the standing leg starts working harder too. Many people eventually notice they are training both sides at once: one side moves, the other stabilizes.
Another common experience is the difference between “doing reps” and “doing quality reps.” At first, some people can crank out 20 fast leg lifts and feel almost nothing. The second they slow down, point the toes forward, and stop rolling open, the move becomes dramatically harder. That is not bad news. That is the sign the right muscles are finally doing their job instead of outsourcing the work.
People who add bands or ankle weights often learn an important lesson very quickly: progression should be humble. It is tempting to jump straight to heavy resistance because the basic move looks easy. In reality, a little extra load goes a long way with side leg raises. Smart progress usually beats dramatic progress here.
Perhaps the most encouraging experience is this: side leg raises reward consistency more than heroics. You do not need a massive setup, a complicated machine, or a playlist that sounds like an action movie trailer. You need controlled reps, decent form, and patience. Over time, many people notice stronger hips, better control, and less wobble in everyday movement. Not flashy, but very useful. And honestly, useful is underrated.
Conclusion
Side leg raises done two ways, side-lying and standing, are simple but powerful tools for building stronger hips and better lower-body stability. The side-lying version helps isolate the outer hip muscles, while the standing version adds balance and functional control. Use clean form, choose a variation that matches your level, and progress gradually. If you stay consistent, this small movement can make a noticeable difference in how your hips feel and perform.
In other words, side leg raises may not be flashy, but they are the kind of exercise that quietly makes everything else work better. And sometimes that is exactly what a smart workout needs.