Table of Contents >> Show >> Hide
- Why a Water Bottle Greenhouse Works (Tiny Science, Big Results)
- Pick the Right Bottle (Because Not All Bottles Are Created Equal)
- Two Ways to Use a Water Bottle Greenhouse
- What to Grow in a Bottle Greenhouse (Best Bets)
- Timing: When Should You Start?
- Temperature, Light, and the “Don’t Grow Sad Spindly Seedlings” Plan
- Ventilation: The #1 Mistake That Cooks Seedlings
- Watering Without Drowning (or Forgetting for a Week)
- Hardening Off: Turning Indoor Babies into Outdoor Adults
- Cleanliness and Safety (Because Seedlings Are Drama Queens)
- Troubleshooting: Quick Fixes for Common Bottle Greenhouse Problems
- A Quick, Real Example (Because Theory Is Nice, But Lettuce Is Nicer)
- Bonus: of Real-World Experience Using Water Bottle Greenhouses
- Conclusion
If you’ve ever stared at a packet of seeds in late winter and thought, “I want tomatoes NOW,” congratulations:
you’re officially a gardener. And gardeners are famous for two things: optimism and hoarding “useful” containers.
Today, those two traits combine into a tiny miracle you can build in five minutesyour very own
water bottle greenhouse.
A water bottle greenhouse is exactly what it sounds like: a clear plastic bottle repurposed into a mini
greenhouse (also called a cloche) that traps warmth, softens wind, and keeps seedlings from getting
bullied by spring weather. It’s cheap, it’s surprisingly effective, and it gives you the deeply satisfying feeling
of outsmarting frost with something that used to hold sparkling water.
Why a Water Bottle Greenhouse Works (Tiny Science, Big Results)
Greenhouses work because sunlight passes through clear material, warms the air and soil inside, and that heat
escapes more slowly. A bottle greenhouse is the same ideajust… snack-sized. It helps you:
- Raise the temperature around seeds/seedlings, especially on cool nights.
- Reduce wind stress so young plants don’t dry out or snap like overcooked spaghetti.
- Hold humidity (great for germination and for tender transplants).
- Protect from pests like slugs, cutworms, and curious neighborhood rabbits with strong opinions.
- Stretch your season by warming soil earlier and buffering cold snaps.
Pick the Right Bottle (Because Not All Bottles Are Created Equal)
Your best bottle greenhouse is clear, sturdy, and big enough to give plants some headroom.
A few practical guidelines:
- Size: 1–2 liter soda bottles or larger water bottles give the best “mini greenhouse” space.
- Clarity: Clear plastic lets in more light. Avoid heavily tinted bottles.
- Structure: Thicker bottles resist collapsing and stand up to wind better.
- Condition: Skip bottles that are cloudy, brittle, or deeply scratched (they vent heat poorly and look sad).
Two Ways to Use a Water Bottle Greenhouse
You can use bottles in two main wayseach one solves a different “gardener problem.”
Method 1: Bottle Cloche Outdoors (Protect Seedlings in the Ground)
This is the classic move: cut the bottom off a bottle, pop it over a seedling, and instantly give that baby plant
a protected microclimate.
What you’ll need
- A clear plastic bottle (1–2 liters is ideal)
- Scissors or a utility knife
- A skewer, nail, or screwdriver (to poke holes if needed)
- Optional: small garden staples, landscape pins, or a little soil to anchor the edge
Step-by-step
- Wash the bottle with warm soapy water and let it dry.
- Cut off the bottom (leave the cap end intact). Smooth jagged edges if needed.
-
Create ventilation control: Keep the cap on for cold nights, take it off for warm days.
If you want finer airflow, poke 2–4 small holes in the cap. - Place over the seedling and gently press the bottle edge into the soil.
- Anchor it with soil around the rim or a pin so wind doesn’t relocate your greenhouse to the next zip code.
-
Vent on sunny days. If the sun is out, treat the bottle like a car in a parking lotit heats up fast.
Remove the cap or lift the bottle briefly to avoid overheating. - Remove when crowded. If leaves touch the top or sides, it’s time to retire the bottle (plants outgrow them quickly).
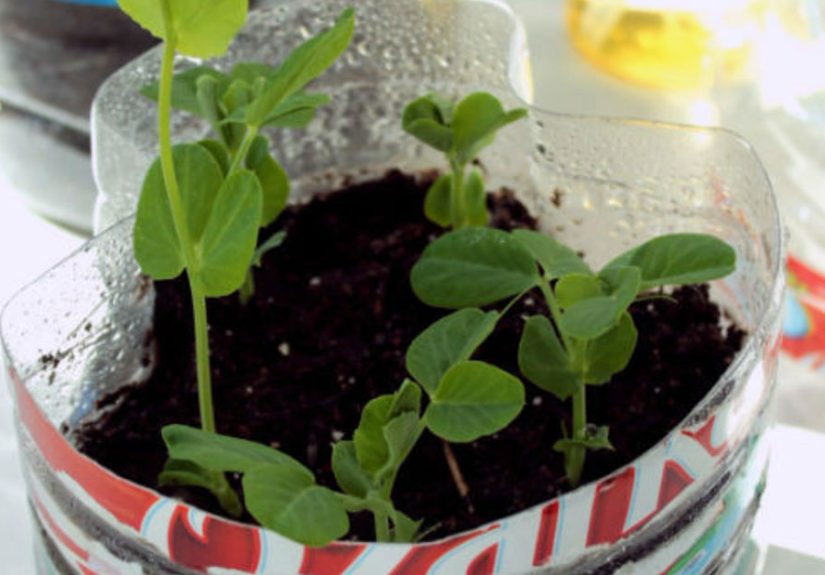
Method 2: Bottle Mini Greenhouse for Seed Starting (A “Portable Nursery”)
If you want to start seeds with less equipment, the bottle itself can become the container. Think of it like a
humidity dome plus pot, all in one. This method is especially handy if you’re short on windowsillsor just enjoy
building tiny ecosystems and feeling powerful.
What you’ll need
- A clear bottle (bigger is easier to work with)
- Seed-starting mix or light potting mix (not heavy garden soil)
- Seeds
- Label (permanent marker + tape works)
- Scissors/knife + something to poke drainage holes
Step-by-step
- Wash and dry the bottle.
-
Cut it like a hinged clamshell: Cut around the bottle about 2/3 of the way up,
leaving a small uncut section as a “hinge.” - Poke drainage holes in the bottom (3–6 holes is usually enough).
- Add 3 inches of moistened seed-starting mix. It should feel like a wrung-out spongedamp, not swampy.
- Sow seeds according to packet depth. (Small seeds = barely covered; big seeds = a bit deeper.)
- Label clearly. Future-you will not remember what “mystery green thing” is.
-
Close the bottle and leave the cap off (or loosened) to allow airflow and moisture exchange.
If it won’t stay shut, use tape or a binder clip. - Place in bright light (sunny window or under a grow light).
-
Open once germination starts. When you see sprouts, increase airflowcrack it open daily or widen vent holes.
Too much humidity after sprouting can encourage mold and weak growth.
What to Grow in a Bottle Greenhouse (Best Bets)
Bottle greenhouses shine with plants that like a little warmth and protection early onbut they’re also great for
tough seedlings that just need a weather buffer.
Great choices for outdoor bottle cloches
- Cool-season greens: lettuce, spinach, arugula, kale, mustard greens
- Brassicas: cabbage starts, broccoli, cauliflower (transplants benefit from wind protection)
- Early herbs: parsley, cilantro (especially as transplants)
- Strawberry starts or small perennial divisions that need wind buffering
Great choices for bottle seed-starting
- Tomatoes and peppers (start indoors with warmth; bottle helps humidity early)
- Basil (likes warmth; benefits from steady moisture)
- Flowers: marigolds, zinnias, cosmos (easy and fast)
Bonus mode: Winter sowing (outdoors in “mini greenhouses”)
If you want the easiest possible seed-starting routine, winter sowing uses recycled containers (including soda
bottles) set outside during winter so nature handles timing. This is especially successful for many
perennials and hardy annualsseeds germinate when conditions are right, without you playing thermostat manager.
Timing: When Should You Start?
Timing depends on what you’re growing and your local last frost date. A practical rule: many seeds are started
indoors several weeks before the last frost, then transplanted outside after hardening off.
-
Indoor seed starting: often about 6–8 weeks before your last frost for many garden favorites, with slower crops
(like peppers) sometimes needing longer. - Outdoor bottle cloches: best used in early spring once soil can be worked and daytime sun is reliable.
- Winter sowing: commonly done in mid-winter through early spring, with containers placed outside to catch rain and sun.
Temperature, Light, and the “Don’t Grow Sad Spindly Seedlings” Plan
A bottle greenhouse helps, but it doesn’t replace the basics: seeds need moisture, oxygen, and the right
temperature to germinateand seedlings need enough light to grow sturdy.
Temperature tips
- Many vegetables germinate best in warm conditions; seed packets often list ideal ranges.
- If your house is chilly, a warm spot (or a heat mat) can speed germination.
- Once sprouts appear, slightly cooler temperatures can help keep growth stocky instead of leggy.
Light tips
- As soon as seedlings emerge, give them bright light right away.
- Grow lights are often run roughly 12–16 hours per day for strong seedlings, depending on setup and plant needs.
- Keep lights reasonably close (but not scorching) to prevent the “reaching for the sun like a cartoon character” look.
Ventilation: The #1 Mistake That Cooks Seedlings
Here’s the truth: a closed bottle in full sun can heat up fast. Your bottle greenhouse is a helpful tool,
but it’s also a tiny solar oven if you ignore airflow.
- On sunny days: remove the cap or crack the bottle open.
- On cold nights: cap it (or close it fully) to hold warmth.
- If you see heavy condensation all day: add more airflow to reduce fungal risk.
- If seedlings wilt at midday: they may be overheatingvent immediately and add partial shade.
Watering Without Drowning (or Forgetting for a Week)
Bottle greenhouses reduce evaporation, which is great… right up until you overwater and create a tiny
swamp where fungi throw a party.
Simple watering rules
- Damp, not soaked: potting mix should hold together when squeezed but not drip continuously.
- Drainage matters: holes in the bottom prevent rot and “mystery mush” seedlings.
- Watch for condensation: a light fog inside often means moisture is fine.
- Water gently: misting or bottom-watering helps avoid displacing seeds.
Hardening Off: Turning Indoor Babies into Outdoor Adults
If you start seeds indoors (bottle or not), you can’t just toss them outside like, “Good luck!”
Hardening off is the gradual process of acclimating seedlings to sun, wind, and temperature swings.
- Start about 7–14 days before transplanting.
- Begin with short outdoor visits in bright shade or filtered light.
- Increase time outdoors and sun exposure each day, watching for wilting or sun scorch.
- Bring plants in (or protect them) if nights are too cold for the crop.
A bottle cloche can actually help here: it gives transplants a gentler “transition zone” outdoors while
they toughen up.
Cleanliness and Safety (Because Seedlings Are Drama Queens)
Seedlings are vulnerable to damping-off disease and other problems when conditions are too wet and air is still.
Good sanitation and airflow make a big difference.
- Wash reused containers before planting.
-
If you’re reusing seed-starting items, a common approach is disinfecting with a diluted household bleach solution,
then rinsing thoroughly and drying (always handle cleaners safely and keep them away from kids/pets). - Remove covers after sprouting (or increase ventilation) to reduce fungal issues.
Troubleshooting: Quick Fixes for Common Bottle Greenhouse Problems
Problem: Seedlings are tall, thin, and floppy
That’s usually not “bad genetics”it’s low light or lights too far away. Increase brightness, bring the light closer,
and consider a gentle fan for sturdier stems.
Problem: White fuzzy mold on soil
Too much moisture + not enough airflow. Vent more, water less, and scrape off the moldy surface. A thin layer of dry
seed-starting mix on top can help the surface dry out.
Problem: Plants wilt every sunny afternoon
Classic overheating. Vent immediately, move to morning sun/afternoon shade, or remove the bottle during peak heat.
Problem: Seeds didn’t sprout
Check the basics: seed freshness, temperature, moisture, and planting depth. Some seeds need light to germinate;
others need warmth; a few need cold stratification (winter sowing handles that naturally).
A Quick, Real Example (Because Theory Is Nice, But Lettuce Is Nicer)
Let’s say you want early lettuce. In early spring, you direct-sow lettuce in a prepared bed. Then you cover each
sowing spot with the bottomless half of a clear bottle, cap off during sunny days and cap on during chilly nights.
You’ve just created a line of micro-greenhouses that warm soil, protect emerging seedlings from wind, and reduce
pest damage. When the seedlings hit the bottle roof, remove itand enjoy that smug “I started spring early” feeling.
Bonus: of Real-World Experience Using Water Bottle Greenhouses
The first time you use a water bottle greenhouse, you’ll probably feel like a gardening genius. The second time,
you’ll realize you were one forgotten cap away from inventing “seedling sous-vide.” That’s the pattern:
bottle greenhouses work incredibly well, but they reward attentionespecially on sunny days.
One of the best surprises is how much wind protection matters. I used to assume cold was the enemy, but in early spring
it’s often the drying wind that slows seedlings down. Under a bottle cloche, the soil stays evenly moist longer,
and tiny plants don’t get whipped around. Leafy greens in particular seem to “relax” and grow with less stress.
It’s not magic; it’s just fewer harsh variables at once.
Another practical lesson: anchoring is not optional. A bottle perched politely on the soil looks secureuntil a gust shows up
like a prankster. After watching a cloche roll across the yard like tumbleweed, I started pressing the rim into the soil
and pinning it with a U-shaped landscape staple. In a pinch, a little soil piled around the edge works too.
Bonus: anchoring also reduces gaps where cold air sneaks in at night.
Venting is where you earn your stripes. On a cool but sunny day, a sealed bottle can heat up quickly. The outside air might
feel brisk, but inside the bottle the temperature can climb fast. My simplest routine is: cap on at night, cap off in the morning.
If the day stays cloudy, I’ll leave it partially vented. If the sun comes out, I vent more aggressivelysometimes even lifting the bottle
for a few minutes. This is especially important for transplants, which can wilt from heat stress even when the soil is moist.
I’ve also learned that bottles are fantastic for “almost hardy” transplantsplants that technically can handle cool weather but hate sudden
exposure. For example, young brassica seedlings (broccoli/cabbage) can tolerate cold, but the bottle reduces stress from wind and temperature
swings. After a few days under a cloche, they often look sturdier and more established. It’s like giving them a buffer week before full exposure.
For seed starting inside bottles, the biggest win is how well the container holds moisture during germination. But once sprouts appear,
you have to shift your mindset. At that stage, the goal is not “keep it humid forever.” The goal becomes: strong light + airflow.
I crack the bottle daily, widen vents, and gradually leave it open longer. If you don’t, you risk mold and weak growth. If you do, you get compact,
healthy seedlings that transition outdoors more easily.
Finally, labeling is the unsung hero. Marker fades, tape peels, and “I’ll remember” is a lie we tell ourselves every spring.
I now write the plant name and date on tape, stick it low on the bottle, and also put a second label inside. It sounds extrauntil you’re staring
at eight identical sprouts and realizing you’ve created a tiny, leafy identity crisis.
Conclusion
A water bottle greenhouse is one of the simplest ways to start your garden earlier, protect seedlings from spring chaos, and stretch your season
without buying fancy gear. Cut, vent, anchor, and pay attention on sunny daysthose four steps turn “recycling bin clutter” into real harvest momentum.
Whether you’re sheltering baby greens outdoors or starting seeds in a bottle nursery, you’ll get sturdier plants and a head start that feels like cheating
(the wholesome kind).