Table of Contents >> Show >> Hide
- What Rawhide Lace Is (and Why It Acts Like It Has Opinions)
- Meet Tandy Leather Rawhide Lace: Sizes, Length, and What You Actually Get
- When Rawhide Lace Is the Best Choice
- When You Should Choose a Different Lace
- Tools That Make Rawhide Lace Behave
- Prep Like a Pro: Soaking, Stretching, and De-Twisting
- Hole Spacing and Edge Layout: The “Looks Handmade” vs “Looks Homemade” Line
- Popular Lacing Styles That Pair Well With Rawhide
- Dyeing and Finishing Rawhide Lace
- How Much Lace Do You Need? A Simple Way to Estimate
- Care and Storage So It Doesn’t Turn Into a Crunchy Noodle
- Quick Project Ideas Using Tandy Leather Rawhide Lace
- Experiences From the Workbench: What Makers Learn the First Time They Use Rawhide Lace (About )
- Conclusion
- SEO Tags
If you’ve ever wanted a material that starts out floppy, turns stubborn on command, and tightens up like it just heard someone say “deadline,” you’re going to love rawhide lace. Specifically, Tandy Leather rawhide lace is one of those classic leathercraft supplies that looks simplejust a spool of natural laceuntil you realize it can braid, bind, lace, and even “lock” a shape in place as it dries.
This guide breaks down what rawhide lace is, when it’s the right choice (and when it’s absolutely not), how to prep it so it behaves, what tools make your life easier, and a handful of projects that show off why rawhide is still a favorite for braiding and specialty lacing. Stick around to the end for a longer, experience-based section that captures what makers tend to learn the first time they work with rawhide lace (spoiler: water is both your friend and your chaos agent).
What Rawhide Lace Is (and Why It Acts Like It Has Opinions)
Rawhide is untanned animal hidemost commonly cattleprocessed by cleaning, de-hairing, and drying rather than tanning. Because it isn’t tanned, rawhide reacts strongly to moisture: wet it and it becomes workable; let it dry and it stiffens and tightens. That “tightening” is the real superpower. When rawhide is stretched around an object, it tries to shrink back toward its original length as it dries, which can create a very snug, durable bind.
That same superpower is also the reason rawhide can be a little dramatic. Use it where you want tension and firmnesslike braids, decorative edges, bindings, certain repairs, or traditional craft applications. Avoid it where you need softness, drape, or consistent flexibility (or anywhere you expect repeated soaking), unless you enjoy watching your work shift personality over time.
Meet Tandy Leather Rawhide Lace: Sizes, Length, and What You Actually Get
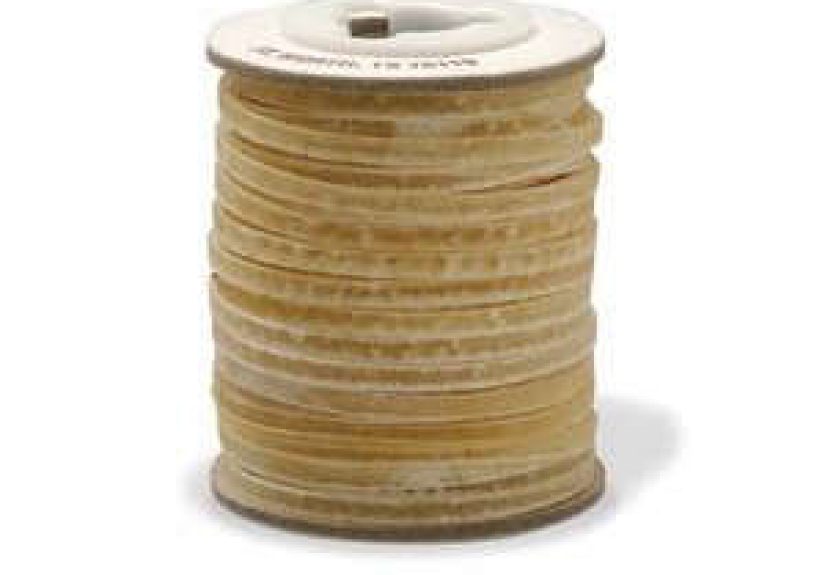
Tandy’s rawhide lace is commonly sold on a spool in a natural color. You’ll typically see it offered in widths like 1/8 inch and 1/4 inch, which are two of the most useful sizes for general lacing and braiding. The spool format is convenient because you can pull exactly what you need, rather than trying to coax a tangled coil into cooperating.
Here’s the key detail that makes rawhide lace different from many “regular” leather laces: it’s meant to be soaked before use. Once it becomes pliable, you can lace or braid it. As it dries, it firms up and tightensso your finished work often looks crisp and secure, with edges that stay put.
Quick size-to-use cheat sheet
- 1/8 inch rawhide lace: Great for wallets, pouches, small cases, journal edges, decorative trims, and medium braids.
- 1/4 inch rawhide lace: Better for chunkier braids, heavier decorative lacing, handles, traditional bindings, and bigger visual impact.
Pro tip: If you’re lacing an edge and you want the pattern to look balanced, choose the lace width firstthen match your hole or slit size to it (not the other way around). That’s how you avoid the “why does this look like it’s wearing shoes two sizes too big?” effect.
When Rawhide Lace Is the Best Choice
Rawhide lace shines when the project benefits from structure, tension, and durability. It’s popular for braiding and specialty lacing because it can be formed while wet and then “set” as it dries.
Great use cases
- Braiding: Key fobs, bracelets, lanyards, handle wraps, and decorative braid accents on leather goods.
- Edge lacing for a firm finish: Cases, sheaths, journals, pouchesitems that benefit from a slightly raised, protective edge.
- Traditional/heritage projects: Many makers use rawhide for repairs and heritage-inspired builds where that stiffening/tightening effect is part of the goal.
- Bindings and wraps: Securing layers, reinforcing joints, or wrapping areas where you want a strong “grip” once dry.
If your project needs an edge that looks intentional and stays that way, rawhide lace is a strong contender.
When You Should Choose a Different Lace
Rawhide is not your best friend in every scenario. Sometimes you need lace that stays flexible, tolerates frequent moisture, or feels softer in hand. That’s when you reach for other laces like latigo lace, deerskin lace, kangaroo lace, or purpose-made glove lace (depending on the project).
Consider alternatives when:
- The item must stay soft and flexible: Wearables, straps that bend constantly, or any piece that needs a “drapey” feel.
- The item will get wet often: Rawhide’s moisture sensitivity can lead to loosening, swelling, or shape changes if repeatedly soaked.
- You’re repairing something designed for tanned lace: For example, many “baseball glove lace” products are tanned leather and behave differently than true rawhide.
Rawhide can still work in these situations, but you’ll want to plan carefully (and you may need finishing steps to help resist moisture). If you want predictable flexibility, tanned lace is usually the calmer choice.
Tools That Make Rawhide Lace Behave
You can absolutely lace with rawhide using minimal tools, but the right setup turns frustration into flow. Think of tools as the difference between “handmade” and “hand wrestled.”
Lacing needles
A two-prong lacing needle is a staple for flat lace. You taper the lace end, insert it between the prongs, and the needle grips it so you can pass through holes or slits smoothly. Two-prong needles are especially handy for common flat lace widths around 2–3 mm (roughly 3/32″ to 1/8″).
Thonging chisels and hole tools
For flat lace, slits often look cleaner than round holes because they hold the lace flatter and reduce twisting. Thonging chisels come in different prong counts and slit sizes, helping you keep spacing consistent. Many leathercrafters lay out a guideline near the edge and punch evenly spaced slits so the lacing looks deliberate, not accidental.
Mallet, beveler, and basics
A non-metal mallet (rawhide, poly, or wood) helps protect your tools while punching. An edge beveler rounds sharp edges on the leather piece so the lace sits nicely and the finished edge feels smoother in hand. A ruler, wing dividers, and a scratch awl help with layout so your lacing line doesn’t wander like it’s sightseeing.
Prep Like a Pro: Soaking, Stretching, and De-Twisting
Rawhide lace rewards prep work. Skip prep, and you’ll spend your whole project correcting twists, fighting stiffness, and wondering why your loops look like they’re trying to escape.
Step-by-step prep routine
- Cut a workable length: Pull off an armspan or two, not the entire spool. Long lengths can kink and scuff while you wrestle them through holes.
- Soak until pliable: Rawhide lace is typically soaked in water until it becomes flexible. Blot off excess water so it’s damp and workable, not dripping.
- Stretch gently: Run the damp lace through your fingers with light tension or pull it over a smooth edge (like a rounded table edge) to reduce memory and curling.
- Taper the end: Skive the last inch thinner so it feeds through holes and fits your lacing needle cleanly.
- Keep it consistently damp: If it starts drying mid-lace, it can stiffen and twist. Light re-dampening keeps it cooperative.
Want a clean, professional look? The secret is consistent dampness and consistent tension. Rawhide doesn’t like surprises, and it will show every surprise you give it.
Hole Spacing and Edge Layout: The “Looks Handmade” vs “Looks Homemade” Line
Beautiful lacing is mostly layout. If the holes are uneven, the lace can’t magically fix itrawhide will simply tighten into a neat, high-definition version of your spacing mistakes. (It’s honest like that.)
Layout tips that pay off
- Mark a guideline: Keep your slits a consistent distance from the edge so the lacing line stays straight.
- Match slit size to lace width: Slits that are too small shred lace; slits too big look sloppy and let the lace flop.
- Keep spacing consistent: Even spacing creates even loops, even angles, and that “finished” look you’re after.
- Mind corners: Corners usually need tighter spacing or corner-specific steps so the lace turns cleanly without bunching.
If you’re new to lacing, practice on scrap leather first. Five minutes of practice can save you from an hour of un-lacing and re-lacing while muttering “I swear it looked better in my head.”
Popular Lacing Styles That Pair Well With Rawhide
Rawhide can be used for many lacing patterns, but it’s especially satisfying in styles where a firm, raised edge is a featurenot a bug.
Whip stitch
A classic, straightforward stitch that wraps the edge and gives a clean outline. It’s beginner-friendly and works well on small pouches, journal covers, and trim edges.
Double loop lacing
Double loop lacing creates a decorative, slightly raised finish that looks polished on wallets, pouches, sheaths, and similar goods. Rawhide’s ability to tighten as it dries can help this stitch look crispjust keep tension even and avoid over-tightening on thin leather that might distort.
Braiding and wraps
Rawhide is a favorite for braiding because damp strands can be shaped neatly and then set firm. A simple three-strand braid becomes a durable accent for key fobs, zipper pulls, handle wraps, or decorative ties.
Dyeing and Finishing Rawhide Lace
Natural rawhide is beautiful on its ownclean, classic, and slightly rustic. But if your project needs color, some rawhide lace (especially bleached rawhide) can be dyed. The best approach is to test first, because rawhide can absorb color differently than vegetable-tanned leather.
How to approach dyeing
- Test on a small piece: Always test color before committingrawhide can take dye unevenly if you rush.
- Apply dye evenly: Use a soft applicator and work in smooth strokes or circular motion to reduce streaking.
- Let it dry fully: Don’t lace while the dye is still wet unless you want color transfer on your hands and your leather.
- Buff and seal: Buff off excess pigment, then consider a finish to help reduce rub-off and add some water resistance.
If you plan to dye rawhide lace, it’s often easier to dye the lace before lacing the projectespecially if the project leather is light-colored and you want to avoid accidental staining.
How Much Lace Do You Need? A Simple Way to Estimate
Lace math can feel mysterious because different stitches “eat” different amounts of lace, and corners add extra consumption. The safest strategy is to plan with margin.
Practical estimating tips
- Measure the perimeter: Add up all edges you’ll lace (and don’t forget curves).
- Choose your stitch: Decorative stitches generally use more lace than simple ones.
- Add extra for corners and splices: Corners and joins always take more than you think.
- Use a calculator tool when available: Some leather supply shops provide lace calculators that help estimate length based on width and hole spacing.
Rule of thumb: It’s better to have extra lace than to run out mid-edge, because adding a new length can be visible if the splice lands in a prominent spot. If you must splice, aim to do it on the back, bottom, or least noticeable area.
Care and Storage So It Doesn’t Turn Into a Crunchy Noodle
Rawhide’s biggest strengthits moisture responsivenessis also the reason you should store it thoughtfully. Keep rawhide lace clean, dry, and protected from extremes, and it will stay usable far longer.
Storage tips
- Store in a dry place: Avoid high humidity areas where rawhide can absorb moisture and lose consistency.
- Keep it out of direct heat and sun: Excess heat can dry it out unevenly and make it brittle.
- Prevent kinks: Let the spool do its jobdon’t unwind the entire length unless you have a specific reason.
- Label your widths: If you keep multiple sizes, label them so you don’t accidentally lace a delicate wallet with “handle wrap” lace.
If your lace feels overly dry or stiff before you even start, proper soaking will usually restore workability. Just avoid aggressive bending while it’s dry, because that’s when cracking is most likely.
Quick Project Ideas Using Tandy Leather Rawhide Lace
Need inspiration? Here are a few projects that show off rawhide’s strengthsstructure, crisp edges, and that satisfying “set” when dry.
1) Double-loop laced journal cover
Use 1/8″ rawhide lace to finish the edge of a journal cover. The raised lacing protects the edge and gives a clean, decorative border.
2) Braided key fob
Cut three lengths of damp rawhide lace and braid. Add a key ring and a small leather tab. Once dry, it firms up and keeps its shape.
3) Knife sheath edge reinforcement
Edge lace a sheath with rawhide for a durable border. Keep spacing tight and tension consistent so the edge stays flat and tidy as it dries.
4) Handle wrap for a tool or walking stick
Wrap damp 1/4″ rawhide lace around the grip area with firm, even tension. As it dries, it tightens and locks into a secure wrap.
Experiences From the Workbench: What Makers Learn the First Time They Use Rawhide Lace (About )
Most people’s first rawhide lace project starts with confidence and ends with a new respect for water. The common “aha” moment is realizing that rawhide doesn’t behave like normal leather lace. With tanned lace, you can often muscle through. With rawhide, the smart move is to work with the material: soak it, keep it evenly damp, and let it do what it’s designed to dotighten as it dries.
One of the first lessons makers share is that “damp” beats “soaking wet.” If the lace is dripping, it’s slippery, harder to control, and more likely to stretch unevenly. If it’s only lightly damp, it can still be stiff and twisty. The sweet spot is usually a pliable, towel-blotted lace that bends easily without feeling mushy. People often keep a small dish of water nearby and re-dampen the lace lightly as needed, rather than soaking the whole length again and again.
The second lesson is about tension. Newer leathercrafters sometimes pull rawhide lace as tight as possible in the moment, thinking tighter is always better. But because rawhide tightens further as it dries, over-tightening can lead to edges that pucker, corners that curl, or panels that warpespecially on thinner leather. Experienced makers tend to aim for “snug and consistent,” then let drying do the final tightening. If you’re edge-lacing something like a portfolio, pouch, or journal cover, the difference between snug and over-snug is the difference between “crisp frame” and “why does my rectangle look like a potato chip?”
Another widely reported realization: hole layout is everything. Rawhide’s firmness makes uneven spacing more obvious, not less. People who get beautiful results usually mark a guideline near the edge, use consistent slit spacing, and treat corners like special zones rather than afterthoughts. Corners often need closer spacing or a corner technique so the lace turns without crowding. The first time someone takes an extra five minutes to plan corners, they usually don’t go back.
Then there’s the “twist factor.” Rawhide can twist while you lace, especially if the slits are round holes or oversized. Makers often solve this by slightly dampening the lace to reduce twisting, stretching it gently before starting, and checking the flat orientation of the lace every few stitches. It’s not glamorous, but it’s the difference between a smooth, ribbon-like edge and a spiraled edge that looks like it got bored halfway through.
Finally, many people talk about the satisfaction of the next-day reveal. Rawhide often looks good when freshly lacedbut it looks even better after it dries, tightens, and sets. That’s when the edge becomes crisp, the braid firms up, and the project suddenly feels more “finished.” It’s a small thrill: you did the work, and the material did the final polish. Rawhide lace is one of the few craft supplies that can honestly say it improves your project while you’re asleep.
Conclusion
Tandy Leather rawhide lace is a classic for a reason: it’s strong, it’s versatile, and it delivers a crisp, durable finish when you prep it well and lace it with intention. Treat it like rawhidesoak it until pliable, keep tension consistent, and plan your hole layoutand it will reward you with edges and braids that look clean, traditional, and built to last. Treat it like ordinary lace, and it will still work… but it may also teach you a few lessons you didn’t schedule.