Table of Contents >> Show >> Hide
- What Is a Tent Pole Clothing Rack?
- Why Tent Poles Make Surprisingly Good Clothing Racks
- Best Use Cases
- Core Designs That Actually Work
- Materials and Parts
- How to Build a Practical Tent Pole Clothing Rack
- Load, Safety, and “How Not to Create a Clothes Avalanche”
- Smart Variations and Upgrades
- Troubleshooting Common Problems
- Frequently Asked Questions
- Real-World Experiences and Lessons Learned (The “500-Word Reality Check”)
- Conclusion
If you’ve ever tried to hang “just a few things” in a tiny hotel room, a cramped studio apartment, or a damp campsite,
you already know the truth: modern life is basically a never-ending battle between gravity and your wardrobe.
A tent pole clothing rack is a clever, lightweight solution that borrows the best ideas from backpacking shelters:
strong-but-light poles, quick assembly, compact storage, and stability tricks that don’t require an engineering degree
(or a miracle).
This guide breaks down what a tent pole clothing rack is, why it works, how to build one that won’t collapse
the moment you hang a hoodie, and how to tweak the design for everything from camping gear organization
to pop-up markets, backstage costume changes, and “I swear I have a closet somewhere” apartments.
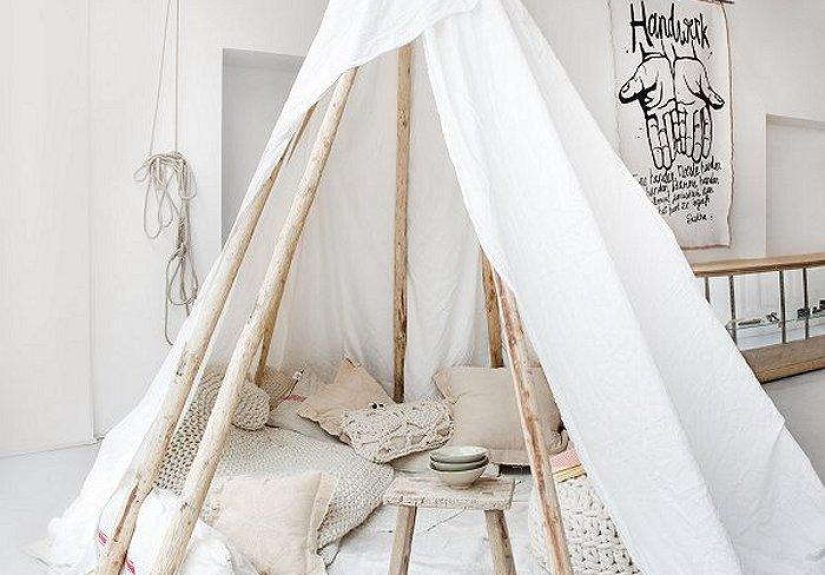
What Is a Tent Pole Clothing Rack?
A tent pole clothing rack is a portable garment rack made using the same types of segmented,
shock-corded poles used in modern tents and tarps. Instead of forming a dome or tunnel shape, the poles form a
freestanding (or semi-freestanding) frame that supports a horizontal bar for hangers, plus optional lower bars or
lines for drying and organization.
Think of it as a “pop-up closet skeleton.” You provide the clothes. It provides the spine.
Why Tent Poles Make Surprisingly Good Clothing Racks
1) Strength-to-weight ratio that feels like cheating
Quality tent poles are typically aluminum alloys designed for high strength while staying light. That strength is why
tents can survive wind loads without turning into modern art. For a clothing rack, it means your frame can be
lightweight enough to travel, yet sturdy enough for real-life usewithin reason (more on safe loading later).
2) Modular pieces = easy packing
Because poles break into short segments, the rack can pack down into a slim bag. That’s ideal for travel,
seasonal storage, RV/vanlife, photo shoots, or anyone who likes the idea of “extra closet space” but not the idea
of “permanent furniture.”
3) Shock cord makes setup fast (and prevents “Where did that piece go?”)
Internal shock cord keeps segments together, so assembly is closer to “snap-snap-done” and less like dumping
a hundred chopsticks onto the floor.
4) Stability tricks from outdoor shelters translate well indoors
Outdoor gear relies on triangulation, guy lines, and smart geometry. Those same ideas can keep your rack stable
on carpet, concrete, grass, or the mysterious hotel-room flooring that looks clean but feels like it has seen things.
Best Use Cases
- Camping and road trips: a gear-hanging station, towel/outerwear drying, wet layers management
- Small-space living: overflow closet, guest room “instant wardrobe,” laundry staging
- Events and vending: pop-up clothing display for markets, trunk shows, craft fairs
- Costumes and productions: portable backstage garment bar, quick-change organization
- Sports and outdoor hobbies: drying base layers, wetsuits, or muddy gear (with drip control)
Core Designs That Actually Work
Design A: The A-Frame Rack (simple, stable, easy to DIY)
Two A-shaped side supports with a horizontal crossbar on top. This is one of the most stable designs because
triangles naturally resist wobble. If you’ve ever seen scout-style drying racks, you’ve seen the concept.
Best for: heavier garments, frequent setup, indoor/outdoor mixed use
Design B: The Tripod Rack (fast, minimal parts, good for light loads)
Three legs converge at the top with a hub or lashing, and a short crossbar (or a hanging loop system) supports
clothes. It’s quick and packs small, but can rotate or tip if overloaded.
Best for: lightweight travel, towels, daily outfits, quick drying
Design C: The Rectangular “Mini Closet Frame” (neat, customizable, a bit more engineering)
A rectangular top frame with four legs. This looks the most like a traditional garment rack, but it needs
bracing or guying to prevent racking (side-to-side collapse), especially if the legs are tall.
Best for: display racks, pop-ups, and indoor “I want it to look intentional” setups
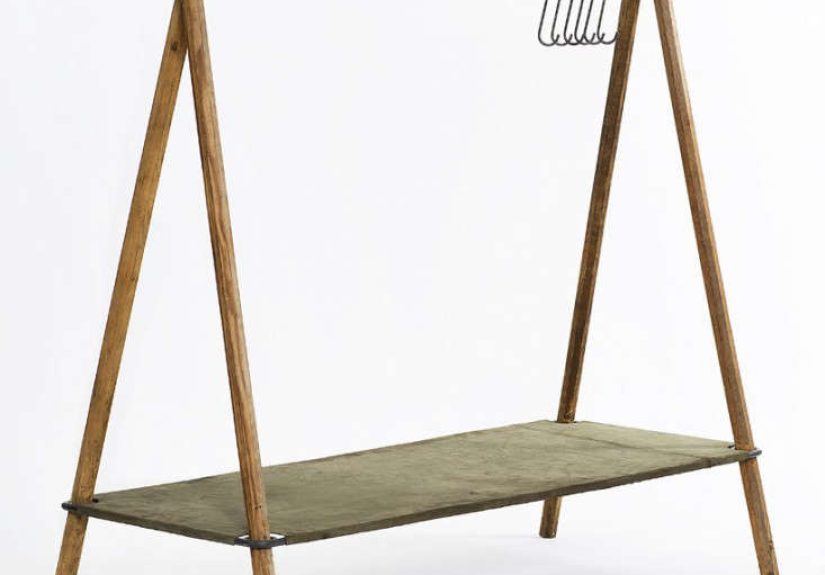
Materials and Parts
Tent poles (your main structure)
You can use spare or replacement tent poles, adjustable tarp poles, or collapsible poles designed for shelters.
Look for aluminum poles with a reliable fit at the joints and an intact shock cord. Adjustable tarp poles are great
because you can tune height and tension without cutting anything.
Connectors (the “make it a rack” pieces)
The simplest connectors are:
- Pole hubs: purpose-built hubs or adaptable connectors (best stability)
- PVC fittings: cheap, easy to find, easy to replace (great for prototyping)
- Bolted wood blocks: a sturdy DIY option if you have basic tools
- Straps/cord + knots: surprisingly effective when done cleanly (and very packable)
Crossbar (the hanger bar)
Your crossbar can be:
- a thicker tent pole section (if it’s stiff enough)
- a lightweight metal tube (aluminum or steel)
- a wooden dowel (fine indoors, less ideal when wet)
- a line system (cord/clothesline) if you’re focusing on drying rather than hangers
Stability add-ons (don’t skip these)
- Guy lines + stakes (outdoors) or weights/sandbags (indoors)
- Non-slip feet (rubber tips, furniture pads, or silicone caps)
- Diagonal bracing (cord or strap from leg to leg)
How to Build a Practical Tent Pole Clothing Rack
Here’s a reliable approach based on the A-frame concept. It’s stable, scalable, and forgiving if your parts
aren’t perfectly matched.
Step 1: Decide your size (and be honest about your clothes)
A common mistake is building too tall. Taller racks look cool but wobble more and amplify leverage.
For most uses, aim for a hanging height that clears the longest garment you plan to hang without dragging.
- Everyday shirts/jackets: moderate height is fine
- Dresses/coats: add height, but plan extra bracing
- Drying towels/base layers: you can go lower and wider for better airflow
Step 2: Build two side A-frames
Each side needs two legs that meet at a top connector. If you don’t have a dedicated hub, a simple strap-and-knot
lash can work: bind the two legs together near the top, leaving a small gap so they can spread into an A shape.
Add a short bottom spreader (or a cord) between the legs to prevent them from sliding out.
Step 3: Add the crossbar
Connect the two A-frames with your crossbar. If you’re using tent poles for the crossbar, choose the stiffest
diameter you have. If you’re using a metal tube, you can often insert pole ends into the tube or use fittings
to clamp it in place.
Step 4: Lock stability with diagonal cord bracing
Run a cord diagonally from the base of one leg to the opposite top area (and repeat on the other side),
forming an “X” when viewed from the side. This is the easiest way to stop side sway and “accordion collapse.”
Tension matters: snug, not guitar-string tight.
Step 5: Add feet and weight
Rubber tips or furniture pads help prevent slipping and protect floors. Indoors, add small weights at the base
(ankle weights, dumbbells, sandbags). Outdoors, stake guy lines from the top corners to the ground.
Load, Safety, and “How Not to Create a Clothes Avalanche”
Tent poles are strong for their weight, but clothing racks fail in predictable ways: joints slip, frames rack sideways,
and top bars bow. Use these rules of thumb:
- Spread weight evenly: don’t park every coat on one end like you’re testing gravity.
- Heaviest items near the supports: keep coats close to the A-frames, lighter items in the center.
- Mind the joints: the rack is only as strong as the weakest connection point.
- Stabilize on slick surfaces: tile and polished concrete are basically slip ’n slides for furniture.
- Keep kids/pets in mind: a portable rack can tip if climbed, tugged, or used as a circus apparatus.
Smart Variations and Upgrades
Turn it into a drying station
Add parallel lines under the hanger bar for socks, base layers, or towels. If you’re drying outdoors, prioritize airflow:
spacing + breeze beats “pile of damp fabric” every time. A dedicated travel clothesline system can also be clipped to
your rack frame for quick drying without clothespins.
Add a “gear shelf” without building a shelf
Stretch a mesh, tarp corner, or strong fabric between the bottom bars (or between the legs) to create a sling shelf
for shoes, bags, or folded items. It’s lighter than a rigid shelf and packs flat.
Make it event-friendly
For pop-ups and markets, add a second bar (lower or behind the first) for backup inventory. Use discreet weights at
the base so a gust of wind doesn’t turn your booth into a runway show for tumbleweeds.
Use color coding for fast setup
Many tent systems color code poles and attachment points for speed. You can do the same: small colored tape bands
at matching joints make setup brainless when you’re tired, cold, or distracted by snacks.
Troubleshooting Common Problems
“It wobbles side-to-side.”
Add diagonal bracing (cord/strap), widen the base, or lower the height. If you already have bracing, tighten it
slightly and check that your feet aren’t sliding.
“The top bar bows.”
Move heavy garments closer to the ends, reduce the span (shorter bar), upgrade to a thicker/stiffer bar,
or add a center support line from above (indoors) or a tensioned guy line (outdoors).
“The joints keep slipping apart.”
Inspect pole ends for wear, ensure correct diameter matching, and consider friction aids:
a thin wrap of tape at an insert point (temporary), a better-fitting connector, or a mechanical lock (pin/bolt)
if you need a semi-permanent build.
“The rack tips when I pull a hanger.”
Add weight at the base, widen the stance, and avoid yanking. (A gentle lift is the grown-up version of hanger removal.)
Frequently Asked Questions
Can I use trekking poles instead of tent poles?
Yestrekking poles can work well because they’re designed to be load-bearing and often adjustable. They’re especially
handy for a quick tripod or a tensioned clothesline frame. Just protect the floor with rubber tips and stabilize the base.
Will this damage delicate clothes?
If you’re using hangers, your clothes won’t touch the poles much. If you’re drying items directly on bars or lines,
avoid sharp edges and use smooth cord. Also, don’t hang soaked denim on a delicate line unless you enjoy watching
physics in action.
Is this better than a normal garment rack?
A traditional rack often wins on raw capacity and convenience at home. A tent pole clothing rack wins when you need
portable, packable, and adaptableespecially for travel, temporary setups,
outdoor use, or tight storage.
Real-World Experiences and Lessons Learned (The “500-Word Reality Check”)
People usually discover the magic of a tent pole clothing rack at the exact moment they need it most:
after a rainy hike, during a chaotic move, or five minutes before guests arrive and the “chair closet” (you know the one)
has reached critical mass. In real use, the biggest win isn’t just extra hanging spaceit’s how quickly a portable rack
turns disorder into a system.
One common experience: the first setup is always a little optimistic. You assemble the frame, step back, and think,
“Wow, this is sturdy.” Then you hang a heavy coat, two damp hoodies, and a bag, and suddenly the rack develops a
personalityspecifically, the personality of a baby deer on ice. That’s when you learn the number-one lesson:
stability is a feature, not an accessory. The people who love these racks long-term almost always add
something simplediagonal bracing, base weights, or a wider stance. After that, the rack stops wobbling and starts
feeling like real furniture (just furniture that can also live in a duffel bag).
Another pattern shows up with drying clothes. New users tend to bunch items together like they’re trying to keep the
shirts warm. Unfortunately, fabrics don’t dry by positive vibesthey dry by airflow. The best experiences come from
spacing items out, angling the rack where air moves (a porch, a breezy campsite edge, near a fan indoors), and using
lower lines for socks and base layers. People also learn quickly that “drying indoors” needs drip control:
a towel underneath, a tray, or a bathroom-friendly setup keeps the rack from turning your floor into a slip hazard.
If you use the rack for eventsvending, pop-ups, photo shootsthere’s a very specific kind of satisfaction in arriving
with something that looks professional but packs like camping gear. The shared lesson here is that wind is the enemy
of tall, light frames. Vendors who have smooth days are the ones who quietly anchor the base with weights or tie-out
straps before the first gust tests their patience. A second trick: keep the heaviest pieces close to the supports and
avoid loading the far ends. This simple habit makes the rack feel dramatically more solid, and it reduces that
annoying “bar bow” that can make hangers drift toward the center like they’re attending a meeting you didn’t schedule.
For small apartments, the experiences tend to be equal parts practical and comedic. A tent pole rack often starts as
“temporary,” then quietly becomes permanent because it solves a real problem: extra hanging space that doesn’t eat a room.
People like that it can be tucked away when not needed, or reconfigured for seasonal rotationscoats in winter,
lightweight jackets in spring, and that one outfit you keep “saving for later” (later is now; wear it).
The overall takeaway from real use is simple: a tent pole clothing rack works best when you treat it like a shelter frame.
Build triangles, brace against sway, distribute load thoughtfully, and anchor when conditions demand it. Do that, and your
rack becomes a surprisingly capable toolpart closet, part drying station, part “why didn’t I do this sooner?” energy.
Conclusion
A tent pole clothing rack is one of those smart, adaptable builds that fits modern life: portable, modular,
and strong enough for daily chaos when designed with good geometry and a little stabilization. Whether you’re drying
layers at camp, organizing a micro-closet, or setting up a pop-up display, the winning formula stays the same:
sturdy connectors, sensible height, balanced loading, and bracing that prevents wobble. In other words:
build it like you’re expecting weathereven if the “weather” is just your laundry routine.