Table of Contents >> Show >> Hide
- Why a “Workshop Power Strip” Is Different From a Regular Power Strip
- The Must-Have Features That Make a Power Strip Workshop-Ready
- 1) UL listing (the non-negotiable safety baseline)
- 2) A real circuit breaker (preferably resettable)
- 3) Wide outlet spacing (because “brick plugs” are undefeated)
- 4) Mounting options (bench, wall, or under-shelf)
- 5) A cord that matches the job
- 6) Surge protection (for the stuff with circuit boards)
- 7) Switch design that fits how you actually work
- Workshop Power Strip Safety: The Stuff That Prevents “Exciting” Mistakes
- How to Set Up a Workshop Power Strip Like You Actually Planned It
- Buying Checklist: How to Choose the Best Power Strip for Your Workshop
- Maintenance: The 2-Minute Habits That Keep Your Strip from Becoming Sketchy
- So… Why Is This a “Must-Have” Instead of Just a “Nice Upgrade”?
- Real-World Workshop Experiences: of “Yep, Been There”
- Conclusion
Every workshop has two kinds of people: the ones who swear they’ll “organize the cords later,” and the ones who have accepted that later is a mythical land like Atlantisright next to the 10mm socket. If your bench currently runs on a tangled noodle-pile of chargers, lights, and “temporary” extension cords that have been temporary since 2019, it’s time for the upgrade that quietly makes everything better: a workshop-ready power strip.
Not the flimsy, bargain-bin strip you’d trust with a desk lamp and a single phone charger. I’m talking about a heavy-duty, mountable power stripthe kind with sane outlet spacing, an honest circuit breaker, a cord that doesn’t feel like cooked spaghetti, and (ideally) surge protection for the electronics you actually care about.
Why a “Workshop Power Strip” Is Different From a Regular Power Strip
A workshop is basically a stress test for electricity management. You’ve got chargers for cordless tools, bench-top lighting, a shop vac or dust extractor kicking on, maybe a soldering station, a laptop playing music, and that one mystery device you bought because it was “a deal.” In other words: lots of plugs, lots of switching loads, and lots of opportunities for chaos.
A proper power strip for a workshop isn’t just “more outlets.” It’s a safety and productivity tool. It keeps connections off the floor, reduces strain on cords, helps prevent overloads, and makes it easy to shut down the bench when you’re done. Think of it like a good vise: you don’t realize how much you need it until you finally have one that doesn’t wobble like a toddler on roller skates.
The Must-Have Features That Make a Power Strip Workshop-Ready
Here’s what separates a legit industrial power strip from the “free with purchase” kind that exists purely to make smoke alarms feel important.
1) UL listing (the non-negotiable safety baseline)
Look for a strip that’s UL certified/listed. That marking is your best quick indicator the unit has been evaluated against applicable safety standards. In practical terms: better odds it won’t become a surprise space heater. Also, counterfeit labels exist in the wild, so buying from reputable brands and sellers matters more than people think.
2) A real circuit breaker (preferably resettable)
Workshop loads change constantly. A built-in overload circuit breaker is your friendespecially when you inevitably forget you’re running task lighting, battery chargers, and a benchtop sander at the same time. A resettable breaker is nicer than a one-time fuse because you don’t need to go hunting for replacements mid-project while the glue is setting.
3) Wide outlet spacing (because “brick plugs” are undefeated)
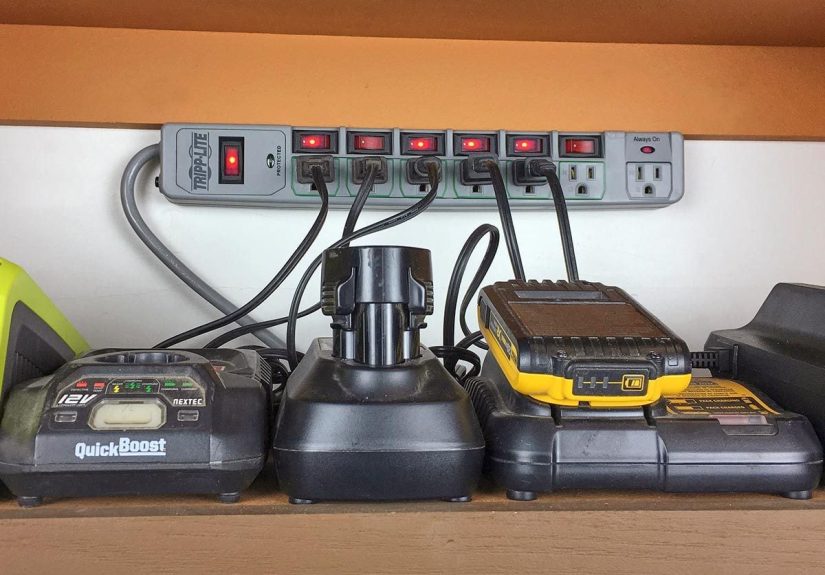
Chargers love being huge. Some tool battery chargers are basically small apartment buildings with prongs. A good workshop strip includes spaced outlets so you can plug multiple bulky adapters without playing Tetrisor worse, using three “cube taps” like you’re building a questionable plug pyramid.
4) Mounting options (bench, wall, or under-shelf)
A workshop strip should be mountable. Keyhole slots, screw tabs, or a bracket system lets you secure it where it makes sense: under the bench lip, on the side of a tool cabinet, or vertically on a wall stud. Mounting is not just “tidy”it reduces cord strain, keeps outlets away from sawdust piles and puddles, and makes switching things off faster.
5) A cord that matches the job
In a shop, cord length and durability aren’t luxuries. A longer, thicker cord (often marketed as heavy-duty) means you can route power cleanly without stretching, pinching, or running cords under rugs (which is a “no” for safety and common sense). Bonus points for a flat plug if the strip needs to sit behind a cabinet or tool chest.
6) Surge protection (for the stuff with circuit boards)
Not everything in your workshop needs surge protection. A purely resistive load like a simple lamp? Fine. But if you’re powering chargers, computers, smart tools, laser levels, speakers, routers, 3D printers, or anything that would make you say “ugh” if it died, surge protection is worth it.
When you see surge specs, don’t get hypnotized by one big number. Use a mix of indicators:
- UL 1449 listing (a key safety standard for surge protective devices)
- VPR (Voltage Protection Rating) / let-through ratinglower is generally better
- Joule rating (energy absorption capacity over time)
- Protection status lights so you know the surge components aren’t cooked
Translation: you want protection that’s measurable and verified, not just a dramatic marketing label that says “MEGA SURGE DESTROYER 9000.”
7) Switch design that fits how you actually work
Some people want one master switch. Others want individual switches per outlet bank. In a workshop, individual control can be genuinely handy: keep chargers live, cut power to a soldering iron, or shut down a benchtop fan without unplugging anything. The best setup depends on your workflow, but either way, the switch should feel sturdynot like it came from a cereal box.
Workshop Power Strip Safety: The Stuff That Prevents “Exciting” Mistakes
A power strip makes a workshop safer and cleanerif you use it correctly. Workshops invite bad habits because projects are messy, and time is short, and the brain says “just this once.” Here are the rules that keep “just this once” from becoming “why does it smell like hot plastic?”
Don’t daisy-chain power strips
Plugging one power strip into another (or strip into extension cord into strip) is the electrical equivalent of stacking chairs to reach a ceiling fan: it works until it absolutely doesn’t. Daisy chaining increases the risk of overload and fire, and it’s widely flagged as unsafe in workplace and fire-safety guidance.
Know your limits: amps and watts
Most common U.S. power strips are designed around a 120V / 15A circuit environment. That’s roughly 1,800 watts maximum under ideal conditions. As a practical workshop habit, treat ~1,400–1,500 watts as your “comfortable” ceiling if something may run continuously, because heat builds over time.
Quick math you can do without opening a spreadsheet:
- Watts = Volts × Amps (in the U.S., volts is typically 120V for standard outlets)
- A tool that draws 8 amps uses about 960 watts (120 × 8)
- Two 6-amp devices at once is ~1,440 watts (120 × 12)
Big-draw tools belong in the wall, not the strip
Table saws, air compressors, space heaters, big shop vacs, and many dust collectors can draw a lot of current especially at startup. Many safety authorities strongly recommend plugging high-wattage appliances directly into a wall receptacle rather than relying on a power strip.
A workshop strip shines at the bench: chargers, lights, small electronics, measurement gear, glue guns, and modest loads. If you need multiple high-load tools at one station, consider adding dedicated outlets or circuits (aka: “make future-you grateful”).
Extension cords aren’t permanent wiring
In real life, people run extension cords like they’re installing a new wing of the house. In safety guidance and workplace rules, extension cords are typically treated as temporary solutionsnot a replacement for permanent wiring. If you’re relying on long runs daily, that’s a sign you need more outlets (or a better layout).
Keep strips dry, ventilated, and visible
Don’t bury power strips under piles of rags, sawdust, or offcuts. If the strip feels warm, something is wrong: too much load, poor ventilation, or a failing component. Also avoid wet areas unless everything (outlet, strip, and environment) is appropriate for moisture exposure. Many workshops are in garages or basementsplaces where dampness likes to sneak in uninvited.
How to Set Up a Workshop Power Strip Like You Actually Planned It
The strip itself matters, but placement is where the magic happens. Here’s a setup approach that improves workflow immediately.
Step 1: Pick a “bench power zone”
Choose the spot where your day-to-day small devices live: battery chargers, task lighting, Dremel, solder station, laptop, Bluetooth speaker. Mount the strip where cords naturally fall without crossing your cutting area or snagging clamps.
Step 2: Split loads into “always on” vs “session tools”
If your strip has individual switches (or you use smart outlets responsibly), group devices:
- Always on: router/modem, clock, maybe a charging dock
- Session tools: soldering iron, hot glue gun, task lights, small fans
This makes shutdown easy. One switch, and the bench goes darkno more driving back from the hardware store wondering if the iron is still on.
Step 3: Use cord management that doesn’t fight you
Cable clips, Velcro wraps, and a few well-placed hooks beat a “cord ball” every time. The goal isn’t perfection. It’s making sure you can plug/unplug without yanking cords, and you can sweep without dragging a power strip across the floor like it’s a reluctant pet.
Step 4: Label the outlets (yes, really)
A tiny label maker (or masking tape) can turn your strip into a control panel. Label things like “CHARGERS,” “LIGHT,” “SOLDER,” “FAN.” It’s the kind of boring step that feels unnecessaryuntil you’re troubleshooting and you fix the problem in 10 seconds.
Buying Checklist: How to Choose the Best Power Strip for Your Workshop
If you want a fast filter that cuts through marketing noise, use this checklist.
Workshop essentials
- UL listed/certified
- 15A rating (common for U.S. workshops; match your circuit)
- Resettable circuit breaker
- Wide-spaced outlets for brick adapters
- Mounting slots (bench/wall-friendly)
- Sturdy housing (metal is popular for shop environments)
Nice-to-haves (depending on your workflow)
- Surge protection with clear status indicator lights
- Low VPR/let-through rating (better protection for sensitive electronics)
- Long, heavy-duty cord and/or flat plug
- USB-A / USB-C ports for phones, headlamps, and tool accessories
- Individual switches for outlet banks
Red flags
- Feels extremely light and flimsy for a high-outlet strip
- No clear certification marking
- Outlets wobble, switch feels loose, or casing gaps look uneven
- Too-good-to-be-true pricing from a questionable seller
Maintenance: The 2-Minute Habits That Keep Your Strip from Becoming Sketchy
Power strips don’t ask for much. But they do appreciate not being treated like disposable spaghetti.
- Monthly glance test: If the casing is cracked, the cord is frayed, or the plug is discolored, retire it.
- Keep it clean: Blow out dust around the outlets and switch area (compressed air is fine; just don’t turn the strip into a dust cannon aimed at your face).
- Watch the heat: A warm strip can indicate overload or failing components. Warm is a warning, hot is a stop sign.
- Pay attention to indicator lights: If your surge strip’s “protected” light goes out, the surge components may be spent. At that point it might still be a power strip, but it’s no longer doing the surge-protection job you bought it for.
So… Why Is This a “Must-Have” Instead of Just a “Nice Upgrade”?
Because it solves three workshop problems at once:
- Organization: Everything plugs in where it belongs. Less cord chaos, fewer accidental unplugging events, less time crawling around like you dropped a contact lens.
- Safety: Mounting + breaker protection + proper usage reduces common risk factors: overloads, damaged cords, tripping hazards, and daisy-chaining.
- Efficiency: One switch can shut down the bench. Labels reduce “which plug is which?” confusion. Outlet spacing saves time and frustration.
It’s not glamorous. No one posts a victory photo of a power strip on social mediaunless it’s mounted perfectly and they’re deeply, delightfully nerdy. But the moment you install a workshop-ready strip, your shop starts feeling calmer, faster, and more intentional. It’s like you finally upgraded from “junk drawer energy” to “I might actually finish this project” energy.
Real-World Workshop Experiences: of “Yep, Been There”
The first time I treated a power strip like a real toolmounted, labeled, chosen for the jobI didn’t expect it to change how I worked. I thought it would be a tiny quality-of-life improvement, like buying a nicer pencil. What I got was a workshop that stopped interrupting me every ten minutes.
Before the upgrade, my bench power situation was “grab whichever plug isn’t buried.” Tool chargers fought for space with a magnifier lamp, and every time I plugged in a hot glue gun, something else mysteriously went dark. Not because the circuit was failingbecause the strip was a cheap, tight-outlet model that turned my chargers into an aggressive game of musical chairs. I’d unplug a battery pack to fit a work light, forget it was unplugged, and come back later to a dead tool. Nothing says “productive Saturday” like discovering your drill battery is at 4% when you’re already covered in sawdust.
The “aha” moment was mounting the strip under the front edge of the bench. Suddenly, cords didn’t have to drape across the work surface. The outlets weren’t collecting every stray wood chip like they were being paid by the particle. And the switch was right thereno more reaching behind a toolbox, knocking over a container of screws, and inventing new words.
The biggest surprise was how much outlet spacing matters in a real shop. On paper, “8 outlets” is “8 outlets.” In reality, a workshop has a lot of bulky adapters and chargers. Wide-spaced outlets meant I could charge two tool batteries, run the lamp, and plug in a small benchtop tool without turning the strip into a medieval weapon made of stacked adapters.
Another small win: labeling. I resisted labeling because it felt like something only hyper-organized people do (the kind of folks who own matching bins). Then I tried it, and now I’m that person. “LIGHT,” “CHARGERS,” “SOLDER,” “FAN.” When something acts up, I can isolate it fast. When I’m done for the day, I flip one switch and the bench goes quiet. That’s not just convenientit’s peace of mind.
I also learned what not to plug into the strip. Big draw tools and anything heat-heavy get wall power. The strip is for the bench ecosystem: the stuff that makes the workspace functional. That one habit reduced nuisance trips and kept the strip cool. And a cool strip is a happy strip. (Also: the only acceptable “happy strip” in a workshop.)
Now, when someone says their workshop feels cramped or chaotic, I don’t immediately tell them to buy a bigger bench or new cabinets. I ask where their power lives. Because when your power is organized, your workflow follows. A workshop-ready power strip isn’t a flashy purchasebut it’s the kind of upgrade that makes every other tool feel easier to use. And honestly, that’s the best kind of “must-have.”