Table of Contents >> Show >> Hide
- What the Tool Actually Does
- Why SVG Is Such a Good Match for 3D Printing
- How the Workflow Usually Works
- Why This Matters More Than It Sounds
- How It Fits Into Today’s 3D Printing Ecosystem
- The Real Strength: Fast Prototyping for Visual Parts
- Best Practices for Better Multicolor Prints
- Where the Workflow Still Has Limits
- Hands-On Experience: What This Workflow Feels Like in the Real World
- Conclusion
If you have ever looked at a clean, crisp SVG logo and thought, “This should be a 3D print by lunchtime,” you are exactly the kind of person this story was made for. A new class of tools, especially the browser-based svg2solid, is making that idea much less ridiculous and much more practical. Instead of forcing makers to wrestle every letter, outline, and color region through a full CAD workflow, these tools can turn an SVG into separate printable solids that work beautifully for multicolor 3D prints.
That matters because traditional CAD is fantastic when you want to engineer a bracket, a hinge, or a part that must survive a dramatic encounter with gravity. It is less fun when your mission is “make this flat vector logo into a sharp-looking sign before I lose patience and start talking to my printer.” SVG-based workflows close that gap. They let artists, hobbyists, Etsy sellers, educators, and workshop tinkerers move from vector graphics to physical objects with fewer steps, less cleanup, and far less muttering.
The big headline is simple: a tool that turns SVGs into multicolor 3D prints makes graphic-first fabrication easier. But the real story is bigger than one tool. It is about how modern slicers, multicolor hardware, and cleaner file preparation are changing the way makers build signs, logos, plaques, badges, QR codes, and decorative panels. In other words, the gap between “pretty graphic” and “printable object” is getting smaller, and the results are getting much better.
What the Tool Actually Does
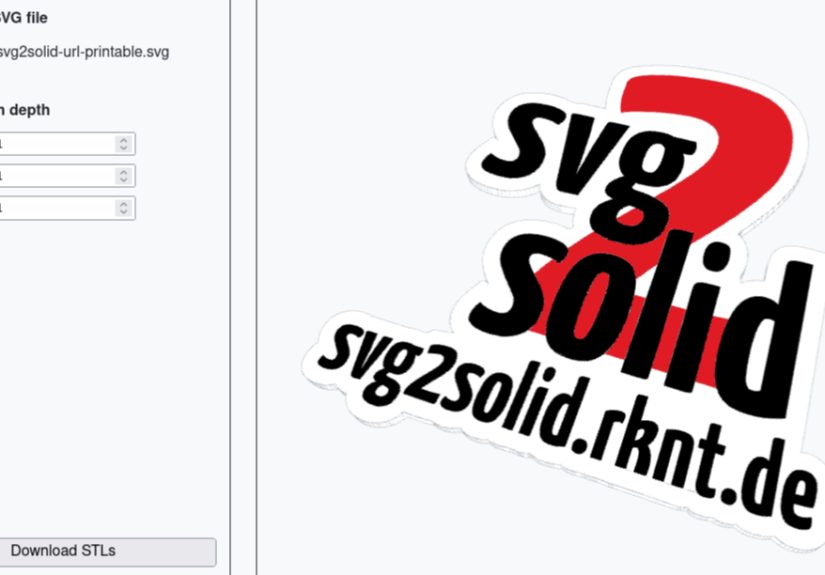
At its core, svg2solid takes an SVG file and separates it by color into individual 3D solids. Those solids can then be exported as separate STL files and imported into a slicer as parts of the same object. That is the secret sauce. Instead of manually tracing every red, blue, black, or white region in CAD, the software reads the color information already present in the vector file and turns those regions into printable geometry.
For makers who create flat signage, nameplates, coasters, wall art, dashboard labels, or first-layer logos, this is a huge time-saver. The workflow is especially appealing because SVG files are already ideal for graphic work: they scale cleanly, preserve sharp lines, and are easy to edit in vector software. That means the same file you designed for a sticker, laser cutter, vinyl cutter, or web graphic can become the starting point for a 3D printed part.
And yes, that is why the maker community paid attention so quickly. The tool does not promise magic. It does promise something almost as exciting: less repetitive CAD labor.
Why SVG Is Such a Good Match for 3D Printing
SVG stands for Scalable Vector Graphics, and the name basically tells the whole story. Unlike raster images such as JPEGs or PNGs, SVG files are built from paths, curves, and shapes. That makes them ideal for clean edges, text, icons, geometric art, and layered graphics. If you are trying to make a 3D printed sign or a logo plaque, SVG is often a better source format than a regular image.
That clean structure makes it easier to turn 2D art into 3D geometry. A letter can become a raised face. A background can become a base plate. A color region can become a separate printable body. It is the same logic people have used in Tinkercad, Fusion, and FreeCAD for years, but tools like svg2solid streamline the process for multicolor output in a way that feels more direct and much less fiddly.
SVG workflows also encourage cleaner design thinking. A print-ready graphic usually needs closed shapes, sensible layer hierarchy, and simplified geometry. Those are good habits anyway. Put bluntly, if your artwork is tidy, your printer has a better chance of acting like a professional machine instead of a dramatic coworker.
How the Workflow Usually Works
1. Start with a clean SVG
The best results begin with a well-prepared vector file. Text should usually be converted to paths. Overlapping shapes should be intentional. Stray points, clipped masks, and mystery layers from old design files are best removed before they become someone else’s problem, especially your nozzle’s.
2. Convert color regions into solids
This is where svg2solid shines. It reads the SVG and separates shapes by color into independent solids. Each colored region becomes a printable part, typically exported as its own STL. That makes it much easier to assign different filaments in your slicer.
3. Import parts into a slicer as one multipart object
Once imported, those solids can be treated as a single model with multiple components. That is exactly what you want for multicolor 3D printing. Each part gets its own color or filament assignment while still aligning properly with the full design.
4. Choose the right printing method
If you have a multicolor system like an AMS, MMU, or dual extruder setup, the process is straightforward. If you have a single-nozzle printer, you can still do the job with manual filament swaps or scheduled color changes at specific layers. Flat signage and logos are especially good candidates for that method because the color depth often only needs to be a few layers thick.
5. Print for surface quality, not just survival
For signs and decorative pieces, the best-looking face is often the one printed against the bed. A face-down print on a smooth or textured build plate can create a crisp front surface with polished-looking color transitions. This is one of those delightful 3D-printing tricks that feels illegal the first time it works.
Why This Matters More Than It Sounds
The phrase “turns SVGs into multicolor 3D prints” might sound like a niche headline for people who alphabetize their filament spools. In reality, it points to a much broader shift in desktop fabrication. More makers are using 3D printers for visual communication, branding, customization, and low-volume product design. The printer is no longer just a machine for mechanical parts. It is also a sign shop, badge maker, classroom tool, and mini production studio.
That shift matters because graphic-based prints need different workflows than structural parts. A phone stand or cable clip starts in CAD. A logo coaster, business sign, or QR plaque often starts in Illustrator, Inkscape, or a downloaded vector file. When software respects that reality, the workflow becomes faster and more approachable.
It also opens the door for nontraditional users. A teacher can turn school mascots into desk tags. A small business can prototype packaging inserts or branded display pieces. A maker can create layered art panels without becoming a full-time CAD modeler. The barrier drops, and the printer becomes more useful.
How It Fits Into Today’s 3D Printing Ecosystem
This tool does not exist in a vacuum. It lands at a time when slicers and printers are increasingly friendly to color workflows. Bambu Studio and OrcaSlicer support modern project workflows and color-aware features. PrusaSlicer has expanded its embossing and color-change tools, making it easier to add logos, text, QR codes, and patterns directly in the slicer. Meanwhile, guides from major 3D-printing publications and hardware companies have helped normalize multicolor printing for hobbyists who once assumed it was an advanced-only feature.
That is important because there are now several ways to reach similar results:
Direct SVG conversion
This is the fastest route for flat graphics and multicolor signs. It is ideal when the artwork already exists in vector form and the print is mostly 2.5D rather than deeply sculptural.
Embossing or debossing in a slicer
This works well for adding logos or text onto an existing 3D model, especially curved or irregular surfaces. If you are customizing a box lid, tool organizer, tag, or enclosure, slicer-based embossing may be easier than rebuilding the whole thing from scratch.
Traditional CAD import
Programs like Tinkercad, Fusion, and FreeCAD can import or work alongside SVG-driven geometry. This method is useful when the design needs more structural editing, tolerances, mounting features, or assembly logic.
Manual color change by layer
If the design is flat and color only appears in top or bottom details, a single-nozzle printer can still produce excellent results. It is slower and more hands-on, but it keeps the hardware requirements low.
The Real Strength: Fast Prototyping for Visual Parts
The most exciting part of this workflow is speed. Once the vector art is cleaned up, iteration becomes easy. Want the letters thicker? Adjust the extrusion height. Want the border wider? Change the shape in the SVG. Want the whole sign 20 percent larger? Scale it without worrying about blurry pixels. That is a dream workflow for prototyping retail signage, custom organizer labels, branded inserts, machine markers, craft fair displays, and educational models.
For small-batch makers, that speed translates into money. For hobbyists, it translates into momentum. And momentum matters because many 3D-printing projects die in the valley between “this would be cool” and “I refuse to spend three hours fixing geometry for a keychain.”
Best Practices for Better Multicolor Prints
Keep the artwork simple at first
Bold shapes, clean text, and limited color regions are your friends. Tiny islands, delicate outlines, and hairline details can print, but they often punish optimism.
Convert fonts to paths
Text rendering can behave unpredictably across tools. Converting text to outlines avoids missing fonts and keeps your design stable.
Reduce unnecessary nodes
Overly complex curves can bog down both conversion and slicing. Simplifying paths often improves reliability without hurting the look of the print.
Use enough thickness for each color region
A color layer that is too thin may not show well, especially if the filament underneath affects opacity. For signs and plaques, a few layers of depth often give cleaner visual separation.
Think about purge waste and print time
Automatic multicolor systems are convenient, but each color change can add time and material waste. Designs that minimize unnecessary swaps are usually kinder to both the printer and your filament budget.
Print decorative faces against the plate when possible
For logos and text-heavy parts, printing face-down can dramatically improve the front finish. The first layer often looks cleaner than the topmost visible surface.
Where the Workflow Still Has Limits
As useful as these tools are, they are not miracle workers. An SVG can describe shapes and colors, but it does not automatically solve engineering issues. The software will not know whether your tiny floating detail is too thin to survive, whether your letters need reinforcement, or whether your five-color design will spend half the print purging into a tower like a confused candy machine.
There is also a limit to what “multicolor” means in desktop FDM printing. Swapping filaments or assigning multiple bodies is not the same as full-color 3D printing with continuous color mixing or ink-like deposition. If you want photographic gradients, soft shading, or intricate painterly color transitions, that is a different technology category. For crisp logos, signs, text, icons, and stylized art, though, this method is excellent.
Complex SVGs can also create headaches. Clip paths, transparency effects, gradient fills, overlapping compound shapes, and imported artwork from design platforms may need cleanup before conversion. In other words, if your file was born in chaos, your print may continue the family tradition.
Hands-On Experience: What This Workflow Feels Like in the Real World
Using a tool like svg2solid feels a little like discovering that a chore you hated can now be done by a reasonably competent assistant. The first time you drag in an SVG and see separate printable parts appear, you stop thinking like a CAD technician and start thinking like a designer again. That shift is bigger than it sounds.
In a normal project, the frustrating part is not the concept. The frustrating part is translating the concept into geometry without losing your weekend. Let’s say you want to print a two-color coffee bar sign, a workshop label set, or a branded QR code plaque for a market booth. Traditionally, that could mean importing vectors into CAD, repairing the sketch, extruding every feature, checking alignment, exporting multiple bodies, and then hoping the slicer does not decide the pieces are strangers. With an SVG-first tool, the process feels more direct and more honest. The software sees what you see: colored shapes that should become printable regions.
There is also something satisfying about how quickly the workflow rewards good design habits. Clean vectors produce clean results. Closed paths behave better. Bold shapes print better. It becomes obvious that graphic discipline and print discipline are cousins. That is a useful lesson whether you are making signs for sale or just turning your favorite inside joke into a coaster.
The experience also teaches restraint. When you first realize you can turn colorful vector art into printable parts, it is tempting to feed the printer a seven-color masterpiece with tiny outlines, layered shadows, and one decorative flourish that looks innocent but is actually 0.3 millimeters wide. The printer, being a machine of great honesty and zero mercy, will usually explain why that was ambitious. After a few prints, you start designing for the medium. Colors become bolder. Details become more intentional. Shapes gain enough thickness to survive sanding, handling, and real life.
Another thing you notice quickly is how much surface strategy matters. A face-down print can look fantastic, especially for logos and lettering. The front comes off the plate with a crisp finish that can look more polished than many top surfaces. Suddenly, you are not just printing geometry; you are planning presentation. The build plate becomes part of the design process, which is a wonderfully nerdy sentence and also completely true.
Perhaps the best part is that this kind of workflow makes 3D printing feel more creative and less procedural. You can move from an idea to a finished object quickly enough to stay excited. That matters. Excitement is an underrated fabrication tool. When the path from artwork to object is short, you experiment more. You try a different border. You add a drop-shadow layer. You test a textured plate. You make one for the workshop, one for the office, one for a friend, and one because your first attempt taught you something useful.
That is why tools like this resonate. They do not just convert files. They remove friction. And in the maker world, less friction usually means more making.
Conclusion
The rise of tools that turn SVGs into multicolor 3D prints signals a smart evolution in desktop fabrication. Instead of forcing every visual design through a heavy CAD pipeline, these workflows let graphics stay graphic for longer, then convert them into solids only when needed. That is efficient, approachable, and genuinely useful.
For signs, logos, labels, QR codes, badges, decorative panels, and other flat or lightly layered designs, the benefits are obvious: faster setup, cleaner multicolor separation, easier iteration, and better compatibility with modern slicers and printers. Add in multicolor hardware, slicer embossing tools, and a little print strategy, and you have a workflow that feels far more mature than the old “trace, extrude, export, sigh” approach.
So yes, the headline sounds a little niche. But the impact is broader. A tool that turns SVGs into multicolor 3D prints is not just a neat trick. It is a sign that 3D printing is becoming more welcoming to designers, small businesses, educators, and everyday makers who want crisp visual results without earning an honorary degree in model repair. And honestly, that is a beautiful thing.