Table of Contents >> Show >> Hide
- Why an Antique Cabinet Makes the Perfect Coffee Station
- Step 1: Choose the Right Antique Cabinet
- Step 2: Clean, Repair, and Prep the Cabinet
- Step 3: Choose a Finish That Fits Your Style
- Step 4: Plan Smart Storage Inside Your Coffee Cabinet
- Step 5: Set Up the Coffee Station on Top
- Step 6: Plan for Power, Steam, and Safety
- Step 7: Style Your Vintage Coffee Station Like a Pro
- Real-Life Layout Ideas for Your Antique Coffee Cabinet
- Maintenance Tips: Keep Your Coffee Station and Cabinet Looking Great
- Experience Spotlight: What It’s Really Like to Transform an Antique Cabinet
- Conclusion
If your morning coffee ritual currently involves shuffling between crowded countertops, digging for mugs, and untangling cords like vintage spaghetti, it’s time for an upgrade. One of the most charming ways to do that?
Transform an antique cabinet into a dedicated coffee station that looks like it’s been in your home for generations.
Whether you’ve scored a Hoosier cabinet, a vintage sideboard, or a quirky little thrift-store find, an antique cabinet has everything a good DIY coffee bar needs: storage, personality, and a solid work surface.
With a bit of cleaning, some creative planning, and a few smart upgrades, you can turn that old piece into the hardest-working (and best-dressed) corner of your kitchen or dining room.
Why an Antique Cabinet Makes the Perfect Coffee Station
Before you drag the cabinet into position and plug in your espresso machine, it helps to know why these old pieces work so well as DIY coffee stations:
- Built-in history and charm: Antique cabinets were designed to work hard, especially classics like the early 20th-century Hoosier-style cabinets that combined storage and workspace in one compact piece.
- Deep, flexible storage: Drawers, shelves, and cubbies are ideal for coffee beans, tea tins, syrups, filters, mugs, and all your barista gadgets.
- A generous work surface: Most antique cabinets, hutches, and buffets have wide topsperfect for a coffee maker, grinder, kettle, and a little decor.
- Sustainable and budget-friendly: Instead of buying a brand-new “coffee bar cabinet,” you’re upcycling furniture that might otherwise sit in a garage or landfill.
- Fits in lots of spaces: A narrow cabinet can work in a hallway or breakfast nook; a larger hutch can anchor a dining room wall.
In other words, your antique cabinet already has the bones of a high-end coffee stationyou’re just teaching it a new trick.
Step 1: Choose the Right Antique Cabinet
Not every old cabinet is destined to become a coffee station. When you’re hunting at flea markets, thrift stores, or online marketplaces, keep a few practical details in mind.
Check the Size and Layout
- Height: Aim for a surface between standard counter height and buffet height so you can comfortably reach your machine and pour without hunching.
- Depth: Make sure there’s enough depth for your coffee maker and possibly a grinder. Many drip machines and espresso machines need at least 12–16 inches of depth.
- Storage layout: Drawers are great for spoons, napkins, pods, and tea bags; closed cabinets are perfect for bulky items like extra mugs and bulk beans.
Look for Solid Construction
A little wobble can be charming in a chair; it’s less cute when it’s holding a steaming espresso machine. Look for:
- Solid wood or sturdy veneer (no crumbling particleboard if you can avoid it).
- Doors that open and close properly.
- Shelves that can support the weight of gear, jars, and dishes.
- Legs or a base that sits flat on the floor.
Think About Electrical Access
Your cabinet needs to live near an outletor you’ll need a safe way to run a power strip behind it. If the back is solid, don’t worry; you can cut a neat hole later for cords. Just plan for this before loading it up with 20 pounds of mugs.
Step 2: Clean, Repair, and Prep the Cabinet
The less glamorous part of transforming an antique cabinet into a coffee station is actually the most important: prep work. Don’t skip this; your finish, hardware, and even your coffee experience will be better for it.
Deep Clean the Piece
- Start by removing drawers and shelves and vacuuming out dust and cobwebs.
- Use a gentle degreaser or a mix of mild soap and warm water to scrub away old grime, especially around handles and corners.
- If there’s a musty smell, leave bowls of baking soda or charcoal inside for a few days, or wipe surfaces with a diluted vinegar solution (then let them dry thoroughly).
Handle Repairs Before You Paint
Once it’s clean, check for anything that needs attention:
- Tighten loose screws and brackets.
- Use wood glue on wobbly joints and clamp if needed.
- Fill deep scratches or old hardware holes with wood filler, then sand smooth.
- Sand glossy finishes lightly so new paint or stain will adhere properly.
At this stage, remove the existing hardware if you plan to replace itjust keep hinges and screws in a labeled container so you don’t play “mystery screw” later.
Step 3: Choose a Finish That Fits Your Style
Now for the fun part: giving your antique cabinet a new look to go with its new job.
Paint for a Fresh, Modern Spin
Many DIYers reach for chalk paint or cabinet paint because it covers old finishes well and creates that soft, matte, farmhouse-style look that’s popular in coffee bar cabinets.
Neutral tones like white, cream, charcoal, navy, or deep green pair beautifully with warm wood and metal accents.
- Light colors brighten up darker corners and showcase your mugs and jars.
- Darker colors hide scuffs and create a cozy, café-like atmosphere.
- Two-tone looks (e.g., darker base with a lighter hutch top) add personality without feeling busy.
Stain or Refresh the Original Wood
If the wood grain is gorgeous, you might skip paint and simply sand, stain, and seal. This works especially well if you’re going for a classic or vintage coffee station vibe. Consider:
- Medium walnut or chestnut for a warm, traditional look.
- Dark espresso stain for a dramatic contrast with white mugs and canisters.
- Clear finish with a matte or satin topcoat if the existing tone is already perfect.
Upgrade the Hardware
Swapping old knobs and pulls for updated hardware is a small change that makes a huge impact.
Think black iron for a farmhouse look, brushed brass for a modern classic feel, or ceramic knobs for vintage charm.
Step 4: Plan Smart Storage Inside Your Coffee Cabinet
The best coffee stations don’t just look goodthey make busy mornings easier. Once the finish is done and cured, it’s time to turn this antique cabinet into a highly organized “coffee command center.”
Create Zones Inside the Cabinet
Treat the inside like a mini café back bar. You might divide it into:
- Bean & tea zone: Airtight canisters for coffee beans, ground coffee, pods, and tea tins on a lower shelf.
- Mug & glass zone: Everyday mugs at the front, seasonal or specialty cups toward the back or on higher shelves.
- Tool zone: A drawer for spoons, stirrers, reusable straws, measuring scoops, and filters.
- Treats zone: A small basket for cookies, sugar packets, or hot cocoa packets for non-coffee drinkers.
Use Organizers to Avoid Coffee Chaos
Even in a vintage piece, you can add modern organization:
- Drawer dividers for spoons and accessories.
- Tiered shelf risers to see everything at a glance.
- Lazy Susans for syrups or flavored powders.
- Clear jars with labels so nobody mistakes cocoa for instant espresso (it happens!).
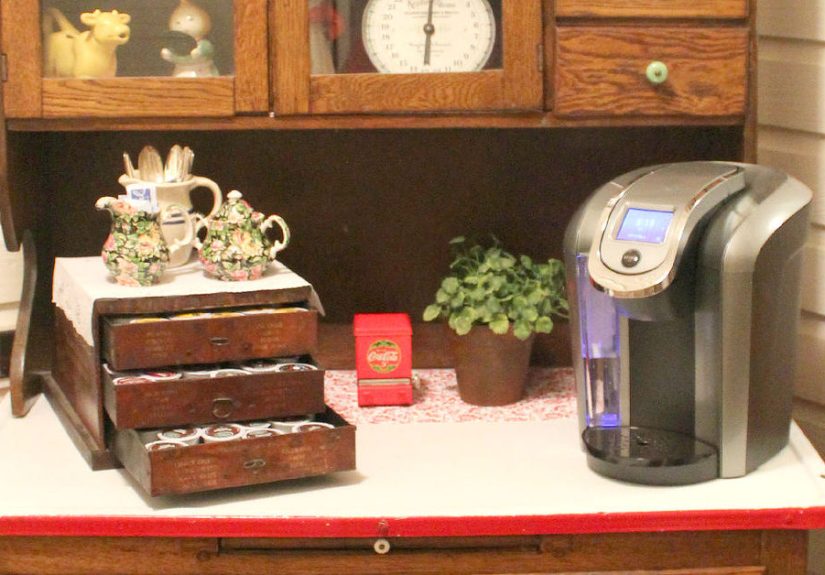
Step 5: Set Up the Coffee Station on Top
The top of your antique cabinet is where the action happens. This is your “service counter,” so it should be both functional and beautiful.
Anchor the Essentials
Start by placing the big pieces:
- Your main coffee maker or espresso machine.
- A grinder (if you’re using whole beans).
- Optional: an electric kettle for pour-over or tea.
Make sure there’s enough clearance for lids and water reservoirs to open easily. Leave a small “landing zone” of clear space where you can set a mug, prep a drink, or refill the water tank.
Use a Tray to Corral Smaller Items
A tray instantly makes things look intentional, not cluttered. On your tray, you might place:
- Sugar bowl, sweeteners, and creamer.
- A small jar of spoons or stir sticks.
- Cinnamon, cocoa, or flavored syrups.
- Napkins or small towels for drips.
When everything lives on a tray, it’s easy to slide it aside for cleaning or rearranging.
Add Vertical Storage Above
If the cabinet sits against a wall, think upwards:
- Floating shelves for mugs, jars, and decor.
- A simple mug rack or hooks under a shelf.
- A small piece of art or a “Coffee Bar” sign for personality.
This vertical layering turns your antique cabinet into a full “coffee station wall” rather than just a lonely piece of furniture.
Step 6: Plan for Power, Steam, and Safety
Coffee stations involve heat, moisture, and electricity, which is an exciting combo if you’re a baristabut not so fun for old wood if you don’t plan well.
- Cut cord holes: Use a hole saw to create neat openings in the back panel for cords, then add grommets for a finished look.
- Use a quality power strip: Choose one with surge protection and an on/off switch, and keep it off the floor where spills could reach it.
- Protect the surface: Place a heat- and water-resistant mat or tray under your coffee maker to catch drips and steam.
- Allow ventilation: Don’t cram a hot machine into an enclosed cubby with no airflow; leave space behind and above it.
With a few small tweaks, your antique cabinet will safely handle modern coffee gadgets for years to come.
Step 7: Style Your Vintage Coffee Station Like a Pro
Now that everything functions well, it’s time to make your cabinet look as good as your latte tastes.
- Mix old and new: Pair the antique cabinet with modern mugs, sleek canisters, or a glass jar of beans to highlight the contrast.
- Play with texture: Add a small plant, woven baskets, a linen runner, or a wooden riser to soften all the hard surfaces.
- Keep it curated: Display a few favorite mugs and jars; store overflow inside the cabinet so the top doesn’t feel chaotic.
- Lean into a theme: Rustic farmhouse, classic café, minimalist, or vintage bakeryuse color and accessories to tell that story.
The goal isn’t perfection; it’s a coffee corner that makes you smile before you’ve even had your first sip.
Real-Life Layout Ideas for Your Antique Coffee Cabinet
Small-Space Corner Coffee Station
If you’re working with a narrow cabinet or a tiny nook, keep the setup streamlined:
- Single-serve coffee maker or compact espresso machine on top.
- Two or three favorite mugs hanging from a small rack.
- A tray for sugar, creamer, and a tiny plant.
- Inside: one shelf for beans and pods, one drawer for tools and filters.
This setup is perfect for apartments, studios, or breakfast corners that need to work hard without crowding the room.
Dining Room Coffee & Dessert Station
Have a longer buffet or sideboard? Turn it into a hybrid coffee and dessert bar:
- Machine and kettle on one side, cake stand or cookie jar on the other.
- Wine glasses and bottles stored below for an after-dinner bar feel.
- Pretty mugs and dessert plates on a shelf above.
This kind of multi-purpose coffee station is ideal for entertainingguests can help themselves while you focus on the main meal.
Hoosier-Style Vintage Coffee Pantry
If you’re lucky enough to have a true antique kitchen cabinet (like a Hoosier or possum belly cabinet), you can turn the whole piece into a “coffee pantry”:
- Work surface for machine, grinder, and hand-brew gear.
- Upper compartments for jars of beans, tea, sugar, and spices.
- Lower bins or drawers for bulk storage, linens, and backup supplies.
Close the doors when you’re done, and your entire coffee shop disappears into a beautiful piece of furniture.
Maintenance Tips: Keep Your Coffee Station and Cabinet Looking Great
- Wipe spills and splashes dailycoffee and syrups can stain painted or raw wood over time.
- Do a quick declutter once a week: remove empty bags, wipe jars, and reset your tray.
- Every few months, check for water rings or wear on the surface; touch up sealant or paint as needed.
- Rotate mugs and decor seasonally to keep the space feeling fresh and intentional.
A few minutes of care here and there will keep your antique cabinet coffee bar looking like a magazine feature, not a forgotten corner.
Experience Spotlight: What It’s Really Like to Transform an Antique Cabinet
It’s one thing to sketch out a plan, and another to actually live with a DIY coffee station every single morning.
Here’s what the process typically feels like when you take an old cabinet from “dust collector” to “caffeine HQ.”
The Hunt for the Perfect Piece
The journey usually starts with an “aha” moment: you spot an antique cabinet at a thrift store, estate sale, or in a relative’s basement.
At first glance, it might look a bit sadyellowed finish, outdated hardware, maybe a drawer that sticks. But you notice the deep shelves, the solid wood, and the way the top is exactly the right height for a coffee machine.
That’s the moment you start mentally arranging mugs and syrups before you’ve even paid for it.
Many people underestimate how satisfying it is to rescue a piece like this. Instead of shopping for a brand-new “coffee bar console,” you’re giving something with real history a second life in the heart of your home.
The “What Did I Just Start?” Phase
Once the cabinet is home, reality hits: there’s sanding, cleaning, and painting ahead. Taking off old hardware can reveal ghost outlines or extra holes.
You might discover a mysterious crayon mark in a drawer or find vintage contact paper that has definitely seen better decades.
This is also when design decisions suddenly feel bigger:
“Should I go with classic white? Deep green? Do I match my kitchen cabinets or let this piece stand out?”
It helps to remind yourself that paint isn’t permanent and that an antique cabinet can handle a bold color just as gracefully as a neutral one.
The Moment It Starts to Feel Like a Coffee Shop
The turning point is usually when the new finish dries and the hardware goes back on. Suddenly the cabinet looks intentional and updated, not just “old but painted.”
Adding the coffee maker, a grinder, and a row of favorite mugs instantly shifts the vibe: your home now has a tiny café built into a piece of history.
The first morning you use it, you’ll probably overdo it: neatly lining up sugar packets, fussing with the angle of a small plant, arranging syrups by color.
But after a few days, the station just quietly does its jobmaking it easier to brew coffee without crowding the kitchen.
Living With a Coffee Station Every Day
Over time, you start to appreciate the little details:
- How nice it is to have all your coffee gear in one place instead of scattered across the kitchen.
- The way guests naturally gravitate to the cabinet and help themselves, which takes pressure off you when hosting.
- How the antique detailscurved legs, glass doors, original trimgive the space character that a brand-new cabinet just can’t fake.
You’ll also learn what needs tweaking. Maybe the mugs you reach for daily should move to hooks above the cabinet.
Maybe the grinder is a bit messy and needs its own small tray. Perhaps you realize you prefer storing tea in the top section and coffee in the bottom.
The beauty of a DIY coffee station is that nothing is set in stoneyou can rearrange until it matches the way you actually drink coffee.
Why It’s Worth the Effort
By the time your antique cabinet has fully settled into its new role, it’s more than just a furniture makeover.
You’ve created a daily ritual zone: a place you walk to in the morning, half-awake, knowing exactly where everything is.
You’ve added storage, style, and functionnot by buying something generic, but by transforming a piece with a story.
That’s the real magic of turning an antique cabinet into a coffee station.
Every cup you make is a quiet reminder that a little creativity (and a little sanding) can turn old furniture into something surprisingly modern and useful.
Conclusion
Transforming an antique cabinet into a coffee station is part DIY project, part design exercise, and part love letter to your morning routine.
With some thoughtful prep, smart storage, and a few stylistic touches, you can create a custom coffee bar that suits your home, your taste, and your favorite brew.
Whether you’re working with a petite vintage cupboard or a grand old hutch, this project turns “just another piece of furniture” into the heart of your caffeinated universeone that blends the charm of the past with the comfort and convenience of your daily coffee ritual.