Table of Contents >> Show >> Hide
- What Is Board and Battenand Why You’re Going to Love It
- Where and How to Use Board and Batten Walls
- Design Ideas That Actually Pop
- Materials & Budget – What to Know Before You Nail
- Step‑by‑Step Snapshot (DIY Friendly!)
- Pros, Cons & How to Make It Work for You
- My Favourite Idea Round‑up
- Conclusion
- My Personal Board & Batten Wall Adventure (and What I Learned)
Sapo: If your walls could wear outfits, the classic vertical trim of board and batten would be their tuxedo. Whether you’re craving farmhouse charm, a moody modern accent, or a practical DIY splurgeusing board and batten wall treatments is a smart move. We’ll dive into what board and batten really means, why it’s become a favorite for both interiors and exteriors, show a buffet of ideas for how to use it (accent wall? full room? bold color? subtle?), cover materials and installation tips, and sprinkle a bit of design humor along the way. If you’re ready to take your plain drywall from “meh” to “marvelous,” grab your level, your nail gun (or friendly prepper of patience), and let’s go!
What Is Board and Battenand Why You’re Going to Love It
First things first: What in the world is board and batten? Simply put, it’s a wall treatment (or siding treatment if outside) where wider boards are installed and narrower stripscalled battensare placed over the seams between the boards. Historically used on barns and exteriors, it now has moved inside homes and is having a full decor moment.
Why do homeowners and decorators pick it? Because it adds texture and visual interest to what would otherwise be a plain wall. The vertical lines can make a room feel taller. It’s surprisingly DIY‑friendly. And it’s versatileworks with rustic, farmhouse, coastal, modern, and even glam styles.
Where and How to Use Board and Batten Walls
Accent Wall or Whole Room?
One of the first decisions: are you doing just one wall as a feature (hello, behind the sofa or bed) or are you going full‑on and doing all walls (or even ceiling) with board and batten? Many of the best design blogs suggest starting with just an accent wall if you’re testing the waters. If things go splendidly (they will), you can expand it.
Room by Room Suggestions
Living Room / Entryway: Tall vertical battens create height and dramaideal in an open space or narrow hallway. Some designers suggest ¾‑height wainscoting style when you don’t want the whole wall covered.
Bedroom: It’s a cozy spot to stop the battens halfway up the wall or run them floor‑to‑ceiling behind the headboard for maximum effect. Don’t forget to plan hanging art or your TVif the battens act as ledges or protrude, you’ll need to adjust.
Bathroom: Yesboard and batten works here too, especially if you pick moisture‑resistant materials or seal everything well. It’s a fun way to add texture in a compact space.
Exterior or Siding: While our focus is interiors mostly, don’t forget board and batten for outsidevertical boards and battens shed water well and offer visual height to a home’s façade.
Design Ideas That Actually Pop
Here are some creative spins on the board and batten wall so your walls aren’t just functionalthey’re photogenic.
- Bold colour + full‑height battens: Pick a rich huenavy, emerald, charcoaland run the battens from floor to ceiling for a dramatic effect.
- Half‑wall treatment + shelf ledge: Use the board and batten up to 3/4 of the wall height and add a wood ledge where the battens stop. Great in dining rooms or hallways.
- Combine with wallpaper or accent panel: Battens frame wallpaper or decorative panels for a geometric, tailored look.
- Modern spacing or custom layouts: Skip traditional even spacingtry varying widths, wider battens, or even grid/square or diamond patterns for a modern take.
- Go natural wood instead of painted: For a rustic or coastal vibe, leave the wood bare or stainedtexture and grain add flavor.
Materials & Budget – What to Know Before You Nail
Materials: According to sources, interior board and batten may use wood (pine, cedar, oak), MDF, or even composite materials for budget‑friendly jobs. For exteriors there are also vinyl and fiber‑cement options.
Budget: Interior board and batten treatments typically run between around $7 and $20 per square foot (materials + installation) depending on complexity. For DIYers, the material cost can be much lowerone blog documented doing an entire wall treatment “on the cheap” by using furring strips.
Experience tip: Even if you’re comfortable with a hammer, measure twice, use a level thrice. Uneven battens will haunt you in your dreams (or at least your Instagram). Also plan how you’ll hang frames, TV, or mirrorsmounting through battens may require extra work.
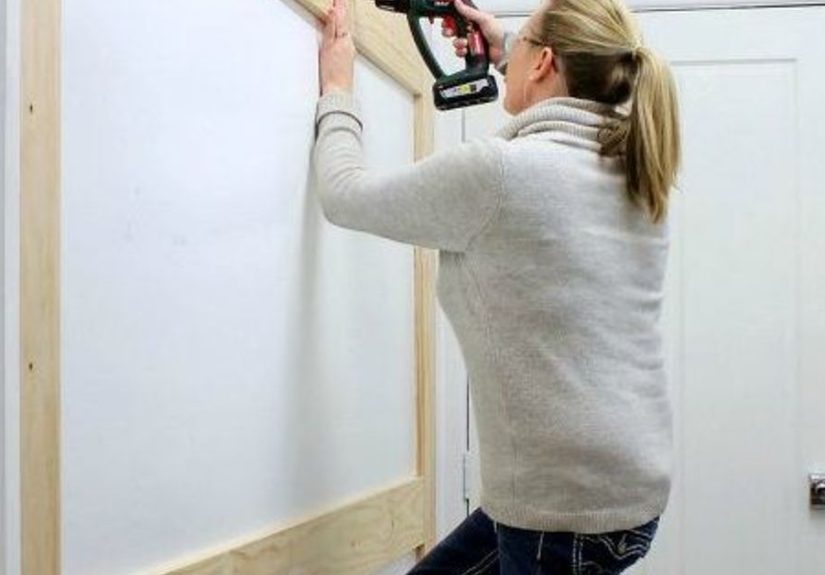
Step‑by‑Step Snapshot (DIY Friendly!)
Here’s a simplified sequence if you’re rolling up your sleeves:
- Remove existing baseboard (optional) or adapt to it.
- Install a horizontal board (if doing ½ or ¾ wall) or mark full‑height.
- Measure and mark vertical batten spacing (common: 12″–20″ although room size and design aesthetic may vary).
- Cut and install vertical battens securely (adhesive + brad nails). Use a level!
- Fill nail holes, caulk seams, sand if needed; you want smooth transitions so your paint job looks pro.
- Prime if needed, paint (or stain) for final look. Two coats paint recommended.
Pro tip: If your walls are textured or not perfectly flat, consider adding a thin hardboard substrate or skim‑coating to give your battens a clean surface.
Pros, Cons & How to Make It Work for You
Pros: Adds architectural detail without needing built‑in cabinetry. Makes plain drywall feel intentional. Vertical lines = height illusion. DIY‑friendly. Works in many decor styles.
Cons: It takes time (cuts, level, caulk). If you hire it, labor adds up. On textured walls you may get uneven look unless you prep. Also consider that heavy battens restrict wall‑hanging options unless you plan accordingly.
How to make it work: Assess your space: wall size, usage, furniture placement, height of ceilings, light. Choose spacing of battens that visually works (wider spacing for large rooms, tighter for cozy spaces). Consider color: neutral for timeless, dark for drama, pastel for soft effect. Combine with your overall decor style. And if you’re doing a whole roomcommit wholeheartedly or it may look half‑hearted.
My Favourite Idea Round‑up
Here are three of my personal favourites that you might steal (and you should):
- Moody green accent wall in home office:</strong Rich emerald battens + full‑height board and batten = immediate “I mean business, but I also vibe” effect.
- Soft pastel nursery with half‑wall battens:</strong The bottom 3/4 wall covered, top part wallpaper or paint, little shelves nestled incute and subtle.
- Entryway with white battens and mid‑height shelf ledge:</strong Bang‑for‑buck welcome space refresh: crisp white vertical lines make the narrow entry feel wider and taller.
Pick the one that makes your heart leap and your friends say “Whoa, did you do that yourself?” (You will.)
Conclusion
If you’ve been staring at that plain wall and longing for a design twist that won’t require ripping out drywall or major constructionlisten up. Board and batten wall treatments are the goldilocks solution: stylish but accessible, textured but not fussy, classic but totally on‑trend. By combining the smart material choice, a clear design idea, and a manageable installation plan, you can elevate your space from “meh” to “marvelous.” Whether you go full room or just one accent wall, calm neutrals or bold colour, this is a home update worth your tool belt.
Extended 500‑word Experience Section
My Personal Board & Batten Wall Adventure (and What I Learned)
Alright, full disclosure: I once tackled a budget‑friendly board and batten wall in my own living room. The space was sarcastically referred to by guests as “the flat beige wall of doom.” Not any more. I decided that a feature wall behind the sofa would benefit from texture and character without overwhelming the entire room. Armed with pre‑primed pine boards, my brad nailer (borrowed from my dad), a level that suspiciously wobbled, and a stubborn streak, I jumped in.
First hurdle: uneven wall. Old house, slightly settled foundation. My initial horizontal board (which I planned at 5 feet up) ended up being a little off on the left side. I quickly learned that trusting just the measuring tape wasn’t enoughmortals need a level. So I raised one end slightly so it visually appeared level. Lesson: always use your spirit level and trust your eye, not just the numbers.
Next: spacing the battens. I started with the typical 16″ spacing (center‑to‑center) but realized the wall was wider than standard, so I shifted spacing to about 20″ and it looked more balanced. Here I learned the “feel” of a wall beats rigid rulestest with cardboard strips before committing with nails.
Installation went smoother than expectedbut then came the finishing touches: nail holes, seams, caulk. The battens looked great but when I stepped back under the afternoon light I saw shadows where gaps were. So I filled, caulked, primed, and sanded. Took two afternoons instead of one, but worth it.
Finally paintingfun part. I selected a deep teal for the battens and boards, with the wall panels painted the same color for a monochromatic but textured look. After two coats I stood back and thought, “Yep, the Beige Wall of Doom has been defeated.” It made such a difference in the room’s mood: more intimate, more styled, more intentional.
What did I learn? First, prep is nearly half the job. If your walls are bumpy, battles will show. Second, decide early: accent wall or full room? I went accent and it fits. If I went full room I might reconsider furniture placement because mounting art becomes trickier once the battens are in place. (I calculated that after I tried mounting a floating shelf and had to shim behind the battens.) Third, colour and spacing matter. If you pick a bold color, the wall should be purposeful. If you pick a soft neutral, you’ll appreciate the texture rather than the shade. Fourth, enjoy the process. I bled a little pine sap, but I also felt empowered: I updated my space without hiring a pro.
Now when guests walk in they ask, “Did you add that trim detail?” My favourite answer: “YesI whipped it out on a Saturday afternoon and may have sworn once or twice.” And then I take a casual sip of my coffee, enjoy the texture, enjoy the vertical lines making the ceiling seem higher, and feel just a little bit proud. Because a wall treatment doesn’t need to be scaryit just needs to be planned and executed. If I can do it, you can too. And the beauty? It doesn’t scream “I live in a decor catalogue”it quietly says “I care about my space and had fun making it better.”
So if you’re reading this and thinking “Hmm, I could tackle that,” here’s your permission slip: go for it. Grab your boards, measure your spacing, nail those battens straight (ish), caulk the seams, paint it bold or subtleand then step back and admire your work. The Beige Wall of Doom shall live no more. Your home will thank you.