Table of Contents >> Show >> Hide
- Step 1: Figure Out What Kind of Ultrasonic Transducer You Actually Bought
- Step 2: Safety First (Because Ultrasound Is Not a Toy Laser)
- Step 3: Unbox Like a Pro: Inspect, Protect, and Plan
- Step 4: Understand Resonance (The Secret Sauce)
- Step 5: Test Your Transducer Without a Full Lab (But With Real Data)
- Step 6: Mounting and Coupling (Where Most “It Doesn’t Work” Stories Begin)
- 10 Smart Things To Do With a Brand New Ultrasonic Transducer
- 1) Build a distance sensor (robots, bins, parking, room projects)
- 2) Measure liquid level without touching the liquid
- 3) Make a “presence” or “occupancy” detector
- 4) Try a Doppler motion experiment (gesture and movement sensing)
- 5) Upgrade or repair an ultrasonic cleaner setup (with the right hardware)
- 6) Explore basic flow sensing concepts
- 7) Use NDT-style thinking: detect flaws, thickness, or delamination (advanced)
- 8) Make a “material behavior” demo for learning (science fair energy)
- 9) Create a water-path experiment (immersion-style learning)
- 10) Prototype a rugged sensor node (real-world deployment mindset)
- Troubleshooting: When Your Transducer Acts Like It’s Mad at You
- Care, Feeding, and Storage (Yes, Your Transducer Has Preferences)
- Conclusion: A Great Transducer Is a System, Not a Lone Hero
- Real-World Experiences: What People Commonly Run Into With a New Ultrasonic Transducer (500+ Words)
- Experience #1: “It works… but only when I hold it at a weird angle.”
- Experience #2: “My distance readings jump around like they had espresso.”
- Experience #3: “I can’t measure anything close up.”
- Experience #4: “The contact probe gives nothing… until I add gel, then it’s amazing.”
- Experience #5: “I drove it harder and now it’s… warm. Is that normal?”
- Experience #6: “I built the electronics perfectly, but the enclosure ruined everything.”
- Experience #7: “After a few days, it got flaky.”
Congratulations! You’ve just adopted a device that speaks in frequencies most humans can’t hear, yet it can
measure distances, spot hidden cracks, clean gunk off tiny parts, and (when used correctly) make engineers
smile for no visible reason. An ultrasonic transducer is basically a translator: it turns electrical energy into
ultrasound (and often back again). What you do next depends on which transducer you bought, how it’s meant
to be driven, and the environment it’s designed to “talk” through (air, water, metal, plastic, tissuepick your
medium).
This guide walks you through the smart first steps: identify your transducer, handle it safely, test it without
accidentally cooking it, mount and couple it properly, and then put it to work in practical projects. We’ll keep
the tone lightbecause nothing says “party” like impedance curvesbut the advice is serious enough to save you
time, money, and at least one “why is it smoking?” moment.
Step 1: Figure Out What Kind of Ultrasonic Transducer You Actually Bought
“Ultrasonic transducer” is a big umbrella term. Before you wire anything, confirm what’s in your hands. Most
newcomers skip this step and jump straight to “apply power,” which is a bold strategy that sometimes ends with a
sad little ping and no more ultrasoundever.
Common types (and how to recognize them)
- Air-coupled ultrasonic transducers (often ~40 kHz): Usually small, round, metal-capped or open
structure sensors used for distance/parking sensors, presence detection, and simple ranging in air. - Contact/immersion NDT probes (often 1–10+ MHz): Typically have robust housings, specific
connectors, and are designed to couple sound into solids (with gel) or liquids (water immersion). - Ultrasonic cleaner transducers (often 25–80 kHz): These are power devices meant to be bonded to
a tank. They’re built for high acoustic power and high duty cyclesdriven by dedicated ultrasonic generators. - Medical ultrasound probes: These are not “generic parts.” They’re part of regulated medical
systems and require proper equipment, safety controls, and approved cleaning methods. - Specialty transducers (sonar, hull-mounted, EMAT, high-temp): Built for specific environments
and usually come with very specific installation constraints.
Your 60-second spec check
Find the datasheet (or product listing) and note these basics:
- Center/resonant frequency (the “sweet spot” where it works best)
- Electrical model (often looks like capacitance + resonance behavior)
- Impedance/capacitance (helps you match a driver and avoid overcurrent)
- Max drive voltage / power / duty cycle (the line between “works great” and “crispy ceramic”)
- Operating temperature range (heat is a common transducer villain)
- Mounting requirements (clamp, bond, immersion, couplant, housing constraints)
Step 2: Safety First (Because Ultrasound Is Not a Toy Laser)
Most ultrasonic projects are safe when you follow basic electrical and usage precautions. The biggest risks tend
to be (1) electrical hazards from high-voltage drivers, (2) heat and mechanical stress, and (3) unintended
exposure to loud audible components or byproducts of ultrasonic systems.
Quick safety rules that prevent expensive mistakes
- Respect the driver voltage. Some ultrasonic systems use surprisingly high voltages. If your setup
involves transformers, bridge drivers, or power ultrasonics, treat it like real power electronicsbecause it is. - Don’t point high-power ultrasonics at ears or pets. While “ultrasound” is above human hearing,
real devices can create audible tones, harmonics, and subharmonics. If it sounds sharp, harsh, or annoying,
that’s your cue to step back and rethink the setup. - Medical probe warning: If your “new transducer” is a medical ultrasound probe, use it only as
part of an approved medical system, with proper safety settings and cleaning procedures. DIY-ing medical
ultrasound is not the move. - Avoid dry-running power transducers. Many high-power transducers expect a load (like a tank of
liquid or a bonded structure). Running “in air” can cause inefficient operation and heating. - When in doubt, start low. Start with low voltage, low duty cycle, and short bursts. You can
always scale up; you can’t un-fry a piezoceramic.
Step 3: Unbox Like a Pro: Inspect, Protect, and Plan
A transducer is part material science, part precision device, and part “please don’t yank my cable.” Before you
build anything, do a quick inspection.
What to look for
- Physical damage (chips, cracks, dented faces, loose housings)
- Connector health (bent pins, loose BNC/LEMO, frayed coax)
- Moisture protection (especially for immersion or outdoor sensors)
- Polarity markings (some piezo parts have indicated electrodes)
If it’s a bare piezo disc or element, handle it gently and keep it clean. Oils, fingerprints, and “mystery bench
grime” can affect bonding and performance. Also: strain relief is not optional. A transducer cable is often the
first thing to fail when projects get “exciting.”
Step 4: Understand Resonance (The Secret Sauce)
Ultrasonic transducers typically have a preferred operating region near resonance. At (or near) resonance, the
transducer converts electrical energy to acoustic energy more efficiently. Off resonance, it may still “make
sound,” but you’ll often see weaker output, more heat, and worse signal quality.
The simple mental model
Think of your transducer like a tuned instrument. The driver is the musician. If the musician insists on playing
the wrong note, the instrument won’t singit’ll complain (usually by heating up). Many transducers can be
approximated as an RLC-like system, which is why impedance and phase shift matter.
Why ring-down matters
In sensing applications, after you “ping” the transducer, it keeps vibrating brieflythis is ring-down. Too much
ring-down can mask close echoes, limiting minimum range. Engineers often reduce ring-down with damping (mechanical
backing, electrical resistance, or driver strategies), balancing sensitivity against recovery time.
Step 5: Test Your Transducer Without a Full Lab (But With Real Data)
You don’t need a million-dollar setup to learn whether your transducer is healthy. You just need to be cautious
and systematic.
Test A: Basic electrical sanity check
- Measure capacitance (if your meter supports it) and compare to the expected range.
- Check for shorts between electrodes/housing (if applicable). A short is a red flag.
- Inspect connectors and verify continuity through the cable.
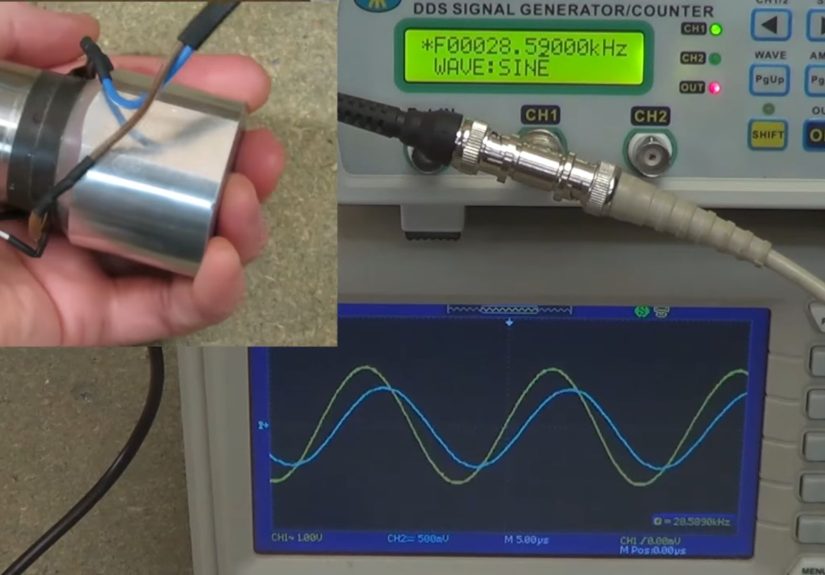
Test B: Gentle “chirp” test (low power)
If you have a function generator and a resistor, you can sweep a low-voltage sine wave across a small frequency
range around the rated frequency and watch for a response peak (electrical current change, voltage across the
resistor, or receiver output if you have a second transducer).
Keep the voltage low and the sweep short. Your goal is to confirm behavior, not to drive maximum acoustic power.
Test C: Receive mode reality check
Many transducers can act as receivers. In a quiet setup, a second driven transducer (or a known acoustic event)
can produce a detectable signal. For higher-frequency NDT probes, specialized instruments are typically required,
but you can still verify cable integrity and general response behavior.
Step 6: Mounting and Coupling (Where Most “It Doesn’t Work” Stories Begin)
Ultrasound hates air gaps. For many applicationsespecially in solidsacoustic coupling is the difference between
“beautiful signal” and “flatline.”
Contact and immersion basics
- Contact probes (solids): Use an appropriate couplant (gel, glycerin-based fluids, or approved
couplants) to eliminate air between the probe and the test surface. - Immersion probes (liquids): Water paths require attention to alignment, distance, and bubble
control. Tiny bubbles can act like tiny signal thieves. - Air transducers: Keep the face unobstructed and avoid mounting that blocks the beam or creates
weird reflections right at the transducer mouth.
Bonded transducers (tanks, plates, hulls)
If your transducer is designed to be bonded to a surface, bonding quality is everything. You want a thin, uniform
bond line with no voids. Poor bonding reduces power transfer and can create hotspots. Also, the mounting surface
matters: a stiff, well-coupled surface transmits better than a flimsy one that behaves like a trampoline.
10 Smart Things To Do With a Brand New Ultrasonic Transducer
Now for the fun part. Below are practical, real-world ideasranging from beginner-friendly to “I suddenly own an
oscilloscope and I’m not sorry.”
1) Build a distance sensor (robots, bins, parking, room projects)
A classic: time-of-flight ranging. Emit a short burst, measure the echo time, and convert to distance. Add
temperature compensation for best results because the speed of sound in air changes with temperature (and your
transducer will absolutely notice).
2) Measure liquid level without touching the liquid
Mount an air transducer above a tank or container and measure the echo from the surface. This is great for
monitoring a water reservoir, a humidifier tank, or a DIY hydroponics setupwithout putting sensors in the
liquid.
3) Make a “presence” or “occupancy” detector
Ultrasonics can detect the presence of a person by measuring echo changes. It’s useful for smart-room projects,
lights, or “gentle reminders” that you’re still in front of your desk at 2 a.m. (No judgment. Okay, a little.)
4) Try a Doppler motion experiment (gesture and movement sensing)
With a continuous wave setup (or clever signal processing), you can observe Doppler shifts from moving objects.
This can become the foundation for simple gesture sensing or motion-triggered interactions.
5) Upgrade or repair an ultrasonic cleaner setup (with the right hardware)
If your transducer is meant for cleaning, pair it with a proper ultrasonic generator and correct mounting. The
payoff is satisfying: cavitation helps remove contaminants from small parts, tools, jewelry, and lab equipment.
Use solutions designed for ultrasonic cleaning and follow device instructionschemistry matters as much as
frequency.
6) Explore basic flow sensing concepts
Ultrasonic flow measurement (transit-time or Doppler methods) is a deep subject, but you can learn a lot by
experimenting with propagation through tubing and observing how alignment and coupling affect signal stability.
7) Use NDT-style thinking: detect flaws, thickness, or delamination (advanced)
With the correct probe and instrument, ultrasonic testing can detect internal defects or measure thickness. It’s
widely used in industry to monitor corrosion, evaluate welds, and inspect materials. If you bought an NDT probe,
you’re holding a serious toolpair it with appropriate equipment and couplant to do real inspection work.
8) Make a “material behavior” demo for learning (science fair energy)
Use ultrasound to demonstrate reflection, attenuation, and coupling differences between materials. Try comparing
echoes from wood vs. plastic vs. metal (with safe, low-power testing). It’s a great way to make wave physics
feel real instead of like a paragraph you skimmed.
9) Create a water-path experiment (immersion-style learning)
If you have an immersion-rated transducer, you can experiment with alignment, water path length, and target
reflectors. Small changes can produce big differences in received signal, and it’s a hands-on way to understand
beam behavior and near-field/far-field concepts.
10) Prototype a rugged sensor node (real-world deployment mindset)
Once you’ve proven your transducer works on the bench, build a real enclosure with strain relief, weather
protection (if needed), and stable mounting. The “pro” version of a project is rarely about the codeit’s about
mechanics, sealing, and repeatability.
Troubleshooting: When Your Transducer Acts Like It’s Mad at You
Problem: Weak output or short range
- Off-frequency drive: You may not be near resonance. Confirm frequency and sweep gently.
- Bad coupling or mounting: Air gaps, uneven pressure, bubbles, or poor bonding kill performance.
- Not enough drive (or wrong driver): Some transducers need a driver designed for their impedance and voltage needs.
- Over-damping: Damping can reduce ringing but also reduces peak outputbalance matters.
Problem: No signal at all
- Wiring/connector issue: Check continuity and connector pinouts.
- Polarity or electrode problem: Verify you’re connected to the correct terminals.
- Driver protection or limits: Some drivers shut down under overcurrent/short conditions.
Problem: Overheating
- Too much power or duty cycle: Reduce duty cycle and confirm power rating.
- Severe mismatch: Poor impedance matching can waste power as heat.
- Wrong environment: Some transducers need a load (liquid/tank/structure) to run efficiently.
Care, Feeding, and Storage (Yes, Your Transducer Has Preferences)
Treat your transducer well and it can last a long time. Treat it like a disposable no-name buzzer and it may
retire early.
Best practices
- Protect it from heat: Excessive heat can degrade piezo performance over time.
- Solder carefully (if applicable): Use controlled temperature, quick contact times, and avoid overheating electrodes.
- Keep faces clean: Especially for contact/immersion probes. Dirt and scratches reduce coupling.
- Don’t yank the cable: Add strain relief and route cables thoughtfully.
- Store dry and protected: Moisture intrusion is a silent performance killer.
Conclusion: A Great Transducer Is a System, Not a Lone Hero
Your brand new ultrasonic transducer can be the heart of a sensor, an inspection tool, or a cleaning powerhouse.
The trick is respecting what it was designed to do: operate near its intended frequency, with appropriate
drive levels, in the right medium, with the right mounting and coupling. Do those things and you’ll get strong
signals, stable measurements, and fewer mysterious “why did it stop working?” afternoons.
Start with identification and safety, test gently, then scale up as your confidence (and measurements) improve.
Whether you’re building a distance sensor for a robot or learning the fundamentals of ultrasonic testing, the
best next step is the same: make your setup repeatable, measurable, and kind to the transducer. Ultrasound is
invisible, but your results don’t have to be.
Real-World Experiences: What People Commonly Run Into With a New Ultrasonic Transducer (500+ Words)
If you’re expecting the “plug it in and it magically works” experience, welcome to engineeringwhere magic exists,
but it’s usually labeled as “proper coupling and impedance matching.” Below are the most common first-week
experiences people report when they buy a brand new ultrasonic transducer, along with what they learn the
hard (and sometimes hilarious) way.
Experience #1: “It works… but only when I hold it at a weird angle.”
This is often your first lesson in beam direction and reflections. Air transducers have directivity; contact and
immersion probes can be even more sensitive to alignment. A tiny angle change can send the reflected energy
somewhere else, and your receiver sits there like, “New number, who dis?” The fix usually isn’t fancy:
consistent mounting, consistent aim, and minimizing nearby surfaces that create confusing echoes.
Experience #2: “My distance readings jump around like they had espresso.”
The speed of sound in air changes with temperature. That means your distance calculations drift unless you
compensate. People also discover that soft targets (fabric, angled surfaces, fuzzy materials) reflect less energy,
so echoes get weak and detection becomes inconsistent. The “aha” moment is realizing that stable readings come
from controlling conditions: temperature compensation, better target geometry, and thoughtful signal processing
(like averaging or rejecting outliers).
Experience #3: “I can’t measure anything close up.”
Ring-down is the usual culprit. After you send a pulse, the transducer vibrates for a short time, and that
vibration can mask echoes from nearby objects. Beginners often interpret this as “my sensor is broken,” when
it’s really “my sensor is still talking.” The practical takeaway: reduce burst length, add damping (where
appropriate), and accept that every transducer has a minimum measurable range.
Experience #4: “The contact probe gives nothing… until I add gel, then it’s amazing.”
This is the classic coupling lesson. Ultrasound doesn’t like air gaps because the acoustic mismatch is huge.
People press harder, press softer, and sometimes even blame the cablethen they add the correct couplant and
suddenly the signal appears like it was waiting backstage the whole time. After that, they become a couplant
evangelist and start offering gel to everyone like it’s hand sanitizer.
Experience #5: “I drove it harder and now it’s… warm. Is that normal?”
A little warmth can happen in power applications, but rapid heating is often a warning sign: mismatch, too high a
duty cycle, or operating off resonance. Many people learn to love low-duty pulsing and gradual scaling. The
‘grown-up’ move is measuring current draw, watching for unexpected changes, and stopping early when something
looks off. You’re not quittingyou’re preventing your transducer from becoming modern art.
Experience #6: “I built the electronics perfectly, but the enclosure ruined everything.”
Enclosures are where good projects go to become greator to quietly fail. Put an air transducer behind a thick
grill, add a tight cavity that resonates, or mount it against a vibrating panel, and your echoes can degrade fast.
The learning: mechanical design is part of the signal chain. Once people realize that, their next iteration
usually improves dramaticallybetter mounting, cleaner apertures, less internal reflection, and more repeatable
geometry.
Experience #7: “After a few days, it got flaky.”
Flakiness is often not the transducerit’s the cable strain, loose connectors, moisture ingress, or a bond line
that was never truly solid. The real-world solution is boring and effective: strain relief, stable connectors,
proper sealing, and careful bonding. People who adopt “build it like it’s going on a tractor” tend to have the
least drama later.
The overall pattern is simple: the first week is about learning that ultrasound is a system. Once you respect the
frequency, coupling, mounting, and drive requirements, your transducer stops acting mysterious and starts acting
reliable. And that’s when projects get funbecause you’re spending time building cool things, not arguing with
physics.