Table of Contents >> Show >> Hide
- Before You Start: The 3-Minute Setup That Makes Everything Easier
- Hack #1: The “Cooler Parking Lot” Trick (So You Don’t Rush and Do a Sloppy Job)
- Hack #2: The “One Shelf Per Day” Reset (A Lazy-Genius Maintenance Plan)
- Hack #3: The Baking Soda “Gentle Scrub” Wash (Vintage Method, Modern Results)
- Hack #4: The “Let It Sit” Stain Softening Move (Stop Scrubbing Like You’re Sanding a Deck)
- Hack #5: The “No-Drip Rule” (Clean Top-to-Bottom Like You Mean It)
- Hack #6: The Toothbrush Detail Pass (Where Grime Goes to Start a New Life)
- Hack #7: The “Handle Reality Check” (Because Everyone Touches Them)
- Hack #8: The Condenser Coil Clean (The Hack That Can Save Energy)
- Hack #9: The Drip Pan + Drain Check (The Hidden Odor Factory)
- Hack #10: The Odor “Layering” Strategy (Stop Masking SmellsNeutralize Them)
- Make It Last: A Simple Refrigerator Cleaning Schedule That Actually Works
- When to Sanitize (Not Just Clean)
- Extra: of Real-Life “Fridge Cleaning Experiences” (Because This Is Where We All Live)
- Conclusion
- SEO Tags
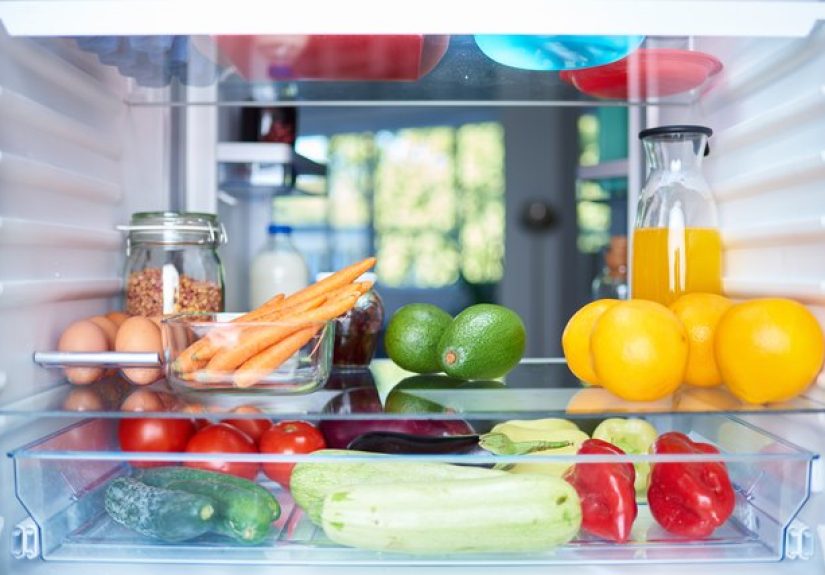
Your refrigerator is basically a tiny apartment building for leftovers, condiments, and that mystery jar you’re scared to open.
It works hard, it gets ignored, and occasionally it develops a “fridge smell” that can only be described as
yesterday’s onions meeting last week’s takeout.
The good news: you don’t need a cart full of fancy sprays to win this battle. With a few smart moves (and a little strategy),
you can deep clean your fridge faster, keep it fresh longer, and even help it run more efficiently. The tips below reflect
common, widely recommended best practices from U.S.-based food safety guidance and home/appliance experts (think: public health
agencies, consumer testing orgs, and major home publications), rewritten into an easy, real-life routine.
Before You Start: The 3-Minute Setup That Makes Everything Easier
Grab this mini kit
- Dish soap + warm water
- Baking soda
- Microfiber cloths or clean rags
- A soft sponge (non-scratch)
- An old toothbrush or small cleaning brush
- Optional: white vinegar (great on many surfaces, but not always ideal for rubber)
- Optional: sanitizer for food-contact surfaces (used only after cleaning)
Safety notes (because nobody wants a cracked shelf or a chemistry experiment)
- Unplug the fridge if you’ll be cleaning coils, removing drawers, or deep cleaning for a while.
- Let glass shelves come to room temp before washinghot water + cold glass can cause cracking.
- Clean first, sanitize second: sanitizers work best on already-clean surfaces.
- Never mix cleaners (especially bleach with ammonia or acids). When in doubt: soap and water is your best friend.
Hack #1: The “Cooler Parking Lot” Trick (So You Don’t Rush and Do a Sloppy Job)
The biggest reason fridge cleanouts fail is panic. You pull everything out… then feel the cold sweat of
“my yogurt is getting warm” and shove items back in like you’re playing Tetris on expert mode.
How it works
- Set a cooler (or insulated grocery bags) on the counter.
- Move perishables in first: milk, meat, leftovers, soft cheeses.
- Put shelf-stable items (mustard army, hot sauce collection) on the counter.
- Now you can actually clean without speed-running the process.
Pro tip: If you’re only doing a quick wipe-down, don’t remove everything. Just clear one section at a time.
Hack #2: The “One Shelf Per Day” Reset (A Lazy-Genius Maintenance Plan)
Deep cleaning doesn’t have to be an event that requires emotional preparation and a playlist titled “Cleaning Rage.”
This hack turns fridge cleaning into a tiny habit you can do while your coffee brews.
How it works
- Pick one shelf (or one drawer).
- Move items to the shelf below.
- Wipe the empty shelf with warm, soapy water (or a baking soda wipe for odors).
- Dry it, return items, and do a 10-second “is anything expired?” scan.
Over a week, your whole fridge gets cleaned without the drama. This is also the best method for busy households
where “deep clean day” never happens because life.
Hack #3: The Baking Soda “Gentle Scrub” Wash (Vintage Method, Modern Results)
Baking soda is the Swiss Army knife of fridge cleaning: mild abrasive, odor fighter, and generally not offensive to food areas.
It lifts grime without leaving a strong scent behind (because nobody wants their strawberries tasting like “Ocean Breeze Spray”).
How to mix it
- Stir baking soda into warm water until you have a lightly cloudy solution.
- For stuck-on gunk: make a paste with baking soda + a small splash of water.
Where it shines
- Shelf rings from jars and bottles
- Sticky drawer bottoms
- That one mysterious dried drip you can’t identify (and shouldn’t)
Hack #4: The “Let It Sit” Stain Softening Move (Stop Scrubbing Like You’re Sanding a Deck)
If you find dried sauce, syrup, or jelly that has fossilized, don’t go straight to scrubbing. The clever move is to
soften first. This protects surfaces and saves your wrist from filing a formal complaint.
Two easy options
- Warm compress: Place a warm, damp cloth over the stain for 5–10 minutes.
- Baking soda paste: Spread it on the stain, wait a few minutes, then wipe away.
Once softened, wipe with a damp cloth. Repeat if needed. This works especially well on dried spills in shelf corners
and under drawer lips.
Hack #5: The “No-Drip Rule” (Clean Top-to-Bottom Like You Mean It)
Here’s a painfully common cleaning mistake: you scrub the bottom crispers first, then clean a higher shelf and
drip dirty water onto the freshly cleaned area. Congratulationsyou’ve invented the cleaning version of untangling earbuds.
Do this instead
- Start at the top shelf and work downward.
- Clean removable parts in the sink while the inside air-dries.
- Finish with the bottom drawers and the floor of the fridge.
Pro tip: Put a towel at the base to catch drips and protect the fridge floor from scratchy debris.
Hack #6: The Toothbrush Detail Pass (Where Grime Goes to Start a New Life)
The grossest parts of a refrigerator are rarely the big open shelves. It’s the tiny places:
gasket folds, shelf seams, drawer tracks, and the corners where crumbs collect like they pay rent.
How to do it (fast)
- Dip an old toothbrush in warm, soapy water.
- Scrub seams, rails, and corners.
- Wipe with a damp cloth, then dry.
Gasket note: Rubber door seals do best with mild soap and water. Avoid harsh abrasives and be cautious
with acidic cleaners on rubber if you’re concerned about long-term wear. Dry the gasket folds so moisture doesn’t linger.
Hack #7: The “Handle Reality Check” (Because Everyone Touches Them)
Inside the fridge is where the mess livesbut outside is where the germs travel. Handles, edges, and the door front get touched constantly,
often by hands that just handled raw chicken packaging, pet treats, or a toddler’s questionable snack.
Quick clean routine
- Wipe handles and door edges with warm, soapy water.
- Follow with a clean damp cloth to remove residue.
- Dry with microfiber (especially on stainless steel to reduce streaks).
Pro tip: Put “handles + gasket” on your weekly 60-second cleaning list. It’s a high-impact habit.
Hack #8: The Condenser Coil Clean (The Hack That Can Save Energy)
This one isn’t glamorous, but it’s clever: dusty coils can make your refrigerator work harder. Cleaning them can improve efficiency,
help cooling performance, and reduce strain on the applianceespecially in pet-heavy homes where fur travels like it has frequent flyer miles.
How to do it
- Unplug the fridge.
- Locate coils (often behind a front grille at the bottom, or at the back).
- Use a vacuum with a soft brush attachment.
- If needed, use a coil brush to gently loosen dust, then vacuum again.
Important: Some newer models (and certain designs) may not require coil cleaning the same way.
When in doubt, check your manufacturer’s care guide.
Hack #9: The Drip Pan + Drain Check (The Hidden Odor Factory)
If your fridge smells “clean-ish” but still off, the source might not be a forgotten lemon. It can be the drip pan
or a drain area where moisture and debris collect. Not every refrigerator makes this easy to access, but when you can,
it’s worth checking.
How to tackle it
- Look for a removable panel near the bottom front or back.
- If the drip pan is accessible, remove it carefully.
- Wash with warm, soapy water; rinse and dry fully.
- Use a small brush or pipe cleaner for tight areas (if your model allows access).
Pro tip: If you can’t access it safely, don’t force it. A manufacturer guide (or a service tech) is the better move.
Hack #10: The Odor “Layering” Strategy (Stop Masking SmellsNeutralize Them)
The classic open box of baking soda works, but it’s not magic if the fridge is harboring odor sources (spills, old produce,
or drippy meat packaging). The clever approach is layering: remove the source, clean surfaces, then deodorize.
What actually helps
- Source removal: Toss anything expired, leaky, or suspicious.
- Surface wipe: Baking soda solution on walls and shelves for odor-prone areas.
- Deodorizer: Open baking soda box in the back of the fridge; replace regularly.
- Extra help: Activated charcoal fridge deodorizer can be useful for persistent smells.
Reminder: Don’t cook with baking soda that’s been living in the fridge absorbing odors. That’s not “seasoning,” that’s regret.
Make It Last: A Simple Refrigerator Cleaning Schedule That Actually Works
Weekly (2 minutes)
- Wipe obvious spills.
- Quick check: produce drawer and leftovers shelf.
- Handle + gasket wipe-down.
Monthly (10–15 minutes)
- One shelf reset (or two, if you’re feeling unstoppable).
- Swap deodorizer (baking soda/charcoal) if needed.
- Wipe condiment bottles that leave sticky rings.
Quarterly (30–45 minutes)
- Remove drawers and shelves, wash and dry.
- Detail brush seams and rails.
- Top-to-bottom interior wipe.
Twice a year
- Vacuum coils (and sweep under/behind the fridge if you can).
When to Sanitize (Not Just Clean)
Most of the time, a thorough clean with soap and water is the main event. Sanitizing becomes more important after a food spill involving raw meat juice,
a refrigerator-wide “oops” event, or a food recall situation where public health guidance recommends extra precautions.
If you choose to sanitize, do it after cleaning, use a food-safe approach, ventilate the area, and allow surfaces to air dry.
Always follow product labels and safety guidance.
Extra: of Real-Life “Fridge Cleaning Experiences” (Because This Is Where We All Live)
If you’ve ever opened your fridge and immediately closed itlike it offended you personallyyou’re not alone.
Refrigerator cleaning isn’t just a chore; it’s a recurring sitcom. There’s the “Holiday Leftovers Era,” where
containers multiply overnight and you swear you’ll eat them tomorrow. Then tomorrow becomes next week, and suddenly
you’re holding a takeout box like it’s an archaeological artifact.
One of the most common experiences people have is the mystery sticky shelf. You don’t know who spilled what,
but you do know it now has the strength of industrial glue. That’s when the “let it sit” hack becomes a small miracle.
A warm cloth parked on the spill for ten minutes can turn a scraping nightmare into a simple wipe. It’s the difference between
“I cleaned the fridge” and “I started sanding the fridge and now I need a nap.”
Another classic: the onion incident. Someone puts a cut onion in the fridge “for later,” and later never arrives.
The smell seeps into everythingyour butter, your berries, your soul. The fix is always layered: remove the source,
wipe surfaces with a baking soda solution, and then set up a deodorizer that stays in the fridge. People often assume odors can be
sprayed away, but fridges are basically smell sponges. If you add fragrance, you’re not erasing the stinkyou’re creating a remix.
Then there’s the condiment ring collection: sticky circles left behind by salad dressing bottles and syrup containers.
It’s amazing how a single sticky drip can recruit crumbs and turn into a gritty, gross patch. A quick monthly bottle wipe
(yes, even the bottoms) prevents this from becoming a full interior deep clean. It’s also one of those tiny habits that makes your fridge feel
instantly more “adult,” like you suddenly have your life together… even if you don’t.
Many households also discover the door gasket reality the moment the fridge starts smelling “off” despite a clean interior.
Those gasket folds collect grime, and when moisture hangs around, it can get funky. The experience here is almost universal:
you wipe the gasket once and feel like you unlocked a hidden level of cleaning. Warm soapy water, a toothbrush for the folds,
and drying afterward can make a surprisingly big difference.
Finally, there’s the moment people clean the condenser coils for the first time and think,
“Wait… my fridge has been breathing THIS?” Dust and pet hair build up quietly until you vacuum it and pull out a small tumbleweed.
The fridge often runs smoother afterwardless cycling, better cooling, and sometimes fewer weird noises. It’s not glamorous,
but it’s one of those “I should’ve done this sooner” experiences that actually pays you back over time.
The best part: once your fridge is clean, you tend to treat it better. You rotate food faster, you spot spills earlier,
and you stop losing produce to the back-of-the-shelf abyss. A clean fridge doesn’t just look niceit changes how you use it,
and that’s the real hack.
Conclusion
Refrigerator cleaning doesn’t have to be a once-a-year crisis. With the right hackssoften stains instead of scrubbing,
detail the hidden grime zones, deodorize strategically, and don’t ignore coilsyou can keep your fridge cleaner, fresher,
and easier to manage all year. Start with one shelf today, and your future self (and your butter) will thank you.