Table of Contents >> Show >> Hide
- Before You Build: The “Make It Feel Good Underfoot” Checklist
- 24 Garden Path Ideas for a Backyard Outdoor Oasis
- 1) Brick-Lined Gravel for instant structure
- 2) Bluestone Steppers on stone dust for a quiet luxury look
- 3) Flagstone with planted joints (thyme, moss, or “tough little greens”)
- 4) Decomposed granite ribbon path for modern desert vibes
- 5) Pea gravel with metal edging for a crisp, budget-friendly walkway
- 6) Mulch path for a woodland garden that feels like a trail
- 7) Grass path with brick edging for “secret garden” energy
- 8) Herringbone brick for timeless curb appeal
- 9) Pavers with a contrasting border to frame the journey
- 10) Boardwalk-style wood path for a coastal or spa feel
- 11) Stepping stones in lawn for an easy mow-friendly path
- 12) Gravel with cobblestone curb for a formal garden look
- 13) “Urbanite” path made from broken concrete slabs
- 14) Checkerboard pavers with green pockets
- 15) Woodland rounds (log slices) for a playful, rustic trail
- 16) Raised-bed “work paths” with wood chips
- 17) Slate stepping stones for a sleek, dark accent
- 18) Mixed-material “transition path” to signal different zones
- 19) Curved path that reveals a focal point (bench, birdbath, or fire pit)
- 20) Wide gravel promenade with planting “shoulders”
- 21) Stone steps on a slope for safe, confident footing
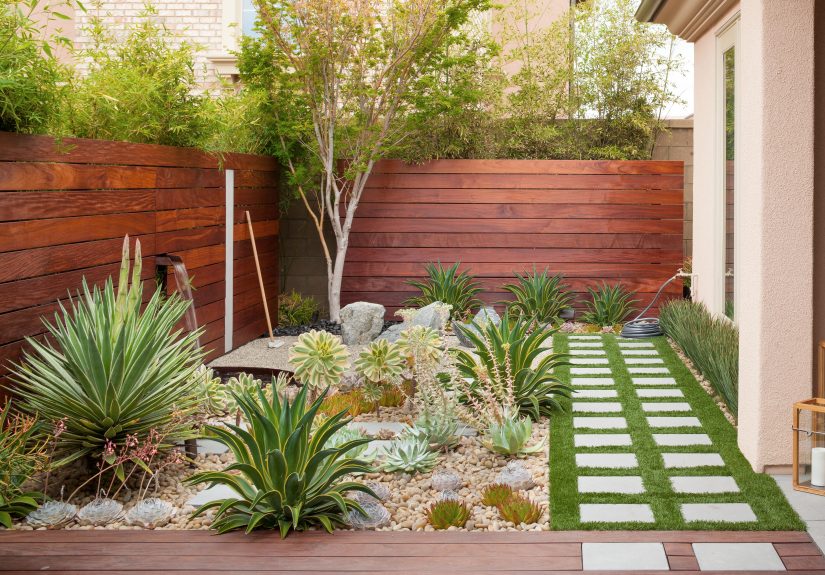
- 22) Permeable pavers for clean lines and better drainage
- 23) Japanese-inspired stepping stones in gravel for calm, minimalist style
- 24) Path lighting that feels magical (without looking like a runway)
- Quick Build Strategy: A Simple Gravel Path That Won’t Drive You Nuts
- Maintenance That Keeps Your Oasis Feeling Like an Oasis
- Experiences From Real-Life Path Projects: Lessons You Only Learn After You’ve Moved 37 Bags of Gravel
- Wrap-Up: Your Path Is the Storyline of Your Garden
A great garden path is basically a promise. It tells your guests, “Yes, you’re allowed to wander here,” and tells your
future self, “No, you’re not going to step on the basil again.” The best part? You don’t need a mansion or a
landscape architect who speaks exclusively in Latin plant names. With the right garden path ideas, you can turn a
plain yard into an outdoor oasis that feels intentional, welcoming, and just a little bit magical.
This guide breaks down the practical stuff (layout, drainage, materials, maintenance) and then serves up 24
backyard pathway ideas across stylesfrom cottage-core stepping stones to sleek modern pavers. You’ll also find a
longer “experience” section at the end with real-world lessons people learn after building paths (including the
surprisingly emotional journey of choosing edging).
Before You Build: The “Make It Feel Good Underfoot” Checklist
1) Decide what the path is for
Every walkway design is easier when you name its job:
- Primary route: front gate to door, patio to grill, shed to garden beds (needs sturdier footing).
- Garden stroll: a meandering loop for enjoying plants (more flexibility with materials and width).
- Utility path: between raised beds, to compost, or along a side yard (durable, easy to maintain).
If you’ll push a wheelbarrow or walk side-by-side, plan a comfortable width rather than a “single-file only” strip
(a common guideline is around 3–4 feet for many home paths).[1]
2) Aim for drainage, not puddles
Outdoor paths and standing water are a comedy duo you don’t want. A slight pitch helps water shed to the side
instead of pooling on top (some landscape guidance suggests about a 2% cross-slope where appropriate).[2]
If your yard already has drainage issues, solve the water story firstthen build the path as part of that solution.
3) Pick the right “feel”: firm, crunchy, or soft
The material you choose changes the whole vibe:
- Firm & clean: pavers, brick, flagstone, concrete (great for frequent use).
- Crunchy & casual: gravel, decomposed granite, pea stone (great drainage; needs edging).
- Soft & natural: mulch, bark, wood chips (budget-friendly; refresh periodically).
If stormwater and sustainability matter to you, consider pervious surfaces that let water soak in more slowly.
Examples often include mulch, stepping stones, gravel, porous concrete, and permeable/pervious pavers.[2]
4) Contain the chaos with edging
Loose materials “wander.” Gravel migrates. Mulch drifts. Your path will try to become a modern art installation
across the lawn. Edging is what keeps the lines crisp and the maintenance sanemetal, brick, cobbles, or sturdy
timbers are common choices.[1]
24 Garden Path Ideas for a Backyard Outdoor Oasis
Mix and match these garden path ideas based on your style, budget, and patience level. (No shame in choosing
“weekend project” over “epic saga.”)
1) Brick-Lined Gravel for instant structure
A gravel path becomes dramatically more “finished” when you border it with brick. The brick edge adds definition,
helps keep stones in place, and looks charming in both traditional and cottage gardens.[6]
2) Bluestone Steppers on stone dust for a quiet luxury look
Flat steppers (like bluestone) set over a compacted base read as high-end without screaming about it. A gently
winding layout softens the geometry and invites strolling.[7]
3) Flagstone with planted joints (thyme, moss, or “tough little greens”)
Flagstone is timeless. Let the joints do the decorating: creeping thyme for fragrance, moss for woodland charm,
or a tough ground cover for a lived-in look. This style feels like a garden you can sink into, not just walk
through.[8]
4) Decomposed granite ribbon path for modern desert vibes
Decomposed granite (DG) compacts into a firm, natural-looking surface that’s less “loose” than many gravels. Pair
it with steel edging for clean lines and a modern outdoor oasis feel.
5) Pea gravel with metal edging for a crisp, budget-friendly walkway
Pea gravel is one of the most approachable DIY materials, and metal edging keeps it from escaping into your
flowerbeds. It’s casual, bright, and great for drainagejust expect a little crunch soundtrack as you walk.
6) Mulch path for a woodland garden that feels like a trail
Mulch (or wood chips) is soft underfoot and forgiving to install. It’s ideal in shaded areas where you want a
natural trail feel. Add stepping stones in muddy zones to keep things practical.
7) Grass path with brick edging for “secret garden” energy
A simple grass walkway edged in brick feels romantic and old-worldespecially when the borders are slightly
imperfect. This is the path equivalent of a linen shirt: casual, classic, and oddly sophisticated.
8) Herringbone brick for timeless curb appeal
Brick laid in a herringbone pattern is durable and visually rich. Use it for a main garden route or a front
walkway where you want classic style with serious staying power.
9) Pavers with a contrasting border to frame the journey
Use one paver color for the main “runway” and another for the border. This makes even a straight path feel
intentionallike it was designed, not just installed because you got tired of muddy shoes.
10) Boardwalk-style wood path for a coastal or spa feel
A simple raised boardwalk can make damp or uneven areas navigable while adding a relaxing, resort-like aesthetic.
Use rot-resistant wood (or composite) and keep the lines clean.
11) Stepping stones in lawn for an easy mow-friendly path
A stepping stone path across turf is one of the fastest upgrades. Sink stones flush with the grass so you can mow
over them easily. Curves make it feel less like a “shortcut” and more like a feature.
12) Gravel with cobblestone curb for a formal garden look
A cobble curb elevates gravel instantly. It’s a classic pairing for formal layouts, but it also works in cottage
gardens if you let plants spill slightly over the edge (in a charming way, not a “help” way).[5]
13) “Urbanite” path made from broken concrete slabs
Reclaimed concrete pieces (often called urbanite) create a relaxed, eco-minded path with tons of character.
Arrange like irregular flagstone, then fill gaps with gravel or ground cover.
14) Checkerboard pavers with green pockets
Alternate pavers with planted spaces to soften hardscape. A tough ground cover (like creeping thyme) adds a
fragrant, living pattern that looks great from both up close and from a patio view.[4]
15) Woodland rounds (log slices) for a playful, rustic trail
Large wood rounds can act like stepping stones in informal areas. Use them in low-traffic zones, keep them level,
and expect to refresh/replace over time as nature does what nature does.
16) Raised-bed “work paths” with wood chips
Between raised beds, wood chips are a favorite because they suppress weeds, feel good underfoot, and are easy to
top off. Add a simple border if chips start migrating into your beds.
17) Slate stepping stones for a sleek, dark accent
If your plants are bright and lush, darker stone creates contrast. Slate feels modern and tidy, especially paired
with gravel infill and minimal edging.
18) Mixed-material “transition path” to signal different zones
Change materials when you move from one garden “room” to anothergravel to pavers, pavers to stepping stones, or
stone to mulch. It’s a subtle cue that you’ve entered a new space, like turning the page in a story.[4]
19) Curved path that reveals a focal point (bench, birdbath, or fire pit)
Straight paths are efficient; curved paths are intriguing. Use a curve to hide the destination until the last
moment, then “reward” the walk with a focal point.
20) Wide gravel promenade with planting “shoulders”
If you have space, go wider and frame the path with low shrubs, ornamental grasses, or perennials. A wide
walkway design makes the garden feel like a place to be, not just pass through.
21) Stone steps on a slope for safe, confident footing
On hills, a “path” often needs to become steps. Use stone treads or pavers, and build in level landings so the
route feels comfortable and safe in wet weather.
22) Permeable pavers for clean lines and better drainage
Permeable systems (like paver grids or pervious pavers) can deliver the polished look of hardscape with the water
friendliness of a more porous surface. They’re especially useful where runoff is a concern.[2]
23) Japanese-inspired stepping stones in gravel for calm, minimalist style
A few large, carefully placed stones in a sea of gravel can look serene and intentional. This style works best
with restraint: fewer materials, fewer colors, stronger impact.
24) Path lighting that feels magical (without looking like a runway)
Soft lighting makes a path safer and turns your backyard into an after-dark oasis. Aim for gentle guidance:
low-voltage fixtures, shielded lights, or solar accents placed to highlight edges and turns rather than blasting
everything like a stadium.
Quick Build Strategy: A Simple Gravel Path That Won’t Drive You Nuts
If you want a straightforward DIY win, gravel is often a sweet spot: affordable, adaptable, and friendly to
curves. Many common approaches include laying out the shape with a hose, excavating several inches, adding edging,
using landscape fabric to reduce weeds, and filling/leveling the gravel layer for a stable walking surface.[3]
The key “secret” is not secret at all: prep and containment (base + edging) make the path feel finished and stay
that way.
Maintenance That Keeps Your Oasis Feeling Like an Oasis
- Gravel/DG: rake occasionally, top off low spots, and keep edging tight.
- Mulch: refresh as it breaks down; pull weeds before they throw a party.
- Pavers/stone: sweep joints, spot clean algae in shade, and re-sand joints if needed.
- Planted joints: trim ground cover so it stays charming, not trippy.
Experiences From Real-Life Path Projects: Lessons You Only Learn After You’ve Moved 37 Bags of Gravel
People often start a garden path project thinking it’s mostly about picking a pretty material. Then reality shows
up wearing muddy boots and holding a level. The most common “experience-based” lesson is that layout is
emotional. On paper, a straight line looks efficient. In the yard, a slight curve can feel like an
invitation. Homeowners frequently walk the route a few times before buildingsometimes with a hose or rope as a
pretend borderbecause your body notices what your brain ignores. If you keep “cutting the corner” while testing
the route, that’s your future self leaving you a note: the path wants to be there.
The next big lesson is that drainage is the difference between “oasis” and “swamp cosplay.” A path
that holds water will quickly feel slippery, messy, and high-maintenance. Many DIYers learn this the hard way
after the first heavy rain, when puddles appear exactly where everyone steps. The fix is usually not dramaticit’s
small grading tweaks, a subtle pitch, or swapping a non-porous material for something more water-friendly. Once
you see how water moves across your yard, you start designing with it instead of fighting it. That’s when the
garden starts feeling calmer, too, because you’re no longer arguing with gravity.
Then there’s the surprisingly spicy topic of edging. People who skip edging often report the same
story: “It looked great for two weeks.” Loose gravel migrates like it’s trying to reach a warmer climate, and mulch
drifts into beds or lawns. Adding edging later is possible, but it’s like trying to install a zipper after you’ve
already put the jacket on. In practice, edging is less about being fussy and more about protecting your time. The
best-looking paths aren’t always the most expensivethey’re the ones that keep their shape through seasons of rain,
raking, and foot traffic.
Another real-life insight: the path’s “neighbors” matter as much as the path. A simple gravel
strip can look ordinary until you frame it with plants that brush the edges, repeat colors along the route, or
create small moments (a pot, a boulder, a bench). People often discover that a path becomes an oasis when it
guides you through scenes: sun-loving flowers at the bright end, ferns and hostas in shade, fragrance near the
sitting area, and a focal point that makes you slow down. Even one intentional “pause spot” changes the whole
experiencesuddenly the walkway isn’t just a connector; it’s part of the destination.
Finally, there’s the “I wish someone told me this” category: buy a little extra material. Gravel
settles, mulch decomposes, ground cover fills in slowly, and paver projects always seem to require one more piece
than you thought. Experienced DIYers often recommend planning for touch-ups from day onebecause the most relaxing
outdoor oasis is the one you can maintain without launching a full-scale weekend production every time a low spot
appears. When your path holds up quietlyno puddles, no runaway gravel, no wobbling stonesyou stop thinking about
it. And that’s the whole point: the path disappears so the garden can take center stage.
Wrap-Up: Your Path Is the Storyline of Your Garden
Whether you choose classic brick, crunchy gravel, or a flagstone walkway with fragrant thyme, the goal is the same:
make it easy (and delightful) to use your yard. Start with function, build for drainage, contain the edges, and
add personality through curves, mixed materials, and planting. Do that, and your outdoor oasis won’t just look
goodit’ll feel like a place you want to spend time, season after season.