Table of Contents >> Show >> Hide
- Quick Rules Designers Follow Before Hiding Anything
- 1) The Slatted Screen: The “Looks Expensive, Isn’t Complicated” Move
- 2) The Mini Trash Shed: For When Critters Treat Your Bin Like DoorDash
- 3) The Fence Extension “Trash Corral”: The HOA-Friendly, Disappears-in-Plain-Sight Solution
- 4) The Green Screen: Trellis + Tall Planting That Makes the Bins Feel “Garden Adjacent”
- 5) The “Disguise It as Something Else” Approach: Outdoor Cabinet, Bench, or Multi-Use Station
- Conclusion: The Best Hiding Spot Is the One You’ll Actually Use
- Extra: of “Real-World” Experience (a.k.a. What Usually Happens After You Hide the Bins)
Garbage cans are the unsung roommates of homeownership: necessary, loud on pickup day, and somehow always
standing exactly where you planned to take photos. The good news? Designers don’t just “hide” trash binsthey
give them a proper parking spot that protects curb appeal, keeps access easy, and (ideally) discourages raccoons
from hosting a midnight buffet.
Below are five designer-approved strategies that work for real homes: small side yards, narrow driveways,
townhouse patios, and “my HOA has opinions” neighborhoods. Each one includes layout tips, material choices,
and practical detailsbecause the goal isn’t to create a gorgeous hiding spot that becomes a daily obstacle course.
Quick Rules Designers Follow Before Hiding Anything
- Measure first: bin width, height (lid open!), and how far you need to roll it.
- Prioritize airflow: solid walls trap odor and moisture; slats and gaps help.
- Make it easy on pickup day: if it’s annoying, you won’t use it.
- Plan for cleanup: include a washable base (pavers or gravel) and drainage.
- Match what’s already there: repeating fence style, siding color, or trim makes it look intentional.
1) The Slatted Screen: The “Looks Expensive, Isn’t Complicated” Move
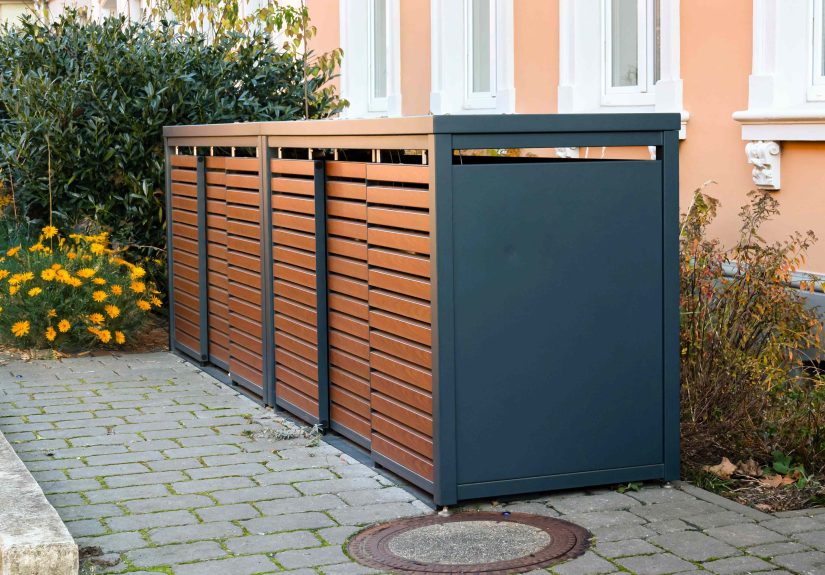
A slatted wood screen is the designer favorite for a reason: it hides the bins without sealing them in. The
look is clean and architecturalthink modern spa, not “temporary hiding place made of regret.” If you match the
wood tone or paint color to your fence, porch railings, or exterior trim, the screen reads like part of the home’s design.
Where it works best
- Side yard next to the garage or along a driveway
- Near a back gate where you want quick access
- Small patios where a full shed would feel bulky
Design details that make it feel “custom”
- Use consistent spacing: even gaps look intentional and let the area breathe.
- Build a U-shape: three panels create a corral without requiring a full structure.
- Add a gate only if you need it: sometimes one hinged panel is enough.
- Upgrade the hardware: outdoor-rated hinges and a simple latch prevent sagging and rattling.
Materials designers typically choose
Cedar is popular because it handles weather well and looks good even as it ages. Pressure-treated lumber is a
solid budget option if you paint or stain it. For a more contemporary feel, some homeowners use composite boards
or metal posts with wood slats.
Practical tip (the one you’ll thank yourself for)
Leave enough clearance above the bin for the lid to open inside the enclosure. This single detail separates
“designer-approved” from “why did I build this torture device.” If you can’t open the lid without rolling the bin out,
you’ll stop using the enclosure (and your bins will migrate back into view like homing pigeons).
2) The Mini Trash Shed: For When Critters Treat Your Bin Like DoorDash
If you’ve ever walked outside to discover your trash can “mysteriously exploded,” you already understand the appeal
of a small, purpose-built shed. This option is more enclosed than a screen and can be designed with a flip-top roof
(easy toss-in access) plus front doors (easy roll-out access). Done well, it looks like a tidy utility structurelike a
compact version of a garden shed.
Where it works best
- Homes with wildlife pressure (raccoons, stray animals, windy neighborhoods)
- Driveway corners where bins are visible from the street
- Backyards where you want a neat “service zone” near the garage
Designer specs that matter (not just the cute stuff)
- Ventilation: include vents, slats, or gaps so odors don’t stew.
- Washable base: pavers or a small concrete pad = easy hose-down.
- Overhang/roof detail: protects the lid area from rain and reduces grime.
- Lockable latch: simple solutions can discourage persistent critters.
Make it look like it belongs
Use the same siding style, stain tone, or paint color as your house or fence. A shed that “matches” reads as a
thoughtful extension of the property, not a random box you placed to hide your shame. Bonus points for adding a
small roofline that mirrors your home’s existing lines.
Cost and effort reality check
This is typically a weekend-to-several-weekend project depending on your tools and experience. The payoff is high:
it’s the most complete visual concealment option and tends to stay neat year-round.
3) The Fence Extension “Trash Corral”: The HOA-Friendly, Disappears-in-Plain-Sight Solution
If designers had a secret weapon for curb appeal, it would be “repeat existing elements.” A trash corral built from the
same fencing style you already have is practically invisible to the eyebecause it looks like it was always part of your yard.
This is especially helpful if you live somewhere with strict exterior rules: it’s not a new “structure,” it’s just… more fence.
(Try saying that with a straight face at an HOA meeting.)
Where it works best
- Side-of-house storage zones (especially near a gate)
- Front-adjacent driveway areas where bins are currently in view
- Homes with existing fencing you can extend cleanly
How designers keep it from looking clunky
- Align the height: match your existing fence height for continuity.
- Keep it tight: don’t build a big “room”; build a tailored pocket just larger than the bins.
- Use a simple gate: one gate panel with sturdy hinges is usually enough.
- Hide the view line: place the opening so it faces away from the street.
Best base options
A small paver pad is the neatest (and easiest to keep clean). Gravel is a good budget choice and helps with drainage,
but use edging so it doesn’t migrate into your lawn like it’s trying to start a new life elsewhere.
Small-space trick
If your side yard is narrow, build the corral so the bins roll straight out toward the driveway or gate rather than requiring a turn.
Turning a heavy bin in a tight space is how you end up with scratched fencing and a new, deeply personal grudge.
4) The Green Screen: Trellis + Tall Planting That Makes the Bins Feel “Garden Adjacent”
When you don’t want to build a structureor you want something softeruse landscaping as camouflage. Designers often
prefer layered screening: a trellis or slim panel behind tall plants, or a planter box in front of a screen. The result feels
like intentional garden design instead of “I shoved the bins behind a shrub and prayed.”
Where it works best
- Homes with limited room for a full enclosure
- Patios where you want something decorative and flexible
- Rental-friendly setups (containers and freestanding panels)
Plant choices that actually behave
- Evergreen shrubs: year-round coverage (no winter “surprise reveal”).
- Ornamental grasses: soft, tall, and forgivinggreat for hiding outlines.
- Climbing vines on a trellis: beautiful, but plan maintenance so it doesn’t swallow your gate.
Designer tip: build a “layer cake”
Start with a slim structure (trellis or screen) for consistent coverage, then add containers or planting in front for
depth and texture. This keeps the screen effective even when plants are between growth spurts. It’s the difference between
“beautiful year-round” and “looks great in June, looks like a crime scene in February.”
Low-maintenance upgrade
Choose planters with drip trays or a gravel base so water doesn’t pool where you roll the bins. Moist corners plus trash
residue equals “why does this area smell like a haunted sandwich?”
5) The “Disguise It as Something Else” Approach: Outdoor Cabinet, Bench, or Multi-Use Station
Designers love multi-use pieces because they earn their footprint. Instead of a dedicated “trash-only” structure, you can
build (or buy) something that reads like outdoor furniture: a storage bench with a lift-top section, an outdoor cabinet,
or a small service station that happens to hold bins behind doors. This is especially slick on patios where every square foot
needs to justify itself.
Where it works best
- Decks and patios where you want a furniture-like look
- Small yards where a shed feels too big
- Homes that want a more “designed” moment near the back door
What makes it work (and not smell)
- Ventilation: louvers, hidden gaps, or slatted doors
- Easy access: doors that open wide enough to roll bins in/out without wrestling
- Cleanable interior: sealed wood, outdoor-rated finishes, or removable liners
- Dedicated “drop zone”: a small shelf for extra bags, gloves, or recycling labels
Two designer-approved styling moves
- Make it match existing patio furniture. If you already have black metal and warm wood, repeat that combo.
Consistency is what makes the “trash station” feel like a normal part of the patio. - Add one intentional decorative element. A planter, a lantern, or a wall hook nearby makes the area feel curated
(instead of “the place where trash lives, sadly”).
Conclusion: The Best Hiding Spot Is the One You’ll Actually Use
The most designer-approved garbage can solution is the one that fits your daily routine. If you need quick access, go with a
slatted screen or fence corral. If critters or wind are the issue, a mini shed is worth the effort. If you want the softest look,
layer a trellis with tall plantings. And if you’re tight on space, disguise the whole thing as outdoor furniture or a cabinet.
Aim for three things: visual calm (curb appeal), daily convenience (no obstacle course),
and easy cleaning (because life happens). Do that, and your garbage cans can finally stop starring in the background
of every photo like they pay rent.
Extra: of “Real-World” Experience (a.k.a. What Usually Happens After You Hide the Bins)
Here’s the part most inspiration photos skip: the first week after you build a gorgeous enclosure, you realize your trash can
has needs. Emotional needs? No. Practical ones. Like “I require airflow,” “I would like a floor that isn’t mud,” and “please stop
making me do a three-point turn to get out on pickup day.”
Homeowners tend to learn lesson number one the hard way: if the lid can’t open inside the enclosure, you will stop using the
enclosure. Not because you’re lazybecause you’re human. You’ll tell yourself you’ll “roll it out every time,” and you will… until
the day you’re carrying chicken scraps, it’s raining sideways, and the bins are wedged behind a gate that now feels like it was
designed by someone who hates joy. The fix is simple: build for lid clearance. It’s not glamorous, but neither is holding a trash lid
open with your elbow like a contortionist.
Lesson number two: solid walls make smells worse. This surprises people because our instincts say “close it off.” But trash isn’t a
secret that can be contained by sheer willpower. Without ventilation, moisture and odor linger, and then your “beautiful enclosure”
becomes the neighborhood’s least fun scented candle. Slats, gaps, vents, and even a small open base line can make a big difference.
If you want the enclosure to feel fresh, design it like a breathable cabinet, not a sealed vault.
Lesson number three: the base matters more than you think. A paver pad sounds boring until you’ve tried to roll a heavy bin through
gravel that shifts, or across dirt that turns into pudding after a storm. People who do pavers (or a small concrete slab) almost always
say the same thing later: “I should have done this sooner.” It’s easier to sweep, easier to hose down, and it makes the whole area feel
finishedlike a real “service zone” rather than a random corner.
Lesson number four: raccoons are creative professionals. If you’ve ever seen one open a latch, you know I’m not exaggerating. The most
successful setups either reduce temptation (keep lids tight, rinse sticky containers, avoid leaving food waste loose) or use simple,
sturdy hardware. You don’t need to turn your backyard into a fortress, but you do want a latch that won’t pop open when a curious animal
uses it as a puzzle toy. Also, don’t underestimate wind: it can fling lids open and scatter lightweight recycling like confetti for a parade
nobody asked for.
Finally, there’s the “social” reality: neighbors and HOAs notice trash cans more than you think. The moment you hide them well, the whole
front-of-house feels calmer. It’s one of those subtle curb appeal upgrades that doesn’t scream “renovation,” but it quietly makes your home
look more polished. And on pickup day, when everyone else’s bins are lined up like plastic soldiers, yours has a designated place to return to.
It’s oddly satisfyinglike your house just got its act together.