Table of Contents >> Show >> Hide
- Jump to a Project
- Before You Start: The 10-Minute Supply Grab
- 1) Stop Drafts at Doors & Windows (Weatherstripping + Caulk)
- 2) Protect Pipes & Outdoor Faucets (Freeze-Proof Plumbing)
- 3) Give Your Heating System a “Pre-Game Warmup” (HVAC Quick Prep)
- 4) Clean Gutters & Fix Drainage (Ice Dam Prevention Starts Here)
- 5) Winterize the Water Heater (Wrap, Insulate, Set Smart Temps)
- 6) Run a Safety Sweep (CO, Smoke, Space Heaters, Chimneys)
- Quick FAQ: Last-Minute Winterizing Questions People Actually Ask
- Wrap-Up: Do These Before the Weather Does Its Thing
- of Real-World Winterizing Experience (What Pros See Every Year)
- SEO Tags
The weather app says “cold snap,” your neighbor says “ice storm,” and your house says “I’m fine” the way a toddler says “I didn’t eat the cookie” while wearing chocolate lipstick. If freezing temperatures are about to roll in, you don’t need a full-blown renovationyou need a smart, last-minute winterizing plan that targets the stuff that actually fails when it’s 17°F and the hardware store is packed like a concert.
Below are six fast winterizing projects that contractors, plumbers, and HVAC pros prioritize before the first hard freeze. They’re practical, weekend-friendly, and focused on preventing the big three: heat loss, frozen pipes, and safety hazards. Use this like a home winterization checklist, not a guilt trip.
Before You Start: The 10-Minute Supply Grab
Pros don’t “wing it” five minutes before the freeze. They stage supplies so the job stays quick. Here’s a common last-minute kit:
- Adhesive-backed weatherstripping (foam, V-seal, or rubber) + a door sweep
- Exterior-grade caulk + caulk gun (and a damp rag for cleanup)
- Foam pipe sleeves and/or pipe wrap, plus zip ties or tape
- Outdoor faucet covers (or insulating foam) and a bucket/towel for draining
- HVAC filter in the right size (take a photo of the old one)
- Gutter scoop or small plastic spatula, gloves, and a hose nozzle
- CO detector batteries (and smoke alarm batteries if needed)
- Flashlight/headlamp (because winterizing loves to happen at dusk)
Now, on to the projects that make the biggest difference before freezing temps hit.
1) Stop Drafts at Doors & Windows (Weatherstripping + Caulk)
If your home feels “cozy” only when you’re wearing two hoodies and holding soup, drafts are likely stealing heat. Pros start here because it’s fast, cheap, and immediately noticeable. Air leaks also make your furnace work harder, which is basically asking it to run a marathon in flip-flops.
What to do (fast and effective)
- Find the leaks. On a windy day, feel around window frames, door edges, and baseboards. You can also use a tissue: if it flutters, you’ve found a draft.
- Weatherstrip the moving parts. Add foam or V-seal to window jambs and door stops. Replace crushed, brittle, or missing strips.
- Add or replace a door sweep. That gap under the exterior door? It’s basically a “Welcome, Arctic Air” mat.
- Caulk the non-moving cracks. Seal gaps around window trim, exterior penetrations (cable lines, pipe entries), and where trim meets sidinganywhere that doesn’t move when opened/closed.
Pro tips that save time
- Clean first, seal second. Dusty surfaces make weatherstripping peel off at the exact moment you brag about fixing drafts.
- Don’t “overstuff.” Weatherstripping should compress when closednot fight the door like it owes you money.
- Prioritize comfort zones. Seal the rooms you actually use: bedrooms, living room, and any office space.
SEO note: This is one of the highest-ROI home winterization projects because it improves comfort and reduces heating loss without major construction.
2) Protect Pipes & Outdoor Faucets (Freeze-Proof Plumbing)
Frozen pipes don’t just freezethey expand. And when they thaw, they can split, leak, and turn your drywall into a sponge. Plumbers treat pipe protection like a pre-flight checklist: shut off, drain, insulate, and keep vulnerable areas warm.
Outdoor faucets: the “do this before dinner” checklist
- Disconnect garden hoses. If a hose stays attached, water can remain trapped and freeze in the faucet line.
- Shut off the indoor supply valve to exterior spigots (if your home has one), then open the outdoor faucet to drain.
- Drain what you can. Let it run until it stops, then leave it open briefly to release pressure.
- Cover the spigot. Use an insulated faucet cover or foam protection to reduce freezing risk.
Indoor pipes: protect the usual suspects
Focus on pipes in unheated or drafty areas: crawlspaces, basements, garages, exterior walls, and under kitchen or bathroom sinks.
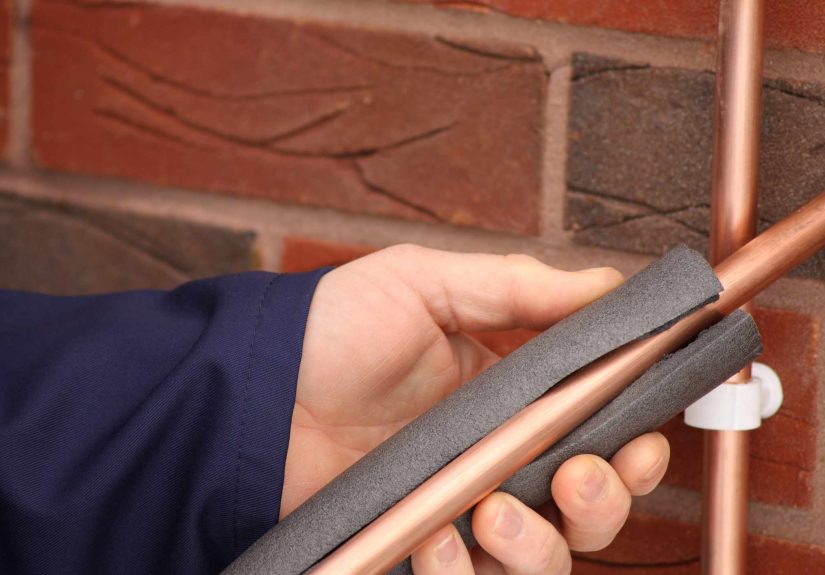
- Insulate exposed sections with foam sleeves or pipe wrap.
- Seal cold air entry points where pipes pass through walls (small gaps can funnel freezing air right onto the line).
- Open cabinet doors during extreme cold to let warm room air reach plumbing on exterior walls.
- Keep garage doors closed if plumbing runs through the garage.
Should you drip faucets?
In many homes, a slow drip on the most vulnerable faucet can help prevent freezing by keeping water moving and relieving pressure. But here’s the grown-up caveat: some cities and utilities discourage widespread dripping during major freeze events because it can reduce system pressure. Your best move is to follow local guidance for your area. If you do drip, target the fixtures fed by pipes on exterior walls and consider dripping both hot and cold lines with a single-handle faucet.
One more pro move: locate the main shutoff valve
Pros always know where the main water shutoff is before an emergency. If a pipe bursts, shutting off water quickly can be the difference between “minor cleanup” and “new flooring, new drywall, new life choices.”
3) Give Your Heating System a “Pre-Game Warmup” (HVAC Quick Prep)
The first cold night is not when you want to discover your furnace makes a noise like a haunted violin. HVAC pros do a quick readiness check: airflow, filter, thermostat, and safety basics.
Start with the simplest win: change the air filter
A dirty filter restricts airflow, can increase energy use, and may shorten equipment life. Replacing it is a five-minute task with “why didn’t I do this sooner” rewards.
- Check the size. It’s printed on the frame (take a photo before you go shopping).
- Install it correctly. Follow the airflow arrow on the filter.
- Set a reminder. During heavy heating season, many pros suggest checking monthly.
Run a heat test before the freeze hits
- Turn the thermostat up a few degrees and listen for normal startup.
- Walk the house and confirm warm airflow from registers/vents.
- Clear intake/exhaust vents (especially around high-efficiency units and any outdoor venting areas) so airflow isn’t blocked.
Quick efficiency upgrades that don’t feel like homework
- Reverse ceiling fans (clockwise) to circulate warm air down.
- Use a programmable or smart thermostat if you already have oneschedule heat for when you’re home, not when the house is empty.
- Don’t close too many vents. It can mess with system balance and pressure.
If you smell gas, hear repeated ignition attempts, or see unusual soot, skip DIY bravado and call a licensed HVAC pro.
4) Clean Gutters & Fix Drainage (Ice Dam Prevention Starts Here)
Pros care about gutters in winter because clogged gutters can trap meltwater. When that water refreezes, it helps create ice dams and can push water where it doesn’t belonglike under shingles or behind fascia. Winterizing your gutters is not glamorous, but neither is a ceiling stain shaped like regret.
Fast gutter cleaning (without turning it into a whole personality)
- Scoop debris into a bucket or bag (a small plastic scoop works great).
- Flush with a hose to confirm water flows to the downspouts.
- Check downspout exits so water drains away from the foundation.
Pro-level “last-minute” checks
- Look for sagging sections where water could pool and freeze.
- Extend downspouts so meltwater moves away from the home (reduces icy walkways, too).
- Keep attic heat in the attic. Ice dams often start when roof surfaces warm unevenlyattic air sealing and insulation help, but even sealing obvious attic hatch gaps can reduce heat loss quickly.
If you’re already seeing thick ice buildup on roof edges in winter, long-term solutions often involve attic insulation and ventilation. For this “last-minute” round, clear the drainage path and remove obvious clogs before temperatures plunge.
5) Winterize the Water Heater (Wrap, Insulate, Set Smart Temps)
Water heating is a major energy user in many homes, and cold seasons can make the system work harder. Pros focus on two fast upgrades: insulating the tank (when appropriate) and insulating hot water pipes so heat doesn’t vanish between the heater and the shower.
Insulate hot water pipes (quick comfort upgrade)
Wrapping accessible hot water pipes reduces heat loss and can help deliver warm water more efficientlyespecially when pipes run through cold basements or crawlspaces.
- Start near the water heater and cover straight runs first.
- Use foam sleeves or pipe wrap and avoid leaving gaps at seams.
- Don’t block controls or vents on appliances.
Add a water heater blanket (only when it makes sense)
For some electric water heaters (especially older ones), an insulating jacket can reduce standby heat loss. Gas water heaters are different: much of their heat loss goes up the flue, so a blanket may not provide the same benefitand you must never cover critical components.
Set the temperature wisely
Many homeowners keep water too hot “just in case.” Pros tend to aim for a practical balance: hot enough for comfort and sanitation needs, but not so hot that it wastes energy or increases scald risk. A commonly recommended target is around 120°F for many households (always consider local code and special health needs).
If your water heater is in an unheated garage or a cold basement corner, insulating nearby pipes and reducing drafts around that area can also help prevent cold-related performance issues.
6) Run a Safety Sweep (CO, Smoke, Space Heaters, Chimneys)
Winter safety isn’t just “don’t slip on ice.” It’s indoor air quality, carbon monoxide prevention, and making sure your backup heat plans won’t accidentally turn your home into a danger zone. Pros do a quick safety sweep before the first real freeze because winter storms and outages often push people toward space heaters, fireplaces, and generators.
Carbon monoxide and smoke alarms: test them now
- Test smoke alarms monthly and replace batteries when needed.
- Check CO detectors (especially if you have gas appliances, a fireplace, or attached garage).
- Replace old alarms according to manufacturer timelinesmany smoke alarms are replaced at about the 10-year mark.
Generator safety (if you own one)
If you lose power in freezing temps, generators can be lifesaverswhen used correctly. If used incorrectly, they can create deadly carbon monoxide buildup.
- Only run generators outdoors and keep them well away from doors, windows, and vents.
- Use heavy-duty outdoor-rated cords and keep cords out of standing water.
- Install battery-operated or backup CO detection in the home.
Space heaters and fireplaces: “cozy” should not mean “combustible”
- Give space heaters space. Keep them away from bedding, curtains, and furniture.
- Use the right fuel and ventilation. Never use charcoal grills or camp stoves indoors.
- Check chimneys and vents. Blockages can cause smoke and CO to backdraft into living areas.
A pro’s rule of thumb: if it burns fuel or makes flame, treat ventilation and alarms like non-negotiable gearnot “nice to have.”
Quick FAQ: Last-Minute Winterizing Questions People Actually Ask
What’s the most important thing to winterize first?
If you have any risk of freezing temps, prioritize plumbing protection (outdoor faucets and vulnerable pipes), then seal obvious drafts. Water damage is usually more expensive than a slightly higher heating bill.
How cold does it need to get for pipes to freeze?
It depends on insulation, wind exposure, and whether pipes run through unheated areas. Many homeowners start taking extra precautions around hard freezesespecially when temps drop into the 20s°F or below for sustained periods.
Can I do all six projects in one weekend?
Many homeowners can knock out most of these in a day or two if supplies are on hand. Pros move quickly because they focus on high-impact zones: entry doors, exterior walls, exposed pipes, gutters, filter, and safety devices.
Wrap-Up: Do These Before the Weather Does Its Thing
Winterizing doesn’t have to be a full-season sport. The pros keep it simple: stop the drafts, protect the plumbing, prep the heat, clear the drainage, tune the hot water, and make sure your safety gear is ready. Do those, and you’ll be ahead of the freezewhile everyone else is panic-buying faucet covers like they’re limited-edition sneakers.
of Real-World Winterizing Experience (What Pros See Every Year)
Pros who work winter callouts tend to tell the same stories on repeatbecause homeowners tend to make the same mistakes on repeat. If you want a little “learn from other people’s chaos” wisdom, here are the patterns that show up when freezing temps hit.
The Draft That Looked Harmless (Until It Became a Pipe Problem)
A tiny gap where a pipe enters the house doesn’t look dramatic. It’s not a gaping hole. It’s not a broken window. It’s a “maybe I’ll seal that later” situation. Then a cold wind finds it, concentrates through that opening like a mini wind tunnel, and chills the pipe section sitting right behind the drywall. The living room still feels okay, so nobody suspects a thinguntil the faucet slows to a sad drip and the panic begins. The takeaway pros repeat: air sealing isn’t just about comfort. A small draft can create a freezing microclimate in a wall cavity.
The Outdoor Hose That Refused to Let Go
One of the most common “why is my pipe burst?” surprises is an outdoor hose left attached to a spigot. When the temperature drops, water trapped in the hose and faucet assembly freezes and expands. Homeowners often assume a faucet cover alone is enoughthen they learn that insulation can’t fix water pressure trapped behind ice. The simplest habit (disconnecting hoses and draining the line) prevents a whole category of expensive repairs.
The Furnace Filter No One Wanted to Talk About
In a perfect world, everyone changes filters on schedule. In the real world, filters often look like they’ve been collecting dust since the last presidential administration. HVAC techs will tell you the first deep cold snap is when a struggling system finally shows its cards: weak airflow, short cycling, strange smells, and rooms that never quite warm up. A fresh filter won’t fix every problem, but it removes a common restriction that makes the system work harder. In winter, “harder” usually means “more expensive and more likely to fail at 2 a.m.”
The Gutter Situation That Turns Into an Indoor Situation
Homeowners often treat gutters like a fall chore, not a winter protection system. But in colder climates, pros see clogged gutters contribute to water backing up and freezing along roof edges. Once ice forms, it can trap meltwater and send it under shingles or into places you really don’t want moisture. The nightmare isn’t just the ice outsideit’s the slow leak inside that stains ceilings, warps trim, and shows up right when guests arrive. Cleaning gutters isn’t glamorous, but it’s one of those jobs where “gross and quick” beats “beautiful and flooded.”
The “We’ll Just Use a Space Heater” Plan
During outages, people improvise. Pros don’t judge the improvisationthey judge the dangerous improvisation. The big lessons: keep space heaters away from anything that can burn, never use outdoor cooking equipment indoors, and treat carbon monoxide detection like a must-have. If you own a generator, set it up correctly before the storm so you’re not making high-stakes decisions in the dark while your fingers are freezing.
The punchline of all these stories is the same: winter doesn’t demand perfection. It demands preparation. The six projects above are the “pros always do this” basics because they prevent the most common cold-weather failureswithout requiring a remodel, a miracle, or a YouTube degree.