Table of Contents >> Show >> Hide
- Why Use Chalkboard Paint on a Door?
- Choose the Right Door for the Project
- Supplies You Will Need
- Step-by-Step: How To Turn A Door Into A Message Board With Chalkboard Paint
- Step 1: Remove Hardware or Tape Around It
- Step 2: Clean the Door Thoroughly
- Step 3: Repair Dents, Holes, and Scratches
- Step 4: Sand the Surface
- Step 5: Tape Off the Design
- Step 6: Apply Primer
- Step 7: Roll on the Chalkboard Paint
- Step 8: Remove Tape Carefully
- Step 9: Let the Paint Cure
- Step 10: Season the Chalkboard Surface
- Design Ideas for a Chalkboard Door Message Board
- Common Mistakes to Avoid
- How to Clean and Maintain a Chalkboard Door
- Creative Finishing Touches
- Extra Experience: What I Learned From Making a Chalkboard Door Message Board
- Conclusion
A regular interior door is useful. It opens. It closes. It occasionally gets slammed when someone is “not mad, just tired.” But with a little chalkboard paint, that same door can become a family command center, a grocery list, a doodle wall, a weekly menu, a homework reminder station, or the official headquarters for notes like “Buy milk” and “Stop buying milk, we now have four.”
Turning a door into a message board with chalkboard paint is one of those DIY projects that looks clever, costs far less than replacing the door, and does not require you to own a garage full of mysterious tools. The key is preparation. Chalkboard paint is forgiving in style but picky about surfaces. If the door is dusty, glossy, greasy, dented, or painted with an old finish that is flaking like a croissant, your new message board may not last.
This guide walks you through the whole process: choosing the right door, gathering supplies, cleaning and sanding, priming, painting, curing, seasoning the chalkboard surface, and styling the final result so it looks intentional rather than “we let a toddler redesign the pantry.” By the end, you will know exactly how to turn a door into a message board with chalkboard paint and make it both beautiful and useful.
Why Use Chalkboard Paint on a Door?
A door is one of the best places for a chalkboard message board because it uses vertical space you already have. No extra wall space? No problem. A pantry door, mudroom door, laundry room door, closet door, or kitchen entry door can become a functional writing surface without taking up a single inch of floor space.
Unlike a framed board, a chalkboard door feels built in. It can blend with farmhouse, modern, industrial, cottage, or family-friendly decor. Black chalkboard paint creates a bold accent, while green or custom-colored chalkboard paint can soften the look. Some brands also offer tintable chalkboard paint, giving you more freedom if classic black feels a little too “middle school math test.”
Best Uses for a Chalkboard Door
A chalkboard door can serve many purposes, depending on where it is located. In the kitchen, it can hold grocery lists, meal plans, recipes, or coffee-related emergency notes. In a mudroom, it can remind everyone about sports practice, library books, keys, backpacks, or “please remove muddy shoes before the floor files a complaint.” In a kid’s room, it becomes a safe place for doodles and creativity. In a home office, it can hold project reminders, deadlines, quotes, or quick brainstorming notes.
The beauty of chalkboard paint is that it turns a plain surface into a flexible tool. Today it is a calendar. Tomorrow it is a birthday countdown. Next week it is a dramatic chalk portrait of the family dog wearing sunglasses. That is the kind of home improvement we can all support.
Choose the Right Door for the Project
Before you open the paint can, look closely at the door. A flat-panel interior door is the easiest option because the surface is smooth and simple to roll. A raised-panel door can also work, but it requires more careful painting around the trim, grooves, and edges. If your door has deep panels, you may choose to paint only the center panels with chalkboard paint and leave the rails and stiles in a contrasting color.
Wood, MDF, and previously painted interior doors are good candidates. Metal doors can also be painted, but they usually need a primer that works well on metal. Glossy doors need extra sanding so the paint can grip. Very damaged doors should be repaired before painting, because chalkboard paint will not magically hide dents, gouges, or old brush marks. It is paint, not a magician with a tiny roller.
Safety Note for Older Doors
If your home was built before 1978, be careful before sanding or scraping old paint. Older paint may contain lead, and sanding can create hazardous dust. Use a lead test kit or consult a certified professional before disturbing old painted surfaces. This is not the fun part of the project, but it is the responsible part, which is basically the vegetable side dish of DIY.
Supplies You Will Need
Gathering supplies before you start keeps the project smooth and prevents the classic DIY moment where you are holding a wet paintbrush and suddenly realize the painter’s tape is in the car, the car keys are in the kitchen, and the kitchen is blocked by a drop cloth.
Basic Materials
- Chalkboard paint
- Quality primer suitable for your door surface
- Fine-grit sandpaper or sanding sponge
- Painter’s tape
- Drop cloth
- Foam roller or high-density mini roller
- Small angled brush
- Clean cloths or tack cloth
- Mild cleaner or degreaser
- Wood filler or spackle for dents and holes
- Screwdriver for removing hardware
- Traditional chalk for seasoning
A foam roller is especially helpful because it creates a smoother finish than a thick nap roller. Smoothness matters because chalkboard paint needs an even surface for writing and erasing. If the door dries with heavy roller texture, your grocery list may look like it was written during a minor earthquake.
Step-by-Step: How To Turn A Door Into A Message Board With Chalkboard Paint
Step 1: Remove Hardware or Tape Around It
The cleanest approach is to remove the doorknob, latch plate, hooks, and any other hardware before painting. Use a screwdriver and keep the screws in a small cup or plastic bag. Label the bag if you are the type of person who owns multiple small cups of mystery screws. If removing the hardware is not practical, tape around it carefully with painter’s tape.
If possible, take the door off its hinges and lay it flat on sawhorses. This helps prevent drips and gives you better control. However, you can paint the door while it is still hanging. Just open it fully, protect the floor, and tape off hinges and trim.
Step 2: Clean the Door Thoroughly
Cleaning is not glamorous, but it is the difference between paint that sticks and paint that peels while judging you. Doors collect fingerprints, grease, dust, pet hair, and mysterious smudges from daily life. Wash the surface with a mild cleaner or degreaser, then wipe it with clean water and let it dry completely.
Pay special attention to areas around the handle. That spot usually has the most oils from hands. Chalkboard paint needs a clean surface to bond well, so do not skip this step. A clean door gives your primer and paint a fighting chance.
Step 3: Repair Dents, Holes, and Scratches
Inspect the door for nail holes, dents, cracks, or chipped areas. Fill imperfections with wood filler or spackle, depending on the door material. Let the filler dry according to the product directions, then sand it smooth. The goal is not perfection worthy of a museum curator, but the writing surface should feel even under your hand.
If your door has peeling paint, remove the loose paint safely and feather the edges with sandpaper. Do not paint over peeling areas and hope for the best. Hope is great for birthday candles, not paint adhesion.
Step 4: Sand the Surface
Lightly sand the door with fine-grit sandpaper or a sanding sponge. You do not need to strip the door down to bare wood. You simply want to dull the glossy finish and create a surface that primer can grip. If the door is very shiny, spend a little extra time scuffing it evenly.
After sanding, remove dust with a vacuum brush attachment, tack cloth, or slightly damp cloth. Dust left behind can create bumps under the paint, and bumps are not exactly what you want on a message board. Your future chalk letters deserve better.
Step 5: Tape Off the Design
Decide whether you want to paint the entire door or only part of it. Painting the entire flat surface creates a dramatic statement and gives you maximum writing space. Painting only the center panel creates a framed chalkboard look, especially on raised-panel doors.
Use painter’s tape to mark clean edges. Press the tape firmly along the edge to prevent paint bleed. If you are painting panels, use a small angled brush for corners and grooves, then roll the larger flat areas. Keep your design simple unless you enjoy spending your weekend negotiating with tape like it owes you money.
Step 6: Apply Primer
Primer helps chalkboard paint adhere better and creates a uniform base. This is especially important on bare wood, glossy surfaces, patched areas, or doors with strong previous colors. Use a primer recommended for your door material. For wood that may bleed tannins, choose a stain-blocking primer.
Apply primer in a thin, even coat. Brush first around edges, grooves, and taped areas, then roll the flat sections. Let the primer dry fully. If the surface feels rough after priming, sand it lightly and wipe away dust before applying chalkboard paint. A smooth base gives you a smoother writing surface.
Step 7: Roll on the Chalkboard Paint
Stir the chalkboard paint thoroughly before using it. Do not shake it like a protein drink unless the manufacturer specifically allows it; shaking can create bubbles. Pour a small amount into a tray and apply the paint with a foam roller in thin, even coats.
Start at the top and work downward. Use the angled brush for detailed edges, then roll the main sections. Avoid overworking the paint once it starts to set. If you keep rolling over drying paint, you can create texture, streaks, or tiny roller marks that show later.
Most chalkboard paint projects need at least two coats. Some doors may need three, especially if you are covering a lighter color or want a richer finish. Follow the recoat time on the label. Rushing between coats can trap moisture and weaken the finish. In DIY, patience is usually cheaper than repainting.
Step 8: Remove Tape Carefully
Remove painter’s tape while the final coat is still slightly soft, or score the edge gently with a utility knife after it dries. Pull the tape back at an angle for a crisp line. If you painted the entire door, check the edges for drips and touch them up before the paint cures.
If you removed the door hardware, wait until the paint is dry enough to handle before reinstalling it. Be gentle around the knob area. Fresh paint may feel dry to the touch before it has fully hardened.
Step 9: Let the Paint Cure
This is the part where everyone gets impatient. Chalkboard paint often needs several days to cure before you write on it. The surface may feel dry earlier, but curing allows the coating to harden properly. Always follow the manufacturer’s instructions, because cure time can vary by product, temperature, humidity, and coat thickness.
Do not write on the door too soon. Do not test it with “just one tiny smiley face.” That tiny smiley face may become a permanent ghost haunting your beautiful new board. Let the surface cure properly and your chalkboard door will erase more cleanly.
Step 10: Season the Chalkboard Surface
Before using the door as a message board, season the chalkboard. Take a piece of traditional white chalk and rub the side of it over the entire painted area. Cover the surface lightly, then erase it with a soft cloth or chalkboard eraser. This step helps prevent the first writing from leaving a stubborn shadow.
Use regular chalk rather than liquid chalk markers unless your paint label says the surface can handle them. Liquid chalk can stain some chalkboard finishes, especially if left on too long. Traditional chalk is safer, softer, and easier to erase. It also gives the door that classic chalkboard charm, minus the cafeteria flashbacks.
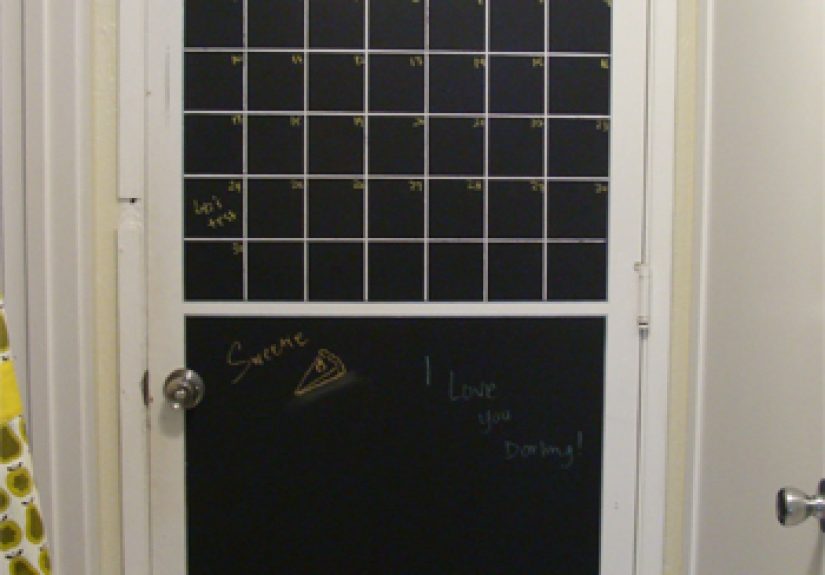
Design Ideas for a Chalkboard Door Message Board
Create a Family Command Center
Turn the door into a weekly organizer by drawing sections for meals, appointments, chores, and reminders. Use chalk lines to divide the board into simple zones. For example, the top can show the week’s schedule, the middle can hold a grocery list, and the bottom can be reserved for kid doodles or motivational quotes.
To keep it tidy, add small labels like “Dinner,” “To Buy,” “Don’t Forget,” and “Big News.” Suddenly, your family has one central place to check before leaving the house. Will they still forget water bottles? Possibly. But now the reminder had a fighting chance.
Make a Pantry Door Grocery List
A pantry door is one of the most practical spots for chalkboard paint. When you run out of pasta, cereal, snacks, or the one spice you only remember when the recipe is already simmering, write it on the door immediately. This prevents the classic grocery store experience of staring into space and thinking, “I know I came here for something.”
You can divide the door into categories such as produce, dairy, pantry, freezer, and household items. This makes shopping faster and keeps the list from becoming a chalky cloud of random nouns.
Use It as a Kids’ Art Zone
A chalkboard door can give children a creative place to draw without sacrificing your walls, furniture, or important paperwork. Keep chalk in a nearby basket and teach kids to erase when they are done. If the door is in a playroom or bedroom, paint the lower portion only so little artists can reach it easily.
For extra fun, add a simple frame around the chalkboard area with trim or paint. It makes the door look polished and tells everyone, “This is art,” even when the artwork is mostly circles, dragons, and a suspiciously large number of stick figures.
Build a Home Office Brainstorming Board
In a home office, a chalkboard door can hold project notes, content ideas, deadlines, or daily priorities. It is especially useful if your desk space is small. Instead of sticky notes forming a paper jungle, you can keep your reminders on one erasable surface.
Use headings like “Today,” “This Week,” and “Waiting On.” The door becomes a visual productivity board that you can update quickly. It is also much harder to lose than a sticky note, unless you lose the entire door, in which case we have bigger questions.
Common Mistakes to Avoid
Skipping Surface Prep
The most common mistake is painting over a dirty or glossy door without cleaning, sanding, or priming. Chalkboard paint needs a stable surface. If the door is slick, dusty, or oily, the finish can peel, scratch, or wear unevenly.
Applying Paint Too Thickly
Thick coats may seem faster, but they dry slowly and can create texture. Thin coats are smoother and stronger. If you need more coverage, add another thin coat after the recommended recoat time.
Writing Before the Paint Cures
A fresh chalkboard door is exciting. It is also not ready for your grocery list five minutes after painting. Let the surface cure fully before use. Your patience will be rewarded with cleaner writing and easier erasing.
Using the Wrong Chalk Products
Traditional chalk is usually the safest option. Some chalk markers may stain or require special cleaning. Test any new marker in a small hidden area first, or stick with regular chalk for everyday use.
How to Clean and Maintain a Chalkboard Door
For daily cleaning, use a soft dry cloth or chalkboard eraser. For deeper cleaning, wipe gently with a slightly damp cloth, then let the surface dry before writing again. Avoid harsh cleaners unless the paint manufacturer recommends them.
If the board starts to look cloudy, re-season it by rubbing chalk over the surface and erasing it again. If the finish becomes scratched after years of use, lightly sand the worn area, clean it, and apply a fresh coat of chalkboard paint. A chalkboard door is easy to refresh, which is one reason this project stays popular with busy households.
Creative Finishing Touches
Small details can make your chalkboard door look custom. Add a narrow wood trim frame around the painted area. Install a small cup hook or rail nearby for chalk storage. Use a magnetic strip for coupons or notes if your door surface supports it. Add a small basket on the wall next to the door for chalk, erasers, and grocery coupons.
You can also pair the chalkboard door with a contrasting paint color on the surrounding trim. White trim creates a crisp farmhouse look. Natural wood feels warm and rustic. Brass or matte black hardware can make the whole project look more intentional. The goal is to make the door feel like part of your home, not like a school board wandered in and got lost.
Extra Experience: What I Learned From Making a Chalkboard Door Message Board
The first thing you learn when turning a door into a message board with chalkboard paint is that the project is simple, but not instant. It feels like it should be a one-afternoon miracle. In reality, the painting part is quick, while the waiting part is where your character develops. The door may look finished after the second coat, but the surface still needs time to cure. I learned that the best way to survive this stage is to put a note on the door that says, “Do not write on this yet,” which is funny because the whole point is eventually writing on the door.
Another lesson is that smoothness matters more than you think. A door that feels “pretty smooth” before painting can look surprisingly textured once chalkboard paint dries. Tiny bumps, dust specks, and old brush marks become more visible on a dark matte finish. Taking ten extra minutes to sand between primer and paint can make the final result feel much more professional. It is not the kind of detail guests will notice directly, but they will notice that the chalk writes nicely and erases cleanly.
I also found that painter’s tape is both a friend and a tiny test of patience. Pressing the tape edge firmly is worth it. If you are painting only the center panel of a door, spend time getting the lines straight. A crooked chalkboard rectangle will bother you forever, especially when you are trying to write a peaceful grocery list and your eye keeps twitching at the lower left corner.
Seasoning the board is another step that seems optional until you skip it. A fresh chalkboard surface can hold onto the first words written on it. Rubbing the entire surface with the side of a chalk stick and wiping it clean gives the board a soft, broken-in finish. It also removes that too-perfect look, which is nice because a message board is meant to be used, erased, smudged, and used again.
One of the best practical decisions is choosing the right location. A pantry door works beautifully because grocery reminders happen naturally there. A mudroom door is great for schedules and sports gear reminders. A bedroom door can work for kids, but it may become more art wall than message center. That is not a bad thing, but it is something to expect. Give children a chalkboard door and they will not write “Finish homework” first. They will draw a dinosaur, a spaceship, or a cat with suspiciously human eyebrows.
Maintenance is easier than expected, but chalk dust is real. Keep a small microfiber cloth nearby and avoid overloading the surface with chalk. If you like a crisp, clean look, erase once a week and rewrite only what is current. If you like a lived-in style, let it collect doodles, quotes, lists, and notes. A chalkboard door does not have to be perfect to be useful. In fact, the charm comes from the way it changes with your household.
The biggest benefit is that a chalkboard door makes communication visible. Instead of reminders getting buried in phones, notebooks, or mental fog, they sit right where people pass every day. It turns an ordinary door into a small household hub. And unlike many DIY projects, it does not demand a major renovation, expensive materials, or advanced carpentry skills. It is a weekend-friendly upgrade with everyday payoff.
My final advice is simple: prep carefully, paint patiently, cure completely, and keep the first design simple. Once the surface is ready, you can experiment with calendars, menus, quotes, lists, and seasonal drawings. A chalkboard door is not just a decorative project. It is a practical little communication system wearing a very stylish black outfit.
Conclusion
Learning how to turn a door into a message board with chalkboard paint is a smart way to add function, personality, and a little playful charm to your home. With the right prep, primer, smooth coats, proper curing time, and a quick seasoning step, an ordinary door can become a writable and erasable surface for grocery lists, family schedules, creative doodles, meal plans, and daily reminders.
The project is affordable, beginner-friendly, and flexible enough for kitchens, mudrooms, bedrooms, playrooms, and home offices. Best of all, it gives a hardworking surface a second life. Your door still opens and closes, but now it also reminds everyone to buy eggs, take out the trash, and maybe smile before leaving the house. That is a pretty impressive promotion for a door.
Note: This article was created from a synthesis of real DIY painting practices, manufacturer-style chalkboard paint guidance, interior door painting methods, and home safety recommendations. Always follow the instructions on your specific paint and primer labels before starting.