Table of Contents >> Show >> Hide
- What Is an ATtiny?
- Why Developers Still Love ATtiny Chips
- The Usual Problem: Programming an ATtiny Can Be Awkward
- What Makes an IDE “Tiny”?
- A Brief Look at the “A Tiny IDE For Your ATtiny” Idea
- Popular Ways to Program an ATtiny
- Key Features to Look for in a Tiny ATtiny IDE
- Example Project: Shrinking an Arduino LED Controller
- ATtiny Programming Tips for Better Results
- When a Tiny IDE Is Better Than a Full IDE
- When You Should Use a Bigger Tool Instead
- Common ATtiny Mistakes to Avoid
- Practical Experience: What It Feels Like to Work With a Tiny IDE for ATtiny
- Conclusion
There is something delightfully ridiculous about programming a microcontroller small enough to disappear under a stray resistor. The ATtiny family, especially chips like the ATtiny85, ATtiny84, ATtiny10, and newer tinyAVR parts, has earned a loyal following because it lets makers build compact, low-power, inexpensive electronics without dragging a full-size development board into every project. But there is one tiny catch: writing and uploading code to an ATtiny can feel less tiny than the chip itself.
That is where the idea of a tiny IDE for your ATtiny becomes so appealing. Instead of wrestling with scattered command-line tools, board packages, programmer settings, fuse bits, datasheets, pinout diagrams, and that one USB cable that apparently only charges phones, a compact development environment can bring the important pieces together. The goal is simple: write code, compile it, upload it, test the circuit, and get back to building the thing you actually wanted to build.
This guide explores what a tiny ATtiny IDE is, why ATtiny microcontrollers are still loved by hobbyists and embedded developers, how popular workflows compare, and what you should know before choosing a programming setup. Whether you are blinking an LED, building a battery-powered sensor, shrinking an Arduino prototype, or squeezing logic into a chip with only a few pins, the right development environment can make the ATtiny feel less like a puzzle box and more like a pocket-sized superpower.
What Is an ATtiny?
ATtiny microcontrollers are members of Microchip’s AVR family, originally developed by Atmel before Microchip acquired the company. They are small 8-bit microcontrollers designed for simple control tasks, low-power applications, and compact circuits. Depending on the model, an ATtiny may offer flash memory, SRAM, EEPROM, timers, analog-to-digital conversion, PWM outputs, SPI, I2C-like interfaces, or serial communication options.
The classic ATtiny85 is one of the best-known examples. It comes in an approachable 8-pin package, has enough memory for many small projects, and can be programmed with Arduino-style code when the correct core is installed. Other chips, such as the ATtiny84, provide more pins. The ATtiny10 goes even smaller, which is charming until you realize your fingers are larger than the entire device. Newer tinyAVR 0-series, 1-series, and 2-series chips modernize the family with improved peripherals and different programming methods.
Why Developers Still Love ATtiny Chips
The ATtiny family survives because it solves a very specific problem: not every project needs a large board. If your circuit only needs to read a button, dim an LED, control a relay, measure a sensor, generate a tone, or wake up every few minutes to send a signal, a full Arduino Uno can be overkill. It is like using a moving truck to deliver a sandwich.
Small Size
ATtiny chips are excellent for projects where board space matters. Wearables, toys, custom keyboard accessories, miniature robots, holiday decorations, and hidden sensor nodes can all benefit from a microcontroller that does not dominate the circuit.
Low Power Consumption
Many ATtiny projects run from coin cells, AA batteries, lithium cells, or small solar setups. With careful sleep-mode programming, lower clock speeds, and minimal peripherals, these chips can sip power politely instead of guzzling it like a desktop computer with trust issues.
Low Cost
For production runs, educational kits, or repeated hobby builds, cost matters. A small ATtiny can replace a larger board once the prototype is working. This makes it attractive for makers who want to move from breadboard spaghetti to a cleaner custom PCB.
Enough Power for Simple Jobs
An 8-bit AVR is not going to run a neural network, stream video, or host a modern web dashboard. But for timing, sensing, switching, blinking, beeping, and controlling, it often has exactly enough horsepower. That “exactly enough” quality is why embedded developers enjoy it.
The Usual Problem: Programming an ATtiny Can Be Awkward
Unlike many Arduino boards, most standalone ATtiny chips do not arrive with a USB connector, serial converter, reset circuit, bootloader, and friendly board name already waiting inside the Arduino IDE. A bare ATtiny is just the chip. It needs power, proper wiring, a programmer, the right board definition, and sometimes fuse configuration before it behaves.
Traditional workflows usually fall into three camps. First, you can add ATtiny support to the Arduino IDE using a third-party core such as ATTinyCore. Second, you can use professional embedded tools such as Microchip Studio, avr-gcc, avr-libc, Makefiles, and avrdude. Third, you can use a modern embedded environment like PlatformIO inside Visual Studio Code. All three approaches work, but each one asks the beginner to learn a different stack of tools.
A tiny IDE for ATtiny aims to reduce that friction. It is not about making the chip more powerful; it is about making the workflow less dramatic.
What Makes an IDE “Tiny”?
A tiny IDE is not necessarily tiny in file size, though that helps. It is tiny in spirit. It focuses on what ATtiny developers actually need instead of dragging in a massive interface built for every processor under the sun. The best small development environment for ATtiny programming should feel direct, fast, and understandable.
Code Editing
At minimum, the IDE should provide a clean code editor for C, C++, Arduino-style sketches, or assembly. Syntax highlighting, search, indentation, and simple file management make a big difference when you are debugging a missing semicolon at midnight.
Compilation
The IDE should know how to call the AVR toolchain. That may involve avr-gcc, avr-g++, avr-as, avr-ld, and supporting libraries such as avr-libc. The user should not need to memorize compiler flags before making a pin go high.
Uploading
Uploading is where many ATtiny beginners get stuck. The IDE should support common programmers such as USBasp, USBtinyISP, Arduino as ISP, Atmel-ICE, or compatible devices. It should also make it clear whether the chip uses ISP, UPDI, TPI, or another programming interface.
Device Selection
Choosing the wrong chip definition can create confusing errors. A useful ATtiny IDE should make it easy to select the exact microcontroller, clock speed, programmer, and upload method.
Pinout Help
Pin numbering is one of the classic ATtiny traps. Physical pin numbers, Arduino pin numbers, port names, and datasheet names may all describe the same tiny leg from different angles. A built-in pinout view can save hours of “why is PB3 not pin 3?” confusion.
A Brief Look at the “A Tiny IDE For Your ATtiny” Idea
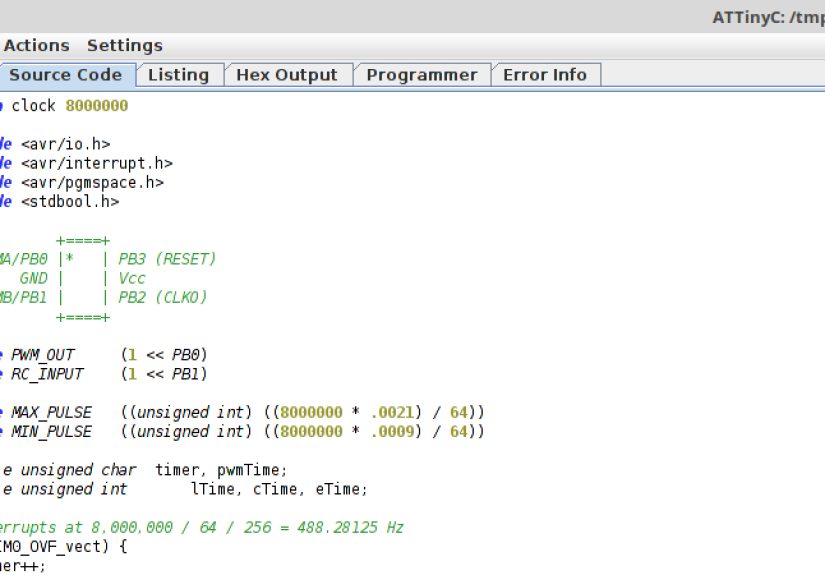
The phrase “A Tiny IDE For Your ATtiny” became popular in the maker community through a Hackaday feature about an open-source, cross-platform IDE project by Wayne Holder. The project reportedly began as a way to program the ATtiny10 in C on macOS and expanded into a broader development environment for ATtiny chips using C, C++, and assembly.
The important idea was not simply “another editor exists.” The exciting part was integration. A small IDE that combines editing, programming, and built-in documentation gives ATtiny users a more focused workshop. Instead of switching between a text editor, terminal, pinout PDF, programmer manual, and forum thread from 2014, the developer can stay closer to the code and the circuit.
Popular Ways to Program an ATtiny
Arduino IDE with ATTinyCore
For many hobbyists, the Arduino IDE remains the easiest entrance. With ATTinyCore installed through Boards Manager, the IDE can support a wide range of classic ATtiny chips. This approach is beginner-friendly because it keeps the familiar Arduino structure: setup(), loop(), pinMode(), digitalWrite(), and libraries where compatible.
The advantage is speed. If you already know Arduino, you can move a small project to an ATtiny without relearning embedded development from zero. The disadvantage is abstraction. Arduino functions are convenient, but they may use more memory and CPU cycles than direct register programming. On a chip with limited flash and RAM, that overhead sometimes matters.
Arduino as ISP
One of the most popular low-cost programming methods is to use an Arduino board as an in-system programmer. The ArduinoISP sketch turns a supported Arduino board into a programmer for other AVR chips. You connect power, ground, reset, MOSI, MISO, and SCK between the Arduino and the ATtiny, select the correct board and programmer, then upload using the programmer.
This method is affordable because many makers already own an Arduino Uno or Nano. It is also educational because it teaches the wiring and programming signals behind the magic. The downside is that wiring mistakes are easy, especially on a breadboard that looks like it was assembled during an earthquake.
Dedicated USB Programmers
Tools such as USBasp, USBtinyISP, SparkFun’s Tiny AVR Programmer, Pololu AVR programmers, and Atmel-ICE-style devices simplify repeated uploads. A dedicated programmer is often more reliable than temporary jumper wires. For anyone programming ATtiny chips regularly, this is usually worth the modest investment.
PlatformIO
PlatformIO is popular with developers who want a more structured environment inside Visual Studio Code. It supports AVR development, board configuration files, library management, and repeatable project settings through platformio.ini. For teams or advanced users, this is cleaner than clicking through menus every time.
The learning curve is a little steeper than Arduino IDE, but the reward is organization. PlatformIO is especially useful when you have multiple projects, custom build flags, version control, or a strong dislike for mystery settings hidden in dropdown menus.
Microchip Studio
Microchip Studio is a full IDE for AVR and SAM microcontroller development on Windows. It supports C, C++, and assembly development with deeper debugging and professional embedded features. For bare-metal programming, register-level control, and serious debugging, it is a strong option.
The tradeoff is size and complexity. Microchip Studio is powerful, but it may feel like bringing a laboratory to a lemonade stand if all you want is an LED candle that flickers convincingly.
Command Line with avr-gcc and avrdude
The command-line workflow is the most flexible and the least hand-holding. Developers can write C or assembly, compile with avr-gcc, link with avr-libc, generate a HEX file, and upload using avrdude. This is excellent for automation, continuous integration, and learning what the tools actually do.
It is also less forgiving. A typo in a device name, fuse setting, or upload command can lead to errors that look like ancient runes. Still, once mastered, the command line is fast, transparent, and reliable.
Key Features to Look for in a Tiny ATtiny IDE
Support for Multiple ATtiny Models
A good tiny IDE should support more than one chip. The ATtiny85 may be famous, but the ATtiny family includes many devices with different pin counts, memory sizes, timers, and communication features. Support for ATtiny13, ATtiny24/44/84, ATtiny25/45/85, ATtiny2313/4313, ATtiny10, and newer tinyAVR devices can make the tool useful beyond one weekend project.
Clear Clock and Fuse Settings
Clock settings matter. An ATtiny may run from an internal oscillator, external crystal, or other clock source depending on the chip and configuration. Fuse bits can change startup time, brown-out detection, clock division, reset behavior, and more. The IDE should present these options carefully because incorrect fuse settings can make a chip difficult to reprogram without special tools.
Useful Error Messages
Embedded development already has enough mystery. A good IDE should translate common problems into understandable hints. “Programmer not responding” is less useful than “Check reset, power, ground, and SPI wiring.” Tiny chips deserve tiny errors, not tiny nightmares.
Integrated Datasheet Shortcuts
The datasheet is the sacred scroll of microcontroller development. But datasheets can be hundreds of pages long. A practical ATtiny IDE can help by including quick access to pinouts, memory maps, register names, timer diagrams, and programming notes.
Lightweight Project Templates
Templates for blinking an LED, reading an analog input, using sleep mode, generating PWM, or handling pin-change interrupts can help users start faster. The best templates teach without hiding everything.
Example Project: Shrinking an Arduino LED Controller
Imagine you built a simple Arduino project that fades three LEDs based on a button press. It works beautifully, but the Arduino Uno is far too large for the final enclosure. This is a perfect ATtiny migration candidate.
First, identify the required pins: three PWM outputs and one digital input. Next, choose a chip with enough I/O and timers, such as an ATtiny85 or ATtiny84 depending on the exact pin needs. Then install the appropriate board core or configure your IDE for the selected chip. After that, rewrite or optimize the code so it avoids heavy libraries and uses memory carefully.
Once compiled, connect the programmer and upload. If the LEDs do nothing, check the pin mapping before blaming the universe. On ATtiny chips, the physical pin number printed in a diagram may not match the Arduino-style pin number used in code. This single detail has humbled many intelligent people, usually while holding a multimeter and muttering.
ATtiny Programming Tips for Better Results
Start With a Known-Good Blink Test
Before building a complex circuit, upload a simple blink program. This confirms the programmer, wiring, clock, board definition, and chip are working. If blink fails, your main project never stood a chance.
Use the Datasheet Early
Do not wait until something breaks to open the datasheet. Check pin functions, timer capabilities, ADC channels, current limits, clock options, and memory size before designing the circuit.
Watch Memory Usage
Small AVR chips may have limited flash and very limited SRAM. Avoid large arrays, unnecessary strings, floating-point math, and bulky libraries unless the chip can handle them. Use PROGMEM when appropriate to store constant data in flash memory.
Prefer Simple Libraries
Many Arduino libraries were written for larger boards. They may compile for ATtiny, but that does not mean they are efficient. Look for ATtiny-compatible libraries or write small direct routines when possible.
Label Your Programmer Wires
When using ISP, label MOSI, MISO, SCK, RESET, VCC, and GND. Future you will be grateful. Future you may even stop calling past you names.
When a Tiny IDE Is Better Than a Full IDE
A tiny IDE shines when you want focus. If you are programming small AVR chips, do not need advanced debugging, and prefer a clean tool that understands the ATtiny workflow, a compact IDE can be faster than a general-purpose environment. It can also be less intimidating for students, artists, hardware hackers, and beginners who want to make small electronics without becoming full-time toolchain archaeologists.
For classrooms, a focused ATtiny IDE can help learners see the connection between code and hardware. For makers, it can reduce setup time. For experienced developers, it can serve as a fast scratchpad for testing small ideas before moving to a formal build system.
When You Should Use a Bigger Tool Instead
A tiny IDE is not always the best choice. If you need source control integration, unit testing, complex project structures, custom build scripts, team collaboration, hardware debugging, or professional deployment workflows, PlatformIO, Microchip Studio, or command-line Makefiles may be better. The more serious the project, the more you may value repeatable builds and advanced diagnostics.
Also, if you are working with newer tinyAVR chips that use UPDI rather than classic ISP, verify that your IDE and programmer support the exact device. The ATtiny name covers multiple generations, and not all programming methods are interchangeable.
Common ATtiny Mistakes to Avoid
Choosing the Wrong Board Definition
Selecting ATtiny85 when you have ATtiny45, or choosing the wrong clock speed, can lead to upload errors or timing problems. Always match the software settings to the physical chip.
Forgetting Power and Ground
This sounds obvious, but every electronics bench has witnessed someone debugging code on an unpowered chip. The chip is tiny, not telepathic.
Misreading Pin Numbers
Use a pinout diagram for your exact package. DIP, SOIC, and other packages may present pins differently. Code names, port names, and physical pin numbers are not always the same.
Using Delay-Heavy Code in Battery Projects
delay() is easy, but sleep modes are usually better for low-power designs. A battery-powered ATtiny project should spend most of its time asleep, waking only to do useful work.
Setting Fuses Without Understanding Them
Fuse settings are powerful. They can optimize your chip, but they can also disable reset or select a clock source that is not present. Change them carefully and document what you changed.
Practical Experience: What It Feels Like to Work With a Tiny IDE for ATtiny
Working with an ATtiny has a different rhythm from working with a large development board. On an Arduino Uno, you often write code first and think about hardware later. With an ATtiny, the hardware taps you on the shoulder immediately. How many pins do you have? Which pins can do PWM? Does this pin also handle reset? Can the chip run at the voltage your battery provides? Suddenly, the microcontroller is not just a platform; it is a tiny roommate with opinions.
A focused IDE helps because it keeps the most important questions visible. In a good ATtiny workflow, you select the chip, confirm the clock, choose the programmer, open a pinout, and write a small test before building the full circuit. That sounds simple, but it changes the experience. Instead of jumping between five windows, you work in one calm space. Calm is underrated when your breadboard has thirteen yellow wires and one of them is lying.
The first satisfying moment usually comes when the blink test works. It is just an LED, yes, but on a bare ATtiny it feels like a tiny flag planted on the moon. The second satisfying moment comes when you remove the programmer, power the chip from a battery, and the circuit still runs. That is when the project stops feeling like a prototype and starts feeling like a real embedded device.
There are frustrations, of course. Upload errors can happen because of loose jumper wires, reversed MOSI and MISO connections, missing capacitors, incorrect clock settings, or a programmer driver problem. Memory limits can turn a friendly sketch into a diet plan. A library that works perfectly on an Arduino Uno may refuse to fit into an ATtiny85. Serial debugging may require creativity because not every ATtiny has hardware UART. Sometimes the best debugger is an LED blink pattern, which is both primitive and strangely effective.
One useful habit is to build projects in layers. Start with power. Then upload blink. Then test one input. Then test one output. Then add the sensor. Then add sleep mode. When something breaks, you know which layer caused it. This method is slower at the beginning but faster than trying to debug a complete circuit that behaves like a haunted toaster.
Another practical lesson is to save working configurations. If you finally get an ATtiny85 running at 1 MHz with Arduino as ISP and a specific core version, write it down. Save the board settings, programmer type, fuse choices, and wiring diagram. A tiny IDE can make this easier, but documentation is still your friend. A simple project note can prevent future confusion when you return months later and wonder why the chip only works when Mercury is in retrograde.
The biggest reward is design freedom. Once you are comfortable with ATtiny programming, you stop seeing microcontrollers as bulky boards and start seeing them as small pieces of logic you can place almost anywhere. A night-light, plant monitor, model train controller, custom sensor, puzzle box, wearable badge, or low-power timer can all become smaller, cheaper, and more elegant. A tiny IDE does not merely make programming easier; it lowers the emotional cost of starting. And in hobby electronics, that matters. The best tool is often the one that gets you building before the coffee gets cold.
Conclusion
A tiny IDE for your ATtiny is more than a cute phrase. It represents a better way to work with small microcontrollers: focused, lightweight, practical, and friendly to the realities of embedded development. ATtiny chips are powerful enough for countless compact projects, but they reward careful setup. The right IDE or workflow can reduce confusion around chip selection, pin mapping, clock settings, compiling, uploading, and documentation.
If you are new to ATtiny programming, start with Arduino IDE and ATTinyCore or a dedicated beginner-friendly programmer. If you want stronger project organization, try PlatformIO. If you want deeper control, learn avr-gcc, avr-libc, avrdude, and Microchip Studio. And if you find a compact IDE that brings the essentials together, give it a serious look. Tiny chips deserve tools that respect their scale.
In the end, ATtiny development is about making small things smart. The IDE should help you do that without turning a weekend project into a full archaeological expedition through compiler flags and forum posts. Keep the workflow simple, keep the wiring clean, and always check the pinout twice. Your ATtiny may be small, but with the right setup, it can do surprisingly useful work.
Note: Always verify pinouts, fuse settings, voltage limits, and programming methods with the datasheet for your exact ATtiny model before uploading code or designing a final circuit.