Table of Contents >> Show >> Hide
- First, What Counts as “Molding”?
- Install New, Restore Old, or Do a Little of Both?
- Planning Like a Pro (So You Don’t Buy Trim Twice)
- Trim Joinery: The Secret Sauce Is in the Corners
- Installing Baseboards: Clean Lines on Not-So-Clean Walls
- Installing Crown Molding: Yes, It’s a Bit DramaticIn a Good Way
- Door and Window Casing: The Frames That Make Everything Look “Finished”
- Restoring Moldings: Bringing Old Trim Back Without Erasing Its Soul
- Finishing Moldings: Where Good Trim Goes to Become Great
- What Does It Cost to Install or Restore Moldings?
- Common Mistakes That Make Trim Look “Off”
- Experience Notes: Real-World Lessons From Molding Projects (The Fun, The Fussy, The “Why Is This Wall Like That?”)
- Wrap-Up
Moldings are the quiet overachievers of interior design. They don’t demand attention like a neon sofa or a “statement”
wallpaper that screams “I learned about maximalism on Tuesday!”but they do the heavy lifting: hiding wavy drywall,
smoothing transitions, and giving your rooms that finished, intentional look.
Whether you’re adding crisp new baseboards in a builder-basic bedroom or rescuing century-old trim that’s survived
generations of paint, pets, and questionable DIY choices, this guide covers both installation and restoration in a way
that’s practical, realistic, and (mostly) free of heartbreak.
Safety note: Trim work often involves sharp tools, power saws, ladders, and older paint that may contain lead.
If you’re under 18, work with a trained adult or hire a pro for cutting and removal. When in doubt, choose “safe” over
“fast,” because your fingers are not replaceable at the hardware store.
First, What Counts as “Molding”?
“Molding” (or “moulding,” if you’re feeling fancy) is trim that adds detail and covers joints between surfaces. Some pieces
are mostly decorative; others are glorified problem-solvers wearing a tuxedo.
The usual suspects
- Baseboards: Run along the bottom of the wall, protecting it from vacuums, shoes, and existential dread.
- Shoe molding / quarter round: Small trim at the baseboard/floor joint that helps hide flooring gaps.
- Crown molding: Installed where walls meet ceilingslike a room’s “nice hat.”
- Casing: Trim around doors and windows, creating a clean frame (and hiding rough edges).
- Chair rail / picture rail: Horizontal bands that protect walls or support hanging systems in older homes.
- Panel molding / wainscoting trim: Adds classic wall detail and dimension.
The style you choose matters: a chunky farmhouse baseboard might look out of place in a delicate 1920s bungalow, while
thin modern trim can feel underdressed in a formal dining room. When restoring, matching the original profile is often
worth the effort because it preserves the home’s “design language.”
Install New, Restore Old, or Do a Little of Both?
Before you start yanking trim off the wall like you’re auditioning for a demolition show, decide what the job actually is:
installation, restoration, or a “trim remix.”
When installation makes sense
- You’re updating a room and the trim is undersized, damaged beyond practical repair, or mismatched.
- You want a new style (taller baseboards, modern flat stock, or a more detailed crown profile).
- The house has uneven “patchwork trim” from past renovations and you want consistency.
When restoration is the better move
- The trim is original or historically significant, and you want to keep the character.
- The wood is high quality (old-growth lumber is often sturdier than what’s commonly available now).
- The profile is unique and hard (or expensive) to replicate.
A smart middle path is common: keep and restore the original trim in public rooms, replace missing or heavily damaged
sections with carefully matched pieces, and install new trim where it never existed.
Planning Like a Pro (So You Don’t Buy Trim Twice)
Moldings look simple until you realize your house was built in the era of “close enough.” Walls bow. Corners aren’t 90°.
Floors slope. And ceilings sometimes do a gentle wave, like they’re trying to communicate in Morse code.
Measure the right way
- Measure each wall run in linear feet (baseboards and crown are sold this way).
- Subtract door openings for baseboards (usually), but consider that you may still want trim blocks or returns.
- Add at least 10% for waste, off-cuts, and “oops.” More if the layout is complex or you’re new to trim work.
Pick materials that match your reality
- Solid wood: Beautiful, durable, repairable. Can move with humidity.
- MDF: Smooth and paint-ready, budget-friendly, but hates moisture like a cat hates baths.
- Finger-jointed pine: Stable and paint-friendly, common for baseboards/casing.
- PVC/composite: Useful in damp areas (bathrooms, basements), but doesn’t feel “historic.”
If you’re restoring, try to identify what you already have: species, profile, thickness, and how it’s assembled.
For older homes, keep an eye out for layered trim “build-ups” (multiple pieces stacked to create a deep profile).
Trim Joinery: The Secret Sauce Is in the Corners
The difference between “DIY” and “Did-a-pro-do-that?” usually comes down to joineryespecially corners. Two key terms
show up constantly: miter and cope.
Miter joints (aka the classic angle cut)
Miters are angled cuts (often 45°) that meet at corners. They’re standard for outside corners and look crisp when walls are
perfectly square. The problem: most walls are not perfectly square, and miters can open up over time.
Coped joints (aka “make one piece hug the other”)
Coping is most common for inside corners, especially with crown molding. One piece runs square into the corner; the other
is cut so its profile fits tightly over the first. It’s more forgiving when corners aren’t perfect, which is… basically always.
Scarf joints (for long runs)
When you need length longer than your board, a scarf joint (two ends cut on a shallow angle that overlap) is stronger and
less noticeable than a straight butt joint. If you’re painting, it nearly disappears after filling and sanding.
Installing Baseboards: Clean Lines on Not-So-Clean Walls
Baseboards are often the easiest “big impact” trim upgrade. They also reveal every wonky wall in your homeso the goal is
a finish that looks straight and intentional, even if the building itself is having a slightly crooked day.
Removal (if replacing)
Score the top seam where paint/caulk meets the wall so you don’t peel drywall paper. Then carefully pry, working along studs
and using a flat bar with a protective shim. Slow is smooth; smooth is fast.
Fitting to imperfect surfaces
- Floors dip: Consider shoe molding to hide small gaps, or scribe the baseboard for bigger changes.
- Walls bow: Fasten to studs and use gentle pressure, but don’t force boards into a heroic arc that will crack later.
- Inside corners: A coped joint can look cleaner than two miters fighting each other.
Fastening and finishing
Aim to fasten into studs. If you’re painting, fill nail holes, sand lightly, and apply paintable caulk sparingly along the
top edge for a seamless wall-to-trim transition. The trick is a neat beadmore “icing line” than “caulk avalanche.”
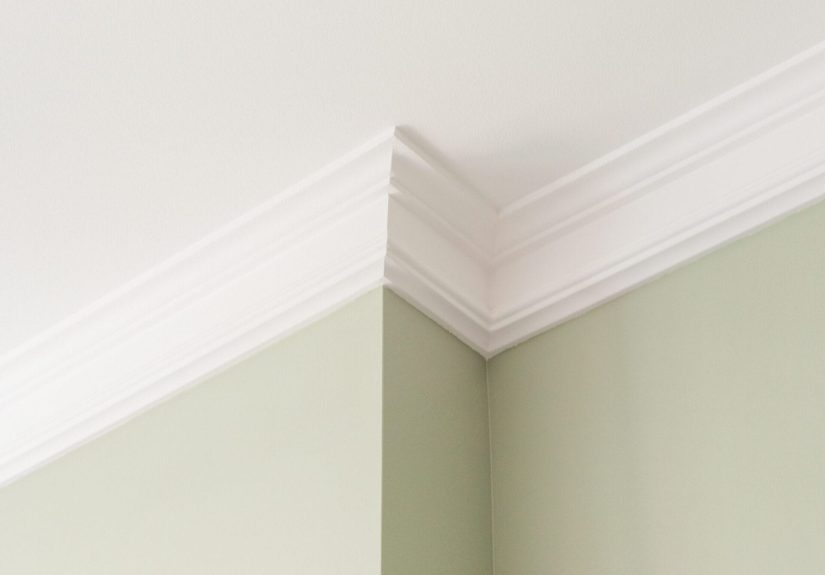
Installing Crown Molding: Yes, It’s a Bit DramaticIn a Good Way
Crown molding adds instant polish, but it’s also the trim most likely to make people whisper, “Let’s just hire someone.”
You can absolutely do itbut success depends on careful planning, solid support, and realistic expectations about your
ceiling corners’ commitment to geometry.
Why crown gets tricky
- Compound angles: Crown sits at an angle between wall and ceiling (the “spring angle”). Cuts must match that.
- Out-of-square corners: Inside corners are rarely perfect, which is why coping is often recommended.
- Fastening points: You need something solid to nail intostuds, ceiling joists, or added backing blocks.
In many homes, adding backing (like nailers or blocks) at the top of the wall can make crown installation sturdier and less
prone to gaps. Once installed, careful filling/caulking and paint can make an imperfect corner look like a deliberate design
choice rather than a late-night panic.
Door and Window Casing: The Frames That Make Everything Look “Finished”
Casing is the trim around doors and windows. It hides the gap between the jamb and drywall, and it’s a huge contributor to
the overall style of a home. Swap out plain casing for a more substantial profile, and suddenly your doors look like they
went to finishing school.
Details that make casing look high-end
- Consistent reveals: That tiny inset line between casing and jamb should be even all the way around.
- Clean corners: Tight miters, or a back-banded profile for extra depth.
- Optional trim blocks: Rosettes (top corners) or plinth blocks (bottom) can add character and simplify cuts.
If you’re restoring casing around older doors, inspect for loose joints, splits, and rot near floorsespecially where water
may have wicked into wood over time.
Restoring Moldings: Bringing Old Trim Back Without Erasing Its Soul
Restoration is less about making everything look brand new and more about making it look right: solid, crisp, and
consistent with the age and style of the home. The best restorations keep the original profile, preserve sharp edges, and
avoid “over-sanding” details into a blurry blob.
Common molding problems (and what they usually mean)
- Gaps at joints: Seasonal movement, loose fasteners, or walls shifting over time.
- Chips and dents: Normal wear, especially in baseboards and chair rails.
- Rot or softness: Moisture exposureoften near exterior doors, bathrooms, or leaky windows.
- Heavy paint build-up: Decades of repainting can bury detail and create gummy edges.
Paint and old houses: proceed with caution
If your home was built before 1978, assume paint may contain lead unless testing proves otherwise. Avoid dry scraping,
aggressive sanding, or uncontrolled dust. A careful approach protects both the wood’s surface detail and the people living
in the home.
Even when lead isn’t a concern, aggressive stripping can permanently damage wood fibers and soften crisp profiles.
Restoration often works best as “minimal intervention”: remove only what you need, repair what’s failing, and keep the
original texture where possible.
Repair options: filler, epoxy, or dutchman patch?
Think of repairs on a spectrum. The smaller and more stable the damage, the lighter the fix can be.
- Caulk: Best for small, non-structural gaps (like where trim meets wall). Use paintable caulk and keep it neat.
- Wood filler: Great for nail holes and shallow dents. Choose a product appropriate for paint or stain.
-
Epoxy repairs: Useful for localized rot or missing sections where you need strength and shapeability. Best when
applied thoughtfully (not as a substitute for rebuilding half the house out of plastic). -
Dutchman patch: A traditional repair where you cut out damaged wood and splice in a new piece of matching wood.
Often the best choice for larger areas or historically sensitive work.
For missing decorative bits (like corner blocks, rosettes, or intricate profiles), you may be able to source matching
millwork from salvage yards, architectural reuse centers, or a local millwork shop. When possible, save an intact sample of
the original profileit’s the best “template” you’ll ever own.
Finishing Moldings: Where Good Trim Goes to Become Great
Installation and repair get the structure right. Finishing is what makes it look intentional. This is where patience pays
offbecause paint highlights every ripple, gap, and overfilled nail crater.
Steps that create a crisp, professional look
- Sand lightly: Smooth patches and filler, but protect edges and profile detail.
- Prime bare areas: Primer helps paint bond and prevents flashing (uneven sheen).
- Caulk sparingly: A thin bead, tooled smoothly, can make trim look like it grew there.
- Paint with intention: Use trim-appropriate paint (durable finish), and keep lines sharp.
If you’re staining wood trim, restoration becomes more exacting: repairs must match color and grain. In those cases, a
dutchman patch or wood replacement can blend better than filler, which can telegraph through stain.
What Does It Cost to Install or Restore Moldings?
Costs vary widely based on materials, home layout, and how ornate the work is. As a rough reference, professional
baseboard installation commonly lands in a mid-hundreds range for a typical room, with costs increasing for taller boards,
complex corners, removal of old trim, and painting.
Restoration pricing is even more variable because it’s labor-heavy: careful removal, paint assessment, repair, and
reinstallation can take time. But that labor is often the pointyou’re paying for preserving detail that’s hard to replace.
When to call a pro
- You suspect lead paint or need controlled paint removal.
- Crown molding is going in a tall stairwell or high ceiling area (ladders + angles = nope).
- You’re matching historic profiles and want museum-level results.
- Rot or structural damage suggests a moisture problem that must be solved first.
Common Mistakes That Make Trim Look “Off”
- Assuming corners are 90°: They aren’t, and they never were. Measure and adjust.
- Over-caulking: Caulk should hide gaps, not become a visible trim feature.
- Over-sanding details: Crisp edges are part of what makes trim look high-end.
- Skipping acclimation: Let wood adjust to indoor humidity before installing to reduce movement.
- Painting without prep: Unprimed patches and rushed filler show up as “flashing” and texture bumps.
Experience Notes: Real-World Lessons From Molding Projects (The Fun, The Fussy, The “Why Is This Wall Like That?”)
The best molding advice rarely comes from a perfect demo room with perfectly square walls. It comes from actual homes,
where nothing lines up, the floor slopes just enough to annoy you, and someone in 1996 decided to glue trim on with what
appears to be industrial-strength caramel.
One of the most common “aha” moments people report is how much taller baseboards change a room’s feel. A
bedroom with short, thin trim can read a little unfinishedlike it’s wearing sneakers to a formal dinner. Swap to a taller
profile (even a simple one), and the room suddenly looks more intentional, as if it has a design opinion. The funny part is
that visitors often can’t name what changed. They just say, “This looks nicer,” which is the highest compliment a piece of
wood can receive.
On the restoration side, the most memorable projects tend to involve paint archaeology. People start with a
simple plan: “We’ll clean up the trim.” Then they discover seven layers of paint, including one glossy coat that seems to
repel every modern product known to science. The lesson that comes up again and again: if the trim is historic or has
delicate profile detail, patience beats brute force. Rushing removal can round over edges and erase the character you were
trying to save. Many homeowners end up choosing a “good enough” approachstabilize what’s failing, smooth what’s rough,
and repaintrather than stripping everything back to raw wood.
Another classic experience: the crown molding confidence curve. It starts at “How hard can it be?” climbs to
“I am basically a finish carpenter,” and then drops dramatically at the first inside corner that’s 87.5 degrees. That’s
where coping becomes a hero. People who switch from mitered inside corners to coped corners often describe it as the moment
the project stops feeling like a fight. The joint looks tighter, it’s more forgiving, and it keeps looking good even when
the house moves with the seasons.
Baseboards have their own storyline: the battle of the crooked wall. Someone installs a straight board against
a slightly bowed wall and is horrified by the gap at the top edge. The natural impulse is to drown it in caulk. Later, they
realize the caulk bead is now thick enough to qualify as a separate architectural element. The better lesson that seasoned
DIYers share is to fix what you can structurally (secure to studs, use shoe molding where appropriate, adjust joints), then
use caulk like seasoningjust enough to bring everything together, not enough to become the main course.
Finally, there’s the emotional win: restoring one original room and seeing the whole house differently. People often say
they didn’t realize how much the trim contributed to the home’s identity until they cleaned it up, repaired a few dings,
and painted it properly. Suddenly the room feels “older” in a good waylike it has history instead of wear. That’s the
strange magic of moldings: they’re not the star of the room, but when they’re done well, everything else looks better too.
If you take only one experience-based lesson into your next project, make it this: trim work rewards the kind of patience
that feels slightly ridiculous in the moment and deeply satisfying later. Measure carefully, choose repairs that respect the
material, and remember that “perfect” is not the goalclean, consistent, and intentional is.
Wrap-Up
Installing and restoring moldings is part carpentry, part design, and part detective workespecially in older homes. With
good planning, the right joinery approach for your corners, thoughtful repairs, and careful finishing, trim can upgrade a
room faster than almost any other detail. And if your walls aren’t square? Congratulations: you live in a real house.