Table of Contents >> Show >> Hide
- Start Here: Pick Your “First Win” Style of Astrophotography
- The Beginner Gear List (What You Need vs. What You’ll Want at 2 a.m.)
- Planning: The Secret Ingredient Nobody Posts on Instagram
- Camera Settings: The Night-Sky Exposure Triangle (No, Your Camera Isn’t “Broken”)
- Your First Shoots (Step-by-Step Recipes That Actually Work)
- Star Trackers and Polar Alignment (A Quick, Beginner-Friendly Explanation)
- Editing and Stacking: Where the Hidden Detail Shows Up
- Common Beginner Mistakes (And How to Fix Them Fast)
- Safety and Night-Sky Etiquette (Because the Universe Is Not Your Studio)
- Mini Cheat Sheet: Quick Settings by Subject
- of Real-World Beginner Experiences (What It Actually Feels Like to Learn Astro)
- Conclusion: Your Next Step Is SimpleGo Shoot
Astrophotography is what happens when you point a camera at the night sky and suddenly discover you have
two new hobbies: photography… and problem-solving at 2:00 a.m. The good news? You don’t need a spaceship,
a $10,000 telescope, or the patience of a monastery cat. You need a simple plan, a few solid techniques,
and the willingness to take a couple of “why is everything blurry?” photos before you get the magic.
This beginner-friendly guide walks you through the easiest paths into astrophotographyMilky Way landscapes,
star trails, the Moon, and your first steps toward deep-sky imagingplus the planning and camera settings
that actually matter. By the end, you’ll know what to buy (and what not to), how to shoot, how to edit, and
how to avoid the classic rookie mistakes that turn galaxies into gray soup.
Start Here: Pick Your “First Win” Style of Astrophotography
“Astrophotography” covers a lot of sky. The fastest way to enjoy it is to choose a target that matches your gear
and your patience level.
1) The Moon (Fast, Bright, and Surprisingly Tricky)
Great for beginners because it’s bright and easy to find. Tricky because it’s so bright you can overexpose it
like a stadium light. Think “daylight photography… at night.”
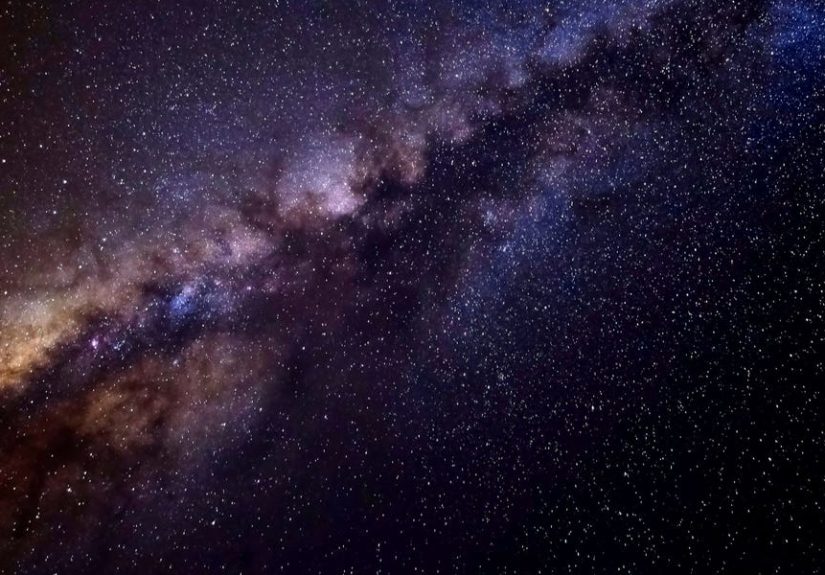
2) Milky Way Landscapes (The Classic Wow Shot)
This is the poster child: a wide-angle scene with stars and a foreground (mountains, trees, a lonely road, your friend
pretending not to be cold). Best with a tripod, a wide lens, and dark skies.
3) Star Trails (The “Set It and Snack” Option)
Star trails are forgiving: you can stack many shorter exposures and still get dramatic circular arcs. You’ll learn planning,
composition, and the joys of batteries.
4) Deep-Sky Objects (Nebulae and Galaxies)
This is where tracking mounts, careful focus, and stacking become the main characters. Still beginner-friendlyjust a different
learning curve. You can start with a small tracking “star tracker” and a camera lens, then grow from there.
The Beginner Gear List (What You Need vs. What You’ll Want at 2 a.m.)
You can start with surprisingly little. Here’s the gear hierarchybeginning with “non-negotiable,” then moving into upgrades.
Non-Negotiable Basics
- Camera with manual controls (DSLR or mirrorless is ideal, but many phones can do basics with night modes and manual apps).
- Sturdy tripod (the night sky punishes flimsy gear).
- Lens: wide-angle for Milky Way (often 14–24mm full-frame range) or telephoto for Moon (200mm+ helps).
- Remote shutter / intervalometer (or a 2-second timer in a pinch).
- Headlamp with red light (your eyes will thank you, and so will everyone near you).
Huge Quality-of-Life Upgrades
- Fast lens (wide maximum aperture like f/2.8 or wider helps gather starlight).
- Extra batteries (cold nights eat batteries like popcorn).
- Dew prevention (a simple dew heater strap can rescue a session if your lens fogs).
- Star tracker (a compact tracking mount that follows the sky’s motion, enabling longer exposures and cleaner images).
Deep-Sky Starter Kit (When You’re Ready)
- Tracking mount (star tracker or equatorial mount).
- Small refractor telescope (often recommended because it’s portable and forgiving).
- Field flattener (optional, helps keep stars sharp to the edges with many refractors).
- Stacking software (free options exist and work great for starting).
Planning: The Secret Ingredient Nobody Posts on Instagram
The difference between “I got noise” and “I got the Milky Way” is usually planning. The sky is a moving subject, and it comes with
scheduling rules.
Dark Skies Matter (A Lot)
Light pollution washes out faint stars and the Milky Way. If you can travel even 30–60 minutes away from bright city centers, you’ll see a huge jump
in results. If you can’t travel, you can still do Moon shots, planets, and brighter constellationsso you’re not locked out.
Know Your Moon Phase
For Milky Way and deep-sky: you generally want a darker sky (often near a new moon). For the Moon itself: any phase works, but many photographers love
the shadows along the “terminator” line (where day meets night on the Moon) because craters pop with contrast.
Shoot After Astronomical Twilight (If Possible)
“Astronomical twilight” ends when the Sun is far enough below the horizon that the sky is fully dark for most astronomy work. If you’re chasing faint detail,
this timing matters.
Check Weather Like a Professional Pessimist
- Cloud cover: obvious, but thin clouds can still ruin contrast.
- Humidity: high humidity increases haze and encourages dew.
- Seeing (steadiness of air): critical for planets and high-magnification Moon shots.
- Transparency: clarity of the sky; crucial for Milky Way and deep-sky detail.
Scout Foregrounds in Daylight
Your camera will happily photograph the stars above a foreground that looks like… a dark blob. Scouting helps you build a composition that works, avoid hazards,
and set up quickly when it’s dark.
Camera Settings: The Night-Sky Exposure Triangle (No, Your Camera Isn’t “Broken”)
Astrophotography is mostly about collecting enough light without turning stars into little streaks. Your main controls are:
aperture, shutter speed, and ISO. You’ll typically use a wide aperture, a relatively long shutter speed, and a higher ISO than daytime photography.
A Beginner Starting Point (Milky Way / Starry Sky)
- Mode: Manual
- Aperture: wide open (example: f/2.8)
- Shutter: 10–25 seconds (depends on focal length and sensor)
- ISO: 1600–6400 (start around 3200–4000, then adjust)
- White balance: around 3500–4500K as a starting place (RAW makes this flexible later)
- Focus: manual focus
- File format: RAW
How Long Can Your Shutter Be Before Stars Blur?
The Earth rotates. Your camera notices. The classic “rule of 500” (and similar rules like 600) gives a rough maximum shutter time:
divide 500 by your focal length (and consider crop factor). It’s a starting point, not a law of physics.
Reality check: modern high-resolution cameras often demand shorter exposures than the old rules suggest if you want crisp stars at pixel level.
If you see tiny streaks, shorten the shutter a bit and bump ISO to compensate.
Focus: The #1 Beginner Problem
Autofocus usually fails in the dark. Use manual focus and magnified live view.
- Point at a bright star (or a distant light far away).
- Zoom in on your live view (5x/10x).
- Turn the focus ring slowly until the star is as small and sharp as possible.
- Take a test shot and zoom in on playback to confirm.
- Once nailed, don’t touch the focus ringsome people even tape it.
Your First Shoots (Step-by-Step Recipes That Actually Work)
Recipe 1: Your First Milky Way Photo (Wide-Angle)
- Find dark skies and aim for a moonless window if possible.
- Set up a solid tripod. If the wind is spicy, hang a bag from the tripod center column (carefully) for stability.
- Compose: include a foreground element (tree silhouette, rock, cabin, lake reflection) so it’s not “just sky.”
- Dial settings: start around f/2.8, 15–20s, ISO 3200–4000, RAW.
- Manual focus using a bright star and magnified live view.
- Take 10–30 frames of the same composition (this makes stacking possible later).
- Optional foreground: take 1–3 shorter, lower-ISO frames for a cleaner foreground you can blend later.
Recipe 2: Star Trails (Easy, Dramatic, and Battery-Hungry)
Instead of one multi-hour exposure, shoot many shorter exposures and stack them. This reduces risk if a car headlight blasts your scene for 3 seconds.
- Compose toward the North Star (for circular trails) or away from it (for diagonal arcs).
- Settings starting point: f/2.8–f/4, 20–30s, ISO 800–3200.
- Use an intervalometer: shoot continuously for 30–120 minutes (or longer).
- Stack in software designed for star trails, or blend images in editing software.
Recipe 3: The Moon (Crisp Detail Without Blowing It Out)
The Moon is bright enough that you can use “daytime-style” exposure settings. If your Moon looks like a white circle with zero detail, it’s overexposed.
- Use a longer focal length if you have it (200mm+ helps).
- Try starting around ISO 100–400, f/8–f/11, and a fast shutter (1/125 to 1/500), then adjust.
- Use a timer or remote shutter to avoid shake.
- For extra sharpness, take multiple frames and stack them (yes, even for the Moon).
Recipe 4: “Baby’s First Deep-Sky” (With a Star Tracker + Camera Lens)
You don’t need a telescope to start deep-sky imaging. A star tracker plus a camera lens can capture targets like the Orion Nebula or Andromeda
(depending on your focal length, sky conditions, and patience).
- Mount and balance your camera on the tracker.
- Polar align (align the tracker with Earth’s axis). This step is everything.
- Use a moderate focal length (50–135mm is a friendly range to learn with).
- Shoot multiple exposures: 30–120 seconds each, ISO 800–3200, and collect 30–100 frames.
- Capture calibration frames (optional at first, but powerful): darks, flats, and bias to clean up noise and dust shadows.
- Stack and process for detail.
Star Trackers and Polar Alignment (A Quick, Beginner-Friendly Explanation)
A star tracker is a small motorized mount that rotates to match the sky’s apparent motion. That means your stars stay still relative to the camera during the exposure,
letting you shoot longer and at lower ISO for cleaner images. It’s one of the biggest “level up” upgrades for astrophotography.
Polar alignment is the process of aiming the tracker so its rotation axis matches Earth’s rotation axis. If you nail this, stars stay sharp. If you miss it, stars drift,
and your images look like tiny commas (which is adorable in handwriting, less so in space).
Editing and Stacking: Where the Hidden Detail Shows Up
Most astrophotos look underwhelming straight out of the camera. That’s normal. The signal (faint detail) is buried in noise, and your job is to pull it out without turning
the sky into a crunchy mess.
Why Stacking Works
When you stack multiple exposures of the same scene, real details add together while random noise averages out. Translation: more stars, smoother sky, better color.
This is why shooting 20 frames can beat one frameeven if each frame looks “meh” alone.
A Simple Beginner Workflow (No Fancy Sorcery Required)
- Cull: delete frames with bumps, clouds, or accidental flashlight crimes.
- Stack: use stacking software for Milky Way/deep-sky shots (or star-trail stacking tools for trails).
- Basic adjustments: exposure, contrast, highlights, shadows, white balance.
- Curves/levels: gently lift faint detail (small steps beat one giant yank).
- Noise reduction: carefullytoo much makes stars look like spilled sugar.
- Selective sharpening: sharpen stars and key detail, not the noise.
- Color: keep it believable; the goal is “wow,” not “radioactive blueberry.”
Calibration Frames (Optional… Until You See the Difference)
Calibration frames help correct sensor noise and optical artifacts:
- Dark frames: reduce hot pixels and thermal noise (same settings as your lights, lens cap on).
- Flats: correct vignetting and dust shadows (even illumination, same focus).
- Bias frames: capture read noise (very fast exposures with lens cap on).
Beginners can start without them, but if you stick with deep-sky imaging, these become your best friends.
Common Beginner Mistakes (And How to Fix Them Fast)
“My stars are blurry.”
- Fix focus (use magnified live view).
- Shorten shutter time (especially with longer focal lengths).
- Stabilize your tripod and use a remote/timer.
“My photo is noisy and gross.”
- Take more frames and stack.
- Shoot darker skies if possible.
- Expose properly: if your image is extremely underexposed, brightening it later boosts noise.
“I can’t see the Milky Way.”
- Check moon phase and light pollution.
- Make sure you’re shooting when the Milky Way core is above the horizon (season and time matter).
- Increase exposure (within star-sharp limits) or raise ISO slightly.
“My lens keeps fogging up.”
- Use a dew heater strap, or at least a lens hood.
- Keep a microfiber cloth handy (but wiping constantly is a losing game).
- Plan for humidity; fog is not a moral failing.
Safety and Night-Sky Etiquette (Because the Universe Is Not Your Studio)
- Use red light to preserve night vision and avoid blasting others.
- Respect private property and local rulesespecially in remote areas.
- Dress warmer than you think. Standing still at night is colder than it sounds.
- If photographing the Sun: only use certified solar filters designed for your optics. Never point unfiltered optics at the Sun.
- Tell someone where you are if you’re heading somewhere remote.
Mini Cheat Sheet: Quick Settings by Subject
- Milky Way: f/1.8–f/2.8, 10–25s, ISO 3200–6400, RAW, manual focus.
- Star trails: f/2.8–f/4, 20–30s frames, ISO 800–3200, shoot for 30–120+ minutes, stack.
- Moon: ISO 100–400, f/8–f/11, 1/125–1/500 (adjust as needed), tripod, remote.
- Deep-sky (tracked): 30–180s exposures, ISO 800–3200, many frames, stack + calibrate.
of Real-World Beginner Experiences (What It Actually Feels Like to Learn Astro)
Almost every beginner’s first night goes the same wayand that’s not an insult, it’s a tradition. You arrive excited, set up fast, and then realize
your camera suddenly has 900 new settings you’ve never needed in daylight. The first few frames come out black (because your ISO was 200 and your
shutter was 1/60 like you’re photographing a birthday cake). Then you crank the shutter to 20 seconds and think, “Wait, the camera just… sits there?”
Yes. It’s not frozen. It’s working. Welcome to long exposure photography, where time passes differently.
Next comes the focus battle. You twist the focus ring to infinity like you always do, but the stars still look soft. That’s because the infinity mark
on many lenses is more of a suggestion than a promise. So you do the live-view zoom trick, you focus on a bright star, and suddenly the sky snaps into
tiny pinpoints. This is usually the moment people get hooked. It’s the first real “oh wow” winlike you just unlocked a secret layer of reality.
Then comes the planning lesson, delivered with zero mercy. Maybe the Milky Way isn’t visible because the Moon is blazing like a flashlight. Maybe your
beautiful location is actually inside a dome of light pollution. Maybe thin clouds are making your stars look dull. Beginners learn quickly that
astrophotography isn’t just photographyit’s timing, weather, moon phase, and location scouting. The good news is that once you start checking those
factors, your success rate jumps dramatically. It’s like the sky stops being “random” and starts being “predictable.”
Editing is the next surprise. Your RAW files look flat and unimpressive at first, which is normal. Beginners often assume they “did it wrong” because
their screen doesn’t instantly show a magazine cover. But once you stack a set of frames or gently push curves and contrast, stars multiply, color shows up,
and dusty Milky Way structure appears. The skill is learning restraintpulling out detail without turning the sky into a noisy cartoon. Most people go too far
at least once (congratulations in advance on your neon-purple sky phase), then circle back to a cleaner, more natural look.
And finally, you get the unglamorous but important experience: batteries die faster than expected, dew appears out of nowhere, and your tripod finds the one
wobbly rock in a 10-mile radius. None of that means you’re bad at astrophotography. It means you’re doing astrophotography. With each session, you’ll pack
smarter, set up faster, and recognize problems earlier. The night sky rewards repetition. Your “first win” becomes your “repeatable win,” and that’s when the
hobby turns from luck into craftstill magical, just a lot more consistent.
Conclusion: Your Next Step Is SimpleGo Shoot
If you take one thing from this guide, let it be this: you don’t need perfect gear to startjust a solid plan and enough repetition to learn what your camera is
doing in the dark. Pick one target (Moon, Milky Way, or star trails), use a simple settings recipe, shoot multiple frames, and practice focus like it’s your new
favorite sport. Every session teaches you something. And eventually, you’ll look at one of your images and think, “Wait… I made that?”