Table of Contents >> Show >> Hide
- Jump to a Section
- What “Blue Ribbon” Corn Relish Means
- Blue Ribbon Secrets: Flavor + Texture (AKA How Jars Win Hearts)
- Ingredients (and Why They Matter)
- The Blue Ribbon Corn Relish Recipe
- Canning Safety Notes (Quick, Important, Non-Scary)
- Variations & Serving Ideas
- Troubleshooting: When Your Relish Has Opinions
- Conclusion
You know that moment at a county fair when someone casually says, “Oh, this old thing?” while holding a jar
that could realistically win a small scholarship? That’s the energy we’re going for: bright, crunchy, sweet-tangy
corn relish that tastes like summer decided to become shelf-stable.
This Blue Ribbon Corn Relish Recipe is built on the classic, canning-friendly flavor profile:
sweet corn, bell peppers, celery, onion, a vinegar-sugar bath, and that iconic duo of
mustard + turmeric that makes relish taste like it belongs on everything from hot dogs to
pulled pork to “I swear this is a salad” bowls.
What “Blue Ribbon” Corn Relish Means
“Blue ribbon” isn’t one single official recipeit’s a style. In the world of
homemade corn relish, blue-ribbon-worthy usually means:
clean flavor, pretty color, consistent chop, and a balanced sweet-tang bite.
The kind of relish that makes people ask, “Is there… maybe… more?”
Classic corn relish is a vinegar-based condiment (think: pickles’ sunny cousin) that turns
peak-season sweet corn into a spoonable topping. It’s especially popular as a
relish for hot dogs, brats, burgers, and barbecuebecause smoke + sweet corn + tang is a
love triangle that works.
Blue Ribbon Secrets: Flavor + Texture (AKA How Jars Win Hearts)
1) Crunch you can hear (politely)
Ribbon-level relish isn’t mush. The goal is tender-crisp corn and vegetables that still feel like
themselves. Overcooking is the fastest way to turn “award winner” into “sweet corn paste.”
2) Sweet-tang balance
Great corn relish is a tightrope walk: enough vinegar to keep it bright, enough sugar to keep it friendly.
If your relish tastes like it’s auditioning to be salad dressing, it needs sweetness. If it tastes like candy,
it needs tang and salt.
3) The “relish color” magic
Turmeric is the tiny pinch of drama that gives corn relish that golden glow.
Mustard (dry or seed) adds savory warmth that keeps the sweetness from getting too innocent.
4) Consistent chop = better bite
Judges and dinner guests agree on one thing: random chunks are suspicious. Keep your dice fairly uniform so
each spoonful is the same delicious story.
5) Time does some of the work
Corn relish tastes good the day you make it. It tastes great after it rests. Give it at least a few days
(or a couple weeks if canned) so the flavors mellow and mingle.
Ingredients (and Why They Matter)
Produce
- Sweet corn: fresh is best for flavor and snap; frozen can work in a pinch.
- Bell peppers: color + sweetness + crunch.
- Celery: the crisp, savory backbone.
- Onion: depth and aroma (the supporting actor who steals scenes).
Pantry Staples
- Vinegar (5% acidity): the tangy base and a key part of canning safety.
- Sugar: balances vinegar and helps that classic relish flavor land.
- Pickling/canning salt: keeps the brine clearer than table salt tends to.
- Dry mustard or mustard seed: warm, savory bite.
- Celery seed: old-school relish flavor in a teaspoon.
- Turmeric: golden color + subtle earthiness.
If you’re planning to water bath can this relish, use commercial vinegar labeled at
5% acidity and stick to tested proportions. When it comes to canning, “I eyeballed it”
is not a cute storyit’s a horror genre.
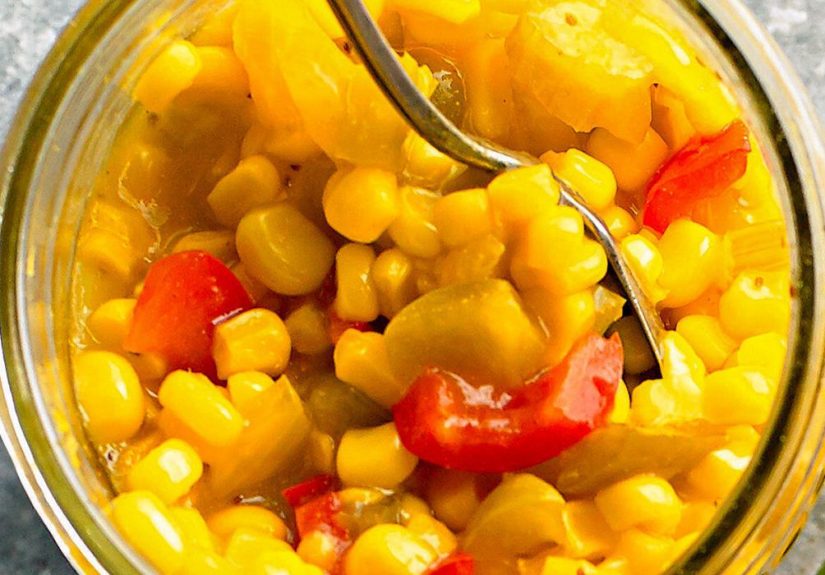
The Blue Ribbon Corn Relish Recipe
This recipe leans on the classic tested corn relish style: sweet corn + peppers + celery + onion simmered in a
sweetened vinegar solution, then processed in a boiling-water canner. It’s the kind of formula that has powered
many a proud pantry shelf and at least a few smug potlucks.
Yield & Timing
- Yield: about 6 half-pint jars (8 oz each)
- Cook time: ~20 minutes
- Processing time: 15 minutes (water bath, adjust for altitude)
Ingredients
- 4 cups cooked corn kernels (about 8 ears)
- 2 cups diced mixed red and green bell peppers (about 2 large peppers total)
- 3/4 cup diced celery (about 2 stalks)
- 1/2 cup finely chopped onion (about 1 small onion)
- 2 cups white vinegar (5% acidity)
- 2/3 cup sugar
- 1 tablespoon canning/pickling salt
- 1 tablespoon dry mustard
- 1 teaspoon celery seeds
- 1 teaspoon ground turmeric
Instructions
-
Prep for canning (if using):
Set up a boiling-water canner and heat your jars. Keep lids warm according to manufacturer guidance.
(You want hot jars for hot relishthis is not the moment for thermal shock.) -
Get the corn ready:
If you’re starting with fresh corn, cook it briefly (steam, boil, or blanch) and cut kernels from the cob.
Aim for tender-crisp kernels that still pop a little when you bite. -
Make the sweet-tang base:
In a large nonreactive pot, bring the vinegar, sugar, and salt to a boil, stirring until the sugar dissolves. -
Add the good stuff:
Stir in corn, peppers, celery, onion, dry mustard, celery seed, and turmeric. Reduce to a steady simmer and
cook for about 15 minutes, stirring often so nothing sticks and gets “toasty” in the wrong way. -
Jar it up:
Ladle hot relish into hot jars, leaving 1/2-inch headspace. Remove air bubbles, wipe rims clean,
apply lids, and screw bands on to fingertip tight. -
Process:
Place jars in the boiling-water canner and process for 15 minutes, adjusting for altitude as needed.
Turn off heat, remove canner lid, and let jars rest about 5 minutes before lifting them out to cool. -
Cool and check seals:
Let jars cool undisturbed 12–24 hours. Check seals, label, and store in a cool, dark place.
Optional: Refrigerator Version
If you’re not canning, you can still make this relish and store it in the fridge. Cool it, cover it, and refrigerate.
It gets better after a day or two (like many people on vacation).
Canning Safety Notes (Quick, Important, Non-Scary)
Corn and peppers are naturally low-acid foods. The reason corn relish can be safely processed in a
boiling-water canner is because the recipe uses enough added acid (vinegar) to make it an acidified product.
That’s why the vinegar percentage and proportions matter.
- Use commercial vinegar labeled 5% acidity. Don’t use homemade vinegar for canning.
-
Don’t reduce vinegar or change veggie-to-vinegar ratios in a canning recipe.
If you want it less sour, increase sweetness rather than cutting acid. -
Process times and altitude adjustments matter. Water boils at lower temps at higher elevations,
so follow altitude guidance for safe processing. - When in doubt, choose refrigerator storage. Fridge relish is flexible; canned relish must be by-the-book.
Variations & Serving Ideas
Flavor variations (best for refrigerator batches unless you’re following a tested canning variation)
- Spicy corn relish: add minced jalapeño or serrano for heat. (If canning, only use a tested variation.)
- Smoky grilled corn relish: grill the corn (and even onion) first for a char-kissed flavor that’s unreal on brats.
- Garden-style relish: fold in diced tomato or cucumber for a fresh, salsa-ish vibegreat, but typically best kept refrigerated.
- Herby finish: stir in chopped cilantro or parsley right before serving (fresh herbs lose punch in long simmering).
How to use corn relish (besides eating it with a spoon over the sink)
- Hot dogs & brats: the classic. Add mustard and pretend you’re at a ballgame.
- Burgers: especially with sharp cheddar or pepper jack.
- Pulled pork or BBQ chicken: sweet-tang cuts through smoky richness.
- Tacos: spoon over carnitas, shrimp, or grilled chicken.
- Eggs: a little relish on scrambled eggs is weirdly wonderful.
- Cheese boards: serve with cheddar, crackers, and a very confident attitude.
Troubleshooting: When Your Relish Has Opinions
“My relish is watery.”
Some corn is juicier than others. Simmer a few minutes longer to reduce slightly (stir often).
For refrigerator relish, you can also drain a bit before serving. For canned relish, stick to the recipe’s cook time
and consistency cuesdon’t thicken with starches for canning.
“It’s too sweet / too sour.”
Day-one flavor can be sharp. Give it time to mellow. If it’s still off and you’re making a refrigerator batch,
adjust at serving: a squeeze of lemon, a pinch of salt, or a spoon of relish brine drained off can help.
For canned batches: don’t tweak acidity after the factserve it with foods that balance it (rich meats, creamy mayo sauces, etc.).
“My jars didn’t seal.”
Refrigerate those jars immediately and enjoy first. Common causes: food on the rim, wrong headspace, bands too tight,
or lids not properly prepared. The good news: unsealed relish still tastes fantasticit just needs cold storage.
“It turned darker than expected.”
Cider vinegar can darken lighter pickled products over time. If you want a brighter golden color, white vinegar is usually the move.
Conclusion
A truly great Blue Ribbon Corn Relish Recipe is equal parts technique and common sense:
crisp vegetables, steady simmering, balanced sweet-tang flavor, and (if canning) strict respect for safe proportions.
The payoff is huge: one batch turns peak-season corn into a condiment that upgrades everything you grill, smoke, fry, or pile onto a bun.
Make it for cookouts, gift it in cute jars, and keep one secret stash for yourselfbecause the first rule of corn relish club
is pretending you “just had extra corn,” even though you absolutely planned this.
Kitchen Experiences (500-ish Words of Real-Life Relish Wisdom)
Here’s what tends to happen the first time someone makes corn relish: they underestimate the corn. Not the flavorthe
volume. Eight ears of corn looks adorable on the counter. Eight ears of corn off the cob looks like you’re
prepping for a midwestern wedding. And suddenly you understand why people invent corn tools. If you can, stand the cob up in a
wide bowl and slice downward so kernels fall where they belong instead of ricocheting across the kitchen like tiny yellow
billiard balls. (Your socks will still find at least three kernels later. That’s tradition.)
The next surprise is how quickly the whole thing comes together once everything is chopped. The simmer is short, which is
fantastic for texturebut it also means your chopping is the main event. Many cooks find the “blue ribbon” difference is
simply taking an extra two minutes to keep the dice consistent. When the peppers, celery, and onion are roughly the same size
as the corn kernels, the relish eats beautifully. Every spoonful feels intentional, like it’s wearing a tiny bow tie.
Then there’s the flavor curve. On day one, vinegar can come in a little hotbright, loud, and determined to be noticed.
After a few days, it mellows and the sweetness stops feeling like an add-on and starts tasting integrated. This is why so many
seasoned canners will tell you to wait before judging your batch. If you’re aiming for that “fair jar” vibe, let it rest.
A week later it tastes like it got its act together.
Another recurring experience: the turmeric panic. Someone will look into the pot mid-simmer and say,
“Is it supposed to be this yellow?” Yes. That warm golden tint is part of the classic relish identity. It’s not neon; it’s
more like “sunset that makes you text your friend a photo.” And it also helps the relish look bright and appetizing in the jar.
If you want an even cleaner color, white vinegar helps; cider vinegar is delicious but can deepen the shade over time.
Finally, the most relatable moment: realizing corn relish is not a single-use condiment. People start with hot dogs, then the
jar migrates to burgers, then to a pulled pork sandwich, then somehow into a quick “corn relish + mayo” spread that disappears
on grilled cheese. Before long, someone is spooning it onto scrambled eggs and acting like it was always normal. That’s the
charm of a blue-ribbon style relish: it’s sweet, tangy, crunchy, and adaptablelike the friend who can hang at a backyard
barbecue and a fancy picnic without changing outfits.