Table of Contents >> Show >> Hide
- Why Arduino Makers Want a Portable Soldering Option
- Why Building the Heating Tool From Scratch Is a Bad Bet
- The Safer Way to “Build Your Own”
- What Makes a Portable Setup Good for Arduino Projects
- Safety Is Not Optional Just Because the Tool Is Cute
- Common Mistakes When People Build a Portable Kit
- Who This Kind of Setup Is Best For
- The Real Goal: Confidence, Not Just Convenience
- Experience Notes: What Portable Arduino Soldering Is Really Like
- Conclusion
If you have ever tried to fix an Arduino shield on a crowded desk, a robotics bench, or the corner of a dining table that was never emotionally prepared to become a workshop, you already understand the appeal of a portable soldering solution. Makers love the idea of a compact, grab-and-go kit that can handle quick wiring jobs, header pins, sensor boards, and field repairs without dragging an entire workbench behind them like a dramatic cape.
But here is the important twist: when people say they want to “build your own portable Arduino soldering iron,” what they usually should build is a portable soldering setup, not a homemade heating tool. A real soldering iron is one of those tools that looks simple until you think about heat control, insulation, power delivery, tip compatibility, and the minor detail that it gets hot enough to turn “quick project” into “why does my table smell like regret?”
The smarter approach is to assemble a safe, efficient, portable soldering kit around a certified temperature-controlled iron and tailor that kit for Arduino work. That gives you the portability you want, the flexibility your projects need, and far fewer opportunities to accidentally invent a pocket-sized dragon.
Why Arduino Makers Want a Portable Soldering Option
Arduino projects are wonderfully mobile. One week you are prototyping a weather station on your desk. The next week you are tweaking a robot chassis in a garage, fixing a loose wire in a classroom, or replacing a header on a sensor board at a hackathon. The whole Arduino ecosystem encourages experimentation, and experimentation has a funny habit of happening nowhere near your main bench.
That is why interest in the portable Arduino soldering iron concept keeps growing. Modern portable irons are smaller, faster, and more capable than the clunky “travel irons” of the past. Many are designed to pair with compact power solutions, making them practical for electronics hobbyists who need flexibility without giving up temperature control.
For Arduino builders, portability is especially valuable because the work itself is usually delicate rather than massive. You are not trying to solder sheet metal or wrangle industrial cable the width of a garden hose. You are working with breakout boards, jumper wires, connectors, and compact PCBs where precision matters more than brute force.
Why Building the Heating Tool From Scratch Is a Bad Bet
There is a certain maker instinct that whispers, “I could build that myself.” Sometimes that instinct leads to brilliance. Sometimes it leads to a drawer full of oddly shaped acrylic rectangles and a story that begins with, “Well, at first it seemed like a good idea.”
A homemade soldering iron sounds clever in theory, but the real challenge is not merely producing heat. It is controlling that heat consistently, safely, and predictably. Electronics soldering depends on stable temperature behavior, proper insulation, reliable power negotiation, safe handling, and tips that can transfer heat efficiently without overwhelming delicate pads and components.
That is why experienced makers usually focus on building a portable soldering station instead of building the iron itself. In other words, use a professionally designed iron and put your DIY energy into the case, layout, power strategy, tool organization, and workflow. That is still very much a maker project. It is just the version with better odds and fewer scorch marks.
The Safer Way to “Build Your Own”
Think of your project as creating a compact mobile workstation for Arduino soldering. The fun is in choosing the parts that work together and arranging them into a kit that matches your style of making. Some people want an ultra-light setup for travel. Others want a more complete field bench with cleaning tools, spare tips, and a compact fume solution.
Start With the Right Iron
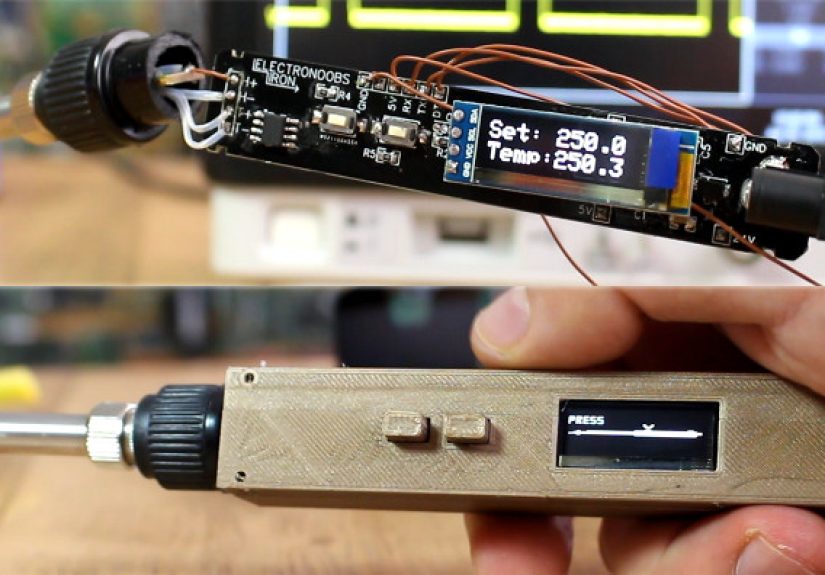
The heart of the kit should be a temperature-controlled portable soldering iron. That phrase matters. Temperature control is not marketing glitter; it is the difference between smooth, repeatable electronics work and a chaotic relationship with heat. Many current portable irons designed for hobby electronics now support USB-C Power Delivery, fast heat-up times, adjustable settings, and compact displays.
For Arduino users, that kind of iron hits the sweet spot. It is portable enough for field work, precise enough for headers and sensors, and modern enough to feel like it was designed in the same century as your development board.
Build Around the Power Source
A portable soldering setup lives or dies by its power plan. This is where many romantic ideas about “tiny travel tools” run directly into physics. Heat takes power. Good heat control takes power delivered cleanly and consistently. That is why so many newer portable irons are built around USB-C PD or similarly capable power systems.
Your power source should match the iron’s real requirements, not your optimism. In practical terms, a portable soldering kit works best when the power source, cable, and iron are all chosen as a team rather than as random roommates who met in a junk drawer.
Add the Small Stuff That Makes a Big Difference
A great portable setup is not just the iron. It is the little supporting pieces that keep your work fast, clean, and sane. A compact stand, tip cleaner, solder storage, tweezers, side cutters, a silicone mat, and a small container for parts can turn a “barely workable” kit into something you actually enjoy using.
This is also where many makers discover a surprising truth: the difference between a frustrating soldering session and a satisfying one often has less to do with the iron than with the environment around it. A stable surface, decent lighting, and a sensible way to keep tools from wandering off can feel downright luxurious when you are mid-project.
What Makes a Portable Setup Good for Arduino Projects
Not every portable soldering rig is automatically good for Arduino work. A tool can be wonderfully compact and still be awkward for electronics. Arduino jobs usually reward precision, control, and fast recovery more than raw size or bragging rights.
Tip Choice Matters More Than People Expect
Many beginners obsess over the iron body and forget the tip. That is like buying hiking boots based entirely on the laces. For Arduino boards, sensor modules, and prototyping shields, tip geometry and thermal mass affect how comfortably you can work on pads, pins, and small connectors.
The ideal tip is not “the tiniest one possible” and it is not “whatever came in the box forever.” Good results usually come from matching the tip to the scale of the job so heat transfers efficiently without forcing you to linger too long on the joint. Portable irons that offer compatible tip options tend to age much more gracefully in a maker’s toolkit.
Stable Heat Beats Raw Heat
Arduino soldering rewards control. You want an iron that stays predictable when it touches a joint, recovers well between connections, and does not act like it is improvising a jazz solo every time it meets a ground pad. A reliable portable tool should feel boring in the best possible way: steady, repeatable, and easy to trust.
That is one reason temperature-controlled irons have become the standard recommendation for electronics work. They make it easier to move between simple wiring, header installation, and more delicate repair tasks without feeling like every joint is a separate negotiation with chaos.
Portability Should Not Mean Sloppiness
There is a temptation to think of portable gear as “good enough for quick fixes.” Resist that. A portable setup should still support clean work, especially when dealing with Arduino boards that may later end up inside enclosures, student projects, demo units, or robots that absolutely will embarrass you in public if a bad joint shakes loose.
Good portability means compact, not careless. If the kit is too stripped down to support neat, repeatable work, it stops being a productivity tool and becomes a very stylish way to create future troubleshooting sessions.
Safety Is Not Optional Just Because the Tool Is Cute
Portable electronics tools have a sneaky talent for looking harmless. A sleek pen-style iron can seem more like a gadget than a hot tool. That illusion disappears quickly when you remember what soldering involves: heat, fumes, residues, sharp leads, and the possibility of contaminating surfaces if you are careless.
That is why a good portable Arduino soldering setup includes safety thinking from the start. Ventilation matters. Surface protection matters. Clean hands matter. Smart storage matters. If your kit fits neatly into a pouch but leaves hot tools, residues, or scraps unmanaged, it is not efficient. It is just compact nonsense.
Many hobbyists also underestimate how much better they work when the setup feels intentionally safe. When you know where the hot tool rests, where the scraps go, and how air moves through your workspace, your brain stops spending energy on low-grade panic and starts focusing on the actual project.
Common Mistakes When People Build a Portable Kit
Buying for Novelty Instead of Workflow
The smallest or flashiest iron is not always the best choice. If the tool looks amazing in product photos but is awkward to power, hard to support, or annoying to pack, your shiny new marvel may spend more time in a drawer than on a project.
Ignoring Cable Quality
Portable soldering setups that rely on modern power standards are only as solid as the cables and accessories supporting them. A great iron paired with a questionable cable is like putting racing tires on a shopping cart.
Skipping Maintenance
Portable tools still need care. Tips wear. Consumables run out. Cases collect debris. If you treat your travel kit like a magical object that maintains itself through vibes alone, it will eventually remind you that reality exists.
Forgetting the Actual Use Case
Are you mainly soldering Arduino headers? Fixing wires on robots? Doing classroom demos? Reworking sensor boards? Your real use case should shape the kit. A field repair setup looks different from a teaching kit, and both look different from a lightweight travel pouch for hobby prototyping.
Who This Kind of Setup Is Best For
A portable Arduino soldering setup is perfect for makers who do not always work in one place. It suits robotics hobbyists, students in supervised labs, electronics tinkerers who attend maker events, and anyone who wants a capable backup to a full-size bench station.
It is also great for people who want less friction between idea and action. When your tools are compact, organized, and ready to go, small fixes happen sooner. Projects move faster. Annoying broken connections get repaired before they turn into month-long mysteries. The whole making process feels lighter.
That said, portability is not a replacement for a dedicated bench if you do heavy, frequent soldering. A full station still wins for all-day comfort, larger jobs, and repeat professional use. The portable kit shines when flexibility matters most.
The Real Goal: Confidence, Not Just Convenience
The best reason to build your own portable soldering setup for Arduino projects is not that it looks cool, though it absolutely can. It is that a thoughtful setup gives you confidence. Confidence to fix a loose pin. Confidence to install headers cleanly. Confidence to bring your tools somewhere else and still do reliable work.
And that confidence matters. Arduino culture is built on experimentation, iteration, and learning in public. A portable soldering kit supports that spirit beautifully when it is built around safe design choices, real workflow needs, and tools that are designed to do the job properly.
So yes, build your own portable Arduino soldering solution. Just do it the smart way. Build the setup. Build the workflow. Build the case, the organization, and the habits. Leave the heating element engineering to the people who enjoy regulatory testing, thermal design, and sleeping soundly at night.
Experience Notes: What Portable Arduino Soldering Is Really Like
One of the most interesting things about using a portable soldering setup is how quickly it changes your relationship with small electronics projects. At a fixed bench, soldering often feels like a separate event. You gather tools, clear space, sit down, and mentally announce that you are now doing Serious Electronics Work. With a portable kit, the barrier drops. Repairing a loose header or finishing a sensor cable suddenly feels as easy as opening a pouch and getting started. That convenience can be a huge boost for momentum.
There is also something deeply satisfying about having a kit that feels intentional. A well-planned portable setup has a certain calm competence to it. The iron has a place. The cable has a place. The tweezers, cutters, and solder are not floating around like survivors of a tiny tool hurricane. When everything is organized, even a short work session feels cleaner and more professional.
In real life, portable soldering around Arduino projects tends to shine in bursts. Maybe you are adjusting a robotics build in a classroom. Maybe you are helping a friend revive a sensor module. Maybe you are halfway through a weekend project and realize one header pin never bonded as well as you thought. In those moments, a portable setup feels less like a luxury and more like a very good decision you made earlier when you were smarter than your future self.
Of course, portable work also teaches humility. You notice immediately when lighting is poor, when your surface is unstable, or when you packed the glamorous gear but forgot the one tiny accessory that actually matters. Every maker has a version of this story. Mine would probably involve triumphantly arriving with a sleek compact kit and then realizing I had everything except the one item needed to keep clipped leads from becoming metallic confetti.
Another real-world lesson is that portability does not automatically create speed. A portable setup can absolutely save time, but only if it is designed around how you truly work. If your kit is too minimal, you end up improvising. If it is too crowded, you spend half your energy managing clutter. The sweet spot is a kit that supports the work you most often do with Arduino boards: headers, wires, sensors, connectors, quick repairs, and the occasional “why is this pin only working when I wiggle it?” mystery.
What surprises many people is how emotionally reassuring a good portable kit can be. Electronics projects often stall because fixing one tiny issue feels annoying enough to postpone. When the fix is easy to access, the project keeps moving. That alone makes a portable setup worth building. It reduces friction, protects momentum, and turns maintenance from a chore into a quick pit stop.
So the experience of portable Arduino soldering is not just about mobility. It is about readiness. It is about giving yourself a toolset that fits the reality of how projects actually happen: messily, unexpectedly, and usually three feet away from wherever you thought you would be working.
Conclusion
If you are drawn to the idea of a DIY portable Arduino soldering iron, the best modern interpretation is not a homemade heating wand. It is a carefully chosen portable soldering system built around a certified iron, sensible power delivery, thoughtful accessories, and a workflow that supports clean electronics work. That approach gives you the freedom of mobility without sacrificing the precision and reliability Arduino projects deserve.
In short: build the kit, not the hazard. Your boards, your fingers, and your future troubleshooting sessions will thank you.