Table of Contents >> Show >> Hide
- Why a Cast Iron Skillet Makes This Cookie Better
- Red Velvet Flavor 101 (So It Doesn’t Taste Like a Red Cookie)
- Ingredients
- Equipment and Skillet Size
- Step-by-Step: How to Make a Red Velvet Skillet Cookie
- How to Know When It’s Done (Without Guessing)
- Optional Cream Cheese Topping (Because Red Velvet)
- Pro Tips for the Best Texture
- Troubleshooting: Quick Fixes for Common Problems
- Fun Variations (Same Skillet, New Personality)
- Serving Ideas (A.K.A. How to Make People Think You’re a Dessert Wizard)
- Storage and Reheating
- Cast Iron Care After Dessert (So Your Skillet Stays Happy)
- FAQ
- Real-World Experiences: What Usually Happens When People Make This
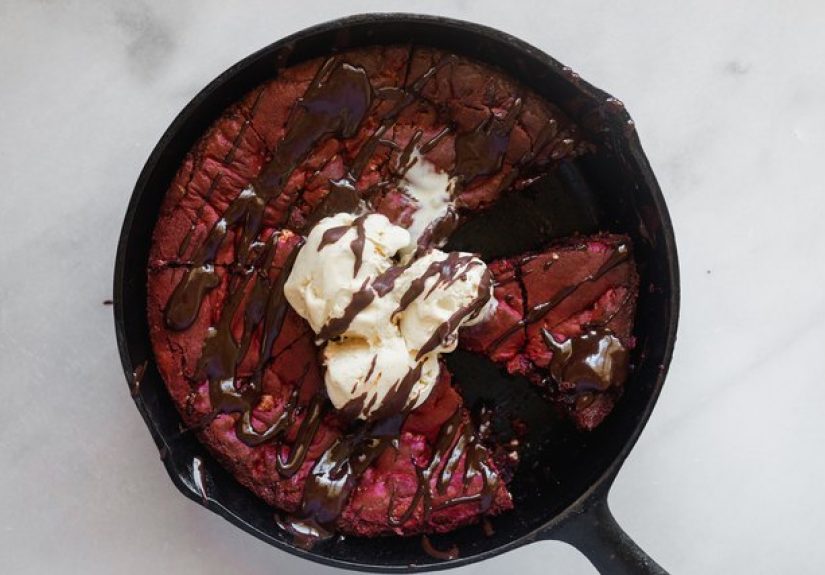
If a cookie and a cake had a delicious, slightly dramatic baby, it would be a red velvet skillet cookie. You get the crisp, caramelized edges that only a hot cast iron skillet can pull off, plus a soft, fudgy center that begs for a scoop of vanilla ice cream. It’s a “cookie cake” with better personalitybecause it’s served warm, straight from the pan, and nobody has to pretend tiny cookies are enough.
This recipe leans into what red velvet is actually about: gentle cocoa, vanilla, and a subtle tang that makes the sweetness feel less like a sugar megaphone. The cast iron part isn’t just for vibes, eitherit’s a texture tool. Let’s bake a giant cookie that looks like it belongs in a bakery window, but tastes like you made it on purpose.
Why a Cast Iron Skillet Makes This Cookie Better
Cast iron holds heat like it’s guarding a secret family recipe. That steady heat means the dough sets quickly around the edges (hello, crisp border) while the center stays thick, gooey, and brownie-adjacent. In a regular baking dish, you can get “even,” but you don’t always get “legendary.”
Another bonus: the skillet is the serving dish. Fewer pans. Fewer crumbs migrating into every corner of your kitchen. More people hovering around the counter saying, “So… when can we cut it?” (Answer: soon. But not immediately. We’re not monsters.)
Red Velvet Flavor 101 (So It Doesn’t Taste Like a Red Cookie)
A good red velvet dessert isn’t “chocolate, but dyed.” It’s usually a mix of:
- A small amount of cocoa for a mellow, cocoa-kissed base (not full-on brownie territory).
- Vanilla to round everything out and keep it dessert-forward.
- Something tangy (often buttermilk, sometimes a tiny splash of vinegar) to give that signature red velvet edge.
In a cookie, we’ll use just a little buttermilk (or a quick DIY version) so the dough stays soft without turning cakey. The result tastes like red velvet on purpose, not like a prank played by food coloring.
Ingredients
For the Red Velvet Skillet Cookie
- 1 cup (2 sticks) unsalted butter, softened
- 1/2 cup granulated sugar
- 3/4 cup packed light brown sugar
- 1 large egg + 1 large egg yolk (for extra chew)
- 2 teaspoons vanilla extract
- 1 tablespoon buttermilk (or 1 tablespoon milk + 1/2 teaspoon lemon juice, rested 5 minutes)
- 1 to 1 1/2 tablespoons red gel food coloring (or 2 to 3 tablespoons liquid coloring)
- 2 cups all-purpose flour
- 2 1/2 tablespoons unsweetened cocoa powder
- 1 teaspoon baking soda
- 1/2 teaspoon fine salt
- 1 cup white chocolate chips (or a mix of white chocolate + semisweet)
- Optional: 1/2 cup crushed chocolate sandwich cookies for a “red velvet crumbs” vibe
Optional Cream Cheese “Cloud” Topping
- 4 ounces cream cheese, softened
- 2 tablespoons unsalted butter, softened
- 3/4 cup powdered sugar
- 1/2 teaspoon vanilla extract
- Pinch of salt
- 1–2 teaspoons milk (only if you want it looser for drizzling)
Equipment and Skillet Size
A 10-inch cast iron skillet is the sweet spot. Bigger skillets make a thinner cookie that bakes faster. Smaller skillets make a thicker cookie that needs more time. If your skillet is very dark and well-seasoned, it may brown faster than a newer panso you’ll rely on doneness cues, not just the timer.
Step-by-Step: How to Make a Red Velvet Skillet Cookie
1) Prep the oven and skillet
Heat oven to 350°F. Lightly grease a 10-inch cast iron skillet with butter. For super-easy release, you can line the bottom with a round of parchment paper (trim to fit so it doesn’t climb the sides).
2) Cream the butter and sugars
In a large bowl, beat softened butter, granulated sugar, and brown sugar until fluffyabout 1 to 2 minutes. You’re not trying to win a bodybuilding contest with your mixer; just build some air for a tender bite.
3) Add egg, yolk, vanilla, buttermilk, and color
Beat in the egg and yolk until smooth. Mix in vanilla and buttermilk. Add red food coloring and mix until the dough looks evenly tinted. (It’ll deepen slightly as the cocoa joins the party.)
4) Combine dry ingredients (briefly!)
In a separate bowl, whisk flour, cocoa powder, baking soda, and salt. Add to the wet ingredients and mix on low just until no dry streaks remain. Overmixing turns “chewy” into “tough,” and nobody asked for a jaw workout.
5) Fold in chips and add-ins
Fold in white chocolate chips (and any optional add-ins). Save a small handful of chips to sprinkle on top for bakery-style looks.
6) Press dough into the skillet
Spread the dough evenly into the prepared skillet. Press a few extra chips on top. For a slightly thicker, gooier middle, mound the center just a touch higher than the edges.
7) Bake
Bake for 22 to 28 minutes. The edges should look set and slightly darker, while the center should look just set but still soft. If you like a sliceable cookie “cake,” bake a couple minutes longer. If you want spoonable, molten-cookie energy, pull it sooner.
8) Cool (the hardest step)
Cool in the skillet on a rack for 10 minutes for scoopable servings, or 25–30 minutes for cleaner slices. Cast iron stays hot, so the cookie continues to cook as it reststhis is normal and also very convenient.
How to Know When It’s Done (Without Guessing)
Timers are helpful, but your eyes (and maybe a thermometer) are better. Look for:
- Edges: set, slightly puffed, darker than the middle.
- Center: no wet batter shine; it should jiggle slightly if you gently tap the skillet.
- Optional thermometer: aim for about 195–200°F in the center for a fully baked, sliceable skillet cookie.
Optional Cream Cheese Topping (Because Red Velvet)
While the cookie cools, beat cream cheese and butter until smooth. Add powdered sugar, vanilla, and salt. If you want a drizzle instead of a spread, add milk 1 teaspoon at a time.
You’ve got options:
- Dollop + swoosh: add big spoonfuls on the warm cookie and swirl.
- Drizzle: make it looser and zig-zag like you’re signing autographs.
- Serve on the side: let people choose their own frosting destiny.
Pro Tips for the Best Texture
Don’t preheat the skillet (unless you love living dangerously)
Preheating can crisp the bottom fastsometimes too fast. For this cookie, a room-temperature skillet is the safer path to crisp edges without a scorched base.
Check earlycast iron browns faster
Cast iron’s heat retention can speed browning, so start checking a few minutes before your usual cookie instincts tell you to. The cookie should look set around the edges even if the middle still looks soft.
Measure flour like you mean it
Too much flour is the #1 way skillet cookies turn dry. If you’re scooping straight from the bag, you can pack flour in without realizing. Fluff, spoon, levelor at least be gentle with the scoop.
Use parchment wisely
A parchment round helps release and makes cleanup easier. Just keep it away from the oven walls or exposed heating elements. Most parchment is rated safe up to about 425°F, which covers this recipe.
Troubleshooting: Quick Fixes for Common Problems
“My cookie is too gooey in the middle.”
You likely pulled it at the perfect time for spooningcongrats. If you want cleaner slices, bake 2–4 minutes longer next time, or let it cool the full 25–30 minutes before cutting.
“The edges are done but the center is still under.”
Your oven may run hot or your skillet may be extra heat-happy. Next time, try moving the rack to the middle, and tent the cookie loosely with foil during the last few minutes if the top is getting too dark.
“It stuck to the skillet.”
Grease more generously, use parchment on the bottom, and let it cool a bit before serving. A hot cookie is fragile. Also, avoid digging in with a sharp metal knifeuse a butter knife or a nylon utensil to protect your seasoning.
“It tastes like a regular cookie… but red.”
Add the buttermilk (or DIY version), and don’t skip the vanilla. Keep cocoa modestred velvet is subtle. If you want more “classic red velvet,” a tiny splash (1/4 teaspoon) of white vinegar can add that signature tang.
Fun Variations (Same Skillet, New Personality)
Valentine’s Day Heart Cookie
Press the dough into a heart-ish shape in the skillet (it can be imperfectso are we). Add pink/red sprinkles after baking and drizzle cream cheese icing on top.
Stuffed Cream Cheese Center
Freeze small teaspoons of sweetened cream cheese (cream cheese + powdered sugar). Press half the dough into the skillet, scatter frozen dollops, then cover with remaining dough before baking. Surprise pockets guaranteed.
Double-Chocolate Red Velvet
Swap 1/3 cup of the white chips for semisweet chunks and add 1 tablespoon extra cocoa. It’s still “red velvet,” just wearing a leather jacket.
Gluten-Free Option
Use a 1:1 gluten-free all-purpose flour blend. Expect a slightly softer chew and consider baking 1–2 minutes less.
Serving Ideas (A.K.A. How to Make People Think You’re a Dessert Wizard)
- Classic: warm wedge + vanilla ice cream + a pinch of flaky salt.
- Cookie sundae: ice cream, hot fudge, crushed cookies, whipped creamgo full amusement park.
- Holiday twist: peppermint ice cream and white chocolate drizzle.
- Party mode: bring the skillet to the table and hand out spoons. Suddenly, everyone is friends.
Storage and Reheating
Cover leftovers tightly or transfer slices to an airtight container. Store at room temperature for up to 3 days. To reheat, microwave individual portions for 10–15 seconds or warm in a 300°F oven until just soft. (Pro tip: ice cream melts faster on warm cookie. This is not a problem. This is a feature.)
Cast Iron Care After Dessert (So Your Skillet Stays Happy)
Let the skillet cool, then wipe out crumbs. If needed, rinse with warm water and a soft brush. Dry thoroughly. If the surface looks dull, rub in a tiny drop of oil and wipe it almost completely off. Your skillet does not want to be greasyit wants a whisper of protection.
FAQ
Can I make the dough ahead?
Yes. Cover and refrigerate up to 48 hours. Let it sit at room temperature 20–30 minutes so it spreads evenly in the skillet.
Do I need natural cocoa or Dutch-processed cocoa?
Either works in a cookie. Natural cocoa can lean a bit more classic and slightly tangy; Dutch-processed is smoother. Since color usually comes from food coloring in modern red velvet, pick based on flavor.
What if I only have an enameled cast iron skillet?
That works toogrease well and still watch bake time. Enameled cast iron holds heat similarly but releases differently, so parchment can help.
Real-World Experiences: What Usually Happens When People Make This
Here’s the funny thing about skillet cookies: the first time most people make one, they expect it to behave like a normal cookie. You knowbake until it “looks done,” cool it for a minute, slice it neatly, and move on with your life. Then cast iron does its cast iron thing: it keeps cooking after you pull it out. That’s why the cookie you swear was underbaked can magically firm up into the perfect chewy center if you give it a little patience. The wait feels personal, but it’s really just physics.
Another common moment: someone tries to cut it too soon. The edges are ready for glory, the center is still deciding who it wants to be, and the knife turns your “cookie cake” into “cookie landslide.” If that happens, don’t paniccall it a “skillet cookie sundae base,” scoop it into bowls, and add ice cream. People will applaud your “creative plating” while you quietly vow to cool it longer next time.
Red velvet adds its own set of real-life lessons. Many bakers discover that the color looks brighter in the bowl than it does after baking. Heat and cocoa mellow the shade, so if you want that bold bakery red, gel coloring helps. And yes, your tongue might briefly look like it joined a marching band. Consider it a souvenir. Flavor-wise, the buttermilk trick is what convinces people it’s actually red velvet and not just “a cookie with good lighting.” That slight tang is subtle, but it’s the difference between “cute” and “oh wow, what is that?”
Cast iron seasoning can also show up in the experienceespecially if your skillet is newer or a bit rough. People often notice that a well-seasoned pan releases cleanly and gives you those gorgeous browned edges, while a newer skillet might cling a little around the center. The easy workaround is butter plus a parchment round on the bottom. It’s not cheating; it’s smart. The goal is dessert, not a sticky tragedy that requires a chisel.
Finally, the most consistent “experience” is social: skillet cookies attract humans like a campfire attracts marshmallows. The smell hits, someone wanders into the kitchen “just to check,” and suddenly you’re hosting a tiny dessert party at the counter. This is why the skillet cookie format is unbeatable for birthdays, game nights, holiday dinners, and Valentine’s Day: it’s warm, shareable, and a little theatrical. Serve it in the skillet, add ice cream, and you’ve basically made an edible group projectexcept nobody has to make a PowerPoint.