Table of Contents >> Show >> Hide
- What Is a Chili-Pasta Skillet (and Why Is It So Good)?
- Chili-Pasta Skillet Recipe (One Pan, Big Comfort)
- How to Nail the Texture (So It’s Not Soup or Cement)
- Flavor Upgrades (Small Moves, Big Payoff)
- Easy Variations (Same Skillet, Different Personalities)
- What to Serve With Chili-Pasta Skillet
- Storage, Reheating, and Make-Ahead Tips
- Troubleshooting (Because Skillets Have Moods)
- Conclusion
- Extra: Real-Life Chili-Pasta Skillet Experiences (500+ Words)
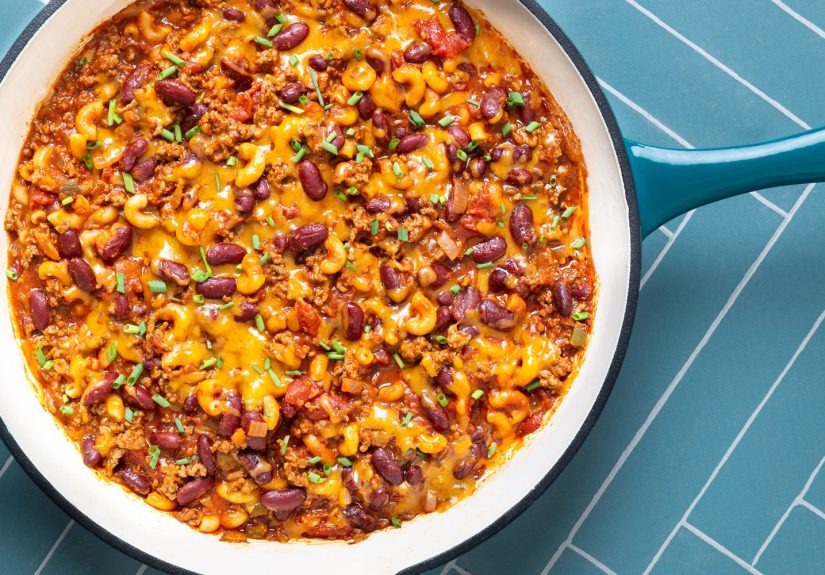
Some nights you want chili. Other nights you want pasta. And then there are the nights when your brain says, “What if we simply… refused to choose?” Enter the chili-pasta skillet: a one-pan, weeknight-friendly, scoopable comfort bomb that tastes like your favorite bowl of chili and your favorite cheesy pasta had a very successful team-building retreat.
The best part: this isn’t a “boil pasta in one pot, make chili in another pot, wash every dish you own” situation. In a good chili-pasta skillet, the pasta cooks right in the sauce, soaking up spicy, tomatoey flavor while its starch thickens everything into that glossy, clingy finish you want in a skillet dinner. Translation: fewer dishes, more applause.
What Is a Chili-Pasta Skillet (and Why Is It So Good)?
Think of it as the happy middle ground between chili mac, beefy goulash, and a quick stovetop mac-and-cheese moment. You brown meat (or not), build a chili-style base with onions, garlic, and warm spices, then simmer pasta directly in the seasoned broth and tomatoes. At the end, you add cheese (and maybe a creamy swirl) so it lands somewhere between “weeknight easy” and “I could absolutely eat this straight from the pan.”
Flavor math that makes it work
- Browning = deeper savory flavor (and a little bragging rights).
- Blooming spices in oil = chili flavor that tastes big, not dusty.
- Pasta cooked in sauce = built-in thickness without a floury shortcut.
- Cheese at the end = smooth melt instead of a clumpy mystery.
Chili-Pasta Skillet Recipe (One Pan, Big Comfort)
This version is classic American-style: beefy, tomato-forward, warmly spiced, and cheesy. It’s also flexible. Swap proteins, tweak heat, add beans, toss in cornthis skillet is not here to judge you.
Time, tools, and yield
- Total time: about 25–35 minutes
- Serves: 4 to 6 (depending on whether everyone “just wants a small bowl” and then gets seconds)
- Best skillet: 12-inch deep skillet with a lid (or a wide Dutch oven)
Ingredients
- 1 tablespoon olive oil (plus more if your pan is lean)
- 1 medium yellow onion, diced
- 1 bell pepper (green or red), diced
- 3–4 cloves garlic, minced
- 1 pound ground beef (or ground turkey/chicken)
- 2 tablespoons chili powder
- 2 teaspoons ground cumin
- 1 teaspoon smoked paprika (optional but highly recommended)
- 1–2 teaspoons dried oregano
- 2 tablespoons tomato paste
- 1 (14–15 oz) can diced tomatoes
- 1 (8 oz) can tomato sauce (or 1 cup marinara for a slightly sweeter, saucier vibe)
- 2 1/2 to 3 cups low-sodium beef broth (or chicken/vegetable broth)
- 8–12 oz short pasta (elbows, rotini, small shells, or fusilli)
- 1 (15 oz) can beans (kidney, black, or chili beans), rinsed and drained (optional but great)
- 1 cup corn (frozen or canned, drained) (optional)
- 1 1/2 to 2 cups shredded cheddar or a cheddar-Jack blend
- Salt and black pepper
- Optional finishing crew: sliced jalapeños, scallions, cilantro, sour cream/Greek yogurt, hot sauce, lime wedges
Step-by-step instructions
- Brown the beef. Heat the oil in a large skillet over medium-high heat. Add the ground beef and cook, breaking it up, until browned. Season with a pinch of salt and pepper. If there’s a lot of fat, spoon off most of it (leave a little for flavor). Transfer beef to a bowl if your pan is crowded, or push it to the edges.
- Soften the aromatics. Add onion and bell pepper to the skillet. Cook 4–6 minutes until softened and starting to get a little color. Stir in garlic and cook 30 seconds, just until fragrant (don’t let it burnburnt garlic is a personality trait nobody asked for).
- Bloom the spices (this is the secret handshake). Add chili powder, cumin, smoked paprika, and oregano. Stir for 30–60 seconds so the spices toast in the oil. Add tomato paste and stir another 30 seconds to caramelize it slightly. This step upgrades the whole skillet from “fine” to “wow, did you do something fancy?”
- Add tomatoes, broth, and pasta. Pour in diced tomatoes (with juices) and tomato sauce, then add 2 1/2 cups broth. Stir well, scraping up browned bits. Add pasta and stir so it’s mostly submerged. Bring to a simmer.
- Simmer until the pasta is tender. Reduce heat to medium-low. Cover and simmer 10–14 minutes, stirring every few minutes to prevent sticking, especially near the end. If the skillet looks too thick before pasta is tender, add more broth 1/4 cup at a time. If it looks too soupy, simmer uncovered for a minute or two.
- Add beans and extras (optional, but delicious). Stir in beans and corn during the last 2–3 minutes, just long enough to warm through.
- Turn off the heat and add cheese. Remove the skillet from heat. Stir in 1 1/2 cups cheese until melty. Taste and adjust salt, pepper, and heat. Sprinkle the remaining cheese on top, cover, and let it sit 3–5 minutes so everything finishes gently.
- Garnish and serve. Add scallions, jalapeños, cilantro, a dollop of sour cream or Greek yogurt, and hot sauce if you like it feisty. Serve straight from the skillet with a spoon. (Forks are allowed, but spoons are the true believers.)
How to Nail the Texture (So It’s Not Soup or Cement)
Pick the right pasta shape
Use short pasta that cooks evenly and traps sauce: elbows, rotini, small shells, or fusilli. Long noodles tend to clump and cook unevenly in a skillet. Save spaghetti for a different kind of drama.
Liquid ratio and simmering rules
- Start with 2 1/2 cups broth for 8–10 oz pasta, closer to 3 cups for 12 oz. Pasta brands vary, so think of broth as a dial, not a law.
- Keep it at a steady simmer, not a rolling boil. Boiling can reduce too fast and leave pasta undercooked.
- Stir every few minutes. Skillet pasta loves to stick when you ignore itkind of like a group project.
- When pasta is just tender, turn off heat and let residual heat finish the job. That rest also thickens the sauce.
Flavor Upgrades (Small Moves, Big Payoff)
Make the chili taste “slow-cooked” in 30 minutes
- Tomato paste caramelization: adds sweetness and depth without adding sugar.
- Smoked paprika: creates that “I grilled something” illusion.
- Finish with acid: a squeeze of lime or a splash of vinegar wakes everything up.
- Salt in stages: a pinch early, then adjust at the endespecially if you use cheese and canned items.
Heat control that doesn’t ruin dinner
Want mild? Use standard chili powder and skip fresh chiles. Want medium? Add diced jalapeño with the onions. Want hot? Add cayenne or chipotle powder a pinch at a time. The skillet should feel exciting, not like it’s filing a complaint.
Easy Variations (Same Skillet, Different Personalities)
1) Turkey taco-chili pasta
Swap ground beef for ground turkey. Add 1 teaspoon coriander and finish with lime, cilantro, and crushed tortilla chips. Use pepper Jack cheese if you want extra kick.
2) Vegetarian chili-pasta skillet
Skip the meat. Add an extra can of beans (black + pinto is great), or stir in cooked lentils. Use vegetable broth. For extra “meaty” vibes, sauté chopped mushrooms until browned before adding onions.
3) Extra-creamy chili mac vibe
Stir in 1/3 to 1/2 cup sour cream or Greek yogurt off heat right before serving. It adds tang and creaminess without breaking.
4) Cincinnati-inspired twist (sweet-spice)
Add a tiny pinch of cinnamon and a pinch of cocoa powder with the chili spices. Keep it subtle. Serve with extra shredded cheddar on top. It’s surprisingly addictive.
What to Serve With Chili-Pasta Skillet
- Simple salad: romaine, cucumbers, and a sharp vinaigrette to cut the richness.
- Cornbread or garlic bread: because scooping sauce is a lifestyle.
- Crunch: tortilla chips, crushed crackers, or fried onions on top for texture.
- Pickled things: pickled jalapeños or quick pickled red onions make it taste brighter.
Storage, Reheating, and Make-Ahead Tips
Storing leftovers
Cool the skillet and store in an airtight container in the fridge. It reheats well for several days, and it’s one of those meals that’s arguably even better on day two.
Reheating without drying it out
- Stovetop: Add a splash of broth or water, cover, and warm over medium-low, stirring occasionally.
- Microwave: Add a tablespoon or two of liquid, cover loosely, and heat in short bursts, stirring between.
Make-ahead strategy
If you want to prep: brown the meat and cook the onion-pepper-garlic base ahead of time. Refrigerate. When it’s dinner time, reheat the base, add liquids and pasta, and finish as written. This keeps the pasta from going soft in storage.
Troubleshooting (Because Skillets Have Moods)
“My pasta is still firm but the sauce is thick!”
Add broth 1/4 cup at a time, keep simmering, and stir more often. Some pasta shapes need more liquid.
“It’s too soupy.”
Simmer uncovered for 1–3 minutes, stirring. The sauce thickens a lot as it rests, so give it a few minutes off heat too.
“The cheese turned grainy.”
Cheese is happiest off heat. Remove the skillet from the burner before adding cheese, and use freshly shredded cheese if you can. Pre-shredded works in a pinch, but it melts a little less smoothly.
Conclusion
A chili-pasta skillet recipe is the kind of dinner that makes your kitchen feel like it knows what it’s doing, even if your day didn’t. It’s fast, flexible, and deeply satisfyingspicy chili flavor, tender pasta, melty cheese, and exactly one pan to clean. Make it classic and beefy, lighten it up with turkey and extra veggies, or go full cozy with a creamy finish. Whatever version you choose, the skillet will show up for you. And honestly? That’s the kind of support we all need.
Extra: Real-Life Chili-Pasta Skillet Experiences (500+ Words)
The first time I made chili-pasta skillet style, I treated it like regular pasta night: I walked away. Big mistake. Skillet pasta is not the “set it and forget it” cousinit’s the cousin who needs you to check in every few minutes and say, “Hey, you doing okay?” Because if you don’t stir, pasta will absolutely glue itself to the bottom of the pan and then act like it’s your fault. The good news is, once you accept the relationship terms, it’s a joy.
One of my biggest lessons: the spice-bloom step is not optional if you want the dish to taste like chili and not “tomato sauce with a vague memory of cumin.” Early on, I used to toss spices into the liquid and call it a day. The result was fineedible, even. But the moment I started stirring chili powder and cumin into the hot oil with the onions, the flavor got louder, warmer, and more rounded. It’s like turning the lights on in a room you were already standing in. Suddenly you can see the furniture, and you stop stepping on LEGOs.
Another real-world tip: pasta brands cook differently. I once used a sturdier whole-wheat rotini and stubbornly refused to add more broth because “the recipe said 2 1/2 cups.” Reader, my skillet became a thick paste with crunchy spirals. Now I treat broth like a friendly adjustable volume knob. If the pan looks dry, I add more. If it looks too wet, I simmer uncovered. And I always remember the most underrated step: the rest. Turning off the heat and letting the skillet sit, covered, for a few minutes changes everything. The sauce tightens, the pasta finishes gently, and the cheese melts without stress. It’s basically a spa day for dinner.
Let’s talk cheese, because cheese has feelings. I used to dump shredded cheese into the pan while it was still bubbling like a volcano. That’s how you get grainy, separated cheese that looks like it’s reconsidering its life choices. Now I pull the skillet off heat first, then stir in cheese slowly. If I’m feeling extra, I do a two-step approach: stir some cheese into the sauce for creaminess, then sprinkle the rest on top, cover, and let it melt into a cheesy blanket. It’s dramatic in the best way.
The chili-pasta skillet also became my go-to “feed people without panicking” dinner. It’s potluck-friendly because it holds warm well, and it’s flexible for picky eaters. Want beans? Add beans. Don’t want beans? Skip them. Someone likes it spicy? Put jalapeños on the side like the civilized host you are. And the leftovers are a gift. The next day, I’ll reheat a bowl with a splash of broth, add a few tortilla chips on top for crunch, and it tastes like a brand-new meallike it went to bed early, drank water, and woke up thriving.
My final experience-based takeaway is the simplest: this recipe is forgiving, but it rewards attention. Brown the meat well. Stir the spices in hot oil. Keep an eye on the simmer. Add cheese off heat. Let it rest. Do those things and you’ll get a skillet dinner that tastes like you put in way more effort than you didexactly the kind of delicious deception weeknights deserve.