Table of Contents >> Show >> Hide
- Why a House-Frame Bookshelf Works So Well
- Project Planning: Pick a Size That Actually Fits Real Life
- Materials and Tools
- How the Build Works (Big Picture)
- Step-by-Step Build Guide
- Step 1: Build the Bookcase Box (The Part That Does the Heavy Lifting)
- Step 2: Plan Shelf Spacing Like a Person Who Owns Books
- Step 3: Prevent Shelf Sag (Because Gravity Is Patient)
- Step 4: Build the House Frame (The Part Everyone Falls in Love With)
- Step 5: Attach the Roof Frame Securely
- Step 6: Sanding and Surface Prep (Where Projects Learn Humility)
- Step 7: Finishing Options (Painted, Stained, or “I Like Wood”)
- Safety First: Make It Stable (Especially in Homes With Kids)
- Example Build: A Practical, Good-Looking Size
- Troubleshooting: Common Problems and Fast Fixes
- Style Ideas to Make It Look Custom
- What to Store (So It Stays Cute, Not Chaotic)
- DIY Experiences: The Real-Life “Wish I Knew This” Section
- Wrap-Up
If a regular bookshelf is a plain cheese pizza, a house-frame bookshelf is the fully loaded slicestill familiar, but with
a roofline, a little character, and the kind of “awww” factor that makes people ask, “Where did you buy that?”
Spoiler: you didn’t. You built it. And you didn’t need a magical woodworking apprenticeship to pull it offjust a solid plan, a few smart
shortcuts, and the willingness to measure twice (because lumber loves comedy, and you are the punchline if you don’t).
This guide breaks down how to build a sturdy, kid-friendly DIY house frame bookshelf inspired by the classic Remodelaholic-style
plan: a simple rectangular bookcase upgraded with a “house” outline on top. You’ll learn what to buy, how to size it to your space,
how to keep shelves from sagging, and how to finish it so it looks intentionalnot like a science fair project that escaped.
Why a House-Frame Bookshelf Works So Well
The genius of the house-frame look is that it’s mostly trim and geometry. The base is a standard bookcase (the dependable
workhorse of storage). The “house” top is a lightweight frame that adds style without stealing shelf space. In a nursery or playroom,
it also turns “put your books away” into something closer to “tuck your stories into their tiny house.” Parenting hack? Possibly.
- It’s customizable: Make it tall and narrow, short and wide, or build two for a symmetrical wall moment.
- It’s budget-friendly: Pine + plywood (or quality pre-sanded plywood) can keep costs reasonable.
- It’s beginner-friendly: Straight cuts for the carcass; simple angles for the roof pieces.
- It photographs like a dream: Which is important, because your project deserves to be the main character.
Project Planning: Pick a Size That Actually Fits Real Life
Before buying lumber, decide what this shelf must do. Is it for board books (short, deep-ish, lots of reach)? Chapter books (taller spacing)?
Decor and baskets (open cubbies)? The easiest way to nail sizing is to start with three numbers:
overall height, overall width, and depth.
Common “Works-In-Most-Rooms” Dimensions
- Width: 24–36 inches (wide enough to hold a lot, narrow enough to move without a forklift)
- Depth: 10–12 inches (deep enough for books + bins without eating the room)
- Base height: 42–54 inches (kid-accessible but still feels like furniture)
- Total height with roof: 60–72 inches (adds drama without scraping the ceiling)
If you’re placing it under a sloped ceiling, next to a door swing, or beneath a window, measure the “weird parts” too. Projects don’t fail
because of math. They fail because of surprise architecture.
Materials and Tools
Lumber and Sheet Goods
- Case (sides/top/bottom): 3/4-inch plywood (pre-sanded if your sanity has value)
- Shelves: 3/4-inch plywood (or solid pine if you like rustic charm and don’t mind wood movement)
- Face frame / roof frame: 1×2 or 1×3 pine/poplar (poplar paints beautifully)
- Back panel (optional but recommended): 1/4-inch plywood to square the case
- Edge treatment: iron-on edge banding or 1×2 shelf edging strips
Fasteners and Adhesives
- Wood glue
- Brad nails (1 1/4–2 inch) or trim screws
- Pocket-hole screws (choose length based on material thickness)
- Wood filler + sandpaper (because wood is never as perfect as it looks on the internet)
Tools (Minimum + Nice-to-Have)
- Minimum: circular saw (with a guide), drill/driver, clamps, sander, measuring tools, level
- Nice-to-have: miter saw (for roof angles), pocket-hole jig, brad nailer, table saw
How the Build Works (Big Picture)
Think of this build as two parts:
(1) a strong bookcase box and (2) a lightweight house frame attached to the top.
This approach keeps the structure simple and stable while letting the “cute factor” live up top where it belongs.
Step-by-Step Build Guide
Step 1: Build the Bookcase Box (The Part That Does the Heavy Lifting)
Start by cutting two side panels, a top, and a bottom from 3/4-inch plywood. A common beginner mistake is assuming plywood is perfectly square.
It often has tiny variations, so cut matching parts together whenever you can.
- Cut sides to height and choose which edges will face forward (pick the prettiest).
- Cut top and bottom to your chosen width and depth.
-
Join the box using pocket holes, countersunk screws, or dados/rabbets if you’re feeling fancy.
Wood glue plus mechanical fasteners is the sweet spot for strength. - Check for square: measure diagonals corner-to-corner. If they match, you’re square. If not, bribe the box with clamps.
Pro stability move: Add a 1/4-inch plywood back. It dramatically reduces racking (the wobbly side-to-side twist)
and makes the piece feel like real furniture, not a hopeful suggestion of furniture.
Step 2: Plan Shelf Spacing Like a Person Who Owns Books
Shelf spacing should match what you’re storing. Here’s a practical starting point:
- Board books: 7–9 inches clearance
- Picture books: 10–12 inches clearance
- Chapter books + bins: 12–14 inches clearance
If you want adjustability, drill shelf-pin holes. If you want speed and strength, install fixed shelves with glue + screws/pocket holes.
A hybrid works great: fixed middle shelf for rigidity, adjustable shelves above/below.
Step 3: Prevent Shelf Sag (Because Gravity Is Patient)
Shelf sag usually shows up when spans get wide and loads get heavy. To keep shelves straight:
- Limit unsupported span: If you go wider than ~30–32 inches with 3/4-inch plywood, consider a center divider or thicker shelves.
- Add a front edge: A 1×2 strip on the front of each shelf acts like a mini-beam.
- Choose better plywood: Higher quality plywood tends to be stiffer and flatter.
Step 4: Build the House Frame (The Part Everyone Falls in Love With)
The house frame is basically two roof “peaks” connected by a ridge, plus optional details like a chimney.
You can build it with 1x2s or 1x3s to keep it light. Most DIYers cut roof angles with a miter saw, but a circular saw works if you clamp well
and cut slowly.
- Decide your roof pitch: A 30–45° angle looks “house-like” without getting too tall.
- Cut two matching roof pieces for each side so your peaks mirror each other.
- Assemble the peaks with glue and brad nails or pocket holes (keep fasteners hidden toward the back if possible).
- Add a ridge board between peaks to tie them together and increase rigidity.
- Test-fit on the bookcase before attaching. This is the moment to fix tiny angle errors without heartbreak.
Design tip: If your roof frame overhangs the sides slightly, it reads more like architecture and less like “two sticks on top.”
A small overhang can look intentional even if you’re secretly winging it.
Step 5: Attach the Roof Frame Securely
Attach the roof frame to the top of the bookcase using glue plus brad nails or screws from inside the case (where you won’t see them).
If you’re using pocket holes, place them where the holes face the back or inside.
Optional add-ons:
- Chimney: A small box of trim pieces on one roof side for extra charm.
- House “windows”: Decorative cutouts are cute, but keep them out of structural areas.
- String light channel: A shallow groove on the back side to hide a tiny LED strand (battery pack in a top bin).
Step 6: Sanding and Surface Prep (Where Projects Learn Humility)
Sand in stages. Start around 80–100 grit for shaping filler and smoothing joints, then finish at 150–180 grit for paint or stain.
Always sand with the grain on solid wood. Plywood veneer is thin, so treat it gentlyno rage sanding.
- Fill nail holes and seams with wood filler, then re-sand.
- If painting, lightly caulk gaps where trim meets plywood for a seamless look.
- Dust removal matters: vacuum + tack cloth (or a slightly damp microfiber) before finishing.
Step 7: Finishing Options (Painted, Stained, or “I Like Wood”)
Your finish decides whether the shelf looks modern, cottage-y, Scandinavian, or “I found this at a boutique for $400.”
Here are three reliable paths:
Option A: Painted (Most Popular for Kids’ Rooms)
- Prime first (especially on plywood edges).
- Use a durable enamel or cabinet-grade paint for wipeable surfaces.
- Roll large areas with a foam roller; brush trim with a quality angled brush.
Option B: Stained (Warm and Classic)
- Use a pre-stain conditioner on softwoods like pine to reduce blotchiness.
- Topcoat with polyurethane or water-based polycrylic for durability.
- Expect “character”stain shows every little variation, which can be a feature.
Option C: Natural + Clear Coat (The “Minimal Effort, Maximum Vibe” Choice)
- Sand well, then apply a clear protective topcoat.
- Great for that airy, natural wood look (especially with poplar or good plywood).
Safety First: Make It Stable (Especially in Homes With Kids)
A tall bookshelfespecially one in a kid’s roomshould be anchored to the wall. Even if it feels heavy. Even if it feels “fine.”
Kids climb like tiny parkour athletes, and furniture tip-overs are a real hazard.
- Anchor into studs when possible using furniture straps or L-brackets.
- Use two anchors (left and right) for wider pieces for better resistance.
- Keep heavy items low to lower the center of gravity.
- Level the base with furniture pads/shims so the unit doesn’t rock.
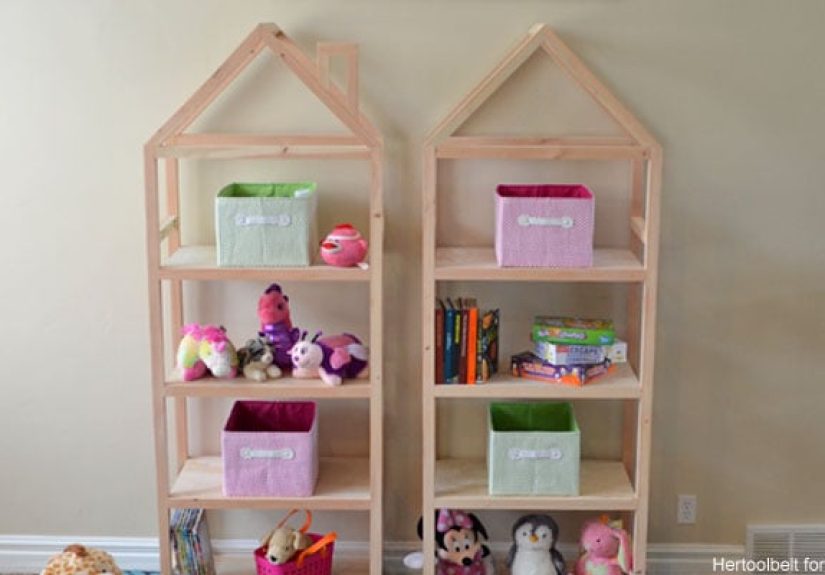
Example Build: A Practical, Good-Looking Size
Here’s a real-world example that works well in many bedrooms and playrooms:
30 inches wide × 11 inches deep × 54 inches tall for the base case, plus a roof frame that adds ~12–16 inches.
That gives you enough shelf real estate for books, bins, and decorwithout turning the room into a library annex.
Example Shelf Layout
- Bottom shelf: bins (12–14 inches clearance)
- Middle shelves: books + puzzles (10–12 inches clearance)
- Top shelf (inside house outline): display or seasonal books (9–10 inches clearance)
Want it to feel more “built-in”? Paint the back panel a slightly different tone (or wallpaper it) before assembly.
Suddenly the shelf has depth, and people assume you paid someone named “Graham” to do it.
Troubleshooting: Common Problems and Fast Fixes
“My roof pieces don’t meet cleanly at the peak.”
Tiny angle errors add up. Re-cut both pieces as a matching pair, or sand the meeting edges together while clamped so they mate cleanly.
Wood filler can help, but a good fit is always the prettier solution.
“My bookshelf is a little wobbly.”
Add a back panel or diagonal bracing, and check that the base is level. Most wobble is racking, and a back panel is the superhero cape.
“My shelves look rough on the front edge.”
Add edge banding or a 1×2 facing strip. It looks finished and stiffens the shelf. That’s a two-for-one win.
Style Ideas to Make It Look Custom
- Two-tone paint: white case + colored roof frame (or vice versa)
- Wallpapered back: install the back panel after wallpapering it flat
- Nameplate detail: a small “address sign” at the peak for the room’s theme
- Soft lighting: LED puck light under the roof ridge for a cozy glow
- Matching set: build two narrower units for a “twin house” wall
What to Store (So It Stays Cute, Not Chaotic)
A house-frame shelf looks best when it’s a mix of functional and styled. Try the “60/40” rule:
about 60% practical storage (books, bins) and 40% visual breathing room (a plant, a framed photo, a favorite toy).
If every inch is packed, the house silhouette disappearsand you built that roof for a reason.
DIY Experiences: The Real-Life “Wish I Knew This” Section
Let’s talk about what the internet rarely shows: the little moments that make a DIY house frame bookshelf feel like a real build,
not just a set of steps. These are the most common experiences DIYers report when tackling a house-frame shelfespecially if it’s your first time
mixing a basic bookcase with decorative framing.
First, the plywood edge surprise. Even if your cuts are clean, plywood edges can look fuzzy, layered, or slightly chippedlike the
wood is trying to show you its “before” photo. The fix is simple (edge banding or a facing strip), but the experience is universal:
you stand there holding a shelf, thinking, “This looked smoother in my imagination.” The good news is that once you add a 1×2 edge to the shelf,
it instantly upgrades from “workshop” to “furniture,” and you’ll feel weirdly proud of a strip of wood that’s barely an inch wide.
Second, the roof angle confidence dip. The first roof cut always feels dramatic. You set the miter saw, you line up the board,
and suddenly you’re a person making angles on purpose. Then you cut the second piece, hold them together, andof coursethere’s a gap.
Not a canyon. Just a gap. A small, smug gap. This is the moment experienced builders don’t panic: they either re-cut as a matched pair or tweak
the meeting edge with a light sand while the pieces are clamped together. The lesson is that roof peaks are forgiving if you treat them like a team:
adjust both pieces so they meet nicely, rather than trying to “fix” one while the other stays wrong.
Third, the “is this sturdy enough?” reality check. A house-frame bookshelf can look delicate because it’s cutebut it still needs
to behave like furniture. DIYers often notice that the shelf feels 10x sturdier the instant they add a back panel or firm anchoring.
It’s one of those satisfying upgrades where the piece stops feeling like something you made and starts feeling like something you own.
Also: the first time you press on the side and it doesn’t wobble? That’s a tiny dopamine hit. Enjoy it.
Fourth, finishing takes longer than building. This is not a rumor; it’s a lifestyle. Cutting and assembly can feel fast and exciting.
Sanding and painting feel like the project’s “terms and conditions.” But the experience most people have is this: the finish is where the shelf becomes
photo-worthy. The difference between “cute idea” and “wow, that looks store-bought” is almost always prepfilling nail holes, sanding thoughtfully,
priming edges, and giving paint enough dry time to cure so it doesn’t get sticky when books slide around.
Fifth, the styling phase is its own mini project. DIYers often discover that the shelf looks best when it’s not packed to the brim.
You’ll probably rearrange books three times, decide bins look better on the bottom, then change your mind because the bins hide the cutest book covers.
A common “aha” moment is rotating some books spine-in and others cover-out, adding one small plant or framed print, and realizing the shelf suddenly
looks intentional. It’s the same shelfjust styled like it knows what it’s doing.
Finally, there’s the most wholesome experience of all: people react to the roof. Visitors might not comment on a normal bookcase.
But a house-frame bookshelf? Someone will notice. Someone will ask where it came from. And you get to say, casually (but not too casually),
“Oh, I built it.” If you’re the kind of person who enjoys a well-earned brag, this project is basically a permission slip.
Wrap-Up
A house-frame bookshelf is the sweet spot between practical storage and playful design. Build a strong, square base. Add a lightweight roof frame.
Finish it like you mean it. Anchor it safely. Then step back and enjoy a piece that makes the room feel warmer, tidier, and a little more magical.
And if anyone asks how hard it was, you’re allowed to say: “Not bad.” (Even if you and the roof peak had a brief disagreement.)