
Table of Contents >> Show >> Hide
- Why Dried Flower Ornaments Are So Popular
- Best Flowers for Easy Dried Flower Ornaments
- How to Dry Flowers for Ornaments
- Supplies You Need for Easy Dried Flower Ornaments
- Method 1: Clear Bauble Dried Flower Ornaments
- Method 2: Pressed Flower Acrylic Ornaments
- Method 3: Dried Flower Ornaments on Wood Slices
- Method 4: Resin Dried Flower Ornaments
- Color Palette Ideas for Dried Flower Ornaments
- How to Personalize Dried Flower Ornaments
- Common Mistakes to Avoid
- How to Store Dried Flower Ornaments
- Creative Ways to Use Dried Flower Ornaments Beyond Christmas
- Experience Notes: What Actually Works When Making Easy Dried Flower Ornaments
- Conclusion
There are holiday decorations, and then there are decorations that make people stop mid-cookie and say, “Wait, did you make that?” Easy dried flower ornaments belong proudly in the second category. They are delicate, colorful, surprisingly simple, and far more charming than anything that comes in a plastic tub labeled “festive assortment.” Best of all, they let you preserve a little piece of a garden, bouquet, wedding, birthday, vacation, or random Tuesday when the flowers on the kitchen table looked too pretty to toss.
Dried flower ornaments are also wonderfully beginner-friendly. You do not need a workshop, a professional floral studio, or a mysterious drawer full of crafting tools. With clear glass or plastic ornaments, dried flowers, ribbon, and a few basic supplies, you can create handmade keepsakes that look airy, botanical, and boutique-worthy. They work for Christmas trees, spring branches, wedding favors, nursery decor, gift toppers, memorial keepsakes, and year-round home styling.
This guide walks through the best flowers to use, how to dry them, several easy ornament methods, design ideas, storage tips, and real-life crafting experience so your ornaments look intentional instead of “I sneezed into a craft drawer.” Let’s turn petals into tiny floating works of art.
Why Dried Flower Ornaments Are So Popular
Dried flower ornaments check every box modern DIY lovers care about: they are affordable, personal, low-waste, lightweight, customizable, and beautiful without shouting for attention. Unlike glitter-heavy ornaments that somehow migrate to your eyebrows, dried flowers bring a softer, more natural look. They feel handmade in the best possible way.
They are especially popular because they can hold meaning. A rose from a wedding bouquet, lavender from a backyard garden, baby’s breath from a graduation arrangement, or petals from a Mother’s Day bouquet can become a keepsake instead of ending up in the trash. The result is not just decor. It is a memory with a ribbon attached.
Best Flowers for Easy Dried Flower Ornaments
Not every flower dries like a dream. Some flowers become graceful and papery. Others collapse dramatically, like they just heard bad news. The best dried flowers for ornaments are small, sturdy, colorful, and low-moisture.
Great Flowers for Clear Ornaments
Small dried flowers and fillers work beautifully inside clear baubles because they fit through narrow openings and create a floating garden effect. Try baby’s breath, statice, lavender, strawflower petals, gomphrena, mini rosebuds, chamomile, yarrow, larkspur, small daisies, feverfew, celosia, globe amaranth, and tiny fern pieces.
Great Flowers for Pressed Ornaments
Pressed flower ornaments work best with flat blooms and delicate leaves. Pansies, violas, cosmos, small daisies, fern fronds, forget-me-nots, Queen Anne’s lace, hydrangea petals, and thin rose petals are excellent choices. Pressed flowers look especially pretty on acrylic discs, glass rounds, ceramic tags, wood slices, and clear flat ornaments.
Flowers That Can Be Tricky
Thick, juicy flowers such as large roses, peonies, lilies, and tulips can be harder to dry evenly. They are not impossible, but they need more patience and usually perform best with silica gel. If you are new to dried flower crafts, start with smaller blooms before asking a giant peony to behave inside a tiny ornament. Peonies are gorgeous, but they do have main-character energy.
How to Dry Flowers for Ornaments
You can buy dried flowers from craft stores or online, but drying your own gives the project more personality. Choose flowers before they wilt, remove extra leaves, and keep them away from direct sunlight while drying to help preserve color.
Air Drying
Air drying is the easiest method. Gather a few stems, tie them with string, and hang them upside down in a dry, dark, well-ventilated space. Closets, pantries, and spare rooms often work well. Small bunches dry more evenly than large bundles, so resist the urge to hang an entire bouquet like a floral chandelier unless you enjoy chaos.
Most flowers need one to three weeks to dry fully. They should feel crisp, not cool or damp. Air drying is best for lavender, statice, baby’s breath, strawflowers, yarrow, and sturdy filler flowers.
Pressing
Pressing is perfect for flat ornaments. Place flowers between absorbent paper, tuck them inside a heavy book or flower press, and leave them for one to three weeks. For better results, change the paper after the first day or two if the flowers are moist. This helps prevent browning and mildew.
Pressed flowers are fragile, so handle them with tweezers. Fingers are useful, of course, but petals seem to sense confidence and immediately fall apart.
Silica Gel Drying
Silica gel is ideal when you want flowers to keep more of their original shape. Pour a layer of silica gel into an airtight container, place the flower heads inside, and gently cover them with more silica. Seal the container and let the flowers dry for several days, depending on their thickness.
This method is especially helpful for rosebuds, small zinnias, mini carnations, and other flowers that look better with dimension. Always follow product instructions, avoid breathing dust, and keep silica gel away from young children and pets.
Supplies You Need for Easy Dried Flower Ornaments
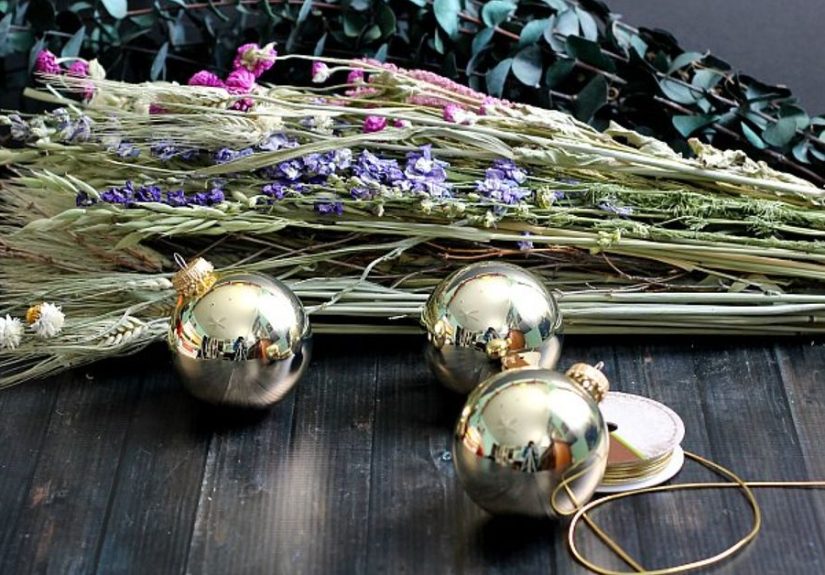
The basic supply list is refreshingly short. You can create beautiful ornaments with clear glass or shatterproof plastic ornaments, dried flowers, ribbon or twine, tweezers, scissors, a paint pen, and optional embellishments such as dried orange peel, cinnamon sticks, tiny pinecones, metallic flakes, or wood beads.
For pressed flower ornaments, add Mod Podge or decoupage glue, a small craft brush, acrylic tags or flat glass rounds, and a clear sealer if desired. For resin ornaments, use a beginner-friendly resin kit, silicone molds, gloves, protective eyewear, and a ventilated workspace. Resin can look stunning, but it is more advanced than the simple fill-and-hang method.
Method 1: Clear Bauble Dried Flower Ornaments
This is the easiest version and the best choice for beginners, kids with supervision, party crafts, or anyone who wants fast results without turning the dining table into a laboratory.
Step-by-Step Instructions
First, remove the cap from a clear ornament. If the opening is narrow, trim your flowers into small pieces. Slide the dried flowers into the ornament one stem or petal at a time. Use tweezers or a rolled piece of paper as a funnel if needed. Mix textures: one airy filler, one colorful bloom, and one fine greenery piece usually creates a balanced design.
Once the ornament looks full but not stuffed, replace the cap. Tie ribbon, velvet cord, jute twine, or silk string around the top. Add a small name tag if you want to personalize it. That is it. You have made a dried flower ornament in about five minutes, which is less time than it takes to untangle one strand of holiday lights from last year.
Design Tip
Do not overfill the ornament. Negative space makes dried flowers look elegant. A clear ornament with just a few stems can look more refined than one packed like a botanical suitcase.
Method 2: Pressed Flower Acrylic Ornaments
Pressed flower acrylic ornaments are flat, modern, lightweight, and great for gifting. They look like tiny stained-glass windows when light shines through them.
Step-by-Step Instructions
Start with a clean acrylic ornament blank. Arrange pressed flowers on the surface before adding glue so you can plan the design. Brush a thin layer of decoupage glue onto the acrylic, place the flowers gently, and smooth them with the brush. Add another thin layer over the top to seal the petals. Let everything dry completely before adding ribbon.
For a polished look, use fewer flowers and leave some open space. You can create a crescent design along one edge, a tiny meadow at the bottom, or a single centered bloom. If you want a more whimsical style, scatter petals like confetti.
Method 3: Dried Flower Ornaments on Wood Slices
Wood slice ornaments give dried flowers a rustic, cottage-style look. They are sturdy, affordable, and great for farmhouse, woodland, or nature-inspired decor.
Step-by-Step Instructions
Choose small wood slices with pre-drilled holes. Arrange pressed flowers or tiny dried stems on the front. Attach them with craft glue or decoupage medium. Once dry, seal lightly if desired. Add ribbon or twine through the hole.
These ornaments look especially lovely with lavender, fern, baby’s breath, and tiny white flowers. You can also write names or dates with a fine paint pen, turning them into place cards, wedding favors, or keepsake gift tags.
Method 4: Resin Dried Flower Ornaments
Resin ornaments preserve dried flowers in a glossy, glass-like finish. They look professional, but they require more preparation and safety care. Use only completely dried flowers, because moisture can cause cloudiness or discoloration.
Follow the instructions on your resin kit exactly. Work in a ventilated area, wear gloves and eye protection, and use silicone molds designed for ornaments. Pour a thin resin layer, place the dried flowers with tweezers, allow bubbles to rise, then add another layer. Let the resin cure fully before removing it from the mold.
Resin is best for special flowers, memorial petals, wedding bouquet pieces, or ornaments you want to last for many years. It is not the fastest method, but the final result can be stunning.
Color Palette Ideas for Dried Flower Ornaments
The easiest way to make dried flower ornaments look cohesive is to choose a color palette before you begin. For a soft romantic look, use blush, cream, pale pink, lavender, and ivory ribbon. For a rustic holiday style, combine dried orange peel, cinnamon, baby’s breath, pine needles, and burgundy flowers. For a modern neutral tree, use white statice, bleached grasses, bunny tails, beige ribbon, and clear glass.
Garden-style ornaments can include mixed colors, but keep the scale small. Tiny yellow flowers, purple petals, green fern, and white filler can look cheerful without becoming visually noisy. Think “wildflower meadow,” not “craft store exploded.”
How to Personalize Dried Flower Ornaments
Personalization turns a pretty ornament into a keepsake. Write a name, date, or short phrase on the ornament with a paint pen. Add a tiny paper scroll inside a clear bauble. Tie on a handwritten tag. Use flowers from a meaningful bouquet. Match the ribbon to a wedding color, nursery theme, or holiday palette.
For gifts, include a small card explaining where the flowers came from. “Made with lavender from Grandma’s garden” is much more meaningful than “Here is a round object containing plant material,” although both are technically accurate.
Common Mistakes to Avoid
The first mistake is using flowers that are not fully dry. Even a little moisture can cause fogging, mold, or sad-looking petals. The second mistake is overhandling pressed flowers. Use tweezers and move slowly. The third mistake is using too much glue. Thick glue can wrinkle petals and create cloudy patches on clear surfaces.
Another common mistake is storing dried flower ornaments in damp places. Basements, garages, and attics can expose ornaments to humidity and temperature swings. Store them in a dry container with padding, and consider adding a small silica packet to help control moisture.
How to Store Dried Flower Ornaments
Dried flowers are long-lasting, but they are still natural materials. Store ornaments in a sturdy box with dividers or tissue paper. Keep them away from direct sunlight, dampness, and heavy objects. Clear ornaments should be wrapped lightly so they do not scratch. Pressed flower ornaments should lie flat or hang freely.
If an ornament loses a few petals over time, do not panic. That is part of working with real botanicals. You can refresh clear ornaments by opening the cap and adding a new small bloom, ribbon, or greenery piece.
Creative Ways to Use Dried Flower Ornaments Beyond Christmas
Despite the word “ornament,” these little botanical pieces are not limited to December. Hang them from spring branches in a vase, use them as wedding escort cards, attach them to wrapped gifts, decorate a nursery wall, display them in a bowl, or hang them in a sunny window. A set of dried flower ornaments can also become a beautiful handmade gift for birthdays, Mother’s Day, housewarmings, bridal showers, or teacher appreciation.
They also make lovely memory projects. Flowers from sympathy arrangements, anniversary bouquets, prom corsages, or baby showers can be preserved in a gentle, decorative way. The key is to dry the flowers as soon as possible, before they begin to wilt.
Experience Notes: What Actually Works When Making Easy Dried Flower Ornaments
After making several batches of dried flower ornaments, one thing becomes clear quickly: the simple version is often the prettiest. The first instinct is to add everything. A rosebud! Some lavender! A fern! A tiny pinecone! Maybe dried orange! Perhaps a cinnamon stick! Suddenly the ornament looks less like elegant botanical decor and more like a terrarium trying to pack for vacation. The best ornaments usually have three ingredients or fewer: one focal flower, one airy filler, and one accent texture.
Clear glass ornaments create the most delicate look, but shatterproof plastic ornaments are more practical for families, classrooms, pets, and anyone who has ever dropped something while saying, “I’ve got it.” Plastic ornaments are also easier to use for craft nights because guests can relax. Glass is beautiful, but it does add a tiny background soundtrack of danger.
For the fillable bauble method, the opening size matters more than expected. Tiny rosebuds and chunky dried orange pieces look adorable on the table, but if they cannot fit through the ornament opening, they are just moral support. Before planning a big batch, test one ornament with your chosen flowers. If the stems are too stiff, trim them shorter. If the petals snag, use tweezers and gently rotate the ornament as you insert them.
Pressed flower ornaments are easiest when the flowers are truly flat. If a petal has a thick center, it may lift from the surface after sealing. A thin layer of glue works better than a heavy coat. The brush should glide, not shovel. Too much decoupage medium can make the flower look cloudy or cause colors to bleed. It helps to test one small flower first, especially with bright reds and purples.
Ribbon changes everything. A simple clear ornament filled with baby’s breath looks sweet with twine, romantic with silk ribbon, modern with velvet, and festive with metallic cord. If the ornament feels unfinished, change the ribbon before adding more flowers. Most of the time, the ribbon was the missing outfit.
One surprisingly useful trick is to create ornaments in small themed batches. Make three blush-and-cream ornaments, three lavender-and-white ornaments, and three woodland-style ornaments. Sets look intentional on a tree and make gifting easier. A single ornament is lovely, but a set of three says, “I planned this,” even if you were crafting in pajamas while drinking cocoa from a mug that says “World’s Okayest Multitasker.”
Another lesson: dried flowers are fragile, but they are forgiving in design. A broken petal can become confetti inside a clear bauble. A short stem can become an accent. A flattened flower can move to an acrylic tag. The project does not demand perfection. In fact, the irregular shapes are part of the charm. Real flowers bend, curl, fade, and vary in size. That natural variation is exactly what makes each ornament feel special.
For sentimental flowers, practice first with inexpensive dried botanicals. Wedding bouquet petals, memorial flowers, or once-in-a-lifetime blooms deserve a warm-up round. Make one or two sample ornaments to test glue, placement, drying time, and ribbon style. Once you feel confident, then use the meaningful flowers. Future you will be grateful, and current you will be less likely to whisper “oh no” at a petal.
The best part of making dried flower ornaments is how calm the process feels. It is slow in a good way. You sort colors, trim tiny stems, hold fragile petals, and build something small but lasting. In a world where most holiday projects seem to require a glue gun, a ladder, and emotional resilience, these ornaments are refreshingly gentle. They are easy enough for beginners, beautiful enough for gifts, and meaningful enough to keep year after year.
Conclusion
Easy dried flower ornaments are proof that handmade decor does not need to be complicated to feel special. With a few dried blooms, clear ornaments, ribbon, and a little patience, you can create keepsakes that are personal, elegant, and full of natural charm. Whether you fill glass baubles, seal pressed flowers onto acrylic tags, decorate wood slices, or preserve petals in resin, each ornament becomes a tiny celebration of color, memory, and creativity.
Start simple, choose flowers that dry well, avoid moisture, and let the natural beauty of the botanicals do most of the work. The result is decor that feels thoughtful without being fussy, stylish without being expensive, and handmade without looking like a craft emergency. In other words, dried flower ornaments are the kind of project that makes you look wildly talented with very little drama. That is the holiday spirit we deserve.


![What Does a World With Zero Search Results Looks Like? [New Data]](https://business-service.2software.net/wp-content/uploads/2026/06/what-does-a-world-with-zero-search-results-looks-like-new-data-QHIlaxzP-thumb.jpg)
