Table of Contents >> Show >> Hide
- Why Recorder Cleaning Matters (Besides Basic Dignity)
- Before You Start: Know Your Recorder Type
- Tools & Supplies (No, You Don’t Need a Power Washer)
- Easy Ways to Clean a Recorder: 11 Steps
- Step 1: Wash Your Hands (Yes, This Counts as Instrument Care)
- Step 2: Warm the Headjoint to Reduce Clogs
- Step 3: Disassemble Carefully (TwistDon’t Yank)
- Step 4: Dry-Swab the Bore After Every Session
- Step 5: Clean the Outside (Because Fingerprints Are Forever)
- Step 6: Wash Plastic Parts (Warm Soapy Water, Not a Lava Bath)
- Step 7: Clean the Windway (The Recorder’s “Air Highway”)
- Step 8: Handle Mineral Buildup (The “White Chalky Stuff”)
- Step 9: Sanitize Only When Needed (Sharing, Rentals, and “Where Has This Been?”)
- Step 10: Dry Completely Before Reassembly and Storage
- Step 11: Reassemble, Lubricate Joints (If Needed), and Set a Cleaning Routine
- Troubleshooting: When Your Recorder Still Sounds Weird
- FAQ: Recorder Cleaning Questions People Google at 11:47 PM
- Real-World Experiences: What Actually Happens When You Start Cleaning Your Recorder (About )
- Conclusion
Let’s be honest: the recorder has a reputation. It’s the instrument that launched a thousand squeaks in elementary music class,
and it can still sound amazing (yes, really) when it’s clean, dry, and not full of mysterious “snack dust.”
If your recorder is sounding airy, hoarse, or like it’s trying to impersonate a goose, a proper cleaning is often the fastest fix.
This guide walks you through how to clean a recorder in 11 easy stepsfor both plastic recorders and
wooden recorders. You’ll also learn how to clean the tricky windway (without doing anything that would make a repair tech cry),
how to sanitize safely when sharing instruments, and how to keep your recorder from turning into a science project.
Why Recorder Cleaning Matters (Besides Basic Dignity)
A recorder is a small wind instrument with a surprisingly sensitive airway. Tiny changeslike a thin film of moisture, a little mineral buildup,
or a crumb from your “just one bite” granola barcan affect tone, response, and tuning. Regular recorder maintenance helps you:
- Reduce clogging (that sudden muffled sound that shows up at the worst moment)
- Improve tone and articulation (clean notes, less “fuzzy air”)
- Prevent odors and mildew (your case should not smell like a damp gym bag)
- Extend the life of joints and pads if your recorder has keys
Before You Start: Know Your Recorder Type
Cleaning a recorder depends on what it’s made of:
- Plastic (resin/ABS) recorders are generally washable with warm, mild soapy water (with a few important exceptions).
- Wooden recorders need a gentler approach. Too much water can swell wood and create long-term problems.
Deep cleaning inside the windway of a wooden recorder is often a “let a professional handle it” situation.
Tools & Supplies (No, You Don’t Need a Power Washer)
Here’s what you’ll want on hand:
- Cleaning rod (or the rod that came with your recorder)
- Soft, thin, lint-free cloth (microfiber works well)
- Mild dish soap (fragrance-free is a nice bonus)
- Warm water (not hot)
- Cotton swabs for the outside and finger holes
- A soft toothbrush (optional, for exterior grime only)
- Recorder joint grease/cream (optional, for plastic tenons)
- Optional sanitizer: alcohol wipes or an instrument-safe disinfectant (only when needed)
Easy Ways to Clean a Recorder: 11 Steps
These steps are arranged from safest and most universal to the deeper-clean options. If your recorder just needs routine care,
you may only need Steps 1–4 plus Step 10.
Step 1: Wash Your Hands (Yes, This Counts as Instrument Care)
Oils, lotion, and snack residue transfer directly to the recorder. Clean hands reduce buildup inside tone holes and around the mouthpiece.
It’s the simplest way to keep your recorder cleaner longer.Step 2: Warm the Headjoint to Reduce Clogs
Plastic recorders clog more easily because condensation forms when warm breath hits a cool windway. Warm the headjoint in your hands,
under your arm, or in a pocket for a minute or two before playing. This helps prevent the “sudden duck-call solo” problem.Bonus tip: If you’re teaching a class, this one trick can save you from a room full of “My recorder is broken!” panics.
Step 3: Disassemble Carefully (TwistDon’t Yank)
Take the recorder apart at the joints using a gentle twisting motion. If it has keys, be extra careful not to bend mechanisms or press pads.
Lay the sections on a clean towel.If the joints feel stuck, don’t force it. A little warmth from your hands and a slow twist is safer than brute strength.
Step 4: Dry-Swab the Bore After Every Session
This is the daily habit that keeps everything else easy. Wrap a soft cloth around your cleaning rod and gently swab each section.
Remove moisture, then let the recorder air-dry for a few minutes before putting it away.This single step does more for recorder cleaning than any “deep clean” you do once a year.
Step 5: Clean the Outside (Because Fingerprints Are Forever)
Wipe the exterior with a barely damp cloth. If there’s grime, add a tiny drop of mild dish soap to the cloth, wipe, then follow with a clean damp wipe.
Dry immediately.For wooden recorders: keep water away from thread-wrapped joints and any pads. Think “spa facial,” not “car wash.”
Step 6: Wash Plastic Parts (Warm Soapy Water, Not a Lava Bath)
For plastic recorder cleaning, you can wash most non-keyed parts in warm, soapy water. Use a basin (safer than a running sink) and keep water warmnot hot.
Rinse thoroughly so no soap remains.Avoid: harsh solvents (they can damage plastic), boiling water, and long hot soaks. Also avoid washing keyed sections unless the maker says it’s safe.
After rinsing, shake out excess water and let parts air-dry on a towel.
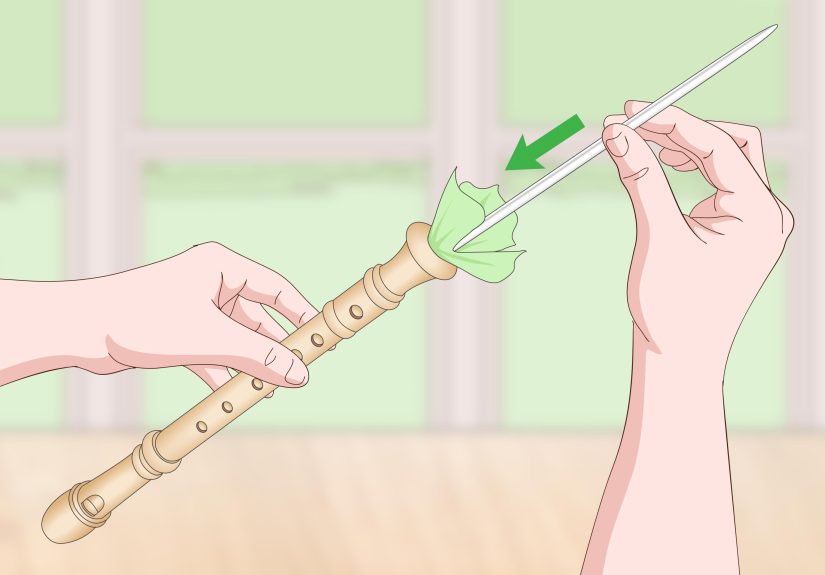
Step 7: Clean the Windway (The Recorder’s “Air Highway”)
The windway is the narrow channel where gunk and moisture love to hang out. Don’t scrape it with anything sharp.
For routine care, drying and gentle flushing (plastic only) is usually enough.For plastic recorders: You can run warm water through the windway and window area, then blow gently (away from your face)
to push droplets out. If buildup is stubborn, use a soft, flexible tool (like a cloth strip) very gentlyno stabbing motions.For wooden recorders: Avoid flushing water through the windway. If the windway is truly dirty or moldy, that’s often a job for a qualified repair person.
Step 8: Handle Mineral Buildup (The “White Chalky Stuff”)
If you see chalky deposits near the beak or around the windway window, that’s often mineral residue from moisture and saliva.
Start with the gentlest approach: wipe with a damp cloth and dry.If the deposit persists (especially on wooden beaks), a very small amount of diluted vinegar applied carefully to the affected exterior area
can helpfollowed by a mild soapy wipe and thorough drying. Keep liquids controlled and minimal, and never soak wood.Step 9: Sanitize Only When Needed (Sharing, Rentals, and “Where Has This Been?”)
Cleaning removes residue; sanitizing reduces germs. If the recorder is used only by you, routine cleaning and drying is usually enough.
If it’s shared (classroom sets, rentals, or a borrowed instrument), add a careful sanitation step.Use instrument-safe disinfectant methods intended for mouthpiece areas. Alcohol wipes are commonly used for many instrument surfaces,
but be cautious with finishes and any pads. Avoid bleach solutions unless you’re following a school-approved protocol designed for instruments,
because bleach can damage materials and is easy to misuse.Always let the instrument fully dry before storage. Moisture plus a closed case equals “mildew’s luxury condo.”
Step 10: Dry Completely Before Reassembly and Storage
Dry every section inside and out. Leave the recorder out on a towel for at least 15–30 minutes (longer if you washed it) so hidden moisture can evaporate.
Reassemble only when dry.If you store a damp recorder, you’re basically sending an invitation to odor and mold.
Step 11: Reassemble, Lubricate Joints (If Needed), and Set a Cleaning Routine
If joints feel tight, use a small amount of recorder cream/grease on plastic tenonssparingly. If joints are loose, don’t “fix” it with extra grease;
that’s like wearing three belts because your pants don’t fit. A loose joint may need a proper adjustment.Suggested routine:
- After every play: swab and air-dry (Steps 4 and 10)
- Weekly or biweekly: exterior wipe + a quick windway check (Steps 5 and 7)
- Monthly (or as needed): warm soapy wash for plastic parts (Step 6)
- When shared: sanitize responsibly (Step 9)
Troubleshooting: When Your Recorder Still Sounds Weird
Problem: “It’s hoarse and airy.”
Most common causes: condensation clogging, moisture in the bore, or debris in the windway.
Try: warm the headjoint, dry-swab, and gently clear moisture from the windway (Steps 2, 4, and 7).
Problem: “Some notes squeak more than usual.”
First check finger coverage (leaks are squeak magnets). If technique is solid, look for moisture and residue around the window/labium.
A clean, dry windway makes high notes more reliable.
Problem: “It smells… not great.”
Odor usually means moisture was trapped in the case. Increase drying time, swab after every session, and leave the case open occasionally to air out.
If mildew is visible, don’t ignore itclean carefully and consider professional help for wooden instruments.
FAQ: Recorder Cleaning Questions People Google at 11:47 PM
Can I put a plastic recorder in the dishwasher?
Some educators mention dishwashers for certain plastic classroom instruments, but it’s not universally recommended for all recorders.
Heat and detergents can warp parts, dull finishes, or affect joints. If you’re tempted, check the maker’s instructions first.
Hand-washing in warm, mild soapy water is the safer default.
Should I use rubbing alcohol inside the recorder?
Alcohol products are often used for mouthpiece-area sanitation on many wind instruments, but you should be cautious:
avoid soaking, avoid contact with pads/finishes, and don’t use harsh methods on wood. If you only need routine cleaning,
soap-and-water plus thorough drying is usually enough.
How do I clean a wooden recorder safely?
Focus on wiping the exterior, swabbing moisture out after playing, and following the maker’s care guidance.
Avoid soaking. Deep windway cleaning often requires a professional, since the internal block and windway dimensions are critical to sound.
Real-World Experiences: What Actually Happens When You Start Cleaning Your Recorder (About )
In the real world, recorder cleaning usually begins with a very specific moment: you play a note, and instead of music you get a sound that can only be described as
“a goose complaining.” Then you do the universal troubleshooting ritual: you glare at the instrument like it betrayed you personally.
Classroom players often discover that the recorder isn’t “broken”it’s just wet. In a room full of beginners, the windway can clog fast because warm breath meets cool plastic,
and suddenly half the class is producing a soft hiss. Teachers who build a two-minute routinewarm the headjoint, play, swab, air-dryreport fewer interruptions
and more time actually making music. It’s not glamorous, but neither is a 25-recorder squeak symphony.
Adult beginners run into a different surprise: buildup happens even when you’re careful. Maybe you drink coffee before practicing. Maybe you snack.
Maybe you’re a normal human who forgets that “just one cracker” becomes “just one crumb” inside the beak. The first time you do a proper wash on a plastic recorder,
you may notice the water looks slightly cloudy. That’s not the recorder dissolving; it’s the tiny film of oils and residue leaving the instrumentexactly what you want.
After a full dry, many players notice cleaner attacks, a more centered tone, and fewer random airy notes.
People who borrow or buy used recorders tend to have the most dramatic cleaning stories. Used instruments can come with mystery residue, old joint grease that has collected grit,
or that unmistakable “stored in a basement” smell. A careful clean plus a responsible sanitation step often transforms the instrument from “questionable relic” to “perfectly playable.”
The key lesson: sanitizing isn’t about drenching the recorder in chemicals; it’s about controlled, appropriate cleaning of the areas that matter, followed by thorough drying.
Wooden recorder owners learn a different kind of patience. Wood is less forgiving than plastic, and a little too much water can cause swelling or surface changes.
Many players find that consistent swabbing and smart storage solve most problems without “deep cleaning.” They also learn to respect the windway.
If a wooden recorder starts clogging constantly or feels unresponsive, the temptation is to poke around. But experienced players usually choose the safer route:
keep it dry, keep it clean on the outside, and consult a professional when internal work is needed. That restraint saves instrumentsand money.
Perhaps the most common experience is this: once you start cleaning your recorder consistently, you stop thinking about cleaning your recorder.
The instrument plays better, it smells normal, and you spend your practice time on music instead of fighting the hardware.
It’s the most boring success story in the worldand that’s exactly the point.
Conclusion
A clean recorder responds faster, sounds clearer, and stays healthierespecially in classrooms and shared-instrument situations.
Swab after every session, wash plastic recorders with warm mild soapy water when needed, avoid harsh chemicals, and treat wooden instruments gently.
Do that, and your recorder will stop sounding like it’s auditioning for “Barnyard: The Musical.”