Table of Contents >> Show >> Hide
- Why Pine Dressers Are Great Upcycling Candidates
- Before You Start: The Smart Upcycler’s Checklist
- Prep Like a Pro (Because Prep Is the Real Makeover)
- The Best Upcycling Plan for a Pine Chest: A Painted Gray Makeover
- Want to Keep the Wood Look? Refinish Instead
- Do You Need a Topcoat?
- Hardware Upgrades That Instantly Improve the Look
- Don’t Forget the Drawers Themselves
- Common Upcycling Mistakes (and How to Avoid Them)
- Real-World Upcycling Experiences: What It’s Actually Like
- Final Thoughts
- SEO Tags
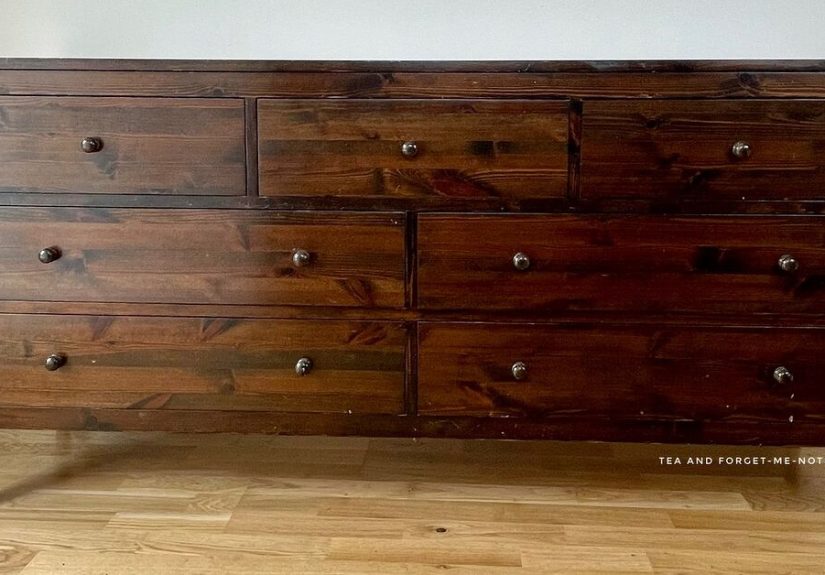
If you’ve got a pine chest of drawers that screams “college apartment, circa 2009,” don’t send it to the curb just yet. Pine furniture is one of the easiest types of wood furniture to upcycle, and that’s exactly why it shows up in so many thrift stores, hand-me-down bedrooms, and “I swear I’ll redo this someday” corners of the house. The good news: someday is today.
With the right prep and a smart finish plan, a basic pine dresser can become a polished bedroom statement, a moody entryway console, a nursery changing station, or even a dining room storage piece. And yes, it can look expensive without costing expensive-money. That’s the magic of upcycling: a little elbow grease, a little paint, and a lot of “Wait…you made that?” energy.
In this guide, I’ll walk you through how to upcycle a pine chest of drawers the right waywithout skipping the boring-but-important prep, without getting trapped in primer confusion, and without ending up with sticky drawers or peeling paint two weeks later. We’ll cover paint, stain, hardware swaps, drawer upgrades, and the mistakes that make DIYers mutter words not suitable for family websites.
Why Pine Dressers Are Great Upcycling Candidates
Pine is a softwood, which makes it easier to sand and customize than many hardwoods. That also means it dents a bit more easily, but honestly, that’s not a bugit’s a feature if you like character. A pine chest of drawers is usually lightweight enough to move, affordable enough to experiment on, and simple enough in shape to work with almost any style: farmhouse, modern, coastal, traditional, or “Pinterest but on a budget.”
Another plus: pine takes both paint and stain well when prepped correctly. If the dresser is knotty pine, you can either embrace the knots for a rustic look or paint over them for a smoother, more elevated finish. A lot of DIY makeovers start with knotty pine because the transformation is dramatic. One coat of the right primer and a few coats of paint, and suddenly the “dated” piece looks custom.
If you want a safe style bet, gray is a fantastic choice for pine. It softens yellow-orange undertones, works with brass or black hardware, and can lean warm or cool depending on your room. A soft gray can make a chunky dresser look refined, while a deeper charcoal gray makes simple furniture look intentional and designer-y.
Before You Start: The Smart Upcycler’s Checklist
1) Check the age of the piece
If your dresser is older (especially if it came from a very old house, antique shop, or family basement), pause before sanding. Older finishes can contain lead, and sanding can create hazardous dust. If there’s any doubt, follow lead-safe practices or get the piece tested first. This is one of those “annoying but essential” steps.
2) Decide your finish path
There are three common upcycling directions for pine dressers:
- Painted finish (most popular): Best for dated orange pine, uneven color, or heavy wear.
- Refinished natural/stained wood: Great if the wood grain is nice and you want a warmer, classic look.
- Hybrid look: Painted frame + stained top, or painted body + wood drawer fronts.
Pick your direction before you prep. The sanding and priming approach changes depending on whether you’re painting or staining.
3) Gather supplies before the chaos begins
Here’s a practical list for most pine dresser upcycles:
- Screwdriver (for removing hardware and drawers)
- Dish soap or degreasing cleaner
- Sandpaper (180 and 220 grit are the MVPs)
- Sanding sponge or orbital sander
- Tack cloth or damp microfiber cloth
- Wood filler + putty knife
- Stain-blocking primer (especially for knotty pine)
- Paint (cabinet/furniture paint or durable interior trim paint)
- Brush + mini roller (foam or fine-finish roller)
- Optional topcoat/sealer
- New knobs or pulls
- Drop cloth, gloves, and a respirator for sanding
Prep Like a Pro (Because Prep Is the Real Makeover)
Everyone wants to skip prep. No one should skip prep. This is the part that determines whether your upcycled chest of drawers lasts two years or two weeks.
Step 1: Remove drawers and hardware
Take out all the drawers, then remove knobs, pulls, and any decorative pieces. Put screws in a labeled bag. If you’ve ever spent 45 minutes on your hands and knees looking for one tiny screw, you already understand this step in your soul.
Step 2: Clean everything
Even bedroom furniture collects dust, oils, and mystery residue. Wash the piece with mild soap and water or a furniture-safe cleaner, then let it dry fully. If the dresser lived in a kitchen, garage, or smoker’s home, clean it extra well. Paint does not bond to grime. It bonds to regret.
Step 3: Repair dents and holes
Fill dents, gouges, and old hardware holes with wood filler. Let it dry, then sand smooth. If you’re changing from small knobs to longer drawer pulls, check whether the existing holes line up with your new hardware. If not, fill and re-drill later.
Step 4: Sand for adhesion, not punishment
You do not always need to sand down to raw wood for a painted finish. Most of the time, your goal is to dull the surface so primer can grab. For many pine dressers, a light sanding with 180- to 220-grit is enough. Focus on smoothing rough spots, knocking down glossy finish, and feathering chipped areas.
If you’re refinishing and staining instead of painting, sanding is more extensive. In that case, you may need to strip the old finish and sand through multiple grits until the surface is even and the stain absorbs consistently.
Step 5: Remove dust (seriously, all of it)
Vacuum the piece, then wipe it down with a tack cloth or a damp microfiber cloth. Dust is the enemy of smooth paint. Leave sanding dust behind and your “modern matte finish” can quickly become “textured oatmeal.”
The Best Upcycling Plan for a Pine Chest: A Painted Gray Makeover
If your pine chest of drawers has that classic yellow-orange tone and visible knots, a painted gray finish is one of the easiest ways to modernize it. Gray neutralizes warm pine undertones and looks great with brass, matte black, or brushed nickel hardware.
Step 1: Prime for knots, sap, and stains
This is the big one for pine. Knots and tannins can bleed through paint, especially light colors. If your dresser is knotty pine, use a stain-blocking primer, and consider spot-priming knots first with a shellac-based primer before priming the full piece. This prevents those annoying yellow-brown circles from ghosting through your beautiful new paint job like tiny tree-related jump scares.
Apply primer in a thin, even coat with a brush for details and a mini roller for flat areas. Let it dry fully. If the original finish is dark, glossy, or patchy, do a second coat. Lightly sand between coats if the surface feels rough.
Step 2: Paint in thin coats
For furniture, thin coats win every time. Use a roller on broad surfaces and a brush in corners, trim profiles, and around drawer details. Follow the wood grain when brushing. Don’t overload your brush. Thick paint looks faster in the moment and worse forever.
Most dressers need two coats for full coverage. Some colorsespecially pale grays and off-whitesmay need a third. Let each coat dry according to the paint label before recoating. If your paint feels dry-to-the-touch but still soft, wait longer. Furniture gets handled a lot, and rushed curing is a top reason DIY paint jobs fail.
Step 3: Optional detail moves that make it look custom
Want your piece to look less “painted furniture project” and more “boutique find”? Try one of these:
- Two-tone finish: Paint the dresser body a medium gray and the drawer fronts a lighter gray (or vice versa).
- Wood top: Strip and stain the top, paint the rest.
- Drawer-front design: Add slim wood trim or dowels, then paint for texture.
- Wallpaper or grasscloth inserts: Apply to drawer faces for pattern and personality.
Gray also pairs beautifully with warm metallic accents. Brushed brass pulls on a gray pine dresser can make a basic piece look surprisingly high-end.
Want to Keep the Wood Look? Refinish Instead
Maybe your pine dresser has great grain and you’re not in a paint mood. Fair. A stain-and-seal makeover can look gorgeous, especially in natural, walnut, or smoked oak-inspired tones.
Refinishing basics for pine
- Strip or sand away the old finish (sometimes both).
- Sand evenly with the grain.
- Test stain in a hidden spot (inside a drawer is perfect).
- Apply stain in small sections and wipe excess.
- Let it dry fully.
- Seal with a clear protective finish.
Pine can absorb stain unevenly, so test first. If you’re changing color over an existing stained finish, some products let you darken or shift tone without aggressive strippinghelpful if you want a faster refresh and the surface is still in decent shape. That said, if you want to go much lighter, full stripping is usually the better route.
Do You Need a Topcoat?
Sometimes yes, sometimes no. If you’re using a durable cabinet/furniture paint and the dresser is for normal bedroom use, you may be fine without a separate clear coat. But for kids’ rooms, high-traffic spaces, or pieces that will get frequent wiping, a topcoat can add protection.
If you do add one:
- Choose a product compatible with your paint.
- Test on a hidden area first (some clear coats can shift color or sheen).
- Use thin coats and don’t overbrush.
- Let it cure completely before heavy use.
For stained dressers, a protective finish is much more important. It helps resist scratches, moisture, and daily wear while making the color look richer and more finished.
Hardware Upgrades That Instantly Improve the Look
New hardware is the jewelry of the dresser. You can repaint a pine chest beautifully, but old brass knobs from a different century (or fake crystal knobs from 2002) can still make it look unfinished.
How to choose the right pulls
If you’re replacing existing drawer pulls, measure the center-to-center distance between the screw holes. That measurement determines what new hardware will fit without drilling new holes. If you’re switching from knobs to pulls, mark and measure carefully, and use a template so your placement stays consistent across every drawer.
Popular pairings for gray dressers:
- Brushed brass (warm and classic)
- Matte black (clean and modern)
- Antique pewter (vintage-friendly)
- Wood pulls (soft, Scandinavian feel)
Pro tip: Check screw length
Drawer fronts vary in thickness, and hardware screws that are too long can poke through the front. Not a great look. Measure the drawer-front thickness before installation so your new hardware tightens securely without turning your project into a safety hazard.
Don’t Forget the Drawers Themselves
A dresser can look amazing and still feel terrible if the drawers stick, wobble, or scrape like a haunted attic door. Upcycling isn’t only about looksit’s about function.
Quick drawer improvements
- Vacuum and clean the drawer interiors before reinstalling.
- Lightly sand rough drawer runners if wood-on-wood slides are dragging.
- Wax wooden runners lightly for smoother movement.
- Consider replacing worn slides if the dresser uses metal slides and they’re bent or sticky.
If you’re doing a full rebuild or heavy upgrade, modern drawer slides (like side-mount or undermount options) can dramatically improve how the dresser feels. Just note that slide replacements require correct clearances and measurements, so check specs before buying.
Common Upcycling Mistakes (and How to Avoid Them)
1) Skipping primer on knotty pine
Paint looks great for a week. Then knots bleed through. Now your gray dresser has yellow freckles. Use the right stain-blocking primer and save yourself the repaint.
2) Painting over dust
Dust nibs happen when you don’t clean between sanding, priming, and painting. A quick wipe-down makes a huge difference.
3) Applying heavy coats
Heavy coats cause drips, tacky edges, brush marks, and long cure times. Thin, even coats always look better.
4) Reinstalling hardware too soon
Fresh paint can feel dry while still soft underneath. Let it cure before tightening hardware or sliding drawers in and out repeatedly.
5) Ignoring safety
Use a respirator while sanding, work in a ventilated area, and protect your eyes and skin when using strippers or strong cleaners. This project should upgrade your furniturenot your cough.
Real-World Upcycling Experiences: What It’s Actually Like
Let’s talk about the part most tutorials skip: what the project feels like in real life. Because upcycling a pine chest of drawers is very doable, but it’s also a little messy, a little unpredictable, and occasionally humbling in the funniest way possible.
A common experience is starting with confidence and ending the first hour covered in dust, holding a drawer pull, and wondering why older furniture owners used seventeen different screw types. This is normal. The project usually looks worse before it looks betterespecially after you remove hardware and sand off the shiny finish. At that stage, your dresser may resemble “wooden potato.” Keep going.
Another very common moment: the color panic. You paint on your first coat of gray and immediately hate it. It looks streaky. The knots are showing. The old pine tone peeks through and you think, “I have ruined everything.” You have not. Furniture paint almost always looks rough after coat one. Coat two is where things start looking intentional. Coat three is where you begin browsing your house for the next victim.
Many DIYers also discover that the hardware swap is the most satisfying part. The dresser can be the same exact shape, but once new pulls go on, it suddenly reads as modern, vintage, or custom. It’s a huge visual payoff for relatively little effort. This is why hardware shopping can become a hobby. Proceed with caution and a budget.
Then there’s the drawer drama. A painted dresser body looks fantastic, but the drawers sometimes stick after reassembly because paint built up on edges or runners. This is frustrating but fixable. A little sanding on the contact points and a bit of wax can transform the feel. It’s one of those tiny adjustments that makes the project feel finished, not just “pretty from across the room.”
People who refinish instead of paint often describe a different kind of satisfaction. Stripping and staining is slower, and yes, it can be messy, but seeing the grain come back to life is incredibly rewarding. It’s less instant-gratification than paint, more “slow reveal.” If the pine has interesting knots and figure, the final result can feel warm and timeless in a way painted pieces sometimes don’t.
One more real-world truth: your second dresser will be better than your first. The first one teaches you how much primer you really need, how little paint is enough on a roller, and why labeling hardware bags matters. By the time you finish your first pine chest upcycle, you’ll have a better eye for proportions, sheen, and color balance. You’ll also start spotting upcycling candidates everywherethrift stores, curbside pickups, your aunt’s guest room. It happens fast.
The best part of the experience, though, is practical. Upcycling a pine chest of drawers gives you a piece that fits your home better than something off the shelf. You choose the color, the hardware, the finish, and the vibe. It becomes yours in a way store-bought furniture rarely does. And every time someone asks where you bought it, you get to say, “Oh, this? It used to be a very sad pine dresser.” That line never gets old.
Final Thoughts
If your pine chest of drawers is sturdy, it’s worth upcycling. Focus on the fundamentals: clean, sand, prime (especially those knots), paint or stain in thin coats, and finish with hardware that matches your style. A basic pine dresser can become one of the best-looking pieces in your roomnot because it was expensive, but because it was done well.
Take your time, let things dry properly, and don’t judge the project too early. Upcycling rewards patience. And if your first attempt isn’t perfect? Congratulations. You’re officially a real DIYer now.