Table of Contents >> Show >> Hide
If you grew up sneaking pastel “pillow” mints from your grandma’s candy dish, this homemade butter mints recipe is your new party trick. These little melt-in-your-mouth bites are rich, buttery, softly minty, and way easier to make than most candies. No boiling sugar, no candy thermometer, just a bowl, a mixer, and a bit of patience while they dry.
In this guide, you’ll learn exactly how to make buttery, old-fashioned dinner mints at home, how to color and flavor them, how to store and freeze them, and what to do if your mint dough is too sticky or too crumbly. We’ll also cover some real-life tips and experiences at the end so your first batch feels like your fiftieth.
What Are Homemade Butter Mints?
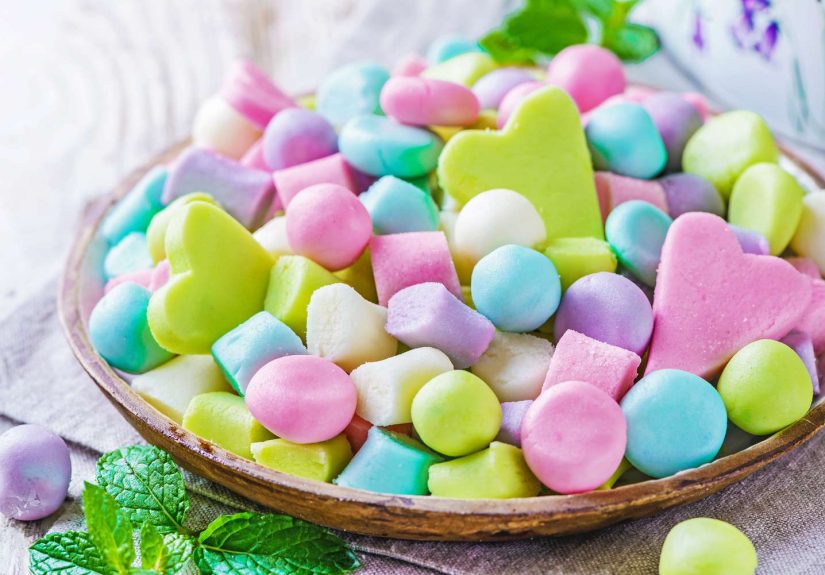
Butter mints (also called dinner mints or pillow mints) are soft, bite-size candies made from butter, powdered sugar, cream, and peppermint flavoring. Unlike cream cheese mints, which rely on cream cheese for a slight tang, classic butter mints get their rich, meltaway texture from softened butter and a splash of cream or sweetened condensed milk.
The texture should be firm enough to hold its shape, but tender enough to practically dissolve on your tongue. Think: somewhere between frosting and fudge, shaped into tiny squares or disks. They’re perfect as a little “thank you for coming” at the end of a meal, set out at weddings, baby showers, holiday buffets, or frankly just eaten straight from the container in the fridge.
Classic Homemade Butter Mints Recipe
This recipe makes a generous batch of butter mints that you can divide into different colors and flavors. Expect roughly 150–200 tiny mints, depending on how small you cut them.
Ingredients
- 1/2 cup (1 stick) unsalted butter, softened to room temperature
- 1/8 teaspoon fine salt (skip if using salted butter)
- 4 cups (about 1 pound) powdered sugar, plus extra for dusting
- 2 tablespoons heavy cream or half-and-half (start with 1 tablespoon and add more as needed)
- 1/2 teaspoon pure peppermint extract (see flavor options below)
- 1/2 teaspoon vanilla extract (optional, for a rounded flavor)
- Gel or liquid food coloring (optional, pastel shades work best)
Equipment
- Stand mixer or handheld electric mixer
- Large mixing bowl
- Rubber spatula
- Baking sheets lined with parchment or wax paper
- Sharp knife or bench scraper
- Fork (for the classic crosshatch pattern, optional)
Step-by-Step Instructions
1. Cream the butter
- Place the softened butter and salt in a large mixing bowl.
- Beat on medium speed for 1–2 minutes, until the butter looks smooth, creamy, and slightly lighter in color.
2. Add powdered sugar and cream
- Turn the mixer to low speed and add about 2 cups of powdered sugar, one cup at a time, mixing just until combined. The mixture will look thick and crumbly.
- Add 1 tablespoon of heavy cream or half-and-half and continue mixing.
- Add the remaining powdered sugar, about 1/2 cup at a time, mixing after each addition. Scrape down the sides and bottom of the bowl as needed.
- If the mixture is still very dry and won’t hold together when squeezed, add up to 1 more tablespoon of cream, 1 teaspoon at a time, until a soft dough forms.
3. Flavor the dough
- Add the peppermint extract and vanilla extract (if using).
- Beat on low until fully incorporated. Taste a tiny bit of dough: it should be pleasantly minty, but not overwhelmingly strong. You can add an extra drop or two of peppermint if you prefer a bolder mint flavor, but add it slowlymint extract is powerful.
4. Adjust the texture
- At this point, the dough should feel like a soft, pliable fondant or very thick frosting. It should hold together in a ball without cracking, but not be so sticky that it glues itself to your hands.
- If it’s too sticky, knead in a little more powdered sugar, 1–2 tablespoons at a time.
- If it’s too stiff or crumbly, knead in 1 teaspoon of cream at a time until it smooths out.
5. Color the dough (optional)
- Divide the dough into 2–4 portions, depending on how many colors you want.
- Working with one portion at a time, add a drop or two of food coloring and knead it in with clean hands until the color is evenly distributed. Aim for soft pastels; a little color goes a long way.
6. Shape and cut the mints
- Dust your work surface lightly with powdered sugar.
- Roll each colored portion into ropes about 1/2 inch in diameter.
- Use a sharp knife or bench scraper to cut the ropes into bite-size pieces (about 1/2 inch long). You can leave them as little pillows or roll them into small balls.
- For the classic look, gently press each mint with the tines of a fork to flatten slightly and create ridges.
- Arrange the mints in a single layer on parchment- or wax-paper-lined baking sheets.
7. Dry the mints
- Let the mints air-dry at room temperature for at least 12 hours and up to 24 hours, depending on your kitchen’s humidity.
- They should feel firm and dry on the outside but still soft when you bite into them.
Make-Ahead, Storage, and Freezing Tips
- Room temperature: Once fully dried, store butter mints in an airtight container at room temperature for up to 2 weeks. Keep them in a cool, dry place away from direct sunlight.
- Refrigerator: If your kitchen runs warm, you can refrigerate the mints for up to 1 month. Let them sit at room temperature for 10–15 minutes before serving so the butter softens slightly.
- Freezer: Freeze in an airtight container or freezer bag for up to 3–6 months. Thaw in the container on the counter so condensation forms on the container, not directly on the candy.
- Make-ahead for events: For weddings or holidays, you can easily make butter mints 1–2 weeks in advance and store them frozen or refrigerated until the big day.
Flavor and Color Variations
Butter mints are surprisingly flexible. Once you master the base recipe, you can customize them for any holiday or party theme.
Flavor swaps
- Spearmint or wintergreen: Use a spearmint or wintergreen extract instead of peppermint for a softer mint flavor.
- Lemon or citrus: Swap in lemon extract for a bright twist and color the mints pale yellow.
- Vanilla “wedding mints”: Reduce the mint extract and bump up the vanilla for guests who want mint-adjacent but not “toothpaste-level” minty.
- Chocolate-mint: Replace 2–3 tablespoons of powdered sugar with unsweetened cocoa powder and keep the peppermint extract for a chocolatey after-dinner mint.
Color ideas
- Spring/Easter: Pale pink, lavender, mint green, and soft yellow.
- Christmas: Red, green, and white swirled or layered ropes.
- Baby shower: Soft blues and pinks, or neutrals like cream and pale peach.
- Weddings: Match the mints to the wedding palettedusty rose, sage, ivory, or champagne tones look especially elegant.
Troubleshooting: Fixing Common Butter Mint Problems
The dough is too sticky
If your dough clings to your hands and refuses to hold a neat rope, it’s probably too wet. Sprinkle in more powdered sugar, 1–2 tablespoons at a time, and gently knead it in until the dough feels like soft modeling clay. Avoid adding a lot at once or your mints can turn chalky.
The dough is crumbly or cracking
Crumbly dough usually means you’re short on moisture. Knead in an extra teaspoon of cream at a time, letting it fully absorb before adding more. In a pinch, even a tiny splash of warm water can help bring a dry dough back together.
The mints taste too strong
Mint extract can go from refreshing to “chewing a tube of toothpaste” very quickly. If you overdo it, you can sometimes soften the flavor by kneading in more unflavored dough (if you haven’t shaped all of it yet). For future batches, start with 1/4 teaspoon of extract, taste, and build up slowly.
The mints never really dry
High humidity can make it difficult for butter mints to dry fully. Spread them out in a single layer with space between each piece and give them more timeup to 24 hours. You can also move the trays to a drier room in your home. Avoid the refrigerator while they’re drying; condensation will keep them tacky.
Serving and Gifting Ideas
Homemade butter mints are tiny, but they make a big impression. Some easy ways to show them off:
- Wedding or shower favors: Package assorted pastel mints in small cellophane bags or mini jars tied with ribbon.
- Holiday candy trays: Add them to a platter alongside cookies, toffee, and fudge. Their soft color and texture balance out richer desserts.
- After-dinner coffee bar: Fill a pretty bowl with butter mints near the coffee and tea station for a simple, elegant finish to a meal.
- Office or school treats: Bring a container of homemade mints to share. They travel well and don’t crumble like cookies.
- Gift boxes: Add a handful to cookie boxes or tins as a colorful filler and sweet surprise.
My Real-Life Butter Mint Experiences and Tips
The first time I made homemade butter mints, I underestimated them. They looked so simple on paperjust butter, sugar, cream, and peppermintthat I assumed they were a “background candy,” something to fill a dish and forget about. Instead, they became the star of the dessert table, with people quietly circling back for “just one more” long after the pie and cake were gone.
One of the biggest lessons I learned early on is that texture is everything. When the dough is right, it’s almost relaxing to work withsmooth, soft, and easy to roll into ropes. When it’s wrong, you’ll know immediately. Too sticky and you’re chasing strands of dough around your cutting board; too dry and it cracks like old playdough. Don’t be afraid to adjust. A spoonful of powdered sugar or a teaspoon of cream can completely transform the dough.
Another key discovery: mint extract is not a “more is better” ingredient. In one memorable batch, I thought, “If 1/2 teaspoon is good, 1 teaspoon will be amazing.” It was not amazing. The mints tasted like they were auditioning to be breath strips. Now I always start smaller, taste, and add extra only if needed. It’s easier to build flavor than to dial it back.
I also love how easily butter mints adapt to different events. For a baby shower, pastel pink and blue mints, pressed with a fork for that classic crosshatch, look sweet and nostalgic. For Christmas, I’ve done half green and half white and tucked them into small tins as part of cookie boxes. They’re budget-friendly, but they feel surprisingly “fancy,” especially when people find out they’re homemade.
If you’re cooking with kids, this recipe is a winner. The dough is safe to taste (no raw eggs, no hot syrup), and the stepsmixing, coloring, rolling ropes, cutting piecesfeel like a craft project. Just be prepared for creative shapes: kids will happily make stars, hearts, snails, and whatever else their imaginations invent. As long as the pieces are small enough to dry, it all works.
Drying time is the part that requires the most patience. I’ve tried to rush it before, thinking, “They look dry enough.” A few hours later, the mints in the container had stuck together in a pastel brick. Now I always give them at least overnight to dry, and I make sure they’re in a single layer on the tray, not piled up. When in doubt, wait a little longerfuture you will be grateful.
When it comes to storage, butter mints are surprisingly forgiving. I’ve had great results freezing them in airtight containers for a month or two before a big event. They thaw quickly and taste just as fresh as the day I made them. That makes them a fantastic “do-ahead” dessert if you’re the kind of person (like me) who gets overly ambitious with party menus.
Most of all, homemade butter mints bring a bit of old-fashioned charm to modern gatherings. They feel like something your grandmother might have made, but with colors and flavors you can customize to your own style. Once you realize how simple they are, you may find yourself inventing excuses to make thembecause there’s always room for a little bowl of minty, buttery happiness on the table.
Conclusion
Homemade butter mints are proof that a short ingredient list can still deliver big flavor and nostalgia. With just butter, powdered sugar, cream, and a bit of peppermint, you can create a candy that melts in your mouth, looks beautiful on a dessert table, and keeps well for gifting and special occasions. Adjust the colors and flavors to match your event, give the mints enough time to dry, and store them properlyyou’ll have a simple, elegant treat that guests remember long after the dishes are done.