Table of Contents >> Show >> Hide
- Why Short Ribs Love a Braise (and Hate Your Impatience)
- Buying Short Ribs: What to Look For at the Store
- The Braise Blueprint: The Always-Tender Method
- Step 1: Season like you mean it (and consider an overnight “dry brine”)
- Step 2: Dry the surface for better browning
- Step 3: Sear hard, in batches
- Step 4: Build a flavor base (aka the “good decisions” stage)
- Step 5: Deglaze like a pro
- Step 6: Add braising liquidbut not too much
- Step 7: Cover and cook low-and-slow
- Step 8: Know when they’re done (hint: it’s not “because the timer yelled”)
- Step 9: Rest the ribs in the liquid
- Step 10: Make the sauce glossy, not greasy
- Temperature and Timing: The Tenderness Sweet Spot
- Sauce Upgrades: How to Get That Restaurant-Style Finish
- Common Braising Mistakes (and How to Fix Them)
- Flavor Variations That Still Stay Foolproof
- What to Serve With Braised Short Ribs
- FAQ: Quick Answers to Common “Wait, What If…” Questions
- Conclusion: Tender Short Ribs Are a Method, Not a Mystery
- Kitchen “Experience” Notes: What It’s Like in Real Life (So You Don’t Panic)
Braised short ribs are the culinary equivalent of showing up to a party in sweatpants and still getting
compliments. They’re cozy, dramatic, andif you do a few key things rightso reliably tender that people will
assume you have a secret restaurant backstory.
This guide walks you through a foolproof, always-tender method for braising beef short ribs: what to buy, how
to build flavor, the right liquid level, the temperature sweet spot, and the “why is my meat still tough?”
troubleshooting that saves dinner (and your reputation).
Why Short Ribs Love a Braise (and Hate Your Impatience)
Short ribs come from a hardworking area of the cow, which means they’re packed with connective tissue
(collagen). Collagen is stubborn at firstchewy, tight, not here for your weeknight schedule. But given time
at gentle heat with moisture, collagen melts into gelatin. That gelatin is the “silky” in silky sauce and the
“falls-apart” in falls-apart tender.
Braising works because it combines two superpowers: deep browning for flavor, then low-and-slow cooking in a
small amount of liquid so the meat softens gradually without drying out. Think of it as a spa day for beef:
a quick sauna (sear), then a long soak (braise).
Buying Short Ribs: What to Look For at the Store
Bone-in vs. boneless
Bone-in short ribs are the classic choice for maximum flavor and a richer braising liquid. Boneless can still
be great, but bone-in tends to taste deeper and feels more “special occasion.” If you can choose, go bone-in.
English-cut vs. flanken-cut
For a traditional braise, you usually want English-cut short ribsthick, single-bone chunks
(the kind that look like tiny beef blocks with a handle). Flanken short ribs are cut across
the bones into thinner strips and are awesome for grilling or Korean-style cooking, but they can overcook more
easily in a long braise.
Marbling matters
Look for ribs with visible marbling and a nice balance of meat and fat. Fat is not the villain herefat is the
supporting actor who steals the show. It renders into the sauce, adds richness, and helps everything taste
like you meant it.
How much to buy
Plan on about 1 to 1½ pounds per person for bone-in ribs (bones add weight). Leftovers are a
feature, not a bug.
The Braise Blueprint: The Always-Tender Method
If you remember nothing else, remember this: deep browning + correct liquid level + low oven +
enough time. That quartet delivers tender short ribs every time.
Step 1: Season like you mean it (and consider an overnight “dry brine”)
Season short ribs generously with kosher salt and black pepper. If you can, salt them and refrigerate
uncovered overnight. This dries the surface (better browning) and seasons deeper. If you can’t, even 30–60
minutes of salting at room temp helps.
Step 2: Dry the surface for better browning
Pat the ribs dry with paper towels before searing. Moisture is the enemy of browning. Your goal is a deep,
crusty, mahogany exteriornot “steamed beef with regret.”
Step 3: Sear hard, in batches
Heat a Dutch oven (or heavy oven-safe pot) over medium-high heat with a thin layer of neutral oil. Sear ribs
on all sides until deeply browned. Don’t crowd the potcrowding drops the temperature and you’ll end up
simmering instead of browning. Browned bits on the bottom (fond) are pure flavor currency.
Step 4: Build a flavor base (aka the “good decisions” stage)
Reduce heat to medium. Add chopped onion, carrot, and celery (the classic mirepoix). Cook until softened,
scraping up some fond. Add garlic for the last minute so it doesn’t burn. Stir in tomato paste and cook it
for a minute or two until it darkens slightlythis adds body and savory depth.
Step 5: Deglaze like a pro
Pour in a dry red wine (or a mix of wine and broth). Scrape up every browned bit. Let it simmer for a few
minutes to reduce slightly. This step is the difference between “nice sauce” and “why does this taste like a
steakhouse?”
Step 6: Add braising liquidbut not too much
Add beef stock (or broth) and aromatics like bay leaf and thyme. Return ribs to the pot in a snug single
layer. Now the key: the liquid should come about halfway up the sides of the ribs, not
submerge them. Braising is part-steam, part-simmer; drowning the meat turns your sauce into soup and robs you
of concentration.
Step 7: Cover and cook low-and-slow
Cover with a tight-fitting lid and braise in the oven at 275°F to 325°F. A very common
sweet spot is around 300°F, which keeps the simmer gentle and steady.
Step 8: Know when they’re done (hint: it’s not “because the timer yelled”)
Start checking around 2½ hours, but expect anywhere from 2½ to 4 hours depending on size and
your oven temperature. You’re looking for:
- Fork-tender meat that yields easily when pierced.
- Meat pulling back from the bone and looking relaxed, not tense.
- Collagen fully softened: if it’s still chewy, it’s undercookedkeep going.
Important truth: when short ribs are tough, they usually need more time, not less. Collagen
doesn’t negotiate.
Step 9: Rest the ribs in the liquid
When they’re tender, let the ribs rest in the pot for 15–30 minutes. This helps the meat settle and stay
juicy. Cutting into them immediately is like leaving a movie before the endingyou’ll miss the payoff.
Step 10: Make the sauce glossy, not greasy
Transfer ribs to a plate. Strain the braising liquid (optional but great for a refined sauce), then skim fat
from the top. If the sauce is thin, simmer it to reduce. If you want extra body, see the “Sauce Upgrades”
section below.
Temperature and Timing: The Tenderness Sweet Spot
Braising short ribs is about controlling the simmer. You want the liquid to barely bubblemore of a gentle
burble than a rolling boil.
- 275°F–300°F: Slow, steady, very forgiving. Great for larger ribs and ultra-tender results.
- 300°F–325°F: Still gentle, slightly faster. A popular range for many home recipes.
- Above 325°F: Riskier. You can do it, but watch for aggressive bubbling and drying edges.
If you’re using a stovetop instead of the oven, keep the heat low enough that the liquid barely simmers and
check more often to prevent scorching.
Sauce Upgrades: How to Get That Restaurant-Style Finish
1) Make it ahead (the laziest “chef trick”)
Braised short ribs often taste even better the next day. Chill the ribs in the braising liquid overnight, and
the fat solidifies on top so you can lift it off in one satisfying sheet. Reheat gently, and your sauce will
taste richer and less greasy.
2) Boost body with gelatin (without getting weird about it)
A sauce feels luxurious when it has a little natural “bounce.” Homemade stock often has gelatin; many boxed
broths don’t. You can enhance store-bought stock with unflavored gelatin to mimic that velvety texture,
especially if you plan to reduce the sauce.
3) Reduce, then balance
Simmer strained liquid to concentrate flavor. Taste and adjust: a pinch of salt, a splash of vinegar, or a
squeeze of lemon can wake up a heavy braise. If your wine is very tannic, a small touch of sweetness (even a
teaspoon of honey) can round the edges.
4) Finish with freshness
Rich braises love bright toppers: chopped parsley, chives, lemon zest, or a quick gremolata (parsley + garlic
+ lemon zest). It’s like opening a window in a warm room.
Common Braising Mistakes (and How to Fix Them)
“My short ribs are tough.”
They’re almost always under-braised. Keep cooking at gentle heat. Collagen needs time to
convert to gelatin. Give it time and it will surrender.
“My sauce tastes flat.”
You likely need one of these: more salt, more reduction, or a tiny hit of acid (vinegar/lemon). Also make sure
you browned the ribs deeplyfond is flavor.
“My sauce is greasy.”
Skim fat while hot, or (better) chill overnight and remove the solid fat cap. Then reheat gently.
“The bottom burned.”
Heat was too high or liquid got too low. Next time, ensure a gentle simmer and check liquid level midway
through. In the moment: transfer everything to a clean pot without scraping the burnt layer, then continue.
“They’re falling apart… like, too much.”
That’s the “overachiever” problem. Pull them a bit earlier next time, and handle gently. Some shredding is
normal (and delicious), but you can keep the shape by using slightly lower heat and checking sooner.
Flavor Variations That Still Stay Foolproof
Classic red wine braised short ribs
The standard: red wine + beef stock + tomato paste + herbs. Choose a dry red wine you’d actually drink. You
don’t need luxury winejust avoid anything super sweet or “cooking wine.”
Beer + wine (deep, malty, cozy)
A stout or dark beer can add roasty depth alongside wine and stock. This is especially good when you want a
bold, wintery vibe.
Asian-inspired braise
Swap the flavor profile: soy sauce, ginger, garlic, orange zest/juice, a little honey, and warm spices like
five-spice. You still use the same method: sear, deglaze, braise gently until tender.
Slow cooker or pressure cooker?
You can adapt the braise to a slow cooker or pressure cooker, but keep the same principles:
brown first, keep the liquid reasonable, and finish the sauce uncovered if you need
reduction. For pressure cookers, reduce wine first so the final sauce doesn’t taste harsh.
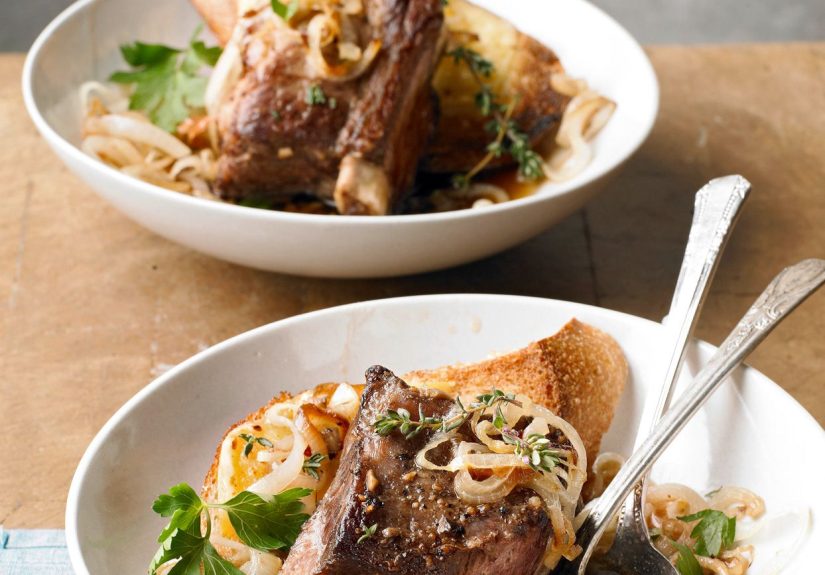
What to Serve With Braised Short Ribs
Braised short ribs come with a built-in sauce, so pair them with something that happily soaks it up:
- Mashed potatoes (classic for a reason)
- Creamy polenta or grits
- Wide pasta ribbons (pappardelle is basically a sauce delivery system)
- Roasted root vegetables
- Crusty bread (the unofficial last course: “sauce cleanup”)
For drinks, bold reds with good structure tend to stand up well to the richness of short ribs.
FAQ: Quick Answers to Common “Wait, What If…” Questions
Can I braise short ribs a day ahead?
Yesand you probably should if you’re cooking for guests. The flavor deepens overnight, reheating is easy, and
removing fat is dramatically simpler when chilled.
How much liquid is “enough”?
Aim for liquid halfway up the ribs. If you submerge them, you dilute the sauce and lose the best part: that
concentrated braising liquid you’ll want to drink with a spoon.
Do I need a Dutch oven?
A Dutch oven is ideal because it holds heat and has a tight lid. But any heavy, oven-safe pot with a lid works.
If your lid is loose, you can add a layer of foil under it to reduce evaporation.
How do I store and reheat leftovers?
Store ribs in the sauce. Reheat gently on the stovetop or in a low oven until warmed through. The sauce keeps
the meat from drying out and makes leftovers taste like you planned ahead (even if you didn’t).
Conclusion: Tender Short Ribs Are a Method, Not a Mystery
Always-tender braised short ribs aren’t about secret ingredients or fancy techniques. They’re about four
repeatable moves: season well, sear deeply, braise gently with the right liquid level, and cook until the meat
truly gives in. Do that, and you’ll get rich sauce, fork-tender beef, and the kind of dinner that makes people
linger at the table “just a little longer.”
Kitchen “Experience” Notes: What It’s Like in Real Life (So You Don’t Panic)
Let’s talk about the part recipes skip: the emotional journey of braising. Because braised short ribs are
incredibly forgiving, but only if you recognize what “normal” looks like along the way.
First, there’s the searing stage, where you wonder if your kitchen will permanently smell
like a steakhouse. This is when people make the biggest mistake: they get nervous and move the ribs too soon.
If the ribs don’t release easily, they’re not browned yet. Let them develop that crust. Browning is not just
colorit’s flavor you can’t invent later with “extra herbs” and hope.
Next comes the deglaze, also known as “scrape up the good stuff.” You’ll see browned bits on
the pot and think, “Is that… burnt?” Usually it’s not burntit’s fond. When wine or broth hits the heat and
those bits loosen, the smell changes immediately into something rounder and deeper. This is a good sign. If
it smells harsh or overly boozy, let it simmer a little longer before adding more stock. Time calms wine down.
Then you tuck the pot into the oven and hit the “nothing is happening” phase. For the first
hour, your ribs won’t look dramatically different. This is where impatience tries to sabotage you. Resist the
urge to keep opening the lid every ten minutes like you’re checking on a sleeping baby. Every peek releases
heat and slows the braise. Let the oven do its job.
Around the 2 to 3-hour mark, you enter the “is it done yet?” phase. You poke the meat. It’s
still kind of tight. This is the crossroads where many people stop too early and end up with tough ribs. If
it’s chewy, it’s not done. Keep going. Collagen doesn’t flip from tough to tender graduallyit often feels
like it happens suddenly, like a curtain drop. One check it’s stubborn; the next check it yields and feels
plush.
Finally, you meet the sauce. It might look a little oily. That’s normalshort ribs have fat,
and fat renders. If you’re serving immediately, skim what you can and reduce a bit for body. If you’re serving
tomorrow, congratulations: you just unlocked the easiest upgrade. Chill it overnight and remove the solid fat
cap in one piece. Reheated short ribs can taste even better the next day, because the flavors have had time to
settle and mingle. It’s not magic. It’s just delicious science.
The best “experience-based” tip: treat braised short ribs like a weekend project with weekday
benefits. Make them when you have a little time, then enjoy leftovers that reheat like a dream. And
if you ever feel like you “messed them up,” remember: most short rib problems are fixed with one thing
lower heat and more time. The ribs will forgive you. The sauce will, too.