Table of Contents >> Show >> Hide
- What “Buffing” Ceramic Tile Really Means
- Before You Start: Check What’s Causing the Dullness
- Supplies You’ll Need
- How to Buff Ceramic Tile Step by Step
- Can You Use a Buffer Machine on Ceramic Tile?
- Should You Use Wax or Polish on Ceramic Tile?
- Best Tips for Making Ceramic Tile Shine Again
- What Not to Do When Buffing Ceramic Tile
- How Often Should You Buff Ceramic Tile?
- When to Call a Pro
- Real-World Experiences: What Buffing Ceramic Tile Taught Me
- Conclusion
If your ceramic tile looks dull, cloudy, or just generally offended by your cleaning routine, don’t panic. In many cases, ceramic tile doesn’t need a dramatic rescue mission. It needs a smarter one. “Buffing” ceramic tile is less about grinding it into a glossy masterpiece and more about restoring the finish it already has by removing residue, haze, soap scum, hard-water buildup, and the mysterious film that appears when someone gets a little too enthusiastic with floor cleaner.
That distinction matters. Ceramic tile is not natural stone, and it doesn’t behave like marble or granite. Most glazed ceramic tile already has a baked-on finish. That means you usually are not polishing raw material to create shine. You are cleaning it correctly, drying it thoroughly, and buffing the surface so the original finish can show up and do its job. Think of it as less “floor surgery” and more “very satisfying makeover.”
In this guide, you’ll learn how to buff ceramic tile safely, which tools actually help, which products can make things worse, and when a dull floor is not dirty at all, but simply worn out. We’ll also cover the difference between glazed and unglazed ceramic tile, because that one detail changes almost everything.
What “Buffing” Ceramic Tile Really Means
When homeowners search for how to buff ceramic tile, they usually mean one of three things:
- They want to make ceramic tile shine again.
- They want to remove cloudy residue or grout haze.
- They want to smooth scuffs and restore the look of older tile.
All three are possible to some degree, but the method depends on the tile finish. With glazed ceramic tile, the shine comes from the glaze itself. You do not want to sand it, strip it aggressively, or hit it with rough pads like you’re refinishing a gym floor. With unglazed ceramic tile, you may have a little more flexibility for deeper cleaning and careful buffing, but you still want to avoid turning the project into a demolition derby.
Glazed vs. Unglazed Ceramic Tile
Glazed ceramic tile has a protective glass-like surface baked onto it. It resists stains well and is fairly easy to clean. If it looks dull, the problem is often residue, hard-water spots, cleaner buildup, or worn glaze in high-traffic areas.
Unglazed ceramic tile has no top glaze, so the tile body is the surface. It often has a more matte or textured look and may be more porous. This type can trap dirt more easily, and it may benefit from more detailed scrubbing and, in some cases, a tile-specific finish approved by the manufacturer.
Rule number one: before you buff anything, figure out which type you have. If you don’t, you may accidentally trade “slightly dull” for “permanently regrettable.”
Before You Start: Check What’s Causing the Dullness
A ceramic tile floor can lose its sparkle for very different reasons, and each one calls for a different fix.
Common Reasons Ceramic Tile Looks Dull
- Cleaner residue: Too much soap, too much product, or not enough rinsing.
- Hard-water film: Mineral deposits that leave a cloudy look.
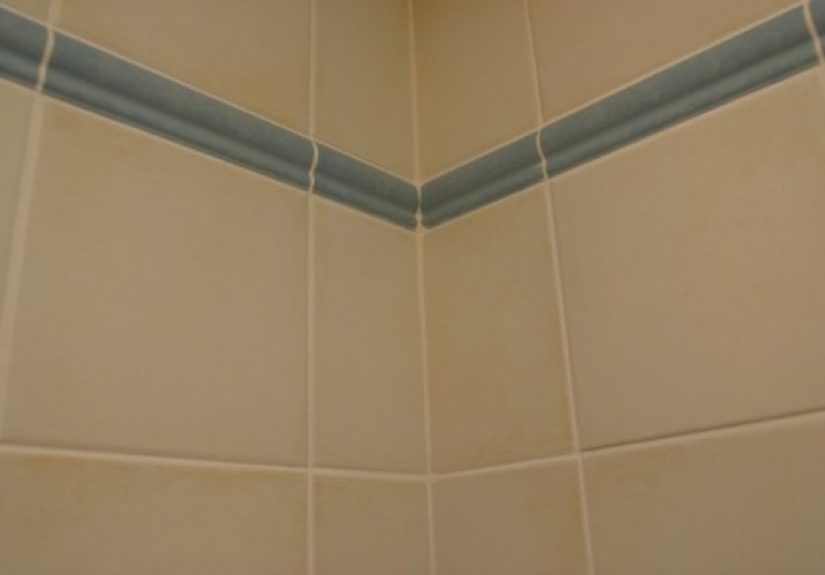
- Soap scum: Common on bathroom wall tile and shower tile.
- Grout haze: A powdery or cloudy film left after installation or repairs.
- Ground-in dirt: Especially on textured or unglazed tile.
- Worn glaze: Common in entryways, kitchens, and hallways with heavy foot traffic.
If your tile is truly scratched, chipped, or worn through, buffing will improve cleanliness but won’t magically grow a fresh factory finish. At that point, you may need tile replacement, professional refinishing, or a serious talk with the family member who thinks dragging metal stools across the floor is a personality trait.
Supplies You’ll Need
- Soft broom, dust mop, or vacuum with a hard-floor setting
- Microfiber mop or microfiber cloths
- Bucket of warm water
- pH-neutral tile cleaner or mild dish soap diluted in water
- Soft-bristle nylon brush
- Dry microfiber towels for buffing
- Optional: tile-safe grout haze remover for post-installation haze
- Optional: wet/dry vacuum for larger floors
Avoid steel wool, wire brushes, rough scrub pads, abrasive powders, and random “miracle shine” products that look like they were invented during a late-night infomercial. If a product isn’t labeled for ceramic tile, treat it with suspicion.
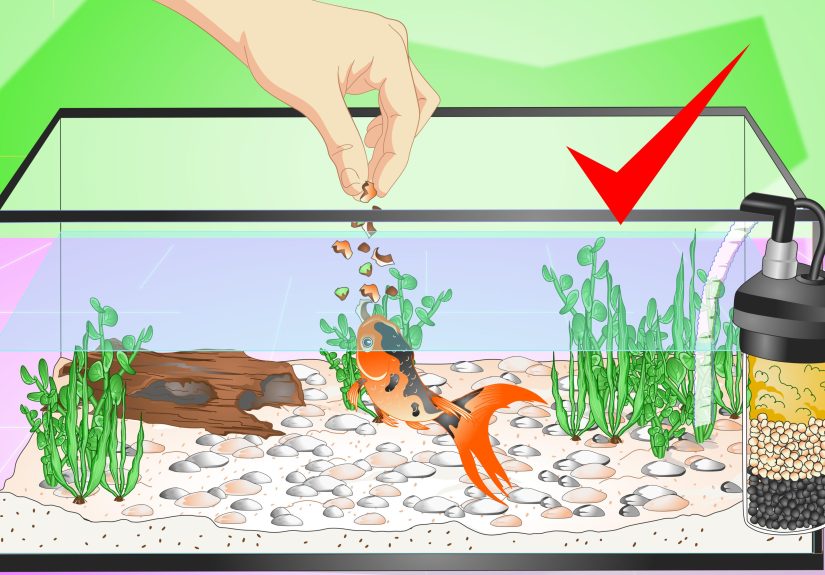
How to Buff Ceramic Tile Step by Step
1. Remove Loose Dirt First
Always start dry. Sweep, dust mop, or vacuum the tile thoroughly before adding any moisture. This step sounds boring, but it matters. Dirt and grit are tiny abrasives, and if you start scrubbing before removing them, you can grind grime across the surface and make the tile look worse.
Pay extra attention to corners, grout lines, entry points, and the space around toilets, vanities, and kitchen islands. Those zones collect more debris than the rest of the floor and love to sabotage your results.
2. Wash With a Gentle Cleaner
Mix warm water with a pH-neutral tile cleaner, or use a very small amount of mild dish soap if the manufacturer allows it. Mop or wipe the tile with the solution, working in sections. The goal is to loosen grime, not leave the floor swimming.
For wall tile, apply the cleaner with a sponge or microfiber cloth. For floors, a microfiber mop works better than a sponge mop because sponge mops can push dirty water into the grout lines. That’s not cleaning. That’s just relocating the problem.
3. Scrub Problem Areas Gently
If some sections still look dingy, use a soft nylon brush to scrub them lightly. Focus on textured tile, greasy kitchen spots, shower buildup, and grout lines. Let the cleaner sit for a few minutes if needed, but do not let it dry on the tile.
For unglazed ceramic tile, a more detailed scrub may be necessary because dirt can cling more stubbornly to the surface texture. For glazed tile, go easy. You’re helping the finish, not trying to erase it from existence.
4. Rinse Thoroughly
This is the step people skip, and then they wonder why the tile still looks cloudy. If cleaner residue stays on the surface, the floor can dry with a film that kills shine. Rinse with clean water, changing the water when it gets dirty. On larger floors, a second pass with plain water is often worth the extra few minutes.
If you are cleaning especially grimy tile, a wet/dry vacuum can help remove dirty water instead of spreading it around like gossip.
5. Buff Dry Immediately
Now comes the actual buffing. Use a clean, dry microfiber cloth or towel to buff the tile in circular motions or broad back-and-forth strokes. For large floors, place a dry microfiber towel under your foot and slide it across the tile. Yes, it looks ridiculous. Yes, it works.
This step helps remove lingering moisture, lifts light film, and restores clarity to the finish. On glazed ceramic tile, buff-drying is often the difference between “meh” and “hey, that actually looks good.”
6. Repeat on Hazy or Cloudy Spots
If certain spots still look dull, inspect them more closely. If the film is leftover cleaner, another rinse-and-buff cycle may fix it. If it is grout haze from a recent installation or repair, use a grout haze remover formulated for ceramic tile and follow the label directions exactly. Use the gentlest effective method first.
Do not grab the harshest acid cleaner in the garage just because you’re impatient. Ceramic tile may be durable, but grout, finishes, and surrounding materials can still suffer if you go rogue.
Can You Use a Buffer Machine on Ceramic Tile?
Sometimes, but with caution. For most residential ceramic tile, especially glazed tile, hand buffing with microfiber is enough. A low-speed floor buffer may be helpful on large commercial-style floors or stubborn residue, but only with a soft white pad and only after testing a small area.
Do not use aggressive stripping pads, sanding discs, or polishing compounds designed for stone unless the tile manufacturer specifically recommends them. Ceramic tile is not the place for experimental chemistry and power tools at the same time.
Should You Use Wax or Polish on Ceramic Tile?
Usually, no. Standard glazed ceramic tile does not need wax, and many shine-enhancing products create buildup that attracts dirt and makes future cleaning harder. Some specialty finishes may be appropriate for certain unglazed tiles, terra-cotta-style surfaces, or commercial applications, but only if the product is specifically designed for that tile and approved by the manufacturer.
If your tile looks dull because the glaze is worn, adding wax may give you a short-lived glow, but it won’t solve the underlying issue. It can also turn routine cleaning into a sticky, streaky sequel nobody asked for.
Best Tips for Making Ceramic Tile Shine Again
- Use less cleaner, not more.
- Rinse with fresh water every time.
- Buff dry with microfiber instead of air-drying.
- Clean spills quickly, especially oils and soap residue.
- Use entry mats to reduce abrasive dirt on floor tile.
- Seal grout if recommended, but don’t seal glazed ceramic tile.
- Test any new product in a hidden area first.
One of the easiest ways to make ceramic tile shine is also the least dramatic: stop overusing cleaning products. Many dull floors are not dirty floors. They are floors wearing too much leftover soap.
What Not to Do When Buffing Ceramic Tile
- Don’t use steel wool or wire brushes.
- Don’t scrub glazed tile with abrasive pads.
- Don’t leave cleaner on the tile to dry.
- Don’t assume vinegar is right for every tile situation.
- Don’t use generic waxes unless they are specifically approved.
- Don’t confuse ceramic tile with stone tile.
- Don’t expect buffing to repair cracked or badly worn tile.
That last point is important. Buffing can restore appearance, but it is not a miracle cure for physical damage. If the glaze is gone, the gloss is gone with it.
How Often Should You Buff Ceramic Tile?
In most homes, ceramic tile only needs occasional buffing after a proper wash. High-traffic floors may benefit from a quick dry buff every week or two, while bathroom wall tile may need buffing after a deeper clean to remove water spots and soap film.
A practical schedule looks like this:
- Weekly: Sweep or vacuum and spot-clean.
- Every 1–2 weeks: Mop with a gentle cleaner and buff dry.
- Monthly: Deep-clean grout lines and textured areas.
- As needed: Remove haze, hard-water film, or soap buildup.
When to Call a Pro
If you’ve cleaned, rinsed, and buffed properly and the tile still looks lifeless, the issue may be etched grout residue, deeply embedded staining, worn glaze, or installation-related damage. A professional tile cleaner can identify whether the tile needs specialty cleaning, grout restoration, or replacement.
This is especially true if you have older tile, large areas of haze after renovation, or a floor that has been coated repeatedly with polish or wax over the years. At that point, the tile may be less “dusty” and more “wearing seven bad decisions.”
Real-World Experiences: What Buffing Ceramic Tile Taught Me
After enough weekends spent trying to make ceramic tile look less tired, I’ve learned that most dull tile is not a disaster. It’s a misunderstanding. People see a cloudy floor and assume the answer is stronger chemicals, heavier scrubbing, or one of those products that promises “instant showroom shine” in a bottle with way too much exclamation-point energy. In real life, the fix is usually simpler and less dramatic.
The first lesson came from a bathroom floor that always looked hazy no matter how often it was cleaned. At first glance, it seemed like the tile finish was gone. But after a proper wash with a gentle cleaner, a full rinse with fresh water, and a slow buff with dry microfiber towels, the tile brightened noticeably. The problem was not worn tile. It was cleaner buildup. Too much product had left a film, and every new mopping just added another layer. That floor didn’t need polishing. It needed a fresh start and less enthusiasm from the mop bucket.
The second lesson came from kitchen tile near the stove. It looked darker and duller than the rest of the room, and regular mopping barely touched it. The culprit was greasy residue mixed with dust, which is basically the flooring version of a bad casserole. A soft nylon brush and a pH-neutral cleaner loosened the grime, but the real improvement happened after rinsing twice and drying immediately. Once the residue was gone, the tile finally reflected light the way it was supposed to.
Then there was the shower wall that looked permanently tired. It wasn’t scratched. It was covered in soap scum and mineral deposits. The tile looked old, but it was just coated. A careful clean, thorough rinse, and dry buff brought back more shine than expected. That experience really drove home how often “dull” tile is just tile hidden under buildup.
Not every story ends with a triumphant sparkle, though. In one entryway, the ceramic tile had taken years of gritty foot traffic right near the door. No matter how clean it got, the busiest path still looked flatter than the surrounding area. That’s when it became clear the glaze had worn down. Buffing helped with cleanliness and made the rest of the floor look better, but it could not recreate a factory finish that had already been physically worn away. That was a useful reminder that maintenance has limits, and sometimes the honest answer is repair or replacement.
Another lesson came from textured, unglazed tile in a mudroom. Smooth glazed tile can often be revived with a good wash and a microfiber buff. Textured tile is fussier. Dirt hides in tiny valleys, and if you rush the job, the surface still looks grubby even when it’s technically clean. In that case, the win came from patience: dry debris removal first, cleaner second, brush work third, rinse fourth, buff last. Skipping the order produced mediocre results every time.
The biggest takeaway from all of these experiences is that ceramic tile rewards gentle, consistent care more than aggressive “fixes.” If you clean it with the right product, rinse it like you mean it, and buff it dry before water spots and residue settle in, it usually looks far better without any heroics. And if it still doesn’t shine, that tells you something valuable too: the issue may be wear, not dirt. Oddly enough, that kind of honesty saves time, money, and a whole lot of scrubbing.
Conclusion
Buffing ceramic tile is not about attacking the floor with the most powerful tool you can rent before lunch. It’s about understanding the surface, removing residue safely, and restoring clarity with the right cleaning and drying method. For most glazed ceramic tile, the winning formula is simple: sweep, wash gently, rinse well, and buff dry with microfiber. For unglazed tile, deeper scrubbing may be needed, but the same principle applies: clean first, shine second.
If your ceramic tile still looks dull after that, don’t assume you failed. You may simply be looking at worn glaze, not removable grime. And honestly, that’s good information. It means you can stop scrubbing and start solving the right problem.