Table of Contents >> Show >> Hide
- Why a Firewood Rack Is Worth Building
- Choose the Right Location Before You Build
- Materials and Cut List
- Tools You Will Need
- How to Build a Firewood Rack Step by Step
- Step 1: Prepare and Level the Site
- Step 2: Measure and Cut the Lumber
- Step 3: Assemble the Rectangular Base
- Step 4: Install the Uprights
- Step 5: Add the Upper Rails and End Ties
- Step 6: Install Diagonal Bracing
- Step 7: Position and Anchor the Rack
- Step 8: Add Weather Protection
- Step 9: Finish the Wood
- How to Stack Firewood Correctly
- Useful Firewood Rack Upgrades
- Common Firewood Rack Mistakes
- Maintenance After the Build
- Experience-Based Lessons From DIY Firewood Rack Projects
- Conclusion
A loose heap of firewood may look charmingly rustic for about three minutes. Then the bottom logs absorb ground moisture, the tarp collapses into a rainwater swimming pool, and a neighborhood committee of ants moves in without paying rent.
A properly built DIY firewood rack solves those problems with a simple formula: elevate the logs, support the weight, allow air to circulate, and protect the top from precipitation. The project below uses ordinary pressure-treated 2×4 lumber to create an approximately 8-foot-long rack suitable for standard 16-inch firewood. It is sturdy, customizable, and realistic for a homeowner with basic carpentry tools.
Why a Firewood Rack Is Worth Building
Firewood does not finish drying simply because it has been split. Moisture still needs to escape through the exposed surfaces, which requires time and moving air. The U.S. Environmental Protection Agency recommends seasoning wood for at least six months, storing it outdoors and off the ground, and covering only the top rather than wrapping the entire pile. The EPA also recommends burning wood with a moisture content below 20 percent.
A rack creates airflow beneath the pile while preventing direct contact with wet soil. Open sides allow cross-ventilation, and upright end supports keep the stack from slowly spreading across the yard like a wooden glacier. DIY references from This Old House, Popular Mechanics, Lowe’s, The Spruce, and experienced builders consistently use these same principles: a raised base, an open structure, weather-resistant materials, and overhead protection that does not suffocate the woodpile.
Project Overview
- Finished size: Approximately 96 inches long, 20 inches deep, and 48 inches high
- Storage capacity: Roughly one face cord when stacked close to four feet high
- Skill level: Beginner to intermediate
- Estimated building time: Three to five hours
- Primary material: Pressure-treated 2×4 lumber
- Recommended log length: Approximately 16 inches
A full cord measures 4 feet high by 4 feet deep by 8 feet long. Because this rack is only about 20 inches deep, it stores closer to a face cord than a full cord. Firewood terminology varies by region, so confirm the actual dimensions whenever you buy wood. “A truckload” is not a recognized unit of measurement, although some sellers use it with remarkable enthusiasm.
Choose the Right Location Before You Build
Select a level, well-drained area with exposure to sun and wind. Avoid low spots where rainwater collects. A gravel pad, concrete surface, patio blocks, or compacted crushed stone provides a more stable foundation than bare soil.
Do not press the rack directly against siding, fences, trees, or solid walls. A gap improves airflow and makes inspection easier. Keeping the main woodpile away from buildings also reduces the chance that carpenter ants and other wood-associated pests will wander toward the house. University of Minnesota Extension recommends elevating stored wood for circulation and locating firewood as far from buildings as practical.
Convenience still matters. A rack positioned half a mile from the back door may provide excellent airflow, but every winter trip will feel like an expedition documentary. Choose a safe middle ground: away from structures and ignition sources, but close enough that carrying an armload during bad weather is manageable.
Materials and Cut List
Lumber
- Ten pressure-treated 2×4 boards, 8 feet long
- Optional: one additional 2×4 for extra diagonal bracing or a center divider
Hardware and Site Materials
- Approximately 60 exterior-rated structural screws, 3 to 3-1/2 inches long
- Hot-dipped galvanized or exterior-rated angle brackets, optional
- Four to six concrete pavers or solid concrete blocks
- Gravel for leveling and drainage, if needed
- Exterior wood stain or sealer, optional
- End-cut preservative for pressure-treated lumber, where recommended
- Top cover, corrugated roofing panel, or heavy-duty firewood cover
Cut List
- Four 2x4s at 96 inches for the lower and upper side rails
- Four 2x4s at 48 inches for the corner uprights
- Seven 2x4s at 17 inches for five base crosspieces and two upper end ties
- Two 2×4 diagonal braces, cut to fit at approximately 48 inches
- Optional short braces cut from remaining lumber
Pressure-treated lumber is economical and appropriate for a rack exposed to outdoor moisture. Cedar is lighter, attractive, and naturally weather resistant, while metal roofing can provide durable top protection. DIY builders commonly combine a pressure-treated base with cedar framing or an open wooden structure with a corrugated roof.
Tools You Will Need
- Tape measure
- Pencil or lumber crayon
- Speed square or framing square
- Circular saw or miter saw
- Drill-driver or impact driver
- Drill bits for pilot holes
- Four-foot level
- Clamps
- Shovel and tamper for site preparation
- Safety glasses, hearing protection, work gloves, and dust protection
Inspect every board before cutting. Pressure-treated 2x4s have a special talent for twisting while nobody is looking. Reject severely warped pieces or reserve them for short braces, where their rebellious personality will be less noticeable.
How to Build a Firewood Rack Step by Step
Step 1: Prepare and Level the Site
Mark an area slightly larger than the rack. Remove grass, roots, and loose organic material. Add two to four inches of compactable gravel if the soil remains damp or soft after rain.
Arrange pavers or solid concrete blocks beneath the future corners and center of the base. Check them from front to back and from end to end with a level. This step is not glamorous, but neither is watching a fully loaded rack lean sideways after the first freeze-thaw cycle.
Step 2: Measure and Cut the Lumber
Use a square to mark clean, perpendicular cut lines. Cut the four rails at 96 inches, the four uprights at 48 inches, and seven crosspieces at 17 inches. Leave the diagonal braces uncut until the main frame is assembled so you can mark their exact angles in place.
Label the components with a pencil. Place the cleanest, straightest boards aside for the long rails. If your treatment manufacturer recommends protecting fresh cuts, apply an approved end-cut preservative and allow it to dry according to the label.
Step 3: Assemble the Rectangular Base
Lay two 96-inch rails parallel on a flat surface. Position a 17-inch crosspiece between them at each end. The finished outside depth should be about 20 inches because the crosspieces sit between two 1-1/2-inch-thick rails.
Check the base for square by measuring diagonally from corner to corner. When both diagonal measurements match, the rectangle is square. Drill pilot holes near board ends to reduce splitting, then fasten each corner with two exterior structural screws.
Install the remaining three 17-inch crosspieces between the rails at approximately 24-inch intervals. These members support the logs and prevent the long base rails from bowing inward under pressure.
Step 4: Install the Uprights
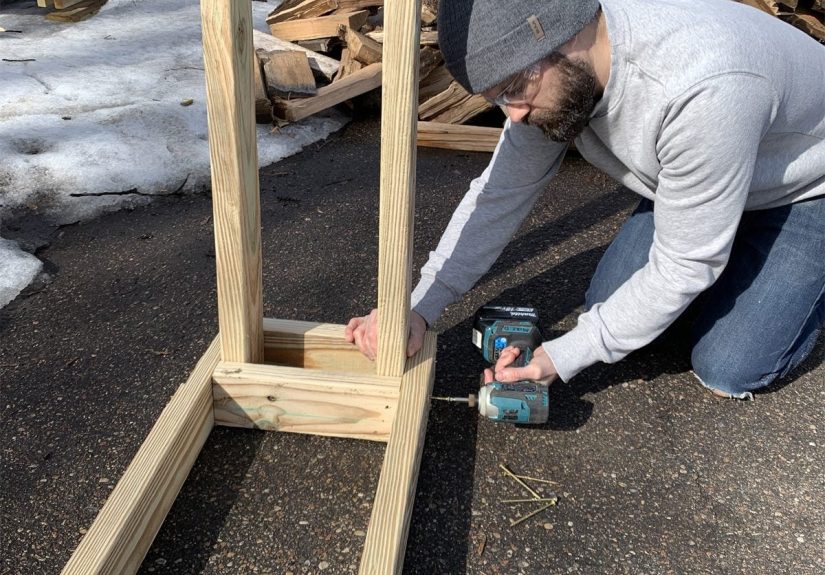
Stand one 48-inch upright at each corner. Clamp the first post to the base, check it in both directions with a level, and fasten it through the lower rails with at least two structural screws from each practical direction.
Repeat for the other three uprights. Temporary scrap-wood braces can hold the posts steady while you work. Do not rely on your knee, one elbow, and optimism to keep an upright plumb while driving a screw.
Step 5: Add the Upper Rails and End Ties
Position the two remaining 96-inch rails along the upper outside edges of the uprights. Clamp them in place, check that the posts remain plumb, and fasten each connection securely.
Fit a 17-inch crosspiece between the upper rails at each end. These ties prevent the rack from spreading and give the structure a finished rectangular shape. Recheck the entire frame for square before tightening every fastener.
Step 6: Install Diagonal Bracing
Place a 2×4 diagonally across the back of the rack, extending from a lower corner toward the opposite upper rail. Mark the cut angles directly on the board, cut it to fit, and secure it with structural screws. Add a second opposing brace if the rack will stand in a windy location or if the frame still flexes.
Diagonal bracing is particularly important on long or tall racks. Without it, the structure may rack sideways even though every individual joint feels tight. This Old House likewise recommends diagonal support when increasing rack height or building in exposed areas.
Step 7: Position and Anchor the Rack
Move the empty rack onto the prepared supports. Ask for help rather than dragging it by one end, which can twist the frame. Confirm that every base contact point is supported and that the rack does not rock.
In high-wind areas, anchor the frame using an appropriate ground-anchor system or fasten it to a properly designed foundation. Do not attach it directly to house siding merely to stop a wobble; correct the base and bracing instead.
Step 8: Add Weather Protection
The simplest option is a fitted firewood cover that protects the top while leaving much of the sides open. Another option is a corrugated metal or polycarbonate roof supported by purlins and pitched slightly toward the rear.
Provide generous overhangs so runoff falls beyond the stack. Do not wrap the rack completely in plastic. Fully enclosed tarps trap humidity, restrict cross-ventilation, and can promote mold or rot. Successful woodshed and covered-rack designs shed rain from above while preserving open access and airflow through the sides.
Step 9: Finish the Wood
Pressure-treated lumber can be left unfinished, but an exterior stain may improve appearance and reduce weathering. Allow new treated lumber to dry sufficiently before applying a finish, and follow the stain manufacturer’s instructions.
Round over sharp corners with sandpaper, especially around the front opening. Remove splinters and protruding screw tips. The rack should store firewood, not collect samples of your favorite winter jacket.
How to Stack Firewood Correctly
Place larger, flatter logs along the bottom. Stack the main pieces in consistent horizontal rows, leaving small irregular gaps for airflow. Use cross-stacked end columns when additional stability is needed.
Keep the finished pile at or below the rack’s designed height. Better Homes & Gardens recommends limiting freestanding firewood stacks to about four feet because taller piles can become unstable and difficult to handle safely.
Practice first-in, first-out rotation. Put newly acquired wood in a separate section or behind the older supply so seasoned logs are burned first. A center divider can help separate green wood from ready-to-burn firewood and can also provide extra structural support.
Use a moisture meter on a freshly split face rather than testing only the outside surface. Wood that reads below 20 percent is generally better prepared for efficient burning. Never burn painted, pesticide-treated, glued, or chemically contaminated lumber.
Useful Firewood Rack Upgrades
Add a Kindling Shelf
Install a narrow shelf at one end or above the main pile. Use slats rather than solid plywood so bark fragments and moisture do not collect on the surface.
Create Two Storage Bays
Add two vertical posts and a center support to divide the rack. One bay can hold seasoned hardwood while the other holds newer splits, softwood, or kindling.
Build a Sloped Roof
Raise the front roof support slightly higher than the rear, add purlins, and attach corrugated panels with gasketed roofing screws. Provide sufficient overhang on every side while keeping the walls open.
Shorten the Design
For occasional fireplace use, reduce the length to 48 inches. Keep the depth near 18 to 20 inches for standard logs and retain diagonal braces. Small racks can be built in an afternoon and placed beneath an existing porch or shed overhang.
Common Firewood Rack Mistakes
- Building directly on soil: Moisture shortens the life of the lumber and the stored firewood.
- Skipping diagonal braces: A rectangular frame can still sway sideways under load.
- Using interior drywall screws: They are not designed for sustained outdoor structural service.
- Wrapping the entire rack: The wood needs cross-ventilation, not a plastic raincoat zipped to the chin.
- Stacking above the frame: Logs can roll or fall when removed from an unstable pile.
- Blocking the sides with solid panels: Decorative siding should include generous ventilation gaps.
- Ignoring drainage: Even a roof cannot help if runoff pools beneath the base.
- Buying transported firewood without checking rules: Insects and diseases can hitchhike in logs. USDA guidance encourages buying or gathering firewood near the place where it will be burned.
Maintenance After the Build
Inspect the rack at the beginning and end of each burning season. Tighten loose screws, replace split braces, and look for soft or discolored wood near the base. Clear leaves, bark, weeds, and other debris that can retain moisture.
Check that the foundation remains level. Pavers may settle, particularly after heavy rain or winter freezing. Relevel them before restacking a large supply. Repair torn covers promptly and renew exterior finish when water no longer beads on the surface.
Bring only a small quantity of firewood indoors at one time. Outdoor stacks naturally provide hiding places for insects, so moving the entire winter supply into a basement or garage is rarely a brilliant surprise party for the homeowner.
Experience-Based Lessons From DIY Firewood Rack Projects
The most important lesson from real-world rack projects is that site preparation usually matters more than decorative carpentry. Builders often spend an hour making perfectly matched cuts and only five minutes placing the rack on uneven dirt. Once several hundred pounds of firewood are loaded, a minor wobble becomes a serious lean. A compacted gravel pad and level pavers may not generate exciting progress photos, but they protect everything built above them.
Another common experience is underestimating how much pressure the stacked logs place on the end uprights. Firewood is rarely shaped like polite rectangular lumber. Pieces push outward, twist, and settle as the pile changes. Two screws driven through one side of an upright may feel solid when the rack is empty but loosen after repeated loading. Fastening from more than one direction, using structural screws, and adding upper ties and diagonal braces produces a noticeably stiffer frame.
Board selection also changes the entire afternoon. Straight lumber makes squaring the base easy. Twisted lumber turns the project into a wrestling match involving clamps, colorful vocabulary, and repeated measurements. When shopping, sight down the length of each board. Save slightly bowed pieces for short crossmembers, but use the straightest material for the 8-foot rails and vertical posts.
Many builders discover that a perfectly fitted tarp is not automatically perfect weather protection. When a cover hangs over all four sides, condensation may remain trapped inside. Wind can also work a loose tarp against sharp log edges until holes appear. A rigid roof with an overhang is more convenient in snowy or rainy climates, while a top-only fitted cover is adequate for a rack beneath an existing eave. In either case, the sides should remain open enough for air to move.
Do not fill the rack immediately after driving the final screw. First push gently on the top corners from both directions. Any visible movement indicates that the frame needs additional bracing. Confirm that all supports contact the ground evenly, then load a few rows and inspect it again. Gradual loading reveals problems before the rack becomes too heavy to adjust.
Organization is another lesson that arrives one winter too late. Without separate sections, newly delivered wood tends to bury older seasoned logs. Adding a simple center divider makes rotation easier and gives the long rails another support point. A narrow kindling compartment also prevents small pieces from disappearing into the bottom of the pile, where they remain until spring as tiny monuments to poor planning.
Finally, build for the way the rack will actually be used. Leave enough room in front for a wheelbarrow, log carrier, or snow shovel. Avoid placing the opening where roof runoff creates ice. Make the top logs reachable without standing on a bucket, and keep screws and braces away from the path of gloved hands. The best DIY firewood rack is not necessarily the fanciest one. It is the rack that stays level, keeps wood dry, allows easy rotation, and does its job without demanding attention every time the weather changes.
Conclusion
Building a firewood rack is a straightforward weekend project with a practical payoff. A level foundation, raised pressure-treated base, strong uprights, exterior structural screws, and diagonal bracing create a dependable frame. Open sides help seasoned wood remain dry, while a top cover or overhanging roof keeps most rain and snow away without trapping moisture.
Measure carefully, select straight boards, and test the frame before loading it. Once the rack is filled with neatly stacked firewood, your yard will look more organized, your logs will be easier to manage, and the local ant population will need to reconsider its housing strategy.