Table of Contents >> Show >> Hide
- Why a DIY Corner Fireplace Is Worth the Effort
- Before You Build: Safety, Codes, and Planning
- Tools and Materials You Will Need
- Step 1: Measure the Corner and Sketch the Design
- Step 2: Mark the Studs and Build the Base Frame
- Step 3: Frame the Fireplace Wall
- Step 4: Plan the Hidden Storage Mantel
- Step 5: Build and Install the Mantel Box
- Step 6: Cover the Frame
- Step 7: Add Trim for a Built-In Look
- Step 8: Paint, Tile, or Add Stone Veneer
- Step 9: Install the Electric Fireplace Insert
- Step 10: Style the Mantel Without Overcrowding It
- Design Ideas for Different Home Styles
- Common Mistakes to Avoid
- Estimated Cost and Time
- Extra Experience-Based Tips for a Better DIY Corner Fireplace
- Conclusion
A corner fireplace is the home improvement equivalent of finding an extra closet you forgot existed. It turns an awkward corner into a cozy focal point, gives your living room a designer-built look, andif you build the mantel with hidden storagequietly swallows remotes, candles, matches, charging cables, seasonal decor, and all the mysterious little things that usually migrate to the coffee table.
The best part? You do not need a mansion, a master carpenter badge, or a dramatic home renovation TV crew yelling “demo day!” in your hallway. With careful planning, basic framing skills, and an electric fireplace insert, you can build a beautiful DIY corner fireplace that looks custom, fits your room, and adds practical storage without taking over the entire wall.
This guide walks you through how to design, frame, finish, and style a corner fireplace with a mantel that hides storage inside. We will focus on an electric fireplace insert because it is the most DIY-friendly option for most homeowners. Gas and wood-burning fireplaces involve venting, combustion, permits, and code requirements that should be handled by licensed professionals. Translation: save your bravery for cutting crown molding, not rerouting gas lines.
Why a DIY Corner Fireplace Is Worth the Effort
A corner fireplace solves several common room problems at once. In small living rooms, it creates a cozy feature without stealing the longest wall from your sofa, TV, bookcases, or windows. In open-concept spaces, it gives the room a natural anchor. In bedrooms, dens, offices, and basements, it adds warmth and ambience without requiring a traditional chimney.
The hidden-storage mantel is where this project gets extra clever. Instead of building a purely decorative shelf, you can create a hollow mantel box with a hinged top, front drawer, or lift-up panel. It keeps everyday clutter close but invisible. Think of it as a stylish secret compartmentless “spy movie,” more “finally, where did I put the TV remote?”
Before You Build: Safety, Codes, and Planning
Before buying lumber, measure your room and read the fireplace insert manual. Every electric fireplace has its own clearance requirements, ventilation needs, power recommendations, and installation instructions. Do not guess. Guessing is how DIY projects become expensive campfire stories.
Choose the Right Fireplace Insert
For this project, a recessed or wall-mounted electric fireplace insert is usually easiest. Look for a unit that fits your room size, has front-facing heat vents, includes overheat protection, and can be used with or without heat. Many homeowners enjoy the flame effect year-round, even when the heater is off.
Make sure there is a properly located wall outlet. Heat-producing electric fireplaces should be plugged directly into a wall outlet, not an extension cord or power strip. If your corner does not have the right outlet, hire an electrician before framing the fireplace. It is much easier to solve electrical access before the wall is covered than after your beautiful new surround is finished and painted.
Check Local Building Rules
Even with an electric fireplace, local building rules may affect electrical work, built-ins, outlet access, and clearances. If you are installing a gas or wood-burning unit, stop here and call a licensed contractor. Combustible materials, venting, mantels, hearths, and clearances become serious code issues with real flames.
For electric units, the main safety rules are simple: follow the manufacturer’s installation guide, do not block vents, secure the structure to studs, keep cords accessible and protected, and use materials suitable for the heat produced by your insert.
Tools and Materials You Will Need
Your exact shopping list depends on your fireplace size and chosen finish, but most DIY corner fireplace builds use the following basics:
Tools
- Measuring tape
- Stud finder
- Level
- Miter saw or circular saw
- Drill and driver bits
- Brad nailer or finish nails
- Caulk gun
- Sander or sanding block
- Utility knife
- Clamps
- Safety glasses, dust mask, and hearing protection
Materials
- 2×4 lumber for the frame
- 1x boards or plywood for the mantel box
- MDF, plywood, shiplap, beadboard, tile backer board, or cement board for the surround
- Trim, casing, lattice strips, or crown molding
- Wood screws and construction screws
- Wood glue
- Hinges or drawer slides for hidden storage
- Magnetic catches or soft-close hardware
- Wood filler, caulk, primer, and paint
- Electric fireplace insert
- Optional: tile, stone veneer, peel-and-stick panels, or wallpaper rated for the chosen location
Step 1: Measure the Corner and Sketch the Design
Start by measuring both walls that meet at the corner. Decide how wide the fireplace should be across the front, how deep it can project into the room, and how tall you want the mantel. A common approach is to build a flat front face set diagonally across the corner, creating a triangular cavity behind the fireplace wall.
For example, if each side wall allows 36 inches from the corner, your diagonal front may be about 48 to 52 inches wide, depending on the angle and depth. The fireplace insert should sit centered in that diagonal face. Leave space above it for a mantel and below it for a base or raised hearth if you want a more traditional look.
Use painter’s tape on the floor and wall to mock up the footprint. Stand back. Sit on the sofa. Walk around it. Pretend you are carrying a laundry basket past it, because real life has a way of testing design decisions. The fireplace should feel intentional, not like a fancy obstacle course.
Step 2: Mark the Studs and Build the Base Frame
Use a stud finder to locate studs on both walls. Mark them clearly with painter’s tape. Your corner fireplace frame must be secured to wall studs, not just drywall. Drywall is great at holding paint and family photos; it is not great at holding a built-in structure.
Build a triangular base frame from 2x4s. This frame sets the footprint and supports the front wall. Use a level to keep everything square and even. Screw the side pieces into the wall studs, then connect them with the angled front plate. Check the angle and measurements twice before fastening everything permanently.
If you want a raised hearth, build it now as a sturdy platform. A low hearth can make the fireplace look more substantial, especially in a living room. For a modern look, skip the hearth and let the fireplace face run cleanly from floor to mantel.
Step 3: Frame the Fireplace Wall
Next, build the vertical front frame that will hold the electric insert. This is essentially a small diagonal wall. Use 2×4 studs, a bottom plate, a top plate, and horizontal blocking around the fireplace opening.
Measure the fireplace insert carefully. Most inserts need a framed opening slightly larger than the unit body but small enough for the front trim or glass to cover the edges. Follow the manufacturer’s rough opening dimensions exactly. Leave any required airflow space around the unit. If the manual says not to cover a vent, believe it. The manual is not being dramatic.
Add extra blocking where the mantel will attach. This step is important because a storage mantel can be heavier than a standard shelf, especially once you fill it with batteries, remotes, and emergency chocolate.
Step 4: Plan the Hidden Storage Mantel
The hidden-storage mantel can be built in several ways. Choose the version that fits your skill level and how you plan to use the storage.
Option 1: Lift-Top Mantel
A lift-top mantel is the simplest hidden storage design. Build a hollow rectangular mantel box, attach the back and bottom securely to the frame, and install the top board with small hinges. Add a magnetic catch or soft-close lid support so the top stays neat and safe.
This works well for lightweight items such as remotes, manuals, candles, small decor, or seasonal garlands. Keep anything heat-sensitive away from the fireplace opening and vents.
Option 2: Front Drawer Mantel
A front drawer looks polished and is easier to access if the mantel is decorated with art or a mirror on top. Use plywood to build a shallow drawer box and install side-mount or undermount drawer slides. Add a decorative drawer face that blends into the mantel trim.
This option requires more precision, but the result feels truly custom. It is perfect for hiding gaming controllers, coasters, charging cords, and the remote you swear you just had five seconds ago.
Option 3: Flip-Down Panel
A flip-down panel is great for narrow mantels. The front face opens downward with hinges, creating access to a shallow storage cavity. Use magnetic catches to keep it closed and add small chains or lid supports if needed.
This design is especially useful if your mantel is not deep enough for a drawer but still has room for hidden storage.
Step 5: Build and Install the Mantel Box
For a classic chunky mantel, build a box from 1x boards or plywood. A common size is 6 to 8 inches tall and 8 to 10 inches deep, but adjust it for your room and fireplace scale. The mantel should look proportional to the surround, not like a diving board for decorative pumpkins.
Cut the top, bottom, front, sides, and internal supports. Dry-fit the pieces first. Use wood glue and nails or screws to assemble the box. If you are adding a lift-top lid, install hinges on the back edge and test the swing before mounting it to the fireplace frame.
Secure the mantel into the blocking you added earlier. Use a level. Then use it again. A crooked mantel will haunt you every time you sit down with coffee.
Step 6: Cover the Frame
Once the framing and mantel are secure, cover the fireplace face. MDF and plywood are easy to paint and trim. Shiplap gives a farmhouse or coastal look. Tile backer board is better if you plan to add tile or stone veneer. Cement board is often used behind masonry-style finishes because it handles mortar and moisture better than standard drywall.
Cut panels to fit the front face and side returns. Attach them with screws or construction adhesive appropriate for the material. Keep fasteners flush, and do not place screws where they may interfere with the fireplace insert.
If the insert slides in from the front, test-fit it before finishing. This is the DIY equivalent of trying on jeans before hemming them. It prevents a lot of regret.
Step 7: Add Trim for a Built-In Look
Trim is where a basic frame starts looking like a high-end built-in. Add casing around the fireplace opening, base trim along the floor, vertical battens on the face, crown molding under the mantel, or simple square-edge trim for a modern profile.
For a clean craftsman-style look, use flat 1x boards around the opening and along the edges. For a traditional look, layer smaller trim pieces under the mantel and around the surround. For modern minimalism, keep the trim thin and let the fireplace insert and wall finish do the talking.
Caulk all seams where trim meets panels. Fill nail holes with wood filler, sand smooth, and wipe away dust before priming.
Step 8: Paint, Tile, or Add Stone Veneer
Paint is the most budget-friendly finish. Use primer first, especially on MDF or raw wood, then apply two coats of durable interior paint. Satin or semi-gloss works well for trim because it wipes clean more easily than flat paint.
If you want a more dramatic fireplace, consider tile or stone veneer. Large-format tile creates a sleek modern look. Marble-look porcelain feels elegant without the marble-maintenance panic. Stacked stone adds texture and rustic charm. Peel-and-stick panels can work for purely decorative areas, but always check heat ratings and avoid using them where the fireplace manual requires noncombustible materials.
Step 9: Install the Electric Fireplace Insert
After the finish is dry, slide or mount the electric fireplace insert according to the manufacturer’s instructions. Secure it with the provided brackets or screws. Make sure the cord reaches the outlet without being pinched, stretched, hidden behind inaccessible framing, or routed under flooring or rugs.
Turn on the unit and test the flame effect, heater, thermostat, remote, and timer. Check for airflow from the vents. Let it run for a short test period while you stay nearby. If anything smells wrong, overheats, flickers electrically, or acts suspicious, turn it off and consult the manual or a professional.
Step 10: Style the Mantel Without Overcrowding It
A corner fireplace already has strong geometry, so mantel styling should balance height, texture, and breathing room. Try one large mirror, oversized artwork, or a framed print as the anchor. Add a small vase, candleholders, books, greenery, or sculptural objects. Keep decor away from heat vents and avoid dangling garlands near the fireplace opening.
For a TV above the mantel, plan early. You may need blocking, cable management, and proper viewing height. A TV mounted too high can make movie night feel like sitting in the front row of a tennis match. If the fireplace is in a small room, consider placing the TV on a nearby wall instead.
Design Ideas for Different Home Styles
Modern Farmhouse
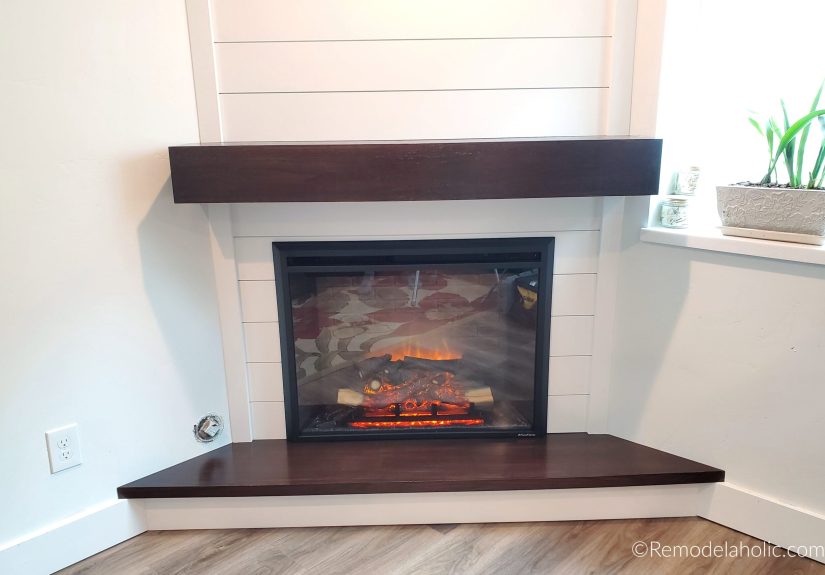
Use vertical shiplap, a chunky stained-wood mantel, matte black fireplace trim, and simple white paint. Add woven baskets or built-in side shelves if the corner has extra room.
Traditional
Layer crown molding, picture-frame trim, and a painted mantel. Choose soft white, warm gray, or deep navy for a classic focal point. A marble-look tile surround adds polish.
Rustic Lodge
Use stacked stone veneer, a reclaimed-look mantel, and warm neutral colors. Keep the hidden storage hardware invisible so the mantel still feels like a solid beam.
Clean Contemporary
Build a simple flat fireplace wall with minimal trim, large-format tile, and a slim mantel shelf. Choose black, charcoal, warm white, or greige for a calm architectural effect.
Common Mistakes to Avoid
The first mistake is building before buying the insert. Fireplace dimensions vary, and “close enough” is not a measurement. Buy the insert first or at least download the exact installation manual before framing.
The second mistake is forgetting airflow. Many electric fireplaces need space around the unit or front clearance for heat vents. Blocking vents can damage the unit and create a safety hazard.
The third mistake is making the mantel storage too deep without support. Hidden storage is useful, but the mantel still needs strong internal framing. Add blocking, use sturdy materials, and avoid overloading it.
The fourth mistake is skipping primer. Raw MDF and wood soak up paint unevenly. Primer helps the finished fireplace look smooth, not patchy and slightly haunted.
The fifth mistake is ignoring scale. A tiny insert in a massive surround looks odd. A huge fireplace in a tiny room feels overpowering. Use painter’s tape to test proportions before cutting lumber.
Estimated Cost and Time
A DIY corner fireplace with an electric insert often costs far less than a custom built-in fireplace installation. Your total depends on the insert, finish materials, trim, hardware, and whether you need electrical work. A basic painted build may stay relatively budget-friendly, while tile, stone veneer, custom drawers, and electrical upgrades will raise the price.
For timing, plan on a weekend for framing and covering the structure, another day for trim and filling, and one to two days for priming, painting, drying, and installing the insert. If you add tile or stone veneer, allow extra time for mortar, grout, and curing.
Extra Experience-Based Tips for a Better DIY Corner Fireplace
After studying many DIY fireplace builds and real homeowner makeovers, one lesson stands out: the project succeeds or fails during the planning stage. The prettiest corner fireplace starts as an unglamorous sketch with exact measurements, outlet locations, stud marks, and clearance notes. That paper plan may not look exciting, but it prevents the classic DIY moment where someone stands in a half-built room whispering, “Why is this opening two inches too small?”
One practical experience is to make a cardboard template of the fireplace insert and tape it to the wall before building. This helps you see the height, width, and viewing angle from across the room. It also helps decide whether the fireplace should sit low like a traditional hearth or higher for a modern media-wall effect. In a corner, height matters even more because furniture often faces the fireplace at an angle.
Another smart trick is to paint or finish sample boards before committing to the full surround. White paint may look crisp in daylight but too stark at night. Dark paint can look dramatic and expensive, but it may show dust or fingerprints. Wood stain can shift orange, gray, or red depending on the species. Testing finishes on scraps is cheaper than repainting the entire fireplace while questioning every choice you have ever made.
For the hidden mantel storage, keep the compartment shallow and organized. A huge empty cavity sounds useful, but it quickly becomes a cave of forgotten batteries and mystery cords. Add small dividers, a felt liner, or labeled trays. If you plan to store remote controls, make sure the lid or drawer opens easily while decor is still on top. The best hidden storage is storage you will actually use.
Hardware quality also makes a big difference. Cheap hinges can sag, squeak, or make the mantel lid feel flimsy. Soft-close hinges, magnetic catches, and smooth drawer slides make the whole fireplace feel more custom. This is one of those places where spending a few extra dollars quietly upgrades the entire project.
Lighting can take the fireplace from “nice DIY” to “wait, did you hire someone?” Consider adding battery-powered picture lights, plug-in sconces nearby, or LED strip lighting on adjacent shelves. Keep electrical safety in mind and do not run cords where they can overheat, pinch, or disappear behind permanent framing without access.
Finally, live with the fireplace for a few days before overdecorating it. A mantel naturally attracts objects. First one vase appears. Then a candle. Then a frame. Suddenly the fireplace looks like a small home decor store had a dramatic sneeze. Let the architecture breathe. A corner fireplace already has presence, so a few well-chosen pieces usually look better than a crowded display.
Conclusion
Building a gorgeous DIY corner fireplace is one of the most rewarding ways to transform an underused corner into a warm, stylish focal point. With an electric insert, sturdy framing, smart clearances, and a mantel with hidden storage, you can create a custom feature that looks beautiful and works hard behind the scenes.
The secret is not complicated: plan carefully, measure obsessively, follow the fireplace manual, anchor everything securely, and give yourself time for finishing details. Trim, caulk, paint, and hardware may seem small, but they are what separate a basic box from a polished built-in.
Whether your style is modern farmhouse, rustic lodge, traditional, or clean contemporary, this DIY corner fireplace can make your room feel cozier, more finished, and much more organized. And when guests compliment the mantel, you can smile peacefully, knowing it is secretly hiding three remotes, two charging cables, and possibly a snack.
Note: This guide is written for a decorative DIY corner fireplace using an electric insert. Always follow the specific manufacturer instructions for your fireplace model, keep heat vents clear, plug heat-producing units directly into a proper wall outlet, and consult a licensed electrician or contractor when local code, wiring, gas, venting, or structural questions are involved.