Table of Contents >> Show >> Hide
- Project Overview
- Pick Your Clothing Rack Style
- Design Notes That Make the Rack Feel “Furniture,” Not “Temporary”
- Materials List
- Tools You’ll Want
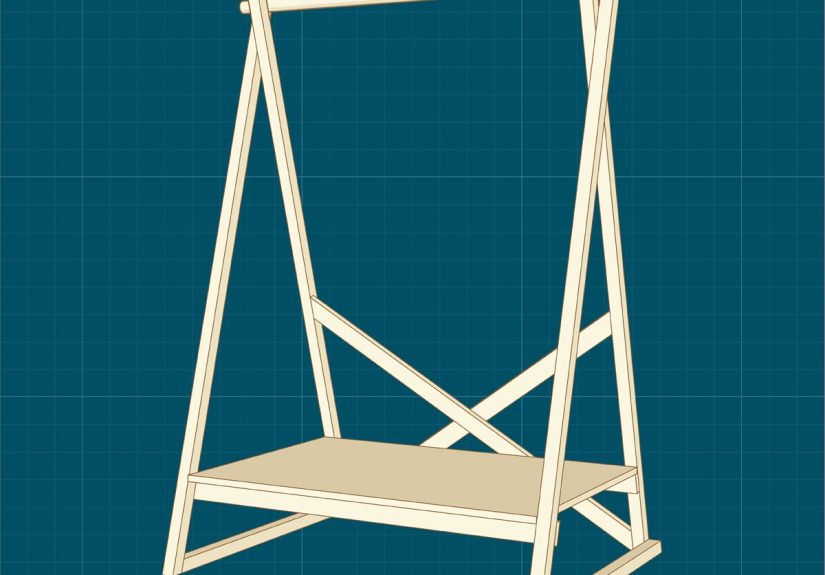
- Cut List (Recommended Size: 66" H × 40" W × 18" D)
- Step-by-Step: Build the Wooden Clothing Rack
- Step 1: Choose the straightest boards (your future self will thank you)
- Step 2: Make your cuts
- Step 3: Build two side frames
- Step 4: Add bottom width rails
- Step 5: Add top width rails
- Step 6: Square the frame (don’t skip this)
- Step 7: Install the clothes rod
- Step 8: Cut and fit the shelf
- Step 9: Attach the shelf
- Step 10: Add diagonal braces (optional, but highly recommended for wobble control)
- Step 11: Sand like you mean it
- Step 12: Clean off dust
- Step 13: Finish the wood
- Step 14: Add feet or casters
- Load, Stability, and “Will This Hold My Entire Winter Wardrobe?”
- Smart Upgrades (Optional, But Fun)
- Troubleshooting
- Safety Notes (Because Fingers Are Hard to Replace)
- Real-World Tips and Builder Experiences (The Stuff You Only Learn Mid-Project)
- Conclusion
If your “closet system” is currently a chair (or a treadmill you swear is “for running”), a wooden clothing rack is a
ridiculously useful upgrade. It gives you instant hanging space, keeps outfits visible (goodbye, forgotten sweater
colony), andbest partcan be built in a weekend with basic tools. You’ll end up with a sturdy DIY garment rack that
fits your room, your style, and your “why does nothing in stores come in the exact size I need?” energy.
This guide walks you through a classic freestanding wooden clothes rack with a bottom shelf for shoes or storage bins.
It’s stable, looks clean, and you can customize it into a rolling clothes rack or a heavy-duty boutique-style display
rack with a couple smart upgrades.
Project Overview
- Skill level: Beginner-to-intermediate (mostly straight cuts + careful measuring)
- Build time: 3–6 hours (plus finish drying time)
- Approx. cost: $35–$120 depending on wood + hardware
- Finished size (recommended): 66″ tall × 40″ wide × 18″ deep
- Capacity goal: Everyday hanging (shirts, jackets, dresses). Add supports for heavy loads.
Pick Your Clothing Rack Style
Before you cut anything, decide how you’ll use the rack. The best design isn’t the fanciestit’s the one that matches
your space and your laundry habits.
1) Freestanding rack (the “works anywhere” option)
A simple frame with a hanging rod and shelf. Great for bedrooms, laundry rooms, dorms, or staging outfits.
This is the design we’ll build in this tutorial.
2) Rolling rack (the “I move my mess” option)
Same rack, plus locking casters. Ideal if you’re using it for seasonal storage, photography, pop-up sales,
or you just like sweeping without doing an obstacle course.
3) Wall-mounted rack (the “my floor space is precious” option)
Strong and sleek, but it requires solid wall anchoring and more careful planning. If you rent or dislike patching
drywall, freestanding is friendlier.
Design Notes That Make the Rack Feel “Furniture,” Not “Temporary”
- Don’t skimp on depth: 16–20″ deep prevents tipping when you load one side with heavy coats.
- A shelf adds stability: It acts like a brace and drops the center of gravity (aka: fewer wobbles).
- Rod span matters: Long rods flex. Keep the span reasonable, or plan a center support if you go wide.
- Wood choice changes the vibe: Pine is budget-friendly; poplar is smoother; oak/maple is tougher.
Materials List
This build uses common lumber sizes you can find at big-box stores. “1×2” and “1×3” are nominal sizes; actual
dimensions are slightly smaller (normal in the U.S.). If you prefer a chunkier look, swap 1×2s for 2×2s.
Lumber
- (2) 1×2 × 8′ boards (uprights and bracing)
- (2) 1×3 × 8′ boards (top and bottom rails; optional shelf supports)
- (1) 3/4″ plywood panel, about 18″ × 40″ (shelf)
- (1) 1-1/4″ to 1-5/16″ hardwood dowel, 40″ long (clothes rod)
Hardware & Supplies
- Wood screws (1-1/4″ and 1-5/8″)
- Wood glue
- Sandpaper (120, 180, 220 grit)
- Finish: stain + polyurethane, or paint + topcoat
- Optional: (4) locking casters, (2) L-brackets, felt pads, or a center rod support
Tools You’ll Want
- Measuring tape + pencil
- Speed square or combination square
- Miter saw or circular saw (with a straightedge guide)
- Drill/driver + bits (and a countersink bit if you have one)
- Clamps (helpful, not mandatory)
- Sander or sanding block
- Optional: Pocket hole jig (makes clean, strong joints easier)
Cut List (Recommended Size: 66″ H × 40″ W × 18″ D)
Adjust width to your space. If you go wider than 48″, plan a center support for the rod to reduce sag.
| Part | Qty | Material | Cut Size | Notes |
|---|---|---|---|---|
| Uprights | 4 | 1×2 | 66″ | Vertical legs |
| Base rails (depth) | 4 | 1×3 | 18″ | Two per side frame (front/back) |
| Top rails (width) | 2 | 1×3 | 40″ | Connect the two side frames at the top |
| Bottom rails (width) | 2 | 1×3 | 40″ | Support shelf and prevent racking |
| Shelf | 1 | 3/4″ plywood | 18″ × 40″ | Can be solid wood boards instead |
| Rod | 1 | Hardwood dowel | 40″ | Cut to match width (leave ~1/2″ clearance if using brackets) |
| Diagonal braces (optional) | 2 | 1×2 | ~24–30″ | Trim to fit after dry assembly |
Step-by-Step: Build the Wooden Clothing Rack
Step 1: Choose the straightest boards (your future self will thank you)
In the lumber aisle, sight down each board like you’re aiming a pool cue. Pick boards that are straight, not twisted,
and relatively knot-freeespecially for the uprights and rails. Warped wood equals a rack that looks like it’s
perpetually shrugging.
Step 2: Make your cuts
Cut all pieces according to the cut list. Keep “matching” parts identicalcut the four uprights together (or at least
measure twice) so the rack stands level.
Step 3: Build two side frames
Each side frame uses two uprights and two base rails (18″) to form a stable “goalpost” shape. You can assemble this a
few ways:
- Easiest: Glue + screws through the rails into the uprights (pre-drill to avoid splitting).
- Cleanest: Pocket holes in the rails, then pocket-hole screws into the uprights.
- Knockdown option: Bolts + cross dowels (more advanced, but disassembles beautifully).
Lay the pieces on a flat surface, square them up, then fasten. Repeat for the second side frame.
Step 4: Add bottom width rails
Stand the two side frames upright. Connect them with the (2) bottom 40″ rails, positioned about
6–10″ off the floor (leave room for shoes and bins). These rails do two things: they support the shelf and stop the
rack from “parallelogram-ing” when you bump it.
Tip: If you have clamps, clamp the rail in place, then pre-drill and screw. If you don’t, recruit gravity and a stack
of books as an assistant.
Step 5: Add top width rails
Attach the (2) top 40″ rails across the top of the frames. Keep them flush and squarethis is where
your hanging rod will live, and it should not look like it’s sliding into a low-budget funhouse.
Step 6: Square the frame (don’t skip this)
Measure diagonally from corner to corner. If both diagonal measurements match, your frame is square. If they don’t,
gently push/pull the frame until they do, then tighten fasteners. This is a small step that prevents big wobble later.
Step 7: Install the clothes rod
You have two solid approaches:
-
Rod sockets/brackets: Screw rod supports to the inside faces of the top uprights, then drop in a
dowel or metal closet rod. -
Drilled holes: Drill matching holes through the uprights and slide the dowel through.
(This is very clean, but drilling perfectly aligned holes takes care.)
If your rod span is long (especially over 48″), consider a center support or a design that ties the rod into a shelf/brace.
Step 8: Cut and fit the shelf
Cut your plywood to 18″ × 40″ (or to fit your exact inner dimensions). Dry-fit it on the bottom rails.
If you want the shelf to sit “in” the frame, add small shelf cleats (scrap 1×2 strips) along the inside faces, then
drop the shelf onto them.
Step 9: Attach the shelf
Fasten the shelf with short screws (pre-drill to avoid splitting) or brad nails plus glue. The shelf adds significant
stiffness, so don’t treat it like a decorative suggestion.
Step 10: Add diagonal braces (optional, but highly recommended for wobble control)
If you want the rack to feel rock-solid, add two diagonal braces on the back (forming a subtle “X” or two opposing
diagonals). Cut braces to fit, then fasten with screws. Diagonals fight racking forceaka the side-to-side wobble that
shows up the first time you hang three hoodies on one side.
Step 11: Sand like you mean it
Start at 120 grit, move to 180, finish at 220 for a smooth, touch-friendly surface. Break sharp edges lightlyyour
clothes (and knuckles) will appreciate it.
Step 12: Clean off dust
Vacuum thoroughly, then wipe with a microfiber cloth. Leftover dust ruins finishes and makes your rack feel like a
gritty handshake.
Step 13: Finish the wood
Choose your vibe:
- Natural + clear coat: Modern, bright, minimal.
- Stain + clear coat: Warmer, more “real furniture” looking.
- Paint + topcoat: Great for kids’ rooms or bold design choices.
For polyurethane, thin coats win. Apply, let dry, lightly sand between coats (fine grit), then recoat. Follow the
product’s dry-time instructions based on your temperature and humidity.
Step 14: Add feet or casters
If the rack will stay put, add felt pads or rubber feet. If you want a rolling clothing rack, attach four locking
casters (two locking at minimum; four locking if you want “does not drift away” confidence). Choose casters with a
weight rating that matches your planned load.
Load, Stability, and “Will This Hold My Entire Winter Wardrobe?”
A wooden clothes rack can be surprisingly strong, but a few physics facts keep it from becoming a slow-motion
disaster:
-
Rod sag: The longer the span, the more the rod can flex under weight. Keep spans modest or add
center support. - Tipping risk: Narrow bases tip more easily. If you’re hanging heavy coats, keep depth closer to 18–20″.
-
Joint strength: Screws alone are okay, but glue + screws (or pocket holes) usually feels sturdier.
Let glue cure properly before loading.
Practical example: If you’re building for a small space and want a skinny 14″ deep rack, compensate by lowering the
hanging rod height a bit and keeping the shelf loaded with shoes or baskets (adding weight low improves stability).
Smart Upgrades (Optional, But Fun)
Add a second rod
Make it a double-hang rack by adding a second rod lower down for shirts. Great for closet organization in small rooms.
Add a top shelf
A shallow top shelf is perfect for hats, bags, or folded sweaters. It also adds stiffness to the upper structure.
Make it “knockdown” for moving
Use bolts and threaded inserts so the rack can disassemble. If you move often, this turns your rack into a reusable
piece instead of a “left it for the next tenant” donation.
Upgrade the rod
If you plan to hang heavy coats or a lot of denim, consider a metal closet rod with supports. It resists flex better
than a softwood dowel.
Troubleshooting
My rack wobbles side to side
- Add diagonal braces on the back.
- Confirm the frame is square (check diagonal measurements).
- Tighten fasteners and add glue blocks in corners if needed.
The rod spins and hangers slide weirdly
- If you used a dowel in sockets, add a small screw through the socket into the dowel (pre-drill).
- Switch to a closet rod with anti-rotation features if it bugs you.
My wood split when I drove screws
- Always pre-drill near ends.
- Use a countersink to reduce wedge pressure.
- Don’t over-torquethis isn’t a car engine.
Safety Notes (Because Fingers Are Hard to Replace)
- Wear eye protection when cutting and drilling.
- Control wood dust: vacuum often, sand with dust collection if possible, and use a dust mask/respirator for sanding.
- Clamp workpieces before drilling (especially small parts).
- Let finishes dry in a ventilated area and follow label directions.
Real-World Tips and Builder Experiences (The Stuff You Only Learn Mid-Project)
People who build their first DIY clothing rack usually expect the “hard part” to be cutting wood. Surprise: it’s
actually the small decisions that separate a rack that feels like real furniture from one that feels like it’s on
probation. Here are the most common experiences DIYers reportand how to use them to your advantage.
1) The floor is not as level as you think. A rack can be perfectly square and still rock like a café
table with one short leg if your floor dips or slopes. Many builders end up adding adjustable feet or thicker felt pads
on one corner. If you’re building for a basement laundry area or an older home, plan for this early: feet are cheap,
frustration is expensive.
2) “Straight” boards are a myth, so buy a little extra. It’s common to get home, start assembling,
and realize one upright has a subtle twist. You can sometimes force it into place, but that tension can reappear later
as a squeak, a wobble, or a rack that slowly leans like it’s trying to hear gossip. Builders often recommend buying one
extra board so you can swap out a problem piece without turning your Saturday into a second trip to the store.
3) Wobble is usually a bracing issue, not a “tighten the screws” issue. Tightening helps, but the
biggest “aha” moment for a lot of people is learning about racking (side-to-side sway). The fix is almost always a
diagonal brace or a shelf that actually ties the structure together. Even a discreet back strap can make a dramatic
difference. The experience is basically universal: someone hangs three jackets, gives the rack a gentle nudge, and
immediately becomes a bracing enthusiast.
4) The rod choice affects daily happiness. A softwood dowel can flex, dent, or feel “sticky” with
certain hangers. DIYers who upgrade to a hardwood dowel or a metal closet rod often say the rack feels more “finished”
and more pleasant to use. If you’re building a boutique-style display or hanging heavier clothes (coats, denim, lots of
hangers packed tight), rod strength and supports matter more than fancy trim pieces.
5) Finishing takes longer than buildingand that’s normal. Many first-time builders underestimate how
much time sanding and finishing requires. The common lesson: slow down here. A rack gets touched constantly (moving it,
sliding hangers, grabbing sleeves), so a smooth finish isn’t just for looks. People also learn quickly that thin coats
beat thick coats; heavy finish can drip, stay tacky, and collect lint like it’s auditioning to be a sweater.
6) Building for real life means planning for real stuff. The rack you build for “a few outfits” may
become the rack that holds gym clothes, tomorrow’s work fit, laundry that’s “almost dry,” and a bag you refuse to put
away. DIYers often add a second lower rod later, or hooks on the side for bags and belts. If you think you might want
upgrades, design with that in mind: leave space, keep the frame sturdy, and don’t block future additions with
permanent bracing in the wrong spot.
7) The best part is the customization. Builders love dialing in the height (long dresses vs. shirts),
the width (tight corners vs. open walls), and the look (natural wood, painted, stained, minimalist, rustic). A wooden
clothing rack ends up feeling personal because it is personalbuilt for your habits, not a generic shopper profile.
And once you’ve built one, you’ll catch yourself looking at other furniture thinking, “I could make that.” (This is a
feature, not a bug. Welcome.)
Conclusion
A wooden clothing rack is one of those rare DIY projects that’s practical on day one and still satisfying months later.
Build it square, brace it smartly, choose a rod that fits your load, and take your time on the finish. You’ll end up
with a clean, sturdy piece that organizes your spaceand quietly shames the chair that used to do the job.