Table of Contents >> Show >> Hide
- Why Changing a Doorknob Makes Such a Big Difference
- Before You Start: Pick the Right Replacement Doorknob
- Tools You Will Need
- How to Change a Doorknob Quickly
- How Long Does It Take?
- Common Mistakes to Avoid
- Ways to Make the Finished Look More Stylish
- Should You DIY or Call a Pro?
- Conclusion
- Real-Life Experiences: What Changing Doorknobs Actually Teaches You
Sometimes a room does not need a full makeover. It just needs one tiny, satisfying upgrade that makes everything look more polished. Enter the humble doorknob: the overlooked piece of hardware you touch every day and almost never compliment. Swap out an old brass relic, a scratched builder-grade knob, or a loose handle that feels like it has seen things, and suddenly the whole door looks newer, cleaner, and more intentional.
If you have been wondering how to change a doorknob quickly for an updated look, the good news is this project is one of the fastest ways to refresh your home without repainting walls, replacing trim, or emptying your bank account into the nearest home improvement store. In many cases, all you need is a screwdriver, a few minutes, and the right replacement knob.
This guide walks you through the process step by step, from choosing the right type of knob to installing it without turning a simple upgrade into a three-act DIY drama. Whether you are updating a bedroom, bathroom, hallway, closet, or front entry, here is how to replace a doorknob the smart way.
Why Changing a Doorknob Makes Such a Big Difference
Doorknobs are small, but they carry a lot of visual weight. They sit at eye level, they break up the door surface, and they quietly tell people whether your style leans modern, traditional, farmhouse, vintage, or “I bought whatever was on clearance and hoped for the best.”
A new knob can instantly:
- Make old doors look cleaner and more current
- Coordinate finishes throughout the house
- Improve how the door feels when opened and closed
- Replace worn, loose, sticky, or outdated hardware
- Add a more polished look for resale or staging
In other words, this is one of those rare home upgrades that is affordable, visible, and genuinely useful. That is the DIY trifecta.
Before You Start: Pick the Right Replacement Doorknob
Before you remove anything, make sure your new hardware matches the door’s function and fit. A gorgeous matte black knob will not help much if it belongs on a closet door and you are trying to install it on a bathroom.
Choose the Right Function
Most residential knobs fall into a few common categories:
- Passage: Non-locking knobs for hallways, closets, and other interior doors
- Privacy: Locking knobs for bedrooms and bathrooms
- Keyed entry: Locking knobs for exterior doors
- Dummy: Decorative or pull-only knobs for pantry doors, French doors, or shallow doors that do not latch
Matching the function matters as much as matching the finish. If you want an updated look, you also want the upgraded hardware to actually do its job.
Check the Measurements
Most modern replacement knobs are designed for standard U.S. doors, but you should still confirm a few basics:
- Backset: The distance from the edge of the door to the center of the large bore hole
- Door thickness: Usually standard interior doors are straightforward, but check your hardware packaging
- Bore hole compatibility: Many replacement locksets are made for standard pre-drilled doors
If your home is older, do not panic. Older doors often work fine with modern knobs, though you may need an adapter plate, backplate, or a little extra patience. Homes have personalities. Some are charming, and some are just weird.
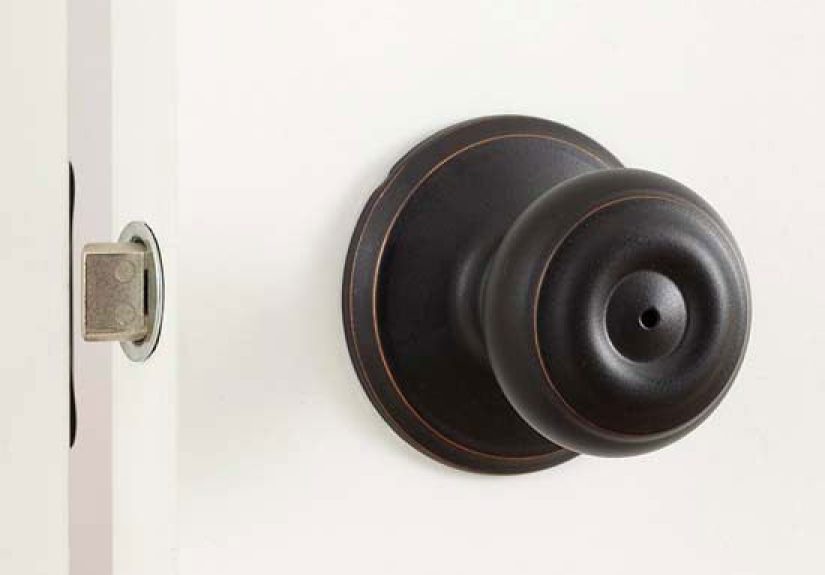
Think About Finish and Style
For the “updated look” part of this project, finish matters. Satin nickel, matte black, polished chrome, aged bronze, and brass all create different moods. If you want a clean, modern update, matte black and satin nickel are safe bets. If your home leans classic, warm brass or bronze can add character without looking dated.
A good rule: choose one primary finish for most of the interior doors so the house feels cohesive, not like every knob arrived from a different timeline.
Tools You Will Need
This is refreshingly not a “buy six specialty tools and a mystery jig” kind of project. Most doorknob replacements require only a few basics:
- Phillips screwdriver
- Flathead screwdriver
- Tape measure
- Paperclip or small pin for knobs with a release hole
- Wood shim or doorstop to steady the door
- New doorknob set
You may also want a soft cloth to protect the finish and clean the area while the old hardware is off.
How to Change a Doorknob Quickly
Step 1: Steady the Door
Open the door slightly and wedge it in place with a doorstop or shim. This keeps it from swinging around while you work. Could you skip this? Sure. Should you? Not unless you enjoy chasing screws across the floor like they are making a break for freedom.
Step 2: Remove the Old Knob
Look at the interior side of the door first. On many knobs, you will see two visible screws on the faceplate. Remove them with a screwdriver, then pull the two knob halves apart.
If you do not see screws, the knob may have a hidden detent or release slot. In that case, insert a small flathead screwdriver, paperclip, or pin into the hole and press inward to release the knob. Then remove the trim plate to access the mounting screws underneath.
This is the part that makes many people think, “Why is a doorknob acting like it has top-secret clearance?” Stay calm. Hidden screws are common, not personal.
Step 3: Remove the Latch and Strike Plate
Once the knob halves are off, unscrew the latch plate on the edge of the door and slide the latch mechanism out. Then remove the old strike plate from the door frame if your new hardware comes with one and you want everything to match.
Take a second to wipe away dust, paint buildup, and grime around the holes. That little cleanup helps the new hardware sit flatter and look neater.
Step 4: Compare the Old and New Hardware
Before installing anything, compare your old latch and knob assembly with the new one. Check the latch length, the faceplate shape, and the way the mounting posts line up.
Many new knob sets come with an adjustable latch, which makes life easier. If yours does, set it to match your existing door prep. Also make sure you are using the correct latch type and function for the room.
Step 5: Install the New Latch
Insert the new latch into the hole on the door edge. The beveled side of the latch should face the door jamb so it catches and closes properly. If you install it backward, the door may still close, but it will do so in the grumpy, reluctant way that suggests you have offended it.
Secure the latch with the provided screws. Tighten them firmly, but do not overdo it. Stripped screws are the unnecessary sequel nobody asked for.
Step 6: Install the Exterior and Interior Knob Halves
Place the exterior half of the knob through the large hole, making sure the spindle or mechanism passes through the latch assembly correctly. Then align the interior half and attach it according to the manufacturer’s instructions.
In most cases, you will insert and tighten two long mounting screws from the inside. Tighten each screw gradually, alternating sides so the hardware pulls together evenly.
This is the moment where “snug” is good and “gorilla strength” is not. Overtightening can bind the mechanism, make the knob feel stiff, or damage the finish.
Step 7: Replace the Strike Plate
If your new knob set includes a matching strike plate, install it on the jamb. This small detail matters more than people think. A shiny new knob paired with an old, scratched strike plate looks like wearing dress shoes with lawn-mowing socks.
If the new strike plate does not align perfectly with the old recess, you may need a tiny adjustment. For quick updates, many homeowners simply reuse the existing strike plate if it matches reasonably well and the door closes cleanly.
Step 8: Test the Door Before Calling It Done
Turn the knob several times. Open and close the door. Lock and unlock it if it is a privacy or keyed knob. Make sure the latch retracts smoothly and the door catches without sticking.
If the knob feels tight, slightly loosen the mounting screws and test again. If the latch sticks, confirm it is installed in the correct direction and that the hardware is centered properly.
How Long Does It Take?
If the door already has standard pre-drilled holes and you are replacing one standard knob with another, the job can take as little as 10 to 20 minutes. That makes this a perfect weekend reset project, especially if you are refreshing several rooms at once.
The timeline gets longer only if:
- The old hardware has hidden fasteners or paint buildup
- The new latch or strike plate does not match the old cutout
- The door is older and not drilled to current standard dimensions
- You stop halfway through to compare six finish samples under three different light bulbs
Common Mistakes to Avoid
Buying the Wrong Type of Knob
A passage knob on a bathroom door is not an exciting design choice. It is just inconvenient. Double-check the function before purchasing.
Ignoring the Backset
Most adjustable latches fit common door setups, but not all do. A quick measurement now can save you a return trip later.
Installing the Latch Backward
If the beveled latch is facing the wrong way, the door may not close smoothly. This is a classic DIY mistake because it is easy to do and easy to miss.
Overtightening the Screws
Too much force can make the knob bind, damage the hardware, or strip the screw holes. Tighten just until secure.
Forgetting About the Marks Left Behind
Sometimes the old knob or plate leaves paint shadows, dents, or unfinished outlines on the door. If that happens, use a backplate, touch-up paint, or a slightly larger trim rose to hide the evidence.
Ways to Make the Finished Look More Stylish
If your goal is not just replacement but a true style update, think beyond the knob itself.
- Match door hinges to the knob finish for a more intentional look
- Upgrade multiple knobs at once for consistency
- Use levers instead of knobs for a more modern look
- Add backplates on older doors for vintage charm
- Pair fresh hardware with newly painted doors for maximum impact
The best part is that changing doorknobs is scalable. You can update one sad-looking knob today, then tackle the rest of the house room by room as budget and energy allow.
Should You DIY or Call a Pro?
For a standard interior doorknob replacement, DIY is usually the clear winner. It is fast, beginner-friendly, and does not require advanced carpentry skills. If you are replacing an exterior keyed entry set, a vintage mortise lock, or hardware on a badly misaligned old door, a professional can save time and frustration.
Still, for most homeowners, this is one of the easiest upgrades on the list. If you can assemble flat-pack furniture without losing your will to live, you can probably replace a doorknob.
Conclusion
Learning how to change a doorknob quickly for an updated look is one of those satisfying home projects that delivers more style than stress. It is affordable, practical, and surprisingly transformative. With the right replacement hardware, a few basic tools, and about 15 minutes of focused effort, you can make a tired door feel fresh again.
Whether you are refreshing a bedroom, bathroom, hallway, or entry door, the process is simple: choose the right knob, remove the old hardware, install the new latch and knob correctly, and test everything before you celebrate. Then step back, admire your upgraded door, and enjoy the rare DIY moment when something actually looks better immediately.
That old knob had a good run. Probably. But your door deserves better now.
Real-Life Experiences: What Changing Doorknobs Actually Teaches You
The funny thing about replacing doorknobs is that almost nobody puts it on a dream project list. People fantasize about kitchen remodels, spa bathrooms, dramatic paint colors, and maybe a sunroom if they are feeling optimistic. Nobody leans back in a chair and says, “You know what would change my life? New hallway hardware.” And yet, once you start swapping out old knobs, you realize this tiny project has an oddly big effect on how a home feels.
One of the first things many homeowners notice is how much old hardware dates a space. A room can have fresh paint, decent lighting, and clean trim, but one scratched brass knob with a loose turn and mystery squeak can drag the whole vibe backward by about 20 years. Replacing it is like putting on a clean pair of shoes with a good outfit. Suddenly the details make sense.
There is also the surprising satisfaction of touching something that works well. Old knobs often jiggle, stick, spin, or feel slightly grimy even when they are technically clean. A new knob clicks with purpose. It turns smoothly. The latch catches correctly. The whole door feels less like a household obstacle and more like part of a finished home. It is a small sensory upgrade, but it is real.
Another common experience is discovering that doors are not nearly as standard as we like to pretend. On paper, yes, many are. In actual homes, though, one closet door seems thinner than the others, one bathroom latch was clearly installed by someone with chaotic energy, and one bedroom plate is hiding three generations of paint lines. The good news is that these little surprises usually do not ruin the project. They just remind you that houses have history, and history occasionally comes with crooked screws.
People also tend to learn that consistency matters more than they expected. Replacing one knob looks nice. Replacing several on the same floor makes the home feel deliberate. The style starts to connect from room to room. Hallways feel more finished. Bedrooms look less random. Even inexpensive hardware can look elevated when it repeats with intention.
And then there is the confidence boost. Changing a doorknob is often one of those gateway DIY projects that teaches people they do not need to call for help every time a screw appears. Once you handle a few knobs, hidden release slots no longer feel intimidating. Measuring backset stops sounding like advanced engineering. You start looking around the house thinking, “What else can I fix in under 20 minutes?” That may be empowering or dangerous, depending on your personality.
Perhaps the best experience, though, is the immediate payoff. Unlike some home upgrades that take days and create dust, noise, and existential regret, this one gives you a result right away. You remove something tired, install something better, and the room genuinely looks updated before your coffee gets cold. That is a rare kind of home improvement win, and honestly, we should celebrate it more.