Table of Contents >> Show >> Hide
- Why Cleaning Your Grill Makes BBQ Taste Better
- The Two-Level Cleaning System (Because You Have a Life)
- Grill Cleaning Supplies You’ll Actually Use
- Step-by-Step: How to Clean Grill Grates (Any Grill)
- How to Deep Clean a Gas Grill
- How to Deep Clean a Charcoal Grill
- How to Clean a Pellet Grill / Smoker
- Material Matters: Don’t Clean Your Grates the Wrong Way
- Wire Brush Safety: The One Grill Problem Nobody Wants
- Food Safety Bonus: Cleaning Is Part of Safe Grilling
- Common Grill-Cleaning Mistakes (And How to Avoid Them)
- Quick Maintenance Schedule (Steal This)
- Backyard Experiences: What Cleaning a Grill Taught Me (The Real-World Version)
- Conclusion
- SEO Tags
A clean grill is the difference between “wow, that’s smoky perfection” and “why do my burgers taste like last week’s salmon?”
Cleaning isn’t just about looksit’s about flavor, performance, and keeping flare-ups from turning your cookout into an impromptu fire drill.
This guide blends the most practical advice from U.S. test kitchens, home-improvement pros, grill manufacturers, and food-safety experts
(think: Better Homes & Gardens, Serious Eats, Food Network, Good Housekeeping, Bob Vila, Family Handyman, The Kitchn, Taste of Home,
Martha Stewart, Bon Appétit, Food & Wine, Consumer Reports, and USDA/FSIS guidance) into one easy routine you’ll actually do.
Why Cleaning Your Grill Makes BBQ Taste Better
Old grease and carbon don’t add “seasoning.” They add bitter smoke, off flavors, and sticky grates that tear your food like a villain in a low-budget
action movie. A clean grill gives you:
- Cleaner flavor: Less burnt residue means smoke tastes like wood and charcoalnot yesterday’s sauce.
- Better searing: Hot metal + clean surface = better grill marks and less sticking.
- Fewer flare-ups: Grease buildup is flare-up fuel. Remove it, and cooking gets calmer.
- Longer grill life: Ash, grease, and moisture speed up rust and corrosion.
The Two-Level Cleaning System (Because You Have a Life)
If you only deep-clean once a year, your grill will behave like a teenager asked to do chores: loud, messy, and unreliable.
The fix is simpledo light cleaning every cook and deep cleaning occasionally.
Level 1: The 5-Minute Clean (After Every Cook)
-
Burn off the gunk: After you’re done cooking, close the lid and run the grill hot for about 5–10 minutes.
This turns drips into brittle carbon that’s easier to remove. -
Brush or scrape while warm (not blazing): Use a sturdy scraper, a bristle-free brush, or a grill stone.
If you use a traditional wire brush, inspect it often and replace it if bristles are bent or shedding. -
Wipe for the win: Use tongs to hold a folded, slightly damp paper towel and wipe the grates.
This picks up loose debris you don’t want “seasoning” your next meal. -
Oil the grates lightly: Dip a paper towel in a neutral, high-heat oil (like canola or grapeseed) and wipe the grates with tongs.
This helps prevent sticking and slows rustthink of it as moisturizer for metal.
Level 2: The Deep Clean (Every 5–10 Cooks, or Monthly in Peak Season)
Deep cleaning is where you tackle the parts you don’t usually see: grease trays, heat shields, burner areas, and the inside walls that look like
they’ve been through a barbecue-themed mud run.
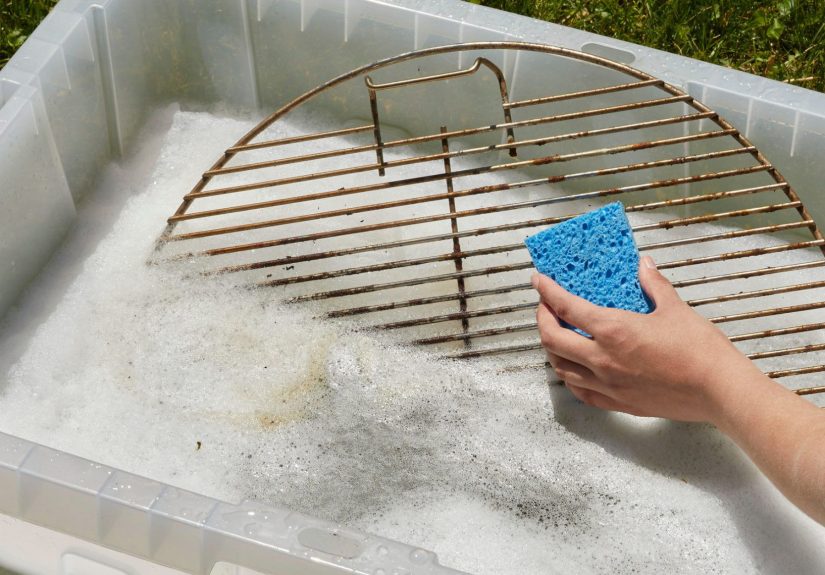
Grill Cleaning Supplies You’ll Actually Use
- Heat-resistant gloves (your fingerprints will miss you if you skip these)
- Grill brush or bristle-free cleaner (plus a scraper edge for stubborn spots)
- Nylon scrub pad (gentler for porcelain-coated parts)
- Bucket of warm soapy water (dish soap is the MVP)
- White vinegar and baking soda (for natural degunking power)
- Microfiber cloths or paper towels
- Plastic putty knife (great for scraping grease without gouging metal)
- Optional: a shop vac (especially handy for charcoal ash and pellet-grill dust)
Step-by-Step: How to Clean Grill Grates (Any Grill)
Grill grates are where the magic happensand also where the sticky, burnt, mystery layer forms if you ignore them.
Here are three proven approaches, so you can pick the one that matches your patience level.
Method A: Heat + Brush + Wipe (Fastest, Best for Regular Maintenance)
- Preheat the grill on high for 10–15 minutes with the lid closed.
- Brush or scrape the grates while they’re hot (use long tools; keep hands away from heat).
- Wipe with a damp towel held in tongs.
- Lightly oil the grates before your next cook (or immediately after wiping if you’re done for the day).
Method B: Baking Soda + Vinegar Foam (Great for Stubborn Spots)
- Let the grill cool enough to work safely.
- Sprinkle baking soda over problem areas.
- Spritz with vinegar (foam happens; it’s science doing the dishes).
- Wait a few minutes, then scrub gently with a nylon brush or pad.
- Rinse with clean water, dry thoroughly, and reheat briefly to evaporate moisture.
Method C: The “Onion Trick” (No Brush, No Drama)
If you forgot your grill brush or swore off wire bristles, this is your “I’ve got this” move.
Heat the grill, then rub the grates with a halved onion held on a fork or with tongs.
The onion’s moisture and natural compounds help loosen residue, and it leaves the grates feeling less sticky.
Bonus: it smells like you’re prepping fajitas, which is never a bad thing.
How to Deep Clean a Gas Grill
Gas grills are convenientturn a knob, become a backyard legend. But grease hides everywhere.
Do this deep clean when you notice flare-ups, uneven heat, or a smell that can only be described as “ancient hot dog.”
1) Shut It Down Safely
- Turn off the burners and the gas supply.
- If you use propane, close the tank valve and disconnect the tank.
- Let the grill cool completely before removing parts.
2) Remove and Clean the Grates
Scrape off loose debris. For stainless or porcelain-coated grates, use a nylon brush or pad if you’re worried about scratching.
For heavy buildup, use the baking soda + vinegar method, then dry thoroughly.
3) Clean the Heat Tents / Flavorizer Bars / Diffusers
These metal shields catch drips and distribute heat. They also collect grease like it’s their full-time job.
Scrape them with a plastic putty knife, then wash in warm soapy water and dry.
4) Empty and Scrub the Grease Tray
Slide out the drip tray. Dump grease into a disposable container (not down the sink unless you enjoy plumbing adventures).
Wash the tray with hot soapy water, rinse, and dry.
5) Check and Clean the Burners (Carefully)
If your flames look uneven or weak, burner ports may be clogged. Gently brush the burner exterior.
Clear clogged holes with something small (like a toothpick or a thin wire), and keep the burner tubes clear of debris.
If your grill has been sitting unused, inspect for spider webs or blockages in burner/venturi areas.
6) Wipe the Firebox Interior
Use a plastic scraper to remove heavy grease, then wipe with warm soapy water. Don’t flood the insidewater + leftover grease = sloppy mess.
Let everything dry completely before reassembling.
7) Reassemble and Burn Off
Put everything back, then run the grill on high for 10–15 minutes.
This dries lingering moisture and burns off any soapy traces.
How to Deep Clean a Charcoal Grill
Charcoal grills create amazing flavor, but ash is sneaky. Ash + moisture is basically a rust recipe.
Your biggest job is removing ash and keeping vents working.
1) Remove Ash After Every Cook
Once everything is completely cool, scoop ash into a metal container. Don’t leave ash sitting in the bottom like a sad gray snowdrift.
2) Clean the Grates
Brush while warm after cooking, and deep clean by soaking (unless they’re cast ironsee the material notes below).
Dry thoroughly and lightly oil.
3) Scrub the Bowl and Vents
Scrape the inside of the bowl with a plastic scraper, then wash with warm soapy water and a scrub brush.
Make sure vents open and close smoothly so you can control temperature next time.
How to Clean a Pellet Grill / Smoker
Pellet grills are flavor machines, but they have two messes: grease and fine ash.
A deep clean keeps temps steady and reduces the risk of greasy flare-ups.
- Unplug and cool completely.
- Remove grates and drip tray. Scrape grease into the trash; wash removable parts with warm soapy water.
- Vacuum ash. Use a shop vac (cold ash only) to remove dust from the fire pot and bottom of the grill.
- Clear grease channels and empty the bucket. Grease that can’t drain will eventually burn in ways you won’t enjoy.
- Reassemble and preheat. A short high-heat run helps dry everything out.
Material Matters: Don’t Clean Your Grates the Wrong Way
Cast Iron Grates
Cast iron loves being dry and lightly oiled. Avoid soaking it in water like it’s a sponge in a bubble bath.
Scrub with a damp cloth or nylon brush, dry immediately, then apply a thin coat of oil to prevent rust.
Porcelain-Coated Grates
Porcelain is tough, but it can chip if you get aggressive with sharp metal tools.
Use a nylon brush or a non-scratch pad. If you do scrape, keep it gentle and avoid gouging.
Stainless Steel Grates
Stainless can handle brushing well. For deep cleaning, vinegar + baking soda works great.
Dry thoroughly to prevent water spots and keep the surface looking sharp.
Wire Brush Safety: The One Grill Problem Nobody Wants
Wire grill brushes can shed bristles. If a bristle sticks to the grate and ends up in food, it can cause serious injury.
If you keep a wire brush, inspect it often, replace it when bristles bend or loosen, and wipe grates afterward.
Many grillers switch to bristle-free brushes, grill stones, or the onion method for peace of mind.
Food Safety Bonus: Cleaning Is Part of Safe Grilling
A clean grill helps, but safe BBQ also depends on what happens around the grill.
Use clean plates for cooked food (don’t put burgers back on the raw-meat plate), wash hands and tools,
and cook to safe minimum temperatures with a food thermometer.
- Ground meats: 160°F
- Poultry (including ground poultry): 165°F
Common Grill-Cleaning Mistakes (And How to Avoid Them)
- Cleaning only the grates: Grease trays and heat shields matter just as much.
- Skipping drying: Moisture invites rustespecially on cast iron and older grills.
- Letting ash sit: Ash holds moisture and speeds corrosion in charcoal grills.
- Using harsh chemicals without rinsing: If you use a strong cleaner, rinse thoroughly and burn off before cooking.
- Ignoring flare-ups: Frequent flare-ups usually mean grease buildupclean deeper.
Quick Maintenance Schedule (Steal This)
- After every cook: Burn off 5–10 minutes, brush/scrape, wipe, light oil.
- Every 5–10 cooks: Deep clean grates, empty grease tray, scrape heat shields.
- Monthly (heavy season): Full interior wipe-down, check burners/vents, clean drip system.
- Start/end of season: Deep clean everything, inspect hoses/igniters, cover and store dry.
Backyard Experiences: What Cleaning a Grill Taught Me (The Real-World Version)
The first time you host a backyard BBQ, you learn two truths fast: (1) people arrive hungry, and (2) your grill will choose that exact moment
to reveal its secret second job as a grease storage facility. I used to think “cleaning the grill” meant a quick swipe on the grates and a confident nod,
like I’d just tuned a race car. Then I hosted a summer cookout where my chicken tasted weirdly like the salmon I’d grilled the week before. Not “hint of smoke”
weirdmore like “ocean breeze meets barbecue sauce” weird. That’s when it clicked: leftover residue doesn’t stay politely in the past. It time-travels into dinner.
The biggest upgrade I ever made wasn’t a fancy thermometer or a new set of tongs. It was adopting the 5-minute clean after every cook.
Burn off, brush, wipe, oil. That routine is boring in the best way, like brushing your teethnobody cheers when you do it, but everybody benefits.
When I started wiping the grates with a damp towel after brushing, the food stopped sticking as much, and my grill marks started looking like I knew what I was doing.
(I did not suddenly become a grill wizard. I just stopped cooking on a crime scene.)
I also learned the hard way that the inside of a grill is not a magical self-cleaning cave. One weekend, I kept getting flare-ups while cooking burgers.
At first I blamed the fat content. Then I blamed the wind. Then I blamed… probably the alignment of the planets. The truth was sitting under the burners:
a drip tray that could’ve been labeled “grease lasagna.” Once I scraped and washed the tray and heat shields, the flare-ups calmed down, and the burgers tasted cleaner.
It wasn’t just saferit was less stressful. Cooking should feel like summer, not like defusing a small delicious bomb.
My favorite “I can’t believe this works” moment was trying the onion trick. I’d heard about it and assumed it was internet folklore,
like putting a wooden spoon over boiling pasta. But on a day I couldn’t find my brush, I heated the grill and scrubbed with a halved onion.
The grates looked noticeably cleaner, and the surface felt less tacky. Did it replace deep cleaning forever? No. But as a weeknight solution, it’s shockingly solid.
Plus, it makes your backyard smell like you’re about to grill fajitas, which is basically free marketing.
Another lesson: cast iron has feelings. I once soaked cast-iron grates like they were stainless, went inside, got distracted, and came back to early-stage rust.
That turned into a mini restoration projectscrub, dry, oil, heat, repeatuntil they behaved again. Now I treat cast iron like a good leather jacket:
keep it dry, condition it lightly, and don’t leave it in a bathtub.
And yes, I’ve joined the crowd that’s cautious about wire brushes. I’ve never had a bristle end up in food, but once I noticed a brush looking rough
(bent, tired, like it wanted to retire to Florida). I tossed it and switched to a bristle-free tool and a scraper.
Cleaning feels the same, but my brain is quieter. That alone is worth itbecause the only thing you should worry about at a cookout is whether you made enough potato salad.
The best part about getting serious (but not joyless) about grill cleaning is what happens next: better food. Cleaner smoke flavor.
Less sticking. Fewer flare-ups. And a grill that heats more evenly, so you’re not playing “hot spot roulette” with expensive steaks.
Once you experience that, cleaning stops being a chore and starts feeling like preplike sharpening a knife before cooking.
The payoff is immediate, delicious, and guaranteed to earn you at least one “Whoa, these are amazing” from someone holding a paper plate.
Conclusion
If you want consistently delicious backyard BBQ, clean grates are the headlinebut a clean drip system and a quick after-cook routine are the real secret sauce.
Do the 5-minute clean every time, deep clean on a simple schedule, and your grill will reward you with better flavor, fewer flare-ups, and easier cooking.
Your future self (and everyone eating) will thank you.