Table of Contents >> Show >> Hide
- Before You Clean: Know What You’re Cleaning
- Daily Harmonica Cleaning (The 2-Minute Routine)
- Weekly “Light Clean” (When You Play Often)
- When Deep Cleaning Is Actually Worth It
- Deep Cleaning Supplies (Keep It Simple)
- Deep Cleaning a Screw-Assembled Diatonic Harmonica
- Step 1: Take a Quick Photo
- Step 2: Remove Cover Plates
- Step 3: Remove Reed Plates (If Needed)
- Step 4: Clean the Cover Plates
- Step 5: Clean the Comb (Plastic or Metal)
- Step 6: Clean the Reed Plates (The “Do Not Wrestle the Reeds” Rule)
- Step 7: Dry Thoroughly (This Is Non-Negotiable)
- Step 8: Reassemble and Test
- Deep Cleaning Wood or Bamboo Comb Harmonicas (Extra Caution)
- Cleaning a Chromatic Harmonica (Daily + Deep)
- Disinfecting vs. Cleaning (They’re Not the Same Thing)
- Troubleshooting After Cleaning
- Simple Cleaning Schedule (So You Don’t Overdo It)
- Final Thoughts (Clean Enough Beats Perfect)
- Player Notes: Real-World Cleaning Experiences (Extra )
Harmonicas are tiny, mighty, andlet’s be honestbasically pocket-sized saliva magnets. The good news: keeping a harmonica clean
doesn’t have to feel like a chemistry lab assignment. The better news: the cleanest harmonica is usually the one you don’t
over-clean.
This guide walks you through two practical tracks:
daily cleaning (the 60–120 second routine that prevents most problems) and
deep cleaning (what to do when your harp is sticky, funky, secondhand, or playing like it’s mad at you).
You’ll also learn what not to dobecause a harmonica is a precision instrument, not a frying pan.
Before You Clean: Know What You’re Cleaning
Most harmonicas have the same core parts:
- Cover plates (the outer metal shells)
- Reed plates (the delicate metal plates with reeds that actually make sound)
- Comb (the “body” with chambers/holescan be plastic, wood/bamboo, or metal)
Chromatic harmonicas add an extra “moving parts” party:
- Mouthpiece & slide (the button mechanism)
- Windsavers/valves (thin flaps that help airflowthese are not fans of water, harsh chemicals, or heavy soaking)
Why this matters: cleaning a plastic-comb diatonic is very different from cleaning a wood-comb Marine Band,
and both are different from cleaning a chromatic with windsavers. The goal is always the same:
remove gunk without bending reeds, swelling combs, or loosening adhesives.
Daily Harmonica Cleaning (The 2-Minute Routine)
Daily cleaning is less about scrubbing and more about moisture management. Most harmonica “grossness” becomes a problem
when it dries into crust, creeps under edges, and starts interfering with reed movement or slide action.
Step 1: Start Clean (Yes, Your Mouth Counts)
If you want a cleaner harmonica, give it cleaner inputs. Quick wins:
- Rinse your mouth with water before playing (especially after coffee, soda, or snacks).
- If you just ate something sugary or oily, wait a bit or rinse wellyour harmonica doesn’t need dessert.
- Avoid playing right after lip balm or greasy snacks (sticky residue can migrate into the holes).
Step 2: Tap Out Moisture (Gently)
Hold the harmonica with the holes facing down and gently tap it against your palm or a clean towel.
This helps remove condensed moisture and saliva before it dries where you don’t want it.
Important note: Some very low-tuned models can be more sensitiveif your manufacturer recommends
air-drying instead of tapping, follow that guidance.
Step 3: Wipe the Outside
Use a clean, lint-free cloth to wipe the cover plates and mouthpiece area. This removes fingerprints, oils, and whatever
your gig bag has been “sharing” with your harmonica.
Step 4: Air-Dry Before Casing
The harmonica case is protection, but it can also become a moisture trap. Let your harmonica air out for at least
15–30 minutes before closing it upespecially after a long session or humid weather.
Step 5: Quick Hole Check (Optional but Useful)
If you see obvious debris around the hole edges, use a dry, soft toothbrush or a wooden toothpick to flick it out gently.
Don’t jam anything deep inside. Think “tidy the doorway,” not “remodel the house.”
Weekly “Light Clean” (When You Play Often)
If you play most days, a weekly light clean keeps buildup from turning into a deep-clean project.
Exterior Refresh
- Wipe covers and mouthpiece with a cloth lightly dampened with mild soapy water, then wipe dry.
- If you prefer a disinfecting wipe-down, keep it conservative and make sure everything dries completely before playing.
Case Cleaning (The Forgotten Step)
Your harmonica can be spotless, but if the case smells like a gym sock’s autobiography, guess who gets blamed.
Wipe the inside of the case and let it dry fully.
When Deep Cleaning Is Actually Worth It
Deep cleaning is for problems, not perfection. Consider a deep clean if:
- A reed is sticking or notes are sluggish even after normal tap-out and drying.
- You’ve got visible buildup under cover edges or around the mouthpiece.
- The harmonica tastes or smells off (and not in the “authentic blues” way).
- You bought it used and your brain won’t let you enjoy it until it’s sanitized.
Also: some harmonicas (especially those not designed for frequent disassembly) should only be taken apart if they’re malfunctioning.
If your harmonica is held together with nails instead of screws, proceed carefullyor consider a professional service if you’re not confident.
Deep Cleaning Supplies (Keep It Simple)
- Lint-free cloth (microfiber works well)
- Small screwdriver that fits your screws properly
- Soft toothbrush (use a fresh oneyour spouse is not donating theirs)
- Mild dish soap (no bleach, no ammonia, no “industrial citrus degreaser of doom”)
- Small bowl of warm water (warm, not hot)
- Wooden toothpicks (for gentle edge cleanup)
- Optional: 70% isopropyl alcohol for external wipe-downs or manufacturer-approved cleaning
- Optional: 3% hydrogen peroxide for occasional disinfecting on plastic-comb harps (with caution)
What to avoid: boiling water, dishwashers, bleach, ammonia, strong solvents, heavy oils inside the reed chambers,
and anything you would not want lingering on something that goes in your mouth.
Deep Cleaning a Screw-Assembled Diatonic Harmonica
This method is best for modern diatonics that come apart with screws (many plastic-comb models fall into this category).
Work on a clean table with good lighting. If your harmonica uses tiny screws, a shallow tray helps prevent “oops, it rolled into another dimension.”
Step 1: Take a Quick Photo
Snap a photo before you start. It’s the easiest way to remember orientation and screw placement.
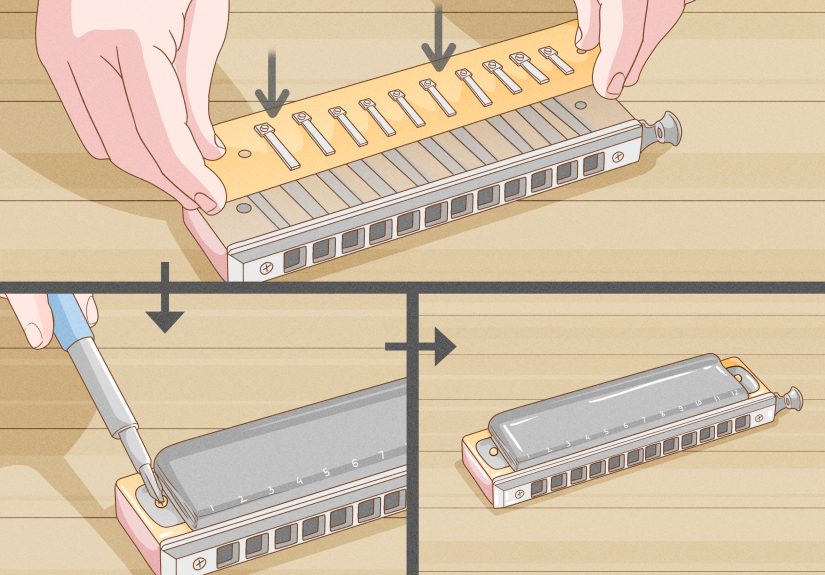
Step 2: Remove Cover Plates
- Unscrew the cover plates.
- Set screws aside in a safe spot.
- Lift covers gentlydon’t drag them across reeds.
Step 3: Remove Reed Plates (If Needed)
If you’re only cleaning cover edges and the mouthpiece area, you may not need to remove reed plates.
But if buildup is clearly inside, remove reed plates carefully and place them on a clean cloth.
Do not touch reeds directly.
Step 4: Clean the Cover Plates
- Soak covers in warm soapy water for a few minutes.
- Lightly brush grime off.
- Rinse and dry completely.
Step 5: Clean the Comb (Plastic or Metal)
- Wash the comb gently in warm soapy water.
- Brush the chambers lightly to remove residue.
- Rinse well and dry completely.
Step 6: Clean the Reed Plates (The “Do Not Wrestle the Reeds” Rule)
Reed plates are where people get brave and then get sad. Be gentle:
- Use a soft brush only if you’re confident and brush from rivet toward the free end, carefully, without snagging reeds.
- Never scrub across reeds sideways.
- If you’re using alcohol as part of a manufacturer-recommended method, wipe parallel to reeds and let everything dry fully.
If discoloration/tarnish is present: it’s usually cosmetic. Polishing reeds can remove metal and affect tuning,
so don’t chase a mirror finish unless you also enjoy re-tuning as a lifestyle.
Step 7: Dry Thoroughly (This Is Non-Negotiable)
- Pat parts dry with a lint-free cloth.
- Air dry for several hours (or overnight) before reassembly.
- If you use a hair dryer, use cool/low airflow and keep it movingno heat blasting.
Step 8: Reassemble and Test
Reassemble in reverse order. Tighten screws evenly (snug, not “I’m building a bridge” tight). Then play each hole gently.
If a reed sticks, don’t panicsometimes a tiny remaining droplet or speck needs one more dry-out cycle.
Deep Cleaning Wood or Bamboo Comb Harmonicas (Extra Caution)
Wood combs can swell and warp with soaking, which can create air leaks or rough edges. For wood/bamboo combs:
- Avoid soaking the comb.
- Use a dry toothbrush for the mouthpiece/slot area.
- Wipe exterior surfaces with a barely damp cloth, then dry immediately.
- If the comb is unsealed and you frequently have moisture issues, consider sealing/modding or using a plastic-comb model for heavy practice sessions.
Cleaning a Chromatic Harmonica (Daily + Deep)
Chromatics are wonderful… and also more complicated. The big rule:
avoid getting water into the reed/valve chambers.
Windsavers can stick, warp, or loosen if treated like a simple rinse-and-go instrument.
Daily Chromatic Cleaning: Keep the Mouthpiece & Slide Happy
- Tap moisture out gently (holes downward).
- Wipe mouthpiece and cover surfaces with a clean cloth.
- If the slide feels sticky, use a shallow-pan rinse method: keep holes facing down and only allow water to contact the mouthpiece/slide areanever the chambers.
- Air dry thoroughly before storing.
Deep Chromatic Cleaning: Mouthpiece Assembly (Careful Mode)
A full chromatic deep clean can involve disassembling the mouthpiece and slide assembly and cleaning parts individually.
If you’re new to this, start small: clean what you can reach safely, and consider professional service for major issues.
- Clean the mouthpiece and slide parts with mild soap and water (or a manufacturer-approved method).
- Rinse and dry completely.
- Reassemble carefullyslide alignment and screw tightness matter for smooth action and airtightness.
Practical tip: if you wouldn’t want the residue in your mouth, don’t use it on your mouthpiece.
“Harsh but effective” is not the vibe for something you literally inhale through.
Disinfecting vs. Cleaning (They’re Not the Same Thing)
Cleaning removes debris. Disinfecting reduces germs. For most players, keeping the harmonica dry and clean does the heavy lifting.
If you bought a used harmonica or you’re sharing a stage environment (not the harmonicadon’t share the harmonica), you may want extra peace of mind.
Safer Disinfecting Habits
- Use a light disinfecting wipe-down on external surfaces (covers, mouthpiece) and let it dry fully before playing.
- For plastic-comb diatonics, occasional disinfecting methods may be used cautiouslybut don’t do it obsessively.
- Never use bleach, ammonia, or aggressive solvents on parts that go in your mouth.
Troubleshooting After Cleaning
“My Reed Still Sticks!”
- Debris: A tiny bit of dried residue can wedge between reed and slot. A gentle air-dry plus careful edge cleanup often helps.
- Moisture: A reed can act weird if moisture remains. Let it dry longer and retest.
- Reed gap/alignment: If the harmonica was already on the edge, cleaning can reveal a setup issue. At that point, it’s maintenance (gapping), not cleaning.
“It Smells Fine… Until I Play.”
That’s often trapped moisture. Extend air-dry time, clean the case, and reduce “playing right after snacks” habits.
Simple Cleaning Schedule (So You Don’t Overdo It)
| How Often You Play | Daily Routine | Light Clean | Deep Clean |
|---|---|---|---|
| Occasional | Tap out + wipe + air dry | As needed | Only if sticky/dirty/used |
| Most days | Tap out + wipe + air dry | Weekly exterior + case | When performance changes |
| Gigging / long sessions | Tap out often, keep cloth handy | Weekly (minimum) | Monthly or as needed |
Final Thoughts (Clean Enough Beats Perfect)
A harmonica is one of the few instruments that lives at the intersection of “precision engineering” and “human mouth.”
The best strategy is prevention: start with a clean mouth, tap out moisture, wipe the outside, and let it dry.
Deep clean only when you have a reasonbecause the fastest way to ruin a harmonica is to treat its reeds like they’re built for scrubbing.
Keep it simple, keep it dry, and your harmonica will keep sounding like music instead of a tiny accordion haunted by crumbs.
Player Notes: Real-World Cleaning Experiences (Extra )
The first time I “deep cleaned” a harmonica, I made the classic rookie move: I assumed more effort meant better results.
I disassembled a perfectly fine diatonic, stared at the reeds like they were indestructible, and learned (very quickly) that reeds are basically
the hummingbird bones of the music world. Nothing catastrophic happened, but I did bend one reed just enough to make a note feel sluggish.
The fix wasn’t more soapit was patience, drying time, and (eventually) a lesson in reed gapping I didn’t plan on taking.
After that, my “daily clean” became a habit instead of a guilt trip. I started doing a quick tap-out after every session,
followed by a wipe-down on a microfiber cloth that lives in my case like a loyal sidekick. The difference showed up not just in cleanliness,
but in performance: fewer sticky notes, fewer surprise buzzes, and less of that weird “why does this hole taste like last week?” moment.
It turns out moisture control is the real boss fight.
One gigging friend taught me another useful trick: treat your harmonica like a wind instrument, not a kitchen utensil.
Between sets, he rests the harmonica holes-down on a clean towel for a minutejust enough to let gravity do its thing.
No frantic rinsing in the bathroom sink. No mystery liquids from a bar napkin. Just a calm, repeatable routine that keeps the harp playable
through a long night.
The most memorable cleaning experience I’ve seen involved a secondhand harmonica. A beginner bought a used harp and couldn’t stop thinking about its past life
(which is fairharmonicas are intimate little instruments). Instead of an aggressive chemical bath, we did a practical “confidence clean”:
external wipe-down, careful cleaning of cover edges, a light clean of the comb (plastic), and lots of drying time. The harmonica played great afterward,
and more importantly, the player stopped making the “this used to be in a stranger’s mouth” face every time they took a breath.
Over time, the pattern became obvious: most problems come from either (1) moisture being trapped, or (2) residue building up where airflow matters.
When you handle those two things consistently, you almost never need a dramatic deep clean. And when you do deep clean, you do it slowly,
like you’re handling tiny musical eyelashesbecause that’s basically what reeds are.
If I had to sum it up: daily cleaning is boring, deep cleaning is risky, and boring is usually the smarter choice.
Make the quick routine automatic, save the deep clean for real symptoms, and your harmonica will stay happier, longer
which is great, because harmonicas don’t exactly come with a “factory reset” button.