Table of Contents >> Show >> Hide
- Why Gas Ovens Cook Pizza Differently (and Why That Helps)
- Quick Checklist: What You Need
- The 14-Step Method for Pizza in a Gas Oven
- Step 1: Pick the right style for your oven’s max temp
- Step 2: Let the dough warm up (cold dough fights back)
- Step 3: Set your rack position based on what your gas oven does
- Step 4: Put your stone/steel in a cold oven, then preheat like you mean it
- Step 5: Prep toppings with “dry heat” in mind
- Step 6: Make a fast, bright sauce (and don’t drown the pie)
- Step 7: Set up your launch station (so you don’t panic later)
- Step 8: Stretch the dough gently and evenly
- Step 9: Transfer to the peel and do the “shake test”
- Step 10: Top quickly and strategically
- Step 11: Launch onto the hot stone/steel with confidence
- Step 12: Bake hot, rotate once, and watch the edges
- Step 13: Finish under the broiler for that pizzeria top (optional but glorious)
- Step 14: Rest, slice, and take notes for your next (even better) pizza
- Timing & Temperature Cheatsheet
- Gas Oven Pizza Troubleshooting
- Flavor Upgrades That Don’t Wreck the Crust
- Cleaning & Care: Keep Your Stone/Steel in Fighting Shape
- Real-World Experience Notes (About )
- Conclusion
A gas oven is like that friend who’s wildly talented but a little unpredictable: it runs hot in some spots, cooler in others,
and somehow makes everything smell amazing. The good news? You can absolutely pull off crisp-bottom, bubbly-cheese, “wait… you made
this at home?” pizza in a standard gas oven. You just need the right setup, a little heat management, and the confidence to
use your broiler like a finishing move.
Why Gas Ovens Cook Pizza Differently (and Why That Helps)
Most gas ovens heat from a burner at the bottom, so you often get strong bottom heat and slightly gentler top heat during baking.
That’s great for crisping the crust, but it can leave cheese and toppings looking a bit… pale and thoughtful. The fix is simple:
preheat a stone or steel thoroughly to supercharge the crust, then use the broiler to give the top that pizzeria-style blister and
browning. Think of it as a two-part harmony: hot deck + intense top heat.
Quick Checklist: What You Need
Equipment
- Pizza stone or baking steel (steel browns faster; stone is forgiving and widely available)
- Pizza peel (wood launches well; metal retrieves well) or the back of a sheet pan
- Oven thermometer (optional, but it settles arguments with your oven dial)
- Bench scraper (optional, but makes dough handling tidier)
- Long tongs or a turning peel (optional for rotating)
Ingredients
- Dough (store-bought is fine; homemade shines with a cold ferment)
- Sauce (not too wet)
- Cheese (low-moisture mozzarella for melt; a little fresh mozzarella for creamy pockets)
- Toppings (light, thin, and pre-cooked when needed)
- Semolina or cornmeal (for launching), plus flour for shaping
The 14-Step Method for Pizza in a Gas Oven
Step 1: Pick the right style for your oven’s max temp
If your oven tops out at 500–550°F, you’re in “New York-ish,” thin-and-crisp territory. Aim for a 12–14 inch pizza with a moderate
rim, not a super-thick crust that needs a long bake. Thicker pan pizzas can still work (and are delicious), but the timing and
browning cues change.
Step 2: Let the dough warm up (cold dough fights back)
Bring dough to room temp so it stretches without tearing and bakes with better spring. For refrigerated dough, give it 60–120 minutes
on the counter, covered. A relaxed dough is basically a good mood you can eat.
Step 3: Set your rack position based on what your gas oven does
Gas ovens often brown the bottom well, so many home cooks get better balance by baking on a stone/steel placed in the
upper third (or second-from-top), where the top can brown faster. If your toppings brown too quickly and the bottom
stays blonde, move the baking surface down a notch. Your goal is even doneness, not loyalty to one rack forever.
Step 4: Put your stone/steel in a cold oven, then preheat like you mean it
Set the stone or steel on the chosen rack while the oven is still cold. This helps prevent thermal shock (especially for stones).
Then preheat the oven to its highest bake setting (usually 500–550°F). Don’t stop when the beep happenskeep heating for
45–60 minutes so the stone/steel stores serious heat.
Step 5: Prep toppings with “dry heat” in mind
Water is pizza’s sneaky enemy. Slice high-moisture toppings thin (mushrooms, fresh mozzarella, tomatoes), pat them dry, and
pre-cook anything fatty or watery (sausage, peppers, onions) so the crust doesn’t steam. Also: go lighter than you think.
Over-topping is the #1 way to make a pizza that tastes great and eats like a wet blanket.
Step 6: Make a fast, bright sauce (and don’t drown the pie)
For quick sauce, crush canned tomatoes with salt, a little olive oil, and maybe garlic or oregano. Keep it thick, not soupy.
A thin layer is enough; you should still see dough through the sauce in spots.
Step 7: Set up your launch station (so you don’t panic later)
Place your peel (or inverted sheet pan) next to the counter where you’ll build the pizza. Dust it with semolina or cornmeal.
Have sauce, cheese, and toppings ready in small bowls. When the oven is blazing hot, you want a smooth assembly linenot a scavenger hunt.
Step 8: Stretch the dough gently and evenly
On a lightly floured surface, press the dough into a round, leaving a thicker rim. Lift and stretch over your knuckles, rotating
as you go, until it’s about 12 inches (or fits your stone/steel). If it shrinks back, let it rest for 5 minutes and try again.
Dough doesn’t respond well to threats, but it loves a short nap.
Step 9: Transfer to the peel and do the “shake test”
Lay the stretched dough on the peel. Give it a small shake: it should slide freely. If it sticks, lift the edge and toss a little
more semolina underneath. Do this now, not after you’ve built a masterpiece.
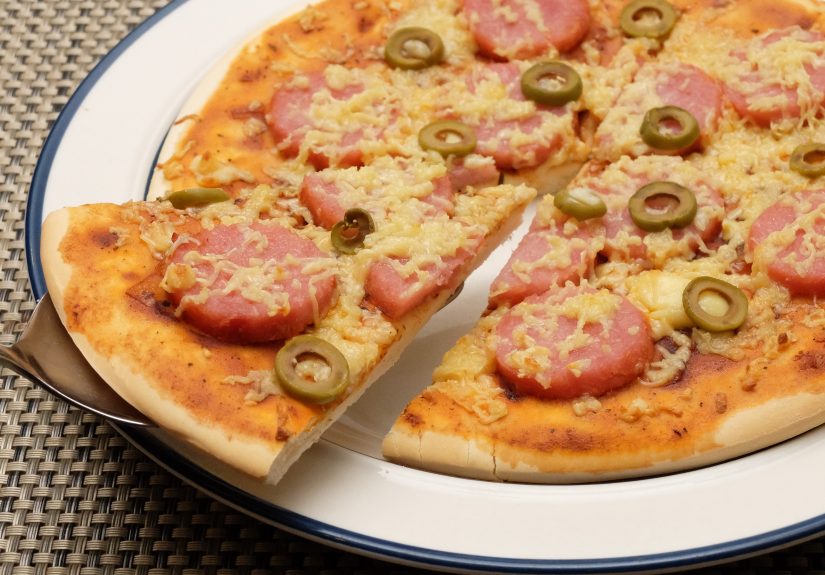
Step 10: Top quickly and strategically
Add sauce (thin layer), then cheese, then toppings. Keep heavier toppings closer to the center so the rim can puff. If using fresh
mozzarella, tear into small pieces and scatter sparingly. Finish with a drizzle of olive oil if you want richer browning.
Step 11: Launch onto the hot stone/steel with confidence
Open the oven, aim the peel at the back of the stone/steel, and use a quick forward-then-back motion to slide the pizza off.
Close the door immediately to keep heat in. If the pizza lands a little crooked, call it “rustic” and rotate later.
Step 12: Bake hot, rotate once, and watch the edges
Bake until the rim begins to puff and the bottom starts browningtypically 4–8 minutes depending on oven temp, dough thickness,
and whether you’re using stone or steel. Most gas ovens have hot spots, so rotate the pizza about 180 degrees halfway through.
You’re looking for an even golden rim and bubbling cheese.
Step 13: Finish under the broiler for that pizzeria top (optional but glorious)
If the bottom is crisp but the top needs more color, switch to broil for 30–90 seconds. Keep your eyes on itbroilers go from
“nice freckles” to “we invented charcoal” fast. Use broiler-safe tools only (avoid glass/ceramic unless clearly rated for broiling),
and consider removing parchment before broiling if it’s anywhere near the flame.
Step 14: Rest, slice, and take notes for your next (even better) pizza
Let the pizza rest 1–2 minutes so the cheese sets slightly, then slice. Make a quick mental note:
Did the bottom brown before the top? Next time, move the rack up or use a brief broiler finish.
Did the top brown before the bottom? Move the rack down or preheat longer. Every oven is a personalitylearn yours.
Timing & Temperature Cheatsheet
| Pizza Style | Oven Setting | Preheat | Typical Bake Time | Best Surface |
|---|---|---|---|---|
| Thin / NY-style-ish | 500–550°F bake | 45–60 min | 5–8 min (+ brief broil if needed) | Steel (fast browning) or stone |
| Thicker crust / lots of toppings | 450–500°F bake | 45–60 min | 10–14 min | Stone, or pan on preheated surface |
| Pan pizza (sheet/cast iron) | 450–500°F bake | Oven preheat | 12–18 min | Dark metal pan / cast iron |
Gas Oven Pizza Troubleshooting
Bottom burns before the cheese browns
- Move the stone/steel up one rack.
- Reduce sugar/honey in the dough (it accelerates browning).
- Use slightly less flour on the peel (excess flour can scorch).
- Finish with broiler later, not earlier.
Cheese browns too fast but crust is pale
- Move the stone/steel down one rack and extend the preheat.
- Switch to bake (not broil) for most of the cook; broil only at the end.
- Go lighter on toppings and moisture-heavy cheese.
Soggy center
- Use less sauce and fewer wet toppings.
- Pre-cook mushrooms/peppers/onions or pat them dry.
- Bake on steel (stronger bottom heat transfer) and keep the pizza movingrotate once.
Pizza sticks to the peel
- Use semolina or cornmeal, and do the shake test before topping.
- Build fasterdough absorbs moisture and glues itself down over time.
- If it sticks mid-launch, lift an edge and toss more semolina underneath.
Flavor Upgrades That Don’t Wreck the Crust
- Hot honey on the last slice (yes, the last onebecause it feels earned).
- Garlic oil brushed on the rim right after baking.
- Parmesan or pecorino added after bake for sharper flavor without extra moisture.
- Fresh herbs (basil, oregano) added after baking so they stay fragrant, not sad.
Cleaning & Care: Keep Your Stone/Steel in Fighting Shape
Let a stone cool completely in the oven before moving it. Scrape off stuck bits once cool and avoid soap (it can soak in).
For a steel, scrape while warm (carefully), wipe, and keep it dry to prevent rust. A dark, seasoned surface is a badge of honor,
not a cleanliness issue. Your pizza steel doesn’t want a spa dayit wants more pizza days.
Real-World Experience Notes (About )
The first time I tried “serious” pizza in a gas oven, I did everything rightat least according to my confidence leveland still
ended up with a crust that looked gorgeous on top but felt like a soft pretzel underneath. The lesson: the oven was hot, but the
stone wasn’t. That beep is a liar. Since then, I treat preheating like warming up before a workout. If I’m not giving my
stone or steel at least 45 minutes, I’m basically trying to sprint in flip-flops.
The second big lesson was rack position. In my oven, the bottom heat is enthusiasticlike it drank three coffees. When I baked on a
lower rack, the underside browned fast while the cheese looked like it was waiting for a permission slip. Moving the steel to the
upper third fixed the balance immediately. Suddenly the rim puffed, the cheese bubbled harder, and I stopped whispering apologies
to my toppings.
Then came the broiler phaseequal parts excitement and fear. If you’ve never used the broiler to finish pizza, the experience is
basically: “Nothing’s happening… nothing’s happening… WOW EVERYTHING IS HAPPENING.” I now set a timer for 30 seconds and
physically stay in front of the oven. The broiler is not a “multitask and check your phone” situation. But when you get it right,
those little browned blisters on the cheese and the tiny char freckles on the rim taste like a restaurant.
I also learned the magic of “less topping, more happiness.” Home ovens don’t have the blast-furnace heat of a pizzeria deck, so a
mountain of wet vegetables and extra sauce turns into steam. Steam is great for dumplings. It is not great for crispy pizza.
Now I slice mushrooms thin, pre-cook onions and peppers, and use fresh mozzarella in small scattered pieces instead of a whole
soggy cloud. The result is a pizza that stays crisp even after the second sliceaka the real victory.
Finally, I started keeping tiny notes. Just quick stuff: rack position, bake time, whether I finished on broil, and how the bottom
looked. It sounds extrauntil you realize it saves you from repeating the same mistake three Fridays in a row. Once you dial in
your oven’s personality, pizza night becomes less like a science experiment and more like a reliable little tradition that makes
everyone in the house “just happen” to wander into the kitchen.
Conclusion
Cooking pizza in a gas oven is all about controlling heat in two directions: intense stored heat from a stone or steel for a crisp
base, plus just enough top heat (often from a quick broiler finish) for bubbling, browning, and that unmistakable pizza-shop vibe.
Preheat longer than you think, top lighter than you want, rotate once, and use the broiler with respect. Do that, and your gas oven
will start acting less like a mystery box and more like your personal pizza jointminus the delivery fee.