Table of Contents >> Show >> Hide
- What Makes a Pot Roast Truly Great?
- Pick the Right Cut of Beef
- Equipment That Helps (But Won’t Judge You if You Don’t Have It)
- Ingredients for a Classic “Best Ever” Pot Roast
- Step-by-Step: How to Cook the Best Pot Roast (Oven Method)
- Step 1: Salt the Roast (Yes, This Matters)
- Step 2: Sear Like You Mean It
- Step 3: Build the Flavor Base
- Step 4: Deglaze (Make the Pot Taste Expensive)
- Step 5: Braise Low and Slow
- Step 6: Add Potatoes at the Right Time
- Step 7: Know When It’s Done (Tender Beats “Technically Cooked”)
- Step 8: Rest the Meat (Don’t Skip This)
- How to Make Pot Roast Gravy That People Talk About
- Flavor Variations (Same Method, Different Mood)
- Slow Cooker and Pressure Cooker Notes (Because Life Happens)
- Troubleshooting: Fix the Most Common Pot Roast Problems
- How to Slice or Shred (Choose Your Pot Roast Personality)
- Serving Ideas That Feel Like a Hug
- Make-Ahead and Leftovers (Pot Roast Gets Better at This)
- Real-World Pot Roast Experiences (What People Learn After a Few Roasts)
- Conclusion
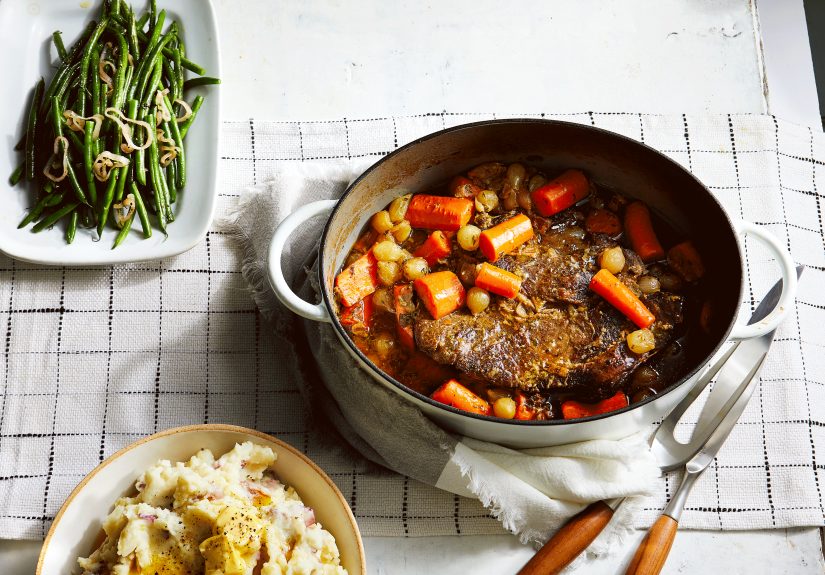
Pot roast is the culinary equivalent of a warm blanket and a good nap. It’s humble, it’s cozy, and when it’s done right,
it turns an inexpensive hunk of beef into something that tastes like you planned your entire week around dinner (even if you
absolutely did not).
The “best” pot roast isn’t about fancy ingredientsit’s about smart technique: choosing the right cut, building deep flavor
with browning, then braising low and slow until the connective tissue surrenders and the meat becomes fork-tender. Let’s make
the kind of pot roast that makes people hover in the kitchen “just to check on it” every 12 minutes.
What Makes a Pot Roast Truly Great?
Pot roast is a braise: part roasting (dry heat) and part simmering (wet heat). You brown the meat, then cook it gently in a
covered pot with a small amount of liquid. Over time, tough collagen converts into silky gelatin, making the beef juicy and
the sauce rich.
The Big 3: Cut, Crust, and Time
- Cut: You want beef with connective tissue and marbling (hello, chuck roast).
- Crust: Searing creates browned flavor compounds that make the whole pot taste “bigger.”
- Time: Tender pot roast is earned, not rushed. Low heat + time = magic.
Pick the Right Cut of Beef
If you want the classic, fall-apart pot roast texture, beef chuck roast is your best friend. It comes from
the shoulder, which works hard, meaning it has plenty of collagen that melts during braising. That collagen is exactly what
makes the final roast succulent instead of sad.
Best Cuts for Pot Roast (and What They’re Like)
- Chuck roast (top choice): Rich, beefy, shreddable. Great marbling and connective tissue.
- Brisket: Gets tender but often stays more sliceable and structured.
- Bottom round/top round: Leaner. Can work, but it’s less forgiving and benefits from extra care and sauce.
Size Guide
For most families, a 3–4 pound roast is the sweet spot. It fits well in a Dutch oven and cooks evenly without
requiring an overnight braise (unless you’re into that, whichno judgment).
Equipment That Helps (But Won’t Judge You if You Don’t Have It)
- Dutch oven (5–7 quarts): The MVP for oven braisingsteady heat, tight lid, great browning.
- Instant-read thermometer: Helpful for confidence and consistency.
- Tongs + a sturdy spoon: For turning, scraping browned bits, and feeling like a pro.
Ingredients for a Classic “Best Ever” Pot Roast
This is a technique-first recipe. The ingredient list is flexible, but here’s a reliable blueprint that tastes deeply beefy
without needing a culinary degree.
Core Ingredients
- 3–4 lb beef chuck roast
- Kosher salt and black pepper
- 2–3 tbsp neutral oil (or a mix of oil + a little butter)
- 2 onions, chunked
- 3–4 carrots, cut into big pieces
- 2 celery stalks, chunked (optional but excellent)
- 4–6 garlic cloves, smashed
- 2 tbsp tomato paste (optional, adds savory depth)
- 1–2 cups beef stock (or a mix of stock + wine)
- 1 cup dry red wine (optional, but adds complexity)
- Fresh thyme/rosemary or 1–2 tsp dried herbs
- 2 bay leaves
Vegetables That Join the Party Later
- 1–1.5 lb baby potatoes or chunked Yukon Golds
- Extra carrots/parsnips (if you want more veg in the final pot)
Step-by-Step: How to Cook the Best Pot Roast (Oven Method)
The oven method is the gold standard because it surrounds the pot with steady heat and cooks gently from all directions.
It’s also the easiest way to get consistent tenderness without babysitting a burner.
Step 1: Salt the Roast (Yes, This Matters)
Pat the roast dry and season generously with salt and pepper on all sides. If you have time, salt it and let it sit uncovered
in the fridge for 8–24 hours. This dry-brining helps the meat stay juicy and taste seasoned all the way through.
If you don’t have time, season it right before searing and proceed confidently.
Step 2: Sear Like You Mean It
Heat your Dutch oven over medium-high heat. Add oil and wait until it shimmers. Place the roast in the pot and don’t move it
for a few minuteslet it develop a deep brown crust. Turn and repeat until browned on all sides.
- Pro tip: If the roast is sticking, it’s not ready. When it releases easily, it’s browned.
- Goal: Dark brown, not burned. Burned bits can make the sauce bitter.
Step 3: Build the Flavor Base
Remove the roast to a plate. Add onions, carrots, and celery to the pot. Cook 5–8 minutes, scraping the bottom to lift up the
browned bits (that’s flavor, not “mess”). Add garlic and tomato paste, and cook 30–60 seconds until fragrant.
Step 4: Deglaze (Make the Pot Taste Expensive)
Pour in wine (or a splash of stock) and scrape the bottom thoroughly. Let it simmer 1–2 minutes to cook off harsh alcohol notes.
Add stock, herbs, and bay leaves.
Step 5: Braise Low and Slow
Return the roast to the pot. The liquid should come up about 1/3 to 1/2 of the meatthis is braising, not boiling.
Cover with a tight lid.
Cook in a 300°F oven (a little lower, like 275°F, is also great if you have time). Plan for roughly
3–4 hours for a 3–4 lb roast, but don’t cook by the clock alonecook until tender.
Step 6: Add Potatoes at the Right Time
Potatoes and extra vegetables can turn to mush if they cook the entire time. Add potatoes (and any additional carrots/parsnips)
during the last 60–90 minutes of cooking, depending on size. You want them tender, not dissolving into the sauce
like they’re trying to escape the pot.
Step 7: Know When It’s Done (Tender Beats “Technically Cooked”)
A pot roast can be food-safe before it’s tender, but the “best pot roast” moment happens when collagen has melted and the meat
yields easily. You’re looking for a knife to slide in with little resistance and for the roast to pull apart with a fork.
If you use a thermometer, many roasts become truly shreddable around the time the internal temperature climbs well above steak
territoryoften in the neighborhood where collagen breaks down and the meat relaxes. Translation: if it’s tough, it usually
needs more time, not less.
Step 8: Rest the Meat (Don’t Skip This)
Remove the roast and let it rest 15–20 minutes. This helps juices redistribute and keeps the meat from shedding moisture the
second you cut into it.
How to Make Pot Roast Gravy That People Talk About
The braising liquid is basically concentrated comfort. Turning it into gravy is optional, but so is happiness.
Easy Gravy Method
- Strain (optional): Strain the liquid for a smooth gravy, or keep some vegetables for rustic texture.
- Defat: Spoon off fat from the top, or chill briefly so fat solidifies and lifts off easily.
- Reduce: Simmer the liquid 5–15 minutes to intensify flavor.
- Thicken: Use a cornstarch slurry (1 tbsp cornstarch + 1 tbsp water) or whisk in a butter-flour paste.
- Balance: Add salt, pepper, and a tiny splash of vinegar or lemon if it tastes flat.
Chef-y Trick Without Being Annoying About It
Blend a small scoop of the cooked onions/carrots into the sauce. It thickens naturally and boosts flavor without tasting like
you “hid vegetables” in the gravy (even though you absolutely did).
Flavor Variations (Same Method, Different Mood)
Classic American Pot Roast
- Thyme, rosemary, bay
- Onion, carrot, celery
- Red wine + beef stock
French-Onion Style
- Extra onions, cooked until deeply golden
- Deglaze with wine and a splash of broth
- Finish with a little Dijon mustard in the gravy
Cozy Italian-ish
- Tomato paste + crushed tomatoes or a spoon of marinara
- Oregano + thyme
- Finish with a little grated Parmesan on the potatoes (trust the process)
Slow Cooker and Pressure Cooker Notes (Because Life Happens)
Slow Cooker Pot Roast
The slow cooker is convenient, but it doesn’t evaporate much, so you typically need less liquid than an oven
braise. Sear first for better flavor, then add just enough stock to keep things saucy without turning it into beef bathwater.
Cook on low until fork-tender.
Instant Pot / Pressure Cooker Pot Roast
Pressure cooking can deliver tenderness faster, but it can’t fully replicate the layered flavor of a long oven braise unless
you build flavor up front. Sear well, deglaze thoroughly, and consider reducing the sauce after cooking to concentrate it.
Troubleshooting: Fix the Most Common Pot Roast Problems
“My pot roast is tough!”
It probably needs more time. Toughness is often undercooked collagen. Put it back in the oven (covered) and check every 20–30 minutes.
The roast usually goes from “chewy” to “butter” in a surprisingly short windowright at the end.
“It’s dry, somehow.”
- You used a very lean cut (round can do this).
- The heat was too high, tightening muscle fibers.
- Not enough braising liquid, or the lid wasn’t tight.
Fix: slice it and serve with extra gravy, or shred it into the sauce and simmer gently until it rehydrates.
“My sauce tastes bland.”
- Insufficient browning (the sear is the flavor foundation).
- Too much liquid (dilution is the enemy of delicious).
- Needs salt, acidity, or reduction.
Fix: simmer uncovered to reduce, season with salt, and add a small splash of vinegar or lemon juice to brighten.
“My vegetables turned to mush.”
Add delicate vegetables later. Big chunks help. Potatoes in the last 60–90 minutes usually stay intact and creamy.
How to Slice or Shred (Choose Your Pot Roast Personality)
- Slice: Better for brisket or a roast that holds together. Cut against the grain for tenderness.
- Shred: Classic chuck roast move. Pull into large, juicy chunks and bathe in gravy.
Serving Ideas That Feel Like a Hug
- Mashed potatoes + gravy (a classic for a reason)
- Buttered egg noodles
- Crusty bread to mop the sauce (the “no plate left behind” method)
- Bright side salad or quick-pickled onions for contrast
Make-Ahead and Leftovers (Pot Roast Gets Better at This)
Pot roast is a next-day champion. Cool it in the braising liquid, refrigerate overnight, then reheat gently. The flavors deepen,
and the fat is easy to lift off once chilled.
Leftover Ideas
- Shredded pot roast sandwiches with horseradish mayo
- Tacos with salsa verde and pickled onions
- Beef-and-potato hash with a fried egg
- “Lazy” beef stew: chop leftovers, add stock, simmer
Real-World Pot Roast Experiences (What People Learn After a Few Roasts)
Pot roast has a funny way of turning everyone into a philosopher. Not the “meaning of life” kindmore the “why does my gravy
taste like dishwater?” kind. Here are the most common, very human experiences that show up when you’re chasing the best pot roast,
along with the lessons they teach (without scolding you like a reality show judge).
First: the patience lesson. Almost everyone has pulled a pot roast too early at least once. It’s cooked, sure,
but it chews like a determined leather wallet. Then someone says, “Just give it more time,” and you think, “That’s what people
say when they don’t have real advice.” But pot roast is one of those dishes where time is the advice. The last stretch of
cooking is when the texture transforms. Home cooks often describe it like this: for hours the roast resists, then suddenly it
gives in and becomes spoon-tender. If your roast is tough, it’s usually not a failureit’s just early.
Second: the searing lesson. Many people try skipping the sear because they’re hungry, busy, or deeply offended by
extra dishes. The result tends to taste “fine,” but not memorable. Then they sear properly oncedeep brown crust, fond on the
bottom of the pot, deglazed into the sauceand they realize pot roast flavor isn’t only in the seasoning. It’s in the browned
bits you scrape up like culinary treasure. That’s the difference between “This is dinner” and “Who made this and can they move
in with us?”
Third: the liquid lesson. A lot of folks assume more liquid equals more moisture. In reality, too much liquid can
dilute the sauce and wash out the concentrated, beefy flavor you worked so hard to build. The best pot roast experiences usually
include someone admitting they basically boiled their roast the first time. The fix is simple: keep liquid at about one-third to
halfway up the meat, and let the lid do its steamy, gentle braising job. If you want more sauce later, you can always add a bit
of stock and reduce it. You can’t un-water down a watery pot easily without waiting forever.
Fourth: the vegetable timing lesson. There’s a special kind of disappointment that comes from perfectly tender
beef surrounded by carrots that have the texture of baby food. Most home cooks eventually land on a rhythm: onions early (they
flavor the sauce), potatoes later (they keep their shape), and carrots depending on how soft you like them. Once you dial this in,
pot roast becomes less of a gamble and more of a dependable “I’ve got dinner handled” move.
Fifth: the balance lesson. People often notice their pot roast gravy tastes heavy or flat until they add a tiny
splash of something brightvinegar, lemon, even pickled onions on the plate. That little pop of acidity makes the beef taste
beefier and the gravy taste richer, without making the dish sour. It’s the same reason a squeeze of lemon wakes up soup. The
“best pot roast” isn’t just tenderit’s balanced, with savory depth and a little lift.
Finally: the leftover glow-up lesson. Pot roast has a reputation for tasting even better the next day, and home
cooks swear by the make-ahead approach. Resting overnight in the braising liquid deepens flavor, and chilling makes defatting
ridiculously easy. Many people report that the second-day pot roast is the one that earns complimentsespecially when turned
into sandwiches, tacos, or a quick hash. In other words: pot roast isn’t just dinner. It’s a meal plan with a cape.
Conclusion
The best pot roast comes down to a few reliable truths: choose a collagen-rich cut like chuck, season well, brown deeply, and
braise gently until the meat is truly tender. Keep the liquid level sensible, add vegetables at the right time, and finish with
gravy that tastes like you paid someone to make it. Once you nail the method, you can change flavors endlesslybut the comfort
stays the same.