Table of Contents >> Show >> Hide
- What You Need Before You Start
- Method 1: The Round Brush Blowout Curl
- Method 2: The Diffuser Curl Method
- Method 3: Pin Curls or Rollers with a Blow Dryer
- How to Choose the Right Method for Your Hair Type
- How to Make Blow-Dryer Curls Last Longer
- Common Mistakes to Avoid
- Final Thoughts
- Real-Life Experience and Practical Lessons from Blow-Dryer Curling
If you have ever stared at your blow dryer and thought, “You dry hair. That is your only personality trait,” I have good news: your blow dryer is capable of a lot more than blasting your bathroom into tropical-storm conditions. With the right technique, a basic dryer can create soft curls, loose waves, bouncy ends, and that “I absolutely did not spend 45 minutes on this” finish.
Learning how to curl hair with a blow dryer is one of those beauty skills that feels oddly grown-up. It saves time, reduces your dependence on a curling iron, and lets you style damp hair in one go instead of drying first and curling second. Better yet, it works for a surprising range of hair lengths and textures when you choose the right method.
In this guide, you will learn three simple methods to curl hair with a blow dryer: the classic round-brush curl, the diffuser method for natural texture, and the pin-curl or roller set method for more defined shape. Along the way, we will cover prep, tools, common mistakes, and tips for making your curls last longer than your motivation on a Monday morning.
What You Need Before You Start
Before you jump into styling, set yourself up properly. Blow-dryer curls work best when the hair is prepped, sectioned, and not soaking wet. That last part matters more than people think. Trying to curl dripping hair with hot air is a fast track to frizz, arm fatigue, and mild emotional damage.
Essential tools
- A blow dryer with at least one attachment, ideally a concentrator nozzle and/or diffuser
- Heat protectant spray or cream
- Clips for sectioning
- A round brush, diffuser, or rollers depending on the method
- Lightweight mousse, curl cream, or styling foam
- Flexible-hold hairspray or finishing spray
Prep matters more than people admit
For most hair types, the sweet spot is damp hair that is about 60 to 80 percent dry. If the hair is too wet, the style takes forever to form. If it is too dry, the curl may not set well. Apply a heat protectant evenly through the mid-lengths and ends, then add a lightweight styling product based on your hair type. Fine hair usually likes mousse. Thick or frizz-prone hair often does better with a smoothing cream or curl-defining product.
Next, divide your hair into manageable sections. This step is not glamorous, but it is the reason one side of your head looks styled and the other side looks like you lost a respectful fight with humidity.
Method 1: The Round Brush Blowout Curl
This is the classic salon-inspired technique and the one most people picture when they search for how to curl hair with a blow dryer. It creates soft, polished curls or big bouncy waves depending on the size of your brush and the size of your sections.
Best for
Medium to long hair, layered cuts, curtain bangs, and anyone who wants a smooth blowout with bend and body.
How to do it
- Attach the concentrator nozzle to your dryer. This helps direct airflow where you actually want it instead of all over the zip code.
- Start with one small section, about 1 to 2 inches wide.
- Place a round brush underneath the section near the roots.
- Pull the brush through while aiming the dryer downward along the hair shaft.
- When you reach the ends, roll the hair around the brush and keep the dryer following the curve of the brush.
- Hold for several seconds on medium heat, then use the cool shot if your dryer has one.
- Gently unwind the brush instead of yanking it out like you are starting a lawn mower.
How brush size changes the curl
A smaller round brush creates more bend and lift. A larger brush gives you softer, looser curls. If your hair is shoulder length or shorter, a medium barrel usually works well. Longer hair often benefits from a larger barrel for a smoother, more relaxed wave. Ceramic or vented round brushes can also help speed up drying and add shine.
Tips for better results
Use smaller sections if your hair is thick. Keep the dryer angled downward to help smooth the cuticle and reduce puffiness. If you want face-framing curls, rotate the front pieces away from your face. For more volume at the crown, lift each section upward before rolling it onto the brush.
The biggest secret is cooling. Heat shapes the curl, but cooling sets it. If you release the section while it is still hot, the curl may drop fast. If you let it cool around the brush for a moment or clip it up loosely, it has a much better chance of lasting.
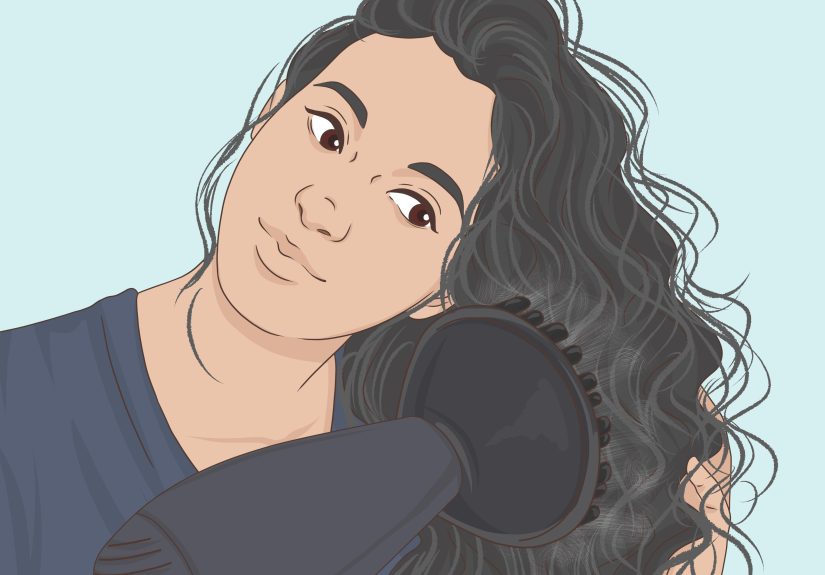
Method 2: The Diffuser Curl Method
If your hair already has some wave, curl, or coil, the diffuser method is the easiest way to bring it to life without blasting it into a halo of frizz. This approach does not create pageant curls. Instead, it enhances natural texture and encourages a defined, touchable pattern.
Best for
Wavy, curly, and coily hair, as well as straight hair that can hold a scrunched texture with the help of mousse or curl cream.
How to do it
- Apply leave-in conditioner or curl product to damp hair.
- Scrunch the hair upward with your hands to encourage shape.
- Twist a few sections away from your face if you want a more intentional pattern.
- Attach the diffuser to your dryer.
- Set the dryer to low or medium heat and low speed.
- Cup the ends of your hair in the diffuser bowl and lift upward toward the scalp.
- Hold in place for 20 to 30 seconds before moving to the next section.
Why diffusers work
A diffuser spreads the airflow over a wider area, which means less disruption to the curl pattern. Instead of blowing strands all over the place, it helps the hair dry in clumps. Translation: more definition, less fuzz, and fewer moments of staring into the mirror asking why one side looks like a woodland sprite.
Common diffuser mistakes
The number one mistake is using too much speed. High airflow may dry the hair faster, but it often roughs up the cuticle and separates the curls. The second mistake is touching the hair constantly while it dries. Resist the urge. Let the diffuser do the work. Once the hair is fully dry, you can gently scrunch out any crunch from gel or mousse and fluff the roots.
How to fake waves on straighter hair
If your hair is mostly straight, apply mousse to damp hair, make several loose twists or mini buns, then diffuse those sections until nearly dry. When you release them, you will usually get casual waves rather than ringlets, but the finish can look effortless and modern.
Method 3: Pin Curls or Rollers with a Blow Dryer
This method is the quiet overachiever of the group. It takes a little more setup, but it can give you the most defined curl pattern without needing a curling iron. Think of it as a heat-assisted set rather than an on-the-spot curl.
Best for
Medium to long hair, fine hair that needs extra hold, and anyone who wants longer-lasting curls with a softer finish.
How to do it with pin curls
- Start with damp hair and apply mousse or setting foam.
- Take a small section and wrap it around two fingers.
- Slide the loop off your fingers and pin it flat against your head.
- Repeat until your hair is pinned into several curls.
- Use your dryer on low to medium heat to dry the sections thoroughly.
- Let the curls cool completely before removing the pins.
- Separate gently with your fingers and finish with flexible-hold spray.
How to do it with rollers
You can swap pin curls for Velcro rollers or traditional rollers if you prefer. Roll each section away from the face for a classic blowout look, then use the concentrator nozzle to direct heat over each roller. Once the hair feels dry, let everything cool before removal. That cooling period is not optional if you want bounce instead of disappointment.
Why this method works so well
Hair is being shaped while it dries and then allowed to cool in the curled position. That gives the strand time to “remember” its shape. This is especially helpful for fine or straight hair that tends to lose body quickly.
How to Choose the Right Method for Your Hair Type
Fine hair
Use lightweight mousse, lower heat, and smaller sections. The round brush and pin-curl methods usually give the best staying power. Avoid heavy oils before styling because they can flatten the curl before it has a chance to live its best life.
Thick hair
Section carefully and work in layers. A concentrator nozzle with a sturdy round brush is often the most efficient option. You may need more drying time, but the results are usually worth it. Thick hair can hold gorgeous blow-dryer curls once it is fully dry and cooled properly.
Wavy or curly hair
The diffuser method is usually the most flattering if your goal is definition without frizz. If you want smoother, more polished curls, blow the roots and mid-lengths with tension first, then use the round brush on the ends.
Short hair
Use a smaller round brush and work in very small sections. Short hair can curl beautifully with a dryer, especially around the face and crown. A little texturizing spray at the end can help keep the style from looking too “helmet” and not enough “chic.”
How to Make Blow-Dryer Curls Last Longer
- Do not skip heat protectant, but keep it lightweight.
- Style hair that is damp, not soaking wet.
- Use product with hold, such as mousse or styling foam.
- Let each curl cool before touching it.
- Finish with flexible-hold hairspray instead of saturating the hair with stiff spray.
- Sleep with your hair loosely clipped up or in a silk wrap if you want to keep the style overnight.
If your curls always fall flat, the issue is often not the dryer. It is usually one of three things: sections are too big, the hair is too wet, or the curl was released before it cooled. In other words, your technique is probably fixable and your blow dryer does not need to be dramatically fired.
Common Mistakes to Avoid
Using high heat on fragile hair is the fastest way to turn “soft curl” into “crispy regret.” Keep the temperature appropriate for your texture. Fine, color-treated, and damaged hair usually does better on lower settings. Another common mistake is fighting the brush. If your round brush gets tangled constantly, use smaller sections and keep tension controlled instead of wrapping huge chunks of hair around it like spaghetti around a fork.
Another trap is too much product. A little mousse helps. Half a mousse mountain does not. Overloading the hair can make curls sticky, heavy, and harder to dry. The same goes for touching the hair too much before it is cool. Every time you rake your fingers through a warm curl, you are basically negotiating directly against your own results.
Final Thoughts
Once you know how to curl hair with a blow dryer, the tool becomes a lot more versatile than most people realize. The round-brush method gives you polished bounce, the diffuser method enhances natural texture, and the pin-curl or roller method offers longer-lasting shape with a softer finish. None of these techniques require salon-level talent. They just require a little patience, better sectioning, and the willingness to stop treating the cool shot button like decorative nonsense.
The best method for you depends on your hair texture, length, and the kind of curl you want. If you are after volume and movement, start with the round brush. If you want natural-looking texture, go with the diffuser. If you want the style to last, try the pin-curl or roller set. Once you test all three, you will probably find one that becomes your regular go-to and another that comes out only when you want your hair to look suspiciously expensive.
Real-Life Experience and Practical Lessons from Blow-Dryer Curling
One thing that becomes obvious after a few attempts is that blow-dryer curls look easier in theory than they do in a sleepy real-life bathroom at 7:10 a.m. The first experience many people have is accidentally over-drying one side, under-drying the other, and somehow creating a single very enthusiastic curl near the temple. That is normal. Blow-dryer styling has a learning curve, but it is usually a short one.
A common experience with the round-brush method is realizing that section size changes everything. When sections are too large, the hair stays damp in the middle and the curl falls out quickly. Once people switch to smaller, cleaner sections, the result improves almost immediately. Another lesson: brush control matters more than speed. Going slower with better tension nearly always produces a smoother, shinier curl than trying to race through the whole head.
With the diffuser method, the biggest surprise is often how much less is actually more. Less touching, less airflow, and less product can create better-looking curls. Many people discover that once they stop flipping their hair around every 12 seconds, their natural pattern looks more defined. Diffusing also teaches patience. Hair can seem nearly dry, then suddenly reveal extra softness and shape once it is completely finished and gently scrunched out.
The pin-curl or roller method tends to win over people who once believed their hair “just doesn’t hold curl.” In reality, the hair often can hold curl; it just needs time to set while cooling in position. That is why this method feels almost magical on stubbornly straight or fine hair. It is not faster, but it can be more reliable, especially for events, photos, or long days when you want the style to survive beyond lunch.
Another real-world takeaway is that not every hair day needs the same method. On rushed mornings, the diffuser may be enough. For dinner plans or a polished office look, the round brush often gives the prettiest finish. For weddings, parties, or days when humidity is feeling especially villainous, the roller or pin-curl method may be worth the extra effort.
Most of all, experience teaches that blow-dryer curls improve when you stop chasing perfection. A few pieces may flip differently. One side may look a little looser. Good. That is often what makes the result look modern and effortless instead of stiff and overworked. The goal is not to resemble a hairspray commercial from 1997. The goal is soft shape, movement, and hair that looks like you know exactly what you are doing, even if five minutes earlier you were holding a round brush like it was advanced engineering equipment.