Table of Contents >> Show >> Hide
- Before You Begin: What This Guide Is (and Isn’t)
- How to Do a Back Flip in the Water: 14 Steps (Coach-Supervised, Safety-First)
- Step 1: Get a Quick Health and Readiness Check
- Step 2: Build Water Competency First
- Step 3: Choose the Right Environment
- Step 4: Never Train Alone
- Step 5: Warm Up Like You Mean It
- Step 6: Practice Breath and Orientation Control
- Step 7: Master Streamline and Body Tension
- Step 8: Learn Safe Entry Rules Before Any Rotation
- Step 9: Do Dryland Prep Under Coaching
- Step 10: Use Assisted Progressions in Water
- Step 11: Add One Variable at a Time
- Step 12: Establish a Stop Rule
- Step 13: Debrief and Review
- Step 14: Progress by Consistency, Not Ego
- Common Mistakes That Slow Progress (or Raise Risk)
- What Good Coaching Looks Like
- Sample Weekly Framework (Coach-Approved)
- Extended Experience Notes
- Conclusion
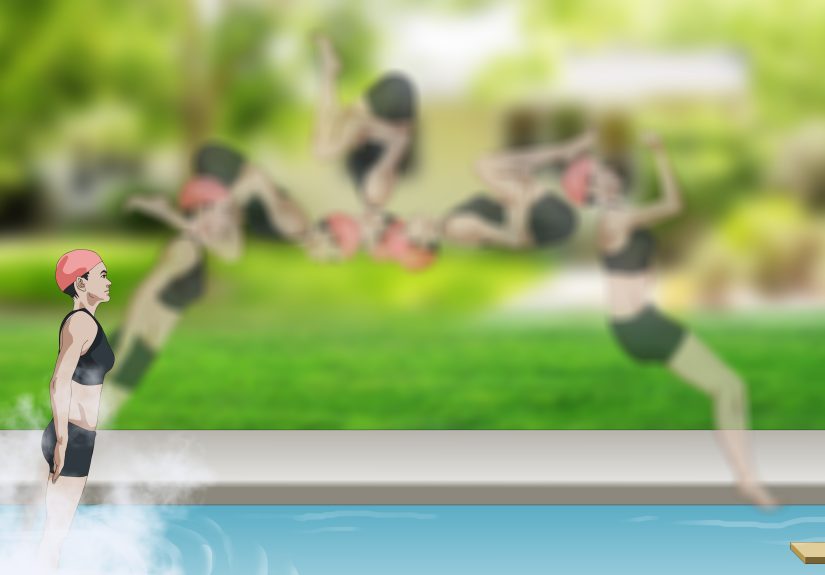
A back flip in the water looks effortless when skilled athletes do it. For everyone else, it can look more like a
startled otter trying to fold laundry underwater. And that’s okaybecause learning this move safely is less about
“being fearless” and more about building smart habits, strong fundamentals, and good coaching.
This guide is intentionally safety-first. Instead of giving risky, unsupervised stunt instructions, it lays out a
coach-led progression you can actually trust. You’ll get 14 practical steps that help you build confidence, protect
your neck and spine, and train with a plan. If your goal is to master a clean water backflip, this is your roadmap:
thoughtful preparation, quality supervision, and patient progression.
In other words: we’re not chasing chaos. We’re chasing control.
Before You Begin: What This Guide Is (and Isn’t)
Let’s be crystal clear. A back flip in the water is an advanced movement with real injury risk if attempted in the
wrong place, wrong depth, or without supervision. So this article is designed for:
- Structured, coach-supervised learning in an appropriate facility
- Swimmers with solid water confidence and basic aquatic skills
- Readers who care more about long-term progress than one-day heroics
This article is not a license for unsupervised attempts, rooftop energy, or “my friend filmed it so it must be safe.”
If you don’t have access to a qualified instructor, treat this as preparation and educationnot a do-it-tonight challenge.
How to Do a Back Flip in the Water: 14 Steps (Coach-Supervised, Safety-First)
Step 1: Get a Quick Health and Readiness Check
If you have recent neck, shoulder, back, ear, or concussion issues, pause and get medical clearance first. Athletic
skills are fun; rehab is less fun. A two-minute readiness check now can save you months of frustration later.
Step 2: Build Water Competency First
Before backflip training, you should be comfortable swimming, floating, treading water, resurfacing calmly, and exiting
the pool without panic. Water competency is your safety foundationand your confidence multiplier.
Step 3: Choose the Right Environment
Train only in a supervised pool with appropriate depth, clear visibility, and no crowding. No murky lakes, no mystery
depth, no “looks deep enough from here.” Your environment is part of your technique.
Step 4: Never Train Alone
At minimum, have a qualified coach or lifeguard-aware adult present who understands your session goals. A training
partner is useful, but a trained supervisor is better. Safety is a system, not a vibe.
Step 5: Warm Up Like You Mean It
Start with 8–12 minutes of gentle cardio and mobility: shoulders, thoracic spine, hips, ankles, and core activation.
A rushed body is a stiff body. A stiff body rotates poorly and lands worse.
Step 6: Practice Breath and Orientation Control
Learn to exhale smoothly underwater and recover your breath without rushing. Add orientation drills (front-to-back
transitions, controlled turns, calm resurfacing). If you get disoriented easily, fix that first.
Step 7: Master Streamline and Body Tension
Work on a strong aligned position (arms set, core engaged, neutral neck). A stable body line protects your spine and
improves control in every aquatic movement, including backward rotation progressions.
Step 8: Learn Safe Entry Rules Before Any Rotation
First entry should always be feet-first unless a coach explicitly directs otherwise. Confirm depth each session.
Respect “No Diving” zones and avoid above-ground-pool assumptions. Rule-following is skill, not weakness.
Step 9: Do Dryland Prep Under Coaching
On deck (or in a proper dryland area), rehearse timing, body position, and controlled tuck mechanics with coaching
cues. Dryland builds motor patterns with lower risk and better feedback than jumping straight into full attempts.
Step 10: Use Assisted Progressions in Water
Progress from simpler backward-rotation drills to more advanced versions only when your coach says you’re ready.
Use support tools and spotting methods when available. Think staircase, not cliff jump.
Step 11: Add One Variable at a Time
Don’t increase speed, height, complexity, and fatigue all in one session. Change one variable, then stabilize. This is
how athletes improve safely and consistently without random “what just happened?” moments.
Step 12: Establish a Stop Rule
End the session immediately if you feel neck pain, headache, dizziness, ear pain, panic, or repeated loss of orientation.
Stopping early is a pro move. Pushing through warning signs is not.
Step 13: Debrief and Review
After each practice, log what worked, what felt unstable, and which cues helped. If your coach records video, use it
for technique review. Objective feedback beats memory every time.
Step 14: Progress by Consistency, Not Ego
A reliable, repeatable movement is the goalnot a single “I landed one!” clip. Build your backflip in the water through
steady sessions, coach feedback, and disciplined recovery. Control is what makes it look effortless.
Common Mistakes That Slow Progress (or Raise Risk)
- Skipping fundamentals: Trying advanced skills without water competency.
- Training in unknown depth: “I think it’s deep enough” is not a safety protocol.
- No supervision: Friends with phones are not a substitute for coaching.
- Poor warm-up: Cold shoulders and core = sloppy control.
- Overtraining in one day: Fatigue destroys technique and decision-making.
- Ignoring warning symptoms: Dizziness or neck pain means stop, not “one more rep.”
- Comparing timelines: Your progress should match your readiness, not someone else’s highlight reel.
What Good Coaching Looks Like
If you’re searching for instruction, prioritize coaches and programs that emphasize skill progression, clear safety rules,
and communication. Strong programs assess readiness, use structured drills, and expect accountability from athletes.
They don’t glorify risky shortcuts.
Ask practical questions:
- How do you evaluate readiness before introducing advanced rotation skills?
- What are your safety and spotting protocols?
- How do you adapt for nervous swimmers or late starters?
- What are your stop criteria for pain, fatigue, or disorientation?
If a program can’t answer these clearly, keep looking.
Sample Weekly Framework (Coach-Approved)
You don’t need marathon sessions. You need quality reps with recovery.
- Day 1: Mobility, water competency drills, orientation work, light progression
- Day 2: Dryland mechanics + controlled in-water progressions
- Day 3: Technique review, short focused set, debrief and notes
Keep sessions focused and end before form collapses. Long-term skill is built by repeatable quality, not exhaustion.
Extended Experience Notes
Coaches often see three types of learners when people want to master a back flip in the water. The first is the
“all gas, no brakes” swimmer: fearless, athletic, and convinced this will be easy. The second is the cautious planner:
thoughtful, teachable, but worried about every detail. The third is the comeback learner: someone who swam years ago,
stepped away, and now wants to rebuild confidence. What’s interesting is that all three groups can succeedif they train
with structure.
In many sessions, the fearless swimmer improves quickly at first, then plateaus. Why? They rush. They skip breath control,
ignore subtle timing cues, and try to power through technique with effort. The moment they slow down and respect progression,
their movement cleans up fast. Their biggest breakthrough isn’t physicalit’s patience.
The cautious planner usually has the opposite journey. Early sessions feel stiff because they’re trying to “do everything
right” at once. But once they trust a few simple cues and repeat them consistently, they become surprisingly smooth. Their
superpower is consistency. They may not post dramatic first-day videos, but after a few weeks they often look the most
technically reliable.
Comeback learners are the most inspiring to watch. They often arrive with decent body awareness but less confidence in deep
water skills. First, they rebuild comfort: controlled floating, calm resurfacing, and stable orientation. Then they add coach-led
rotational progressions. Their progress can look “slow” from outside, but internally it’s hugeeach session replaces uncertainty
with control.
Another common pattern: athletes who train in noisy, chaotic environments struggle more than those in calm, supervised lanes.
Same person, same ability, different context, totally different result. Environment matters. Clear water, predictable space,
and quality supervision reduce cognitive overload so you can focus on mechanics.
Small habits also separate successful learners from stuck learners. The successful group keeps short notes after practice:
what cue helped, what felt off, what to repeat next time. They hydrate, rest, and stop when quality drops. The stuck group
relies on memory, chases random advice, and mixes too many cues in one session. One group builds a system; the other chases
luck.
The emotional side is real, too. Many swimmers feel a spike of nerves right before backward-rotation progressions. Good coaching
doesn’t shame that feelingit normalizes it, then replaces anxiety with a routine: check depth, confirm cue, controlled attempt,
calm recovery, quick feedback. Confidence grows from predictable process.
Over time, the move starts to feel less like “a trick” and more like a skill with checkpoints. That mindset shift changes
everything. You stop hunting for one perfect rep and start building dependable reps. And once dependability shows up, style
follows naturally. The clean look everyone wants? It usually appears right after the athlete stops trying to impress and starts
trying to improve.
If there’s one lesson that keeps proving true, it’s this: progress loves humility. The water rewards control, awareness, and
consistency. Show up with those three, and your backflip journey becomes safer, smarter, and a lot more fun.
Conclusion
If you want to learn how to do a back flip in the water, treat it like a real athletic skill: build water competency, train
under qualified supervision, progress in layers, and respect safety rules every single session. The 14-step path above is designed
to help you improve with confidencewithout reckless shortcuts. A great water backflip isn’t just about rotation; it’s about control,
judgment, and repeatability. Learn smart now, and you’ll enjoy the skill for years.