Table of Contents >> Show >> Hide
- Before You Drill: Know Your Tile (and What’s Behind It)
- Tools and Supplies
- Choose the Right Tile Drill Bit
- Step-by-Step: Drill Through Tile Without Cracking It
- Special Situations: Porcelain, Glass, Stone, and Big Holes
- Common Mistakes (and How to Dodge Them)
- FAQ
- Wrap-Up
- Experiences Related to Drilling Through Tile (Real-World Field Notes)
- SEO tags
Drilling through tile is one of those DIY tasks that feels like defusing a movie bomb: sweaty hands, intense focus,
and the faint sense that one wrong move will make something crack in slow motion. The good news? Tile isn’t out to
get you. It’s just brittle, hard, and unforgivingbasically the gym teacher from middle school.
With the right drill bit, the right speed, and a little cooling water (yes, your drill bit gets thirsty), you can
make clean holes in ceramic, porcelain, glass, or stone tile without chips, spider cracks, or regret. This guide
walks you through the tools, technique, and real-world tricks that make “How to drill through tile” a weekend win
instead of a new backsplash fundraiser.
Before You Drill: Know Your Tile (and What’s Behind It)
Tile varies wildly. Some tiles drill like butter (ceramic wall tile), and some drill like they were forged in a
volcano (porcelain, certain stone). If you’re not sure what you have, assume it’s harder than you think and plan
accordingly. That means a better bit, slower drilling, and more patience.
Quick tile cheat sheet
- Ceramic tile: Usually the easiest. A quality carbide-tipped tile bit often works well.
- Porcelain tile: Denser and harder. Diamond-tipped bits or diamond hole saws are your best bet.
- Glass tile: Chips easily. Diamond is typically the safest choice; go slow and keep it cool.
- Natural stone (marble/granite/slate): Diamond bits + steady cooling. Avoid aggressive pressure.
Also: tile is only the top layer. What matters next is what’s underneathdrywall, cement board, mortar, plaster,
brick, or concrete. You’ll drill through the tile first, then often switch to the correct bit for the substrate.
This “two-bit strategy” prevents dulling expensive tile bits and helps anchors grip properly.
Safety reality check
Bathrooms and kitchens have two things you should respect: water and hidden utilities.
Before drilling into shower tile or a backsplash, consider where plumbing lines and electrical wires typically run.
If you’re anywhere near outlets, switches, or plumbing fixtures, use a stud finder with utility detection and keep
your hole shallow until you’re confident you’re not about to invent an indoor fountain.
Tools and Supplies
You don’t need a contractor’s van full of gear. But you do need the right basics. Here’s the lineup that keeps
“drill holes in tile without cracking” in the realm of reality.
- Variable-speed drill (cordless is nice around water; hammer mode OFF for tile)
- Tile drill bit (carbide spear-point or diamond, depending on tile type)
- Diamond hole saw (for larger holes like pipes, shower bars, or plumbing penetrations)
- Painter’s tape (or masking tape) and a marker/pencil
- Spray bottle, sponge, or small cup of water (cooling + dust control)
- Level and measuring tape (because “close enough” isn’t a measurement)
- Safety glasses and optionally gloves (tile dust and tiny chips are surprisingly rude)
- Vacuum (cleanup + better visibility)
- Wall anchors / screws appropriate for what you’re mounting
Choose the Right Tile Drill Bit
The number-one reason people crack tile is not bad luckit’s using a random bit they found in a drawer labeled
“misc.” Tile needs a bit designed to grind or gently cut hard, brittle surfaces.
For small holes (most bathroom and kitchen hardware)
-
Carbide-tipped tile bits (often spear-point): Great for many ceramic tiles and some porcelain,
especially for smaller holes like 3/16″ to 5/16″. -
Diamond-tipped bits: Best for hard porcelain, glass tile, and stone. They tend to drill cleaner,
last longer in hard materials, and prefer slower speeds with cooling.
For large holes (pipes, shower valves, and “why is this hole so big?” moments)
Use a diamond hole saw (also called a diamond core bit). It drills a ring and removes a plug from
the center, which is faster and cleaner than trying to brute-force a big hole with a standard bit.
Don’t forget the substrate
Once you’re through the tile, switch bits based on what’s behind it:
masonry bit for concrete/mortar/brick,
wood bit for studs,
or a standard bit for certain backer materials. You usually don’t want to keep drilling deep with your tile bit
it’s like using a chef’s knife to chop firewood. It’ll work briefly, and then you’ll cry.
Step-by-Step: Drill Through Tile Without Cracking It
Here’s the method pros and careful DIYers use. The goal is simple: keep the bit from skating, keep heat down,
and avoid sudden pressure changes that can fracture tile.
-
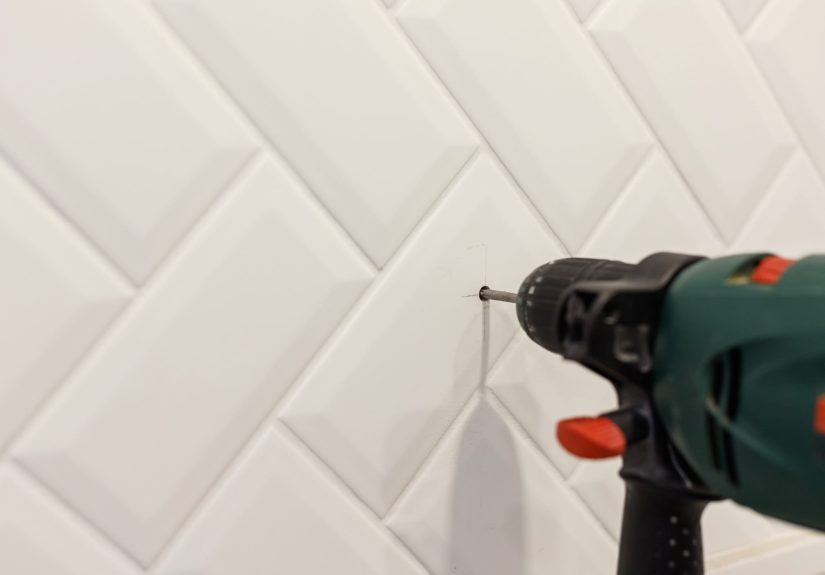
Mark the exact hole location.
Measure twice, then measure once more because tile is forever. Use a level if you’re mounting hardware like a
towel bar, toilet paper holder, or shelf bracket. -
Apply painter’s tape over the spot.
Make a small “X” or a square patch. Mark your hole center on the tape. The tape adds traction and helps reduce
minor chipping on glazed surfaces. -
Start the hole gently (no hero moves).
Put the bit on the mark, hold the drill perpendicular to the tile, and begin at low speed.
Use light pressure until the bit creates a shallow dimple in the glaze. If your bit tries to wander, stop and
re-seat it. -
Keep it cool.
Heat is tile’s sworn enemy. Every few seconds, mist the area with a spray bottle or touch a wet sponge to the
drilling point. You’re not trying to flood the walljust keep the bit and tile face cool. A small drip tray
(or a towel “bib” taped under the work area) keeps cleanup civilized. -
Let the bit do the work.
Steady pressure beats hard pressure. If you push too hard, you risk cracking the tile or overheating the bit.
You want a controlled grind, not a wrestling match. -
Ease up as you break through.
When you feel the resistance change (you’re through the tile body), reduce pressure. The last momentwhen the bit
exits the tilecan chip if you shove through. -
Switch to the right bit for the substrate.
Once the tile is drilled, swap bits and continue to the depth you need. If you’re using anchors, follow the
anchor manufacturer’s drill size and depth guidance. -
Clean the hole and install hardware.
Vacuum dust, insert the anchor (if needed), and tighten screws snuglynot “I am auditioning for a strongman
competition.” Over-tightening can crack tile around the screw head.
Speed and drill settings that keep you out of trouble
- Hammer drill: OFF while drilling tile.
- Speed: Start slow. If progress is steady, you can increase slightlystill controlled.
- Pressure: Light-to-moderate and consistent. Avoid sudden pushes.
- Cooling: Use water sparingly but often enough to prevent heat buildup.
Special Situations: Porcelain, Glass, Stone, and Big Holes
How to drill through porcelain tile
Porcelain is dense and can feel like it’s laughing at you. That’s normal. Use a diamond-tipped bit or diamond hole
saw, keep the bit cool, and be patient. If progress stops, don’t crank the speed to elevenre-wet the area and
maintain steady pressure.
Pro tip: If you need a larger finished hole, some DIYers drill a small pilot hole first, then step
up to the final size. This reduces skating and helps keep the larger bit centered.
How to drill into glass tile without chipping
Glass is dramatic. It wants to chip at the surface and flake at the exit. Use a diamond bit, keep the area wet,
and start extremely gently until the glaze is scratched and the bit is seated. Keep the drill perfectly steady.
Any wobble can chip the edge.
If you’re drilling loose glass tile (not installed yet), drilling halfway from one side and finishing from
the other can reduce exit chipping. For installed tile, you can’t flip itso your best defense is going slow and
easing pressure near breakthrough.
How to drill through natural stone tile
Marble and granite look gorgeous and drill… cautiously. Diamond bits work best, and cooling matters even more. Stone
can micro-fracture from heat and pressure, so keep a steady pace and don’t rush. If your bit is squealing, it’s
basically begging for water and a calmer lifestyle.
Drilling near an edge or corner
Holes close to tile edges are higher risk for cracking. If possible, keep holes at least a couple inches from edges
(or follow the hardware template if it dictates placement). Use extra gentle pressure, start slowly, and keep the
bit from grabbing.
Should you drill into grout lines instead?
Sometimes drilling into grout is easiergrout is softer than tile. But grout is also weaker. For lightweight items
(like a small hook), grout might be fine. For anything load-bearing (grab bars, heavy shelves, towel bars that get
yanked daily), drill where the mounting design requires and anchor into appropriate backing (studs, blocking, or the
correct anchor system). When safety matters, the substrate matters more than the grout.
Large holes for pipes and plumbing
For shower arms, tub spouts, and plumbing penetrations, a diamond hole saw is the cleanest approach. A few key
techniques help:
-
Start at a slight angle to create a groove, then slowly bring the drill level once the hole saw
stops skating. -
Use a guide if you cana purchased drill guide or a DIY template (a piece of wood with a hole)
taped firmly in place. - Use cooling water frequently to reduce heat and extend bit life.
- Go slow at the end to avoid chipping when the core plug releases.
Common Mistakes (and How to Dodge Them)
- Using a standard twist bit: It skates, overheats, and makes tile cry. Use a tile bit or diamond bit.
- Starting too fast: High speed causes heat and wandering. Start slow, then adjust gradually.
- Skipping tape or a guide: The glaze is slippery. Give your bit traction and a clear start point.
- Forgetting cooling: Heat can crack tile and burn out diamond bits. Light water + patience wins.
- Pressing like you’re drilling through a mountain: Too much pressure increases cracking risk.
- Over-tightening screws: Tight is good. “Crunch” is bad. Stop before tile becomes a cautionary tale.
- Not planning for the substrate: Tile is step one. Anchoring correctly is step two.
FAQ
Can I use a hammer drill on tile?
Generally, nokeep hammer mode off while drilling through the tile layer. Hammer action can chip and crack brittle
surfaces. Once you’re through the tile and working in masonry behind it, hammer mode may be appropriate depending
on the material and bit type.
What’s the best drill bit for porcelain tile?
For most people, a diamond-tipped bit (or diamond hole saw for bigger holes) is the most reliable option on
porcelain. Carbide can work for smaller holes, but diamond often drills cleaner and lasts longer in dense tile.
How do I keep the bit from sliding on glossy tile?
Use painter’s tape, start at low speed, and create a tiny dimple before increasing speed. A drill guide or template
also helpsespecially for hole saws.
How big should the hole be for a tile anchor?
Match the hole size to the anchor manufacturer’s instructions. The right anchor depends on the substrate behind
the tile (drywall vs. cement board vs. masonry) and how much weight the item will carry.
What if the tile sounds hollow?
Hollow-sounding tile can indicate a void or poor bonding behind the tile, which can increase the risk of cracking
while drilling. If you suspect a problem area, proceed extra cautiously and consider relocating the mounting point
if possible.
Wrap-Up
Drilling through tile is less about brute force and more about good technique: the right tile drill bit, low speed,
steady pressure, and enough cooling water to keep heat from ruining your day. If you treat the glaze like a slippery
ice rink (because it is), respect porcelain’s stubbornness, and slow down near breakthrough, you’ll get clean holes
that look professionaleven if you’re doing this in old sweatpants with a podcast playing in the background.
And if you mess up? Welcome to DIY: where every project is either a success or a story you’ll tell forever.
Preferably with fewer cracks.
Experiences Related to Drilling Through Tile (Real-World Field Notes)
After enough tile projects, you start to notice that drilling through tile isn’t hardit’s just picky. Tile wants
you to be calm, consistent, and mildly stubborn. If you show up frantic, it will absolutely match your energy by
cracking at the worst possible moment, usually when you’re one hole away from finishing.
The first “aha” moment most people have is realizing that the start matters more than the rest.
Once your bit is seated and you’ve broken through the glossy surface, drilling often becomes boring (the best kind
of boring). The chaos is in those first few seconds when the bit tries to ice-skate across the tile like it’s late
for work. Painter’s tape helps, but your grip and patience help more. I’ve seen people press harder when the bit
wanderslike the drill will suddenly respect them. It won’t. It will just wander faster.
Another lesson: cooling isn’t optional, even when you think “it’s just one hole.” Heat builds up
quickly on hard porcelain. The bit gets hot, the tile warms, and suddenly you’ve got tiny chips at the surface or a
bit that stops cutting efficiently. A spray bottle looks almost comically simple for such a serious task, but it’s
the difference between “clean hole” and “why does this look like a squirrel chewed it?”
You also learn to respect the breakthrough moment. People tend to get impatient right at the end,
when they can feel progress. That’s when they push harderand that’s when tile chips or cracks around the hole.
The smarter move is the opposite: ease up, keep the bit straight, and let it finish gently. Think of it like
landing a plane. You don’t slam it onto the runway because you’re excited to be done.
Hardware installation teaches its own lesson: over-tightening is the silent villain. You can drill a
perfect hole and still crack tile by torquing a screw down like you’re installing parts on a spaceship. Tighten
until snug, then stop. If the hardware wiggles, the problem is usually the anchor choice or the substratenot that
you didn’t Hulk-smash the screw hard enough.
Finally, the biggest mindset shift is accepting that bit quality is cheaper than tile replacement.
A good diamond hole saw or a reliable carbide tile bit can feel expensive in the aisle. But compare that to the
cost of replacing a cracked tile (and trying to find a matching spare). Suddenly, the “fancy” bit feels like the
budget option. If you’re drilling multiple holessay, installing a grab bar, shower door hardware, or a full set of
bathroom accessoriesbuy the right bit once and enjoy the rare DIY luxury of not learning a painful lesson the
hard way.
In short: start slow, stay cool, ease up at the end, don’t over-tighten, and remember that tile isn’t fragile
it’s just waiting to see if you’ll rush. Don’t give it the satisfaction.