Table of Contents >> Show >> Hide
- What Is a Plunge Pool (and Why Everyone Suddenly Wants One)?
- Before You Dig: The Planning Phase That Saves Your Budget
- How To Install a Plunge Pool: Step-by-Step (Precast Concrete Method)
- Step 1: Prepare the site (excavation + a rock-solid base)
- Step 2: Place the pool shell (the crane day)
- Step 3: Install the pool equipment (pump, filter, and optional upgrades)
- Step 4: Plumbing connections (make future service easy)
- Step 5: Electrical + bonding (where you do not DIY your way into regret)
- Step 6: Backfill, build access, and finish the landscape
- Step 7: Fill, start up, and balance the water
- Safety and Code Requirements: Tiny Pool, Same Responsibilities
- Cost Factors: Where the Money Actually Goes
- Design Moves That Make a Plunge Pool Feel Twice as Big
- Maintenance Basics (for People Who Have Better Things To Do)
- Inspection-Day Checklist (Quick, Practical, Non-Dramatic)
- Conclusion: Build the “Small Pool” Like It’s a Big Deal (Because It Is)
- Real-World Experiences: What Installing a Plunge Pool Actually Feels Like (and What People Wish They Knew)
A plunge pool is the backyard equivalent of a perfect espresso shot: small, strong, and surprisingly life-changing.
You’re not building an Olympic training facilityyou’re building a “step outside, cool off, feel fancy” upgrade that fits
in a tighter yard. But don’t let the word small fool you: installing a plunge pool still involves permits, excavation,
drainage, electrical bonding, and enough planning to make you briefly consider becoming a houseplant instead.
Below is a practical, no-fluff guide inspired by the process shown by This Old House, plus best-practice advice from
U.S. pool safety and building guidance. We’ll focus on the common “precast concrete plunge pool” route (the one delivered
by truck and set with a crane), while noting alternatives like fiberglass shells and custom shotcrete builds. [1]
What Is a Plunge Pool (and Why Everyone Suddenly Wants One)?
A plunge pool is a compact, typically deeper pool designed for cooling off and relaxingnot swimming laps. Many plunge pools
land in the “small footprint, big vibe” zone: enough room to sit, soak, stretch, and socialize… without donating your entire
backyard to water. Typical depths are often in the 4–8 foot range (customizable), and many plunge pools are built with benches
or ledges for lounging. [1]
In real-world terms: you get a water feature that can feel like a resort, but with less water, potentially less energy to heat,
and generally lower ongoing maintenance than a full-size pool. (Still maintenance, thoughwater doesn’t magically balance its own pH
just because it’s cute.) [1]
Before You Dig: The Planning Phase That Saves Your Budget
1) Start with rules: permits, setbacks, and barriers
Pool rules are local, and they can be very specific: setbacks from property lines, restrictions near utility easements, requirements for
drainage around decks, andalmost alwaysmandatory safety barriers. Some jurisdictions require minimum setbacks (for example, a minimum
3-foot distance from property lines in one city’s published requirements), and may restrict building within certain distances of public
water/sewer infrastructure or flood-control features. [6]
Safety barriers are not optional “nice-to-haves.” In many places, barriers are required for pools that can hold more than about two feet
of water, and construction-phase temporary barriers may also be required. [7] Even where a specific code isn’t quoted, the U.S. CPSC’s
residential barrier guidance is a widely used foundation for modern pool safety rules. [2]
2) Pick your plunge pool “type” early
- Precast concrete shell: Built in a controlled setting, delivered by truck, set with a crane, then hooked up and backfilled.
This is the approach featured in This Old House. [1] - Fiberglass shell: Often quicker to install, but access and site conditions still matter.
- Shotcrete/gunite (custom build): Most flexible for shape/finish, usually more time and cost.
3) Reality-check your access (a crane is not a teleportation device)
Precast concrete plunge pools can be extremely heavyThis Old House notes units can weigh up to about 18,000 poundsso delivery and placement
typically require a flatbed and crane. [1] If access is tight (narrow side yard, overhead lines, delicate neighbor relations), your plan
(and price) changes quickly.
4) Budget and timeline: small pool, real project
This Old House frames plunge pool installs as a multi-week job (often around 4–6 weeks depending on site work and scheduling) and lists a
starting cost level of $20,000 and up for that project type. [1] Industry cost guides commonly put many installs in the tens of thousands,
with wide variation based on materials, access, and features. For example, multiple U.S. cost sources cite averages around the high-$20Ks and ranges
that can stretch from a few thousand (basic above-ground) to well above $50K (premium in-ground concrete with features). [3][4]
How To Install a Plunge Pool: Step-by-Step (Precast Concrete Method)
The sequence below follows the same overall rhythm shown in the This Old House plunge pool installation: site prep, set the shell, connect the
equipment, then backfill and finish landscaping. [1] Exact details vary by manufacturer and by your local code.
Step 1: Prepare the site (excavation + a rock-solid base)
- Layout and confirm elevations. A plunge pool wants a perfectly level “seat.” Pros commonly use laser leveling to dial in grade. [1]
- Excavate slightly oversized. The hole is dug a bit larger than the pool shell so there’s room to position it and work around it. [1]
- Install a compacted crushed-stone base. This Old House describes roughly 18 inches of crushed stone poured and compacted for stability. [1]
This base helps distribute load, resist settling, and improve drainage under the shell.
Pro tip: If your area is known for expansive soils or high water tables, engineering and drainage details matter even more. Some jurisdictions
explicitly warn that expansive soils may be common and require design considerations unless a soils report shows otherwise. [6]
Step 2: Place the pool shell (the crane day)
- Coordinate delivery and crane staging. Clear the path, protect hardscapes, and ensure the crane can safely set up.
- Lower the shell carefully onto the base. The pool is lifted from the truck and lowered into position. [1]
- Check levelagain. Small errors here become big annoyances later (like waterlines that look crooked forever).
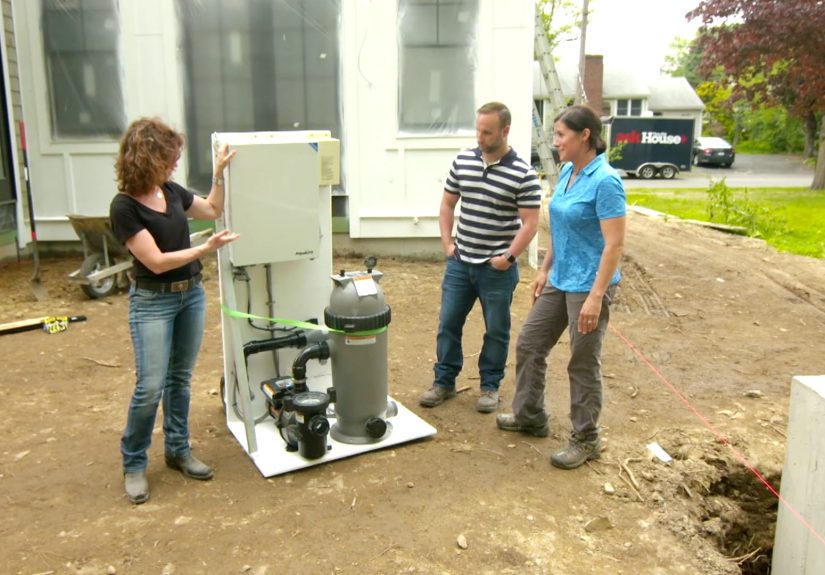
Step 3: Install the pool equipment (pump, filter, and optional upgrades)
A plunge pool still needs circulation and filtration. This Old House calls out core components like a pump and filter system, and notes common
add-ons such as an automation panel (smartphone control) and a heater for year-round use. [1]
- Pump + filter: Sized for the pool volume and plumbing design.
- Sanitization: Chlorine, saltwater chlorine generation, or other approved systems (varies by pool type and local rules).
- Heating/chilling: Heat pumps or gas heaters for warmth; some systems can chill for cold plunge vibes.
- Automation: Helpful for scheduling filtration, heating, and lightingespecially for small pools where chemistry can swing faster.
Some municipalities also care where and how you place equipmentnoise rules, clearances, and even requirements that equipment be housed or screened can apply.
One city’s published requirements, for example, notes pool equipment can be subject to a noise ordinance and may need to be housed in a weather-tight, sound-insulated structure. [5]
Step 4: Plumbing connections (make future service easy)
Plumbing layout depends on the shell design (skimmers, returns, suction fittings). But a good install tends to include:
- Service-friendly valves and unions so equipment can be removed without cutting pipes.
- Correct pipe sizing to reduce noise and improve circulation.
- Pressure testing before you bury anything important.
Step 5: Electrical + bonding (where you do not DIY your way into regret)
Water and electricity can coexist peacefullybut only if installed correctly. Pool electrical work typically involves GFCI protection, correct
wiring methods, and equipotential bonding to reduce voltage gradients. Electrical guidance documents summarizing NEC Article 680 highlight that GFCI
protection is required for outlets supplying pool pump motors in common residential configurations. [8]
Bonding is also a major safety piece. Some code guidance and safety handouts describe bonding conductors (often a solid copper bonding loop) installed around
the pool perimeter to tie metal components together, reducing shock risk. [9] This Old House also notes that a copper bonding wire can be
installed during the plunge pool manufacturing process for electrical safety. [1]
Bottom line: use a licensed electrician who knows pool installations. This is one of those “saving money” moves that can cost you your house, your project approval,
and your peace of mind.
Step 6: Backfill, build access, and finish the landscape
Once the pool is set and connected, the surround gets built:
- Backfill in lifts and compact. Avoid future settling that can crack decking or tilt steps.
- Add stairs or a safe entry. Many plunge pools include or pair well with built-in benches/steps; otherwise plan for a stable entry. [1]
- Build decking with drainage in mind. Some published city requirements go deep on how to prevent deck runoff from flowing onto adjacent property
and may require a collector/drainage system depending on layout. [6] - Finish landscaping. Patios, planters, privacy screens, lightingthis is where it becomes “backyard spa” instead of “hole with water.” [1]
Step 7: Fill, start up, and balance the water
When it’s time to fill, follow the manufacturer’s startup checklist and your equipment installer’s commissioning steps. Then:
- Prime the pump and confirm steady circulation.
- Check for leaks at equipment connections.
- Balance water chemistry (especially important in smaller volumes that can change faster).
- Confirm heater/automation/lighting operation.
Safety and Code Requirements: Tiny Pool, Same Responsibilities
Barriers, gates, and alarms
The U.S. CPSC emphasizes that effective barriers help prevent young children from accessing pools without supervision, and that self-closing, self-latching gates
are a key safety feature. [2] Local codes often get even more specific: some require minimum barrier heights (for example, 48 inches for temporary barriers
during construction in one state summary, and 60 inches for permanent enclosures in one city’s published requirements). [7][6]
Translation: plan your fencing and gate hardware early, not after the pool is done and the inspector is giving you the kind of look usually reserved for burnt casseroles.
Drain and suction safety (anti-entrapment)
Suction entrapment is serious. U.S. safety materials related to the Virginia Graeme Baker Pool & Spa Safety Act discuss compliant drain covers and layers of
protection, noting that compliant drain covers must meet specified standards and that CPSC staff recommends replacing older covers with compliant oneseven in residential contexts. [10]
For plunge pools, this matters because the pool is smaller, people sit closer to fittings, and the “it’s just a little pool” mindset can lead to skipping safety upgrades.
Don’t.
Electrical protection
NEC-based guidance for pools and similar installations highlights GFCI protection for circuits supplying pool pump motors and related outlets commonly found in pool equipment setups. [8]
Combine that with proper bonding practices and you substantially reduce risk. [9]
Cost Factors: Where the Money Actually Goes
Plunge pool pricing ranges widely. Some U.S. cost guides cite a typical “most homeowners” band in the tens of thousands, with averages around the high-$20Ks, and
ranges that can extend from very small/basic setups to premium in-ground builds with features. [3][4]
Common cost drivers
- Pool shell/material: concrete vs fiberglass vs vinyl affects price and labor. [11]
- Excavation surprises: rock, roots, regrading, soil engineering, and hauling. [4]
- Access + crane day: tight sites can require extra labor, protection, or special equipment. [1]
- Electrical and bonding: do it right, pass inspection, sleep at night. [8][9]
- Decking/landscaping: pavers, drainage systems, lighting, privacy elements. [6]
- Heating and automation: nice-to-haves that often become “how did we live without this?” [1]
Design Moves That Make a Plunge Pool Feel Twice as Big
- Built-in bench seating: lounge like you own a boutique hotel.
- Large-format tile + clean waterline: visually expands the interior footprint.
- Deck continuity: run pavers or wood decking to connect doors, seating, and pool entry.
- Privacy planting or screens: small pool + cozy enclosure = “spa courtyard” energy.
- Cover strategy: an insulating, lockable cover helps with safety and heating performance. [12]
Maintenance Basics (for People Who Have Better Things To Do)
A plunge pool can be easier than a full-size pool, but it’s still a pool. Plan for:
- Regular testing and chemical balancing (small volume can swing faster). [11]
- Filter maintenance (cartridge cleaning/replacement schedule depends on system).
- Skimming debris and brushing walls to prevent algae.
- Cover use to reduce debris, evaporation, and heating costs.
Inspection-Day Checklist (Quick, Practical, Non-Dramatic)
- Barrier/fence installed to local requirements; gates self-closing and self-latching. [2][6]
- Electrical work completed with GFCI protection where required; bonding verified. [8][9]
- Suction fittings/drain covers compliant and correctly installed. [10]
- Deck drainage prevents runoff to neighbors and avoids ponding near the pool. [6]
- Equipment accessible for service and operating quietly within local expectations. [5]
Conclusion: Build the “Small Pool” Like It’s a Big Deal (Because It Is)
Installing a plunge pool is absolutely doableespecially with a precast concrete shell method that streamlines the build. But success comes from treating it like a real
construction project: plan for access, get your permits straight, prioritize safety (barriers, bonding, suction protection), and design the surrounding space so the pool
feels intentionalnot like you accidentally summoned a rectangle of water.
Do it right, and you’ll end up with the best kind of home upgrade: one you use constantly, show off shamelessly, and wonder how you lived without.
Real-World Experiences: What Installing a Plunge Pool Actually Feels Like (and What People Wish They Knew)
The technical steps are straightforward on paper: dig, level, set, connect, backfill, finish. The lived experience is more like a short reality show called
“How Many People Can One Backyard Fit?” Here are common lessons homeowners and contractors often report after a plunge pool installespecially with a precast shell.
Access is the plot twist you didn’t see coming
Many people assume the hardest part is excavation. In practice, the “crane day” logistics can become the most stressful chapter. Homeowners frequently describe
the week leading up to delivery as a checklist sprint: removing fence panels, coordinating street parking, protecting driveways, and hoping the weather behaves.
If overhead lines, narrow setbacks, or a tight side yard are involved, the install team may need creative stagingsometimes changing where the equipment pad sits
or how the landscaping is sequenced. The big emotional takeaway: access planning feels boring until it saves you thousands of dollars and a month of rescheduling.
Your yard will look worse before it looks betterby a lot
People are often surprised by how “construction-y” a plunge pool build looks in the middle. Even though the finished pool is compact, the work zone is not.
Excavators need room, material deliveries need room, and soil piles always look bigger than expected (like laundry, but with dirt). A common experience is mild panic
right after excavationwhen the hole is open, the yard is churned up, and you briefly wonder if you’ve ruined everything. Then the shell gets set, the shape becomes real,
and morale instantly improves.
Drainage is the quiet hero of the whole project
Homeowners almost never “feel” good drainage when it’s done rightbecause nothing happens. No puddles, no soggy corners, no water creeping toward the foundation,
no icy patches in cold climates. But when drainage is missed, everyone notices. People often report that the best contractors talk about water management early:
where rain will flow off the deck, where backwash or drained water is permitted to go, and how to keep runoff from creating neighbor problems. If you take one
experience-based lesson and tattoo it on your brain: water always wins. Plan for it.
Small water volume means faster chemistry mood swings
New plunge pool owners frequently say the first month teaches them more about pool chemistry than they ever wanted to know. Smaller pools can change fasterheat faster,
cool faster, and drift out of balance fasterespecially when the pool is used heavily (lots of bodies, sunscreen, and summer chaos). The experienced approach is to
keep a simple routine: test regularly, don’t “double-dose” chemicals out of impatience, keep the filter clean, and use a cover to reduce debris. Once the rhythm
clicks, maintenance stops feeling like homework and becomes more like brushing your teeth: annoying if you skip it, painless if you don’t.
People underestimate how much the surround matters
Many owners say the pool itself was only half the “wow.” The other half was what they built around it: a comfortable place to sit, safe steps that feel solid,
lighting that works at night, privacy that makes the space relaxing, and surfaces that don’t turn into a slip-and-slide. The most satisfied homeowners usually
budgeted for at least one “comfort upgrade” beyond the shelllike a bench ledge, a nicer paver deck, or a heating option that extends the season. In other words,
the best plunge pools aren’t just installedthey’re staged.
The best feeling is the first effortless use
After weeks of noise, scheduling, inspections, and strangers in reflective vests, the most commonly described “this was worth it” moment is hilariously simple:
stepping outside on a hot day and getting inno driving, no reservations, no crowds, no packing. That first quiet soak (or the first dramatic cannonball, depending on
your household) is when the project stops being a construction site and becomes part of everyday life.