Table of Contents >> Show >> Hide
- Before You Start: A 5-Minute Setup That Saves an Hour Later
- Way 1: Use a Family Tree Template (Fastest “Done and Pretty” Option)
- Way 2: Use SmartArt Hierarchy (Best Balance of Speed + Control)
- Way 3: Build a Custom Family Tree with Shapes + Connector Lines (Most Flexible)
- Tips That Make Your Excel Family Tree Look Like It Belongs on Purpose
- Quick Troubleshooting
- Conclusion: Pick the Method That Matches Your Family (and Your Deadline)
- Experiences: What Actually Happens When You Build a Family Tree in Excel (The Honest Version)
Excel is famous for budgets, schedules, and “why is this cell suddenly a date?” surprises. But it’s also surprisingly great at
family treesbecause a family tree is basically a relationship map, and Excel has multiple ways to build clean, printable diagrams.
The trick is choosing the method that matches your goal: fast and pretty, super flexible, or “I need this done before dinner.”
In this guide, you’ll learn three simple ways to make a family tree in Excel (template, SmartArt, and shapes), plus practical tips
for layout, photos, printing, and avoiding the classic “everything moved and now Cousin Leo is floating in space” problem.
Before You Start: A 5-Minute Setup That Saves an Hour Later
1) Decide the scope (so your tree doesn’t become a forest)
Start by answering two questions:
How many generations? (2–3 is a quick chart; 4–6 gets big fast.)
What relationships? (Just direct ancestors/descendants, or spouses, step-family, adoptions, etc.?)
Your answers determine whether a template will work or you’ll want a custom layout.
2) Collect the info in a simple table first
Even if you plan to jump straight into boxes and lines, jotting your data in a mini spreadsheet keeps you sane. Here’s a simple
format you can copy:
| Full Name | Relationship | Birth (Year) | Death (Year) | Notes |
|---|---|---|---|---|
| Evelyn Carter | Grandmother (maternal) | 1944 | Born in Ohio | |
| Marcus Carter | Grandfather (maternal) | 1942 | 2012 | Military service |
| Sophia Carter | Mother | 1972 | Likes to keep photos private |
Bonus tip: if you’re including sensitive details (like living relatives’ full birthdates), decide now what’s okay to share before
the spreadsheet starts traveling around the family group chat.
Way 1: Use a Family Tree Template (Fastest “Done and Pretty” Option)
Templates are the quickest path to a polished family tree. You fill in names (sometimes via a data-entry sheet), and the layout
is already handled. This is ideal when your family structure is fairly standard (clear generations, not too many branches per level).
How to find a template inside Excel
- Open Excel and create a new workbook.
- Go to File > New.
- Use the search box and type: family tree or family tree generator.
- Select a template you like and click Create (it may download from Microsoft’s template library).
How to use third-party Excel templates (still easy)
If you want more generations, multiple orientations, or a pedigree-style chart, downloadable Excel templates can be a lifesaver.
Look for templates that are clearly labeled for Excel and include printable layouts (portrait/landscape).
- Choose your layout: portrait is great for tall, direct-line ancestry; landscape often works better for wide sibling branches.
- Check file type: if a template is .xlsx, it’s usually “fill-in-the-boxes.” If it’s .xlsm, it may include macros.
- Macro safety: only enable macros if you trust the source and understand what the template is doing.
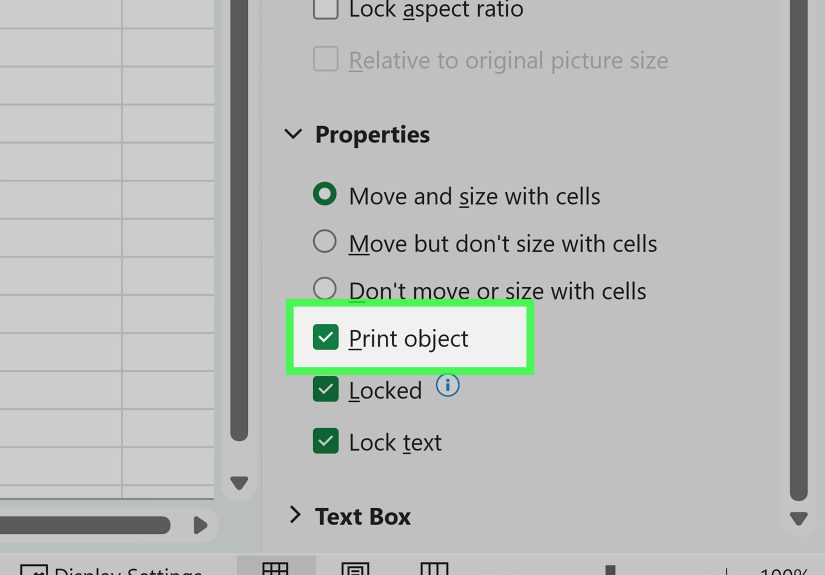
Template pro tip: lock the layout before you personalize
Many templates use merged cells, careful spacing, and print settings. Before you start changing fonts and colors, make a copy of the
original sheet so you can “rewind” if needed. Think of it as version control… but with fewer headaches than explaining Git at a family reunion.
Way 2: Use SmartArt Hierarchy (Best Balance of Speed + Control)
SmartArt is Excel’s built-in diagram tool. It’s designed for org charts and hierarchies, which makes it a natural fit for family trees.
You choose a hierarchy layout, type names, and add boxes as needed. It’s faster than drawing everything manually, but still customizable.
Step-by-step: build a SmartArt family tree
- Open a blank worksheet.
- Go to Insert > SmartArt.
- Choose Hierarchy.
- Select a layout:
- Organization Chart (simple, clean)
- Picture Organization Chart or Circle Picture Hierarchy (if you want photos)
- Type names directly in the boxes, or open the Text Pane and type in a list format.
- Add relatives by selecting a box and using SmartArt Design > Add Shape (After/Before/Above/Below).
How to add photos (without fighting Excel)
If you chose a picture-based hierarchy, click the picture icon inside a shape and insert a photo. Keep images consistent:
crop faces similarly, avoid wildly different zoom levels, and aim for “yearbook” framing (head and shoulders).
The spouse problem (and how to handle it)
SmartArt hierarchy charts naturally connect one parent box to child boxes. Real families often include two parents,
remarriages, step-family branches, or adoptive relationships. SmartArt can still work, but you may need a hybrid approach:
- Option A (simple): Put spouses side-by-side on the same level and draw a connecting line manually.
- Option B (clean): Use one “couple” box (e.g., “Sophia & Daniel”) and put children under that box.
- Option C (most accurate): Use SmartArt for the main structure, then add separate shapes/lines for complex relationships.
Formatting quick wins (so it looks intentional)
- Use consistent text: same font and size across the chart; bold for last names if you want clarity.
- Color code carefully: one color per generation, or one color per family branch (but don’t turn it into a rainbow scoreboard).
- Keep spacing readable: bigger is often betterespecially if you plan to print.
Way 3: Build a Custom Family Tree with Shapes + Connector Lines (Most Flexible)
If your family structure has lots of branching, blended families, adoptions, or “this is complicated but we love each other,”
manual shapes give you total control. This method also works well if you’re using an older version of Excel or you don’t want
to rely on templates.
Step-by-step: build from scratch with shapes
- Open a new worksheet.
- Turn off visual clutter:
- Go to View and uncheck Gridlines (optional but cleaner).
- Consider hiding headings (row/column labels) for a “poster” look.
- Go to Insert > Shapes and choose a rectangle (or rounded rectangle).
- Click and drag to place the first person box (often oldest generation at the top).
- Copy/paste the shape to keep sizes consistent, then edit the text in each box.
- Add relationship lines:
- Insert > Shapes > choose a line or connector.
- Use solid lines for parent/child, and (if you want) dotted lines for marriage/partnership or special notes.
Make it look tidy (without losing your weekend)
- Align shapes: select multiple shapes > use alignment tools so boxes line up neatly.
- Distribute evenly: consistent spacing makes even a huge tree feel readable.
- Group sections: group a family branch so it moves as one unit if you need to rearrange.
- Use a legend: small key for colors/line styles so readers know what they’re looking at.
A quick layout example (3 generations)
Here’s a simple structure you can mimic before adding more branches:
Tips That Make Your Excel Family Tree Look Like It Belongs on Purpose
1) Keep names consistent (the easiest “professional” upgrade)
Decide on a naming format and stick with it. Examples:
“First Last (maiden)” or “First Middle Last” or “First Last, b. 1978.”
Consistency beats fancy fonts every time.
2) Use notes without overcrowding the boxes
If you want to add details (birthplace, dates, stories), consider:
shorter text in the box + longer notes in a comment, a side panel, or a separate “Family Notes” sheet.
Your future self will thank you.
3) Plan for printing from the start
- Use Page Layout to set orientation (landscape is often best).
- Set margins to “narrow” for more space.
- Use scaling (fit to 1 page wide) so the tree doesn’t print like a treasure map split across 12 pages.
4) Build for sharing (and privacy)
If you’re sharing with relatives, consider creating two versions:
a “public” version (names only) and a “full” version (dates, places, photos). Living people may not want personal details widely shared.
5) Save versions as you go
Use filenames like FamilyTree_v1, v2_photos, v3_print-ready. This is the Excel equivalent of leaving breadcrumbs
so you can find your way back out of the forest.
Quick Troubleshooting
“SmartArt rearranged everything!”
SmartArt tries to auto-balance layouts. If it keeps shifting, consider finishing all box additions first, then formatting.
For complex structures, switch to the shapes method (or combine SmartArt with manual lines and extra shapes).
“How do I show two parents connected to the same children?”
In SmartArt, the easiest method is a couple box or manually drawn connector lines between spouse boxes and the child branch.
In shapes, it’s straightforward: draw a spouse line between parents, then draw a single vertical line to the children row.
Conclusion: Pick the Method That Matches Your Family (and Your Deadline)
If you want the fastest result, start with a template. If you want something quick but customizable, SmartArt hierarchy is the sweet spot.
If your family structure is complex (or you’re aiming for a detailed genealogy chart), shapes and connectors give you full creative control.
No matter which method you use, the real “secret sauce” is planning: gather your data first, keep formatting consistent, and design with printing in mind.
Experiences: What Actually Happens When You Build a Family Tree in Excel (The Honest Version)
The first time I built a family tree in Excel, I assumed it would be like assembling a bookshelf: follow the steps, tighten the screws,
admire the finished product. In reality, it was more like cooking a new recipe: the instructions were easy, but the real challenge was
discovering that my “simple” family tree had surprise ingredients (step-siblings, remarriages, name changes, and the classic “Wait… are we sure
about the spelling?” moment).
I started with a template because I wanted instant gratification. It worked beautifully for a basic three-generation viewnames dropped neatly
into boxes, the spacing looked print-ready, and it felt like Excel was finally being kind. Then I hit my first real-world snag: the template didn’t
love uneven branches. One side of the family had four siblings, the other had one, and the layout began to look like it was leaning into a strong wind.
That’s when I learned the template rule: templates are perfect until they aren’t. They’re amazing for a quick school project, a reunion handout, or a
“here’s the big picture” chartbut once you want custom relationships or lots of side branches, you either need a more flexible template or a new method.
Next, I tried SmartArt. This was the moment Excel turned from spreadsheet to diagram tool, and it felt weirdly satisfying. Adding names in the text pane
was fast, and the hierarchy layouts were clean. The “aha” moment came when I realized SmartArt is basically an org chart wearing a fake mustache and
pretending it’s not about middle management. The downside showed up immediately too: SmartArt thinks in single-parent branches. Real families often involve
two parents connected to the same children, plus additional relationships that don’t fit neatly into a strict hierarchy. My workaround was to use SmartArt for
the main structure and then draw a couple of manual connector lines for spouse relationships. That hybrid approach kept the chart tidy without forcing my family
into a layout that didn’t reflect reality.
Finally, I built a version with shapes and connectors, and this was the most “accurate” onealso the one that taught me patience. Shapes are powerful because
you control everything: box placement, line styles, spacing, legends, and notes. They’re also dangerous because you control everything. If you don’t align and
distribute shapes, your tree can drift into chaos. I learned to copy/paste shapes for consistent sizing, group branches so they move together, and set print
settings early so I didn’t end up with a beautiful design that printed across multiple pages like a secret message.
The biggest real-life lesson wasn’t technicalit was collaborative. Family trees are conversation starters. The moment you share a draft, someone will correct a date,
add a nickname, request a photo swap, or politely ask you to remove personal details. So I now build two versions: a “shareable” tree (names, maybe years only) and a
“research” tree (full dates, notes, sources, and the messy details that help me remember who’s who). Excel makes this easy: duplicate the sheet, simplify the public
version, and keep the detailed one for your own files.
If you’re doing this for the first time, here’s the most practical advice I can offer: pick the method based on your family’s complexity, not your optimism.
Templates are quickest, SmartArt is a great middle ground, and shapes are the “I want it exactly right” option. And no matter what: save versions as you gobecause
nothing says “family history” like accidentally dragging Great-Grandpa into the wrong century.