Table of Contents >> Show >> Hide
- What Makes Angel Food Cake So Fluffy and Light?
- Ingredients You Need for a Classic Angel Food Cake
- Equipment That Actually Matters
- Step-by-Step: How to Make Angel Food Cake That's Fluffy and Light
- Common Mistakes That Make Angel Food Cake Dense
- Troubleshooting Angel Food Cake Problems
- Best Toppings and Serving Ideas
- Storage Tips
- Final Thoughts
- Experience-Based Notes and Real-Life Baking Lessons (Extended)
Angel food cake is basically the cloud of the cake world: tall, airy, sweet, and somehow elegant even when you serve it on a paper plate. But it can also be a little dramatic. One speck of grease, one impatient fold, one “I’ll just grease the pan real quick,” and suddenly your heavenly cake turns into a dense sponge with trust issues.
The good news? Once you understand why angel food cake works, it becomes much easier to make it consistently fluffy and light. In this guide, you’ll learn the key techniques (whipping egg whites, folding flour, using the right pan, and cooling upside down), a reliable step-by-step method, common mistakes to avoid, and practical troubleshooting tips. If you’ve been burned by a flat angel food cake before, welcome. You are among friends.
What Makes Angel Food Cake So Fluffy and Light?
Angel food cake gets its lift from whipped egg whites, not butter, oil, or chemical leaveners. That means the structure depends on tiny air bubbles trapped in a stable foam. During baking, those bubbles expand and the cake “climbs” the pan walls. As it cools, the structure sets and firms up.
In plain English: your cake rises because you whipped a lot of air into egg whites and then treated that foam like a fragile bubble bath. This is why angel food cake recipes are obsessed with clean bowls, careful folding, and ungreased pans. They’re not being fussy for fun (well, maybe a little).
Ingredients You Need for a Classic Angel Food Cake
Most angel food cake recipes use a short ingredient list, but each ingredient does a lot of work. Here’s a reliable classic setup:
- 12 large egg whites (room temperature)
- 1 cup cake flour (sifted)
- 1 1/2 cups granulated sugar (divided; superfine works great)
- 1 1/2 teaspoons cream of tartar
- 1/4 teaspoon salt
- 1 to 1 1/2 teaspoons vanilla extract (optional almond extract for extra flavor)
Why each ingredient matters
- Egg whites: The engine of the cake. They create the foam and structure.
- Cake flour: Lower protein than all-purpose flour, which helps keep the crumb tender and delicate.
- Sugar: Sweetens, stabilizes the foam, and helps with texture. Many bakers add it gradually to help it dissolve.
- Cream of tartar: Helps stabilize egg whites and improve volume.
- Salt + extracts: Flavor support. Angel food cake is subtle, so small amounts matter.
Can you substitute ingredients?
Sometimes. Lemon juice or white vinegar can stand in for cream of tartar in a pinch, but cream of tartar is still the best option for consistent volume and stability. Cake flour is strongly recommended. If you use all-purpose flour, the cake can turn out heavier and less tender.
Equipment That Actually Matters
- 10-inch tube pan (angel food cake pan) ideally aluminum, often with a removable bottom
- Electric mixer stand mixer or hand mixer
- Large metal or glass mixing bowl (very clean)
- Sifter or fine-mesh sieve
- Rubber spatula
- Serrated knife for slicing
Do not grease the pan
Yes, this feels wrong. No, you should not “just spray it lightly.” Angel food batter needs to cling to the pan walls to rise properly. A greased pan can lead to a shorter, denser cake. This is one of the most common reasons angel food cake flops.
Can I use a Bundt pan instead?
It’s not ideal. A standard tube pan has straight sides that help the batter rise and release more predictably. Bundt pans have ridges and curves that make a delicate angel food cake harder to remove without tearing. If a tube pan isn’t available, consider cupcakes instead of forcing a Bundt-pan breakup.
Step-by-Step: How to Make Angel Food Cake That’s Fluffy and Light
1) Prep your ingredients and pan
- Preheat your oven to 325°F (some recipes use 300°F–350°F; follow your pan/oven behavior and watch doneness cues).
- Make sure your tube pan is clean, dry, and ungreased.
- Separate eggs carefully so no yolk gets into the whites.
- Let egg whites sit at room temperature for about 30 minutes for easier whipping and better volume.
- Sift the cake flour with part of the sugar (or sift flour well and keep sugar ready, depending on your recipe method).
Pro tip: Separate eggs while cold (it’s easier), then let the whites warm up. It’s the kitchen equivalent of stretching before a workout.
2) Whip the egg whites the right way
- Add egg whites to a very clean bowl.
- Beat until foamy.
- Add cream of tartar and salt.
- Continue beating until soft peaks form.
- Gradually add sugar, a little at a time, beating until stiff, glossy peaks form.
- Beat in vanilla (and almond extract, if using).
The goal is a stable foam that holds shape without looking dry, grainy, or curdled. If the whites look clumpy or dull, you may have overwhipped them. If they slump immediately, they need a bit more time.
3) Fold in the flour gently
This is where good cakes go to either heaven or heartbreak. Sift the flour mixture over the whipped egg whites in several additions (often 3–4 batches). Fold gently with a spatula by cutting through the center, scraping the bottom, and bringing the batter up and over.
Don’t stir like you’re mixing pancake batter. The mission is to combine everything while keeping as much air in the foam as possible. Fold until no dry pockets remain, then stop.
4) Fill the pan and remove big air pockets
- Spoon the batter into the ungreased tube pan.
- Smooth the top lightly.
- Run a thin knife/skewer through the batter (or tap/rap the pan gently) to release large trapped air pockets.
This helps prevent tunnels and huge holes in the finished cake. We want a delicate crumb, not a surprise cave system.
5) Bake until springy and golden
Bake on a lower or middle rack (depending on your oven) until the top is golden and springs back when lightly touched. Many recipes land in the 40–45 minute range, though some older formulas bake longer at lower temperatures.
Don’t rely only on the clock. Angel food cake is a “look and touch” cake. If the top still dents and stays dented, give it a few more minutes.
6) Cool upside down immediately
As soon as the cake comes out, invert the pan and let it cool completely upside down. Some pans have feet; others can be balanced over a bottle through the center tube.
This step helps prevent collapse while the structure finishes setting. Skip it, and gravity may win.
7) Unmold and slice without squishing
- Once fully cool, run a thin knife or offset spatula around the edges and center tube.
- Remove the cake gently.
- Slice with a serrated knife using a gentle sawing motion.
A straight chef’s knife can compress the crumb and make your pretty slices look like they lost a bar fight.
Common Mistakes That Make Angel Food Cake Dense
1) Greasing the pan
This is the big one. The batter needs traction. No grease, no climbing.
2) Even a little fat in the bowl or whites
Oil, butter residue, and egg yolk can interfere with whipping volume. Wash and dry tools thoroughly before you start.
3) Overwhipping or underwhipping the egg whites
Underwhipped whites lack structure. Overwhipped whites can become dry and harder to fold, which causes deflation. Aim for glossy stiff peaks.
4) Overmixing while folding
Once the flour is in, every extra fold risks knocking out air. Fold just until incorporated.
5) Using the wrong pan
A tube pan is designed for this cake. Bundt pans and heavily nonstick pans often make removal and rise more difficult.
6) Skipping the upside-down cooling step
Angel food cake isn’t trying to be high-maintenance here; it simply needs that cooling position to hold its height.
Troubleshooting Angel Food Cake Problems
Why did my cake collapse?
- Pan was greased
- Egg whites were under/overwhipped
- Batter was overfolded
- Cake was underbaked
- Pan wasn’t inverted during cooling
Why is my cake rubbery or chewy?
- Too much mixing after adding flour
- Using all-purpose flour instead of cake flour
- Too much moisture or incorrect measurements
Why does my cake taste eggy?
Angel food cake is egg-white based, so a mild egg note is normal. Boost flavor with vanilla, a little almond extract, citrus zest, or fresh fruit toppings.
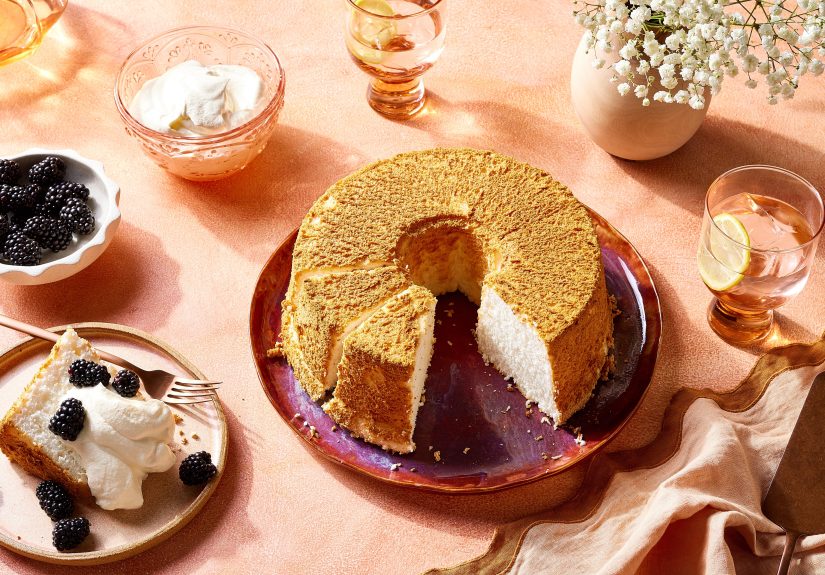
Best Toppings and Serving Ideas
Angel food cake is fantastic plain, but it also plays nicely with almost anything bright, creamy, or juicy:
- Fresh berries + whipped cream
- Macerated strawberries
- Lemon curd (lightly spooned, not drowned)
- Chocolate drizzle
- Vanilla yogurt + fruit for brunch vibes
- Toasted coconut and citrus zest
The cake is delicate, so avoid heavy frosting unless you’re going for a rustic look (which is code for “it still tastes amazing”).
Storage Tips
- Room temperature: Store covered in an airtight container for a few days.
- Freezer: Slice, wrap tightly, and freeze for longer storage.
- Serving later: Keep toppings separate until serving so the cake doesn’t get soggy.
Since angel food cake is low in fat, it can dry out faster than richer cakes. Wrap it well and treat leftovers kindly.
Final Thoughts
If you remember only five things, make it these: use a clean bowl, whip the egg whites properly, fold gently, use an ungreased tube pan, and cool the cake upside down. That’s the core formula for a fluffy, light angel food cake that looks tall and slices beautifully.
Once you nail the technique, angel food cake becomes one of the most satisfying bakes in your kitchen rotation. It’s simple, elegant, and just dramatic enough to make you feel like a baking wizard when it comes out perfectly. Which, to be fair, you kind of are.
Experience-Based Notes and Real-Life Baking Lessons (Extended)
If you’re adding angel food cake to your regular baking lineup, here’s the part that helps most home bakers: the “experience” side of the recipe. In real kitchens, people don’t fail angel food cake because they can’t read the ingredient list. They fail because timing, texture judgment, and tiny habits matter more than they expect.
A very common first-time experience goes like this: the baker follows the ingredient measurements perfectly, but the egg whites never seem to build enough volume. Later, they realize the mixing bowl had a faint greasy film or the whisk was recently used for whipped cream. Angel food cake teaches you that “clean enough” and “angel-food clean” are not the same thing. Once bakers switch to a freshly washed and thoroughly dried metal or glass bowl, the difference is immediate and dramatic.
Another common experience: the batter looks beautiful in the bowl, then deflates after the flour is added. This usually happens because the folding step feels too gentle at first, so people overcorrect and start stirring. A better approach is to accept that folding looks slow. It should feel deliberate. Many successful bakers use a rhythm: sift a little flour, fold just until most streaks disappear, rotate the bowl, repeat. When they stop chasing “perfectly smooth” batter, they get a much taller cake.
Oven behavior is another real-world factor. One baker’s “40 minutes” is another baker’s “still jiggly in the center.” That’s why experienced bakers lean on doneness cues: a golden top, a springy surface, and a cake that no longer looks wet. If your oven runs hot, the top may brown quickly before the interior sets. In that case, reducing the temperature slightly next time (or verifying oven temperature with a thermometer) often fixes the issue.
Cooling is where many people learn the hardest lesson: patience. Angel food cake can look fully baked and still collapse if it isn’t cooled upside down right away. Some bakers panic when they see the inverted pan balancing on a bottle and think, “This cannot be the official method.” It is, and it works. Bakers who trust the process usually get a higher, softer cake. Bakers who skip it often get a cake that sinks enough to inspire a second attempt by the weekend.
Serving also gets easier with experience. First-timers often overdo toppings, which can flatten the delicate slices. Experienced bakers tend to serve the cake simply: berries, whipped cream, maybe a citrus element. They let the texture be the star. And when slicing, they learn fast that a serrated knife is not optional if they want clean pieces instead of compressed cake clouds.
The best long-term takeaway is this: angel food cake rewards technique more than fancy ingredients. Once you learn the feel of properly whipped whites and gentle folding, the recipe becomes surprisingly reliable. It stops being “that intimidating cake” and turns into your go-to dessert for spring gatherings, summer fruit season, and anytime you want a cake that feels impressive without feeling heavy.