Table of Contents >> Show >> Hide
- Why DIY Fabric Covered Flower Pots Are So Popular
- Materials You Need
- Choose the Right Pot Before You Start
- What Fabric Works Best?
- How to Make DIY Fabric Covered Flower Pots Step by Step
- Design Ideas to Make Your Fabric Covered Planters Look Custom
- Common Mistakes to Avoid
- How to Use DIY Fabric Covered Flower Pots in Your Home
- Care Tips for Fabric Covered Flower Pots
- Final Thoughts
- Real-Life Lessons and Experiences From Making DIY Fabric Covered Flower Pots
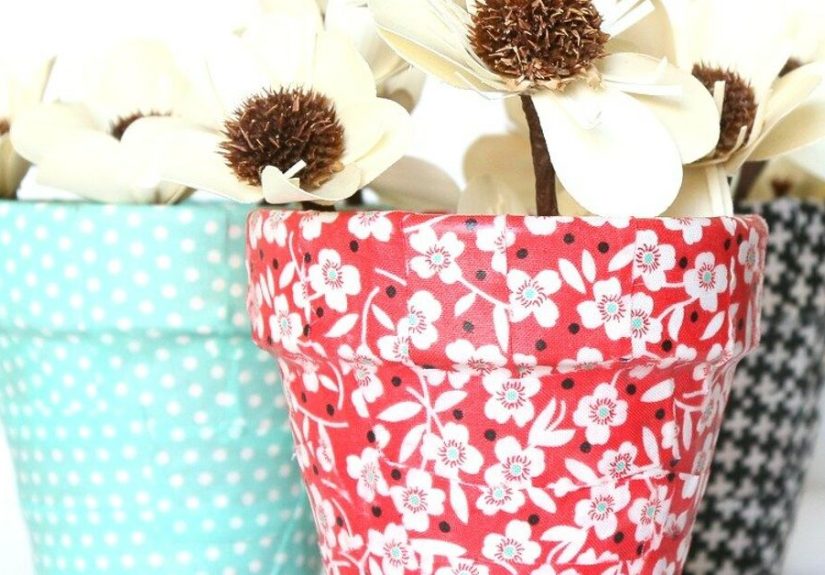
Plain flower pots do an honest job. They hold dirt. They support plants. They sit quietly in the corner behaving like tiny ceramic interns. But sometimes a pot deserves a glow-up. That is where DIY fabric covered flower pots come in. They are colorful, inexpensive, surprisingly easy to make, and dangerously good at convincing guests you are the sort of person who casually creates charming home decor on a Saturday afternoon.
If you have a stash of leftover fabric, a basic terra-cotta pot, and a little patience, you can create a custom planter that looks polished without looking fussy. This project works beautifully for indoor plant decor, gift giving, seasonal decorating, and upcycled home projects. It is also one of those crafts that feels fancy while secretly being very forgiving. A tiny wrinkle here and there? Congratulations. You have invented “handmade texture.”
In this guide, you will learn exactly how to make fabric covered flower pots, which materials work best, how to avoid the soggy-flowerpot-tragedy, and how to keep your finished planter looking good instead of like it lost a fight with a glue bottle.
Why DIY Fabric Covered Flower Pots Are So Popular
There is a reason this project keeps popping up in craft rooms, patios, and Pinterest boards. A fabric covered planter combines the softness of fabric with the structure of clay or plastic, which gives you the best of both worlds. You get pattern, color, and texture without having to sew a thing.
These pots are also wonderfully flexible. You can make them farmhouse-style with linen or burlap, bright and cheerful with floral cotton, modern with black-and-white geometric prints, or delightfully chaotic with patchwork scraps. They work as indoor herb planters, desk accessories, party centerpieces, patio accents, and thoughtful handmade gifts.
Best of all, this project is budget-friendly. One inexpensive pot and a small amount of fabric can create something that looks boutique-worthy. That is the crafting equivalent of getting compliments on an outfit that cost less than takeout.
Materials You Need
Before you start, gather everything in one place. This is not mandatory, but it does lower the odds of wandering through your house with glue on your fingers asking where your scissors went.
- Flower pot or planter, preferably terra-cotta or a smooth-sided plastic pot
- Cotton fabric, lightweight canvas, linen, or quilting fabric
- Decoupage medium or craft adhesive designed for multi-surface use
- Foam brush or soft paintbrush
- Sharp scissors
- Pencil or fabric marker
- Ruler or measuring tape
- Wax paper or scrap paper to protect your workspace
- Optional outdoor sealer or waterproof topcoat
- Optional paint for the rim or base
- Optional plastic nursery pot or liner
Choose the Right Pot Before You Start
If you want the easiest possible project, choose a pot with fairly straight sides. Curved or dramatically tapered pots can still work, but they require a little more trimming and a lot more pep talks.
Terra-Cotta Pots
These are a favorite for a reason. They are affordable, easy to find, and have a natural surface that pairs beautifully with fabric. They are also porous, which is great for many plants, but it means moisture can move through the clay. If you are planting directly into a decorated terra-cotta pot, think ahead about protecting the finished exterior.
Plastic Pots
Smooth plastic pots are another smart choice, especially for indoor decor. They are lighter, less fragile, and less likely to pull moisture through the walls. If the plastic is glossy, lightly cleaning and drying it well before applying fabric will help the adhesive hold better.
Best Practice for Real Plants
If you want your design to last, use your decorated pot as a cover pot and place the plant inside a separate plastic nursery pot. That way, you keep the pretty outside pretty, and you make watering much easier. Your fabric gets less moisture, your plant keeps drainage, and everyone wins.
What Fabric Works Best?
Not all fabrics behave politely in a glue-based craft. The best fabrics for DIY flower pot ideas are medium-light woven fabrics that bend easily around the pot.
Great Options
- Cotton quilting fabric
- Linen blends
- Thin canvas
- Cotton prints with small or medium patterns
Use Caution With
- Very thick upholstery fabric
- Stretch knits
- Velvet or heavily textured fabric
- Loose-weave materials that fray quickly
If your fabric frays easily, you can lightly coat the edges with decoupage medium before cutting the final shape. That little trick can save you from the classic “beautiful project slowly unraveling before your eyes” experience.
How to Make DIY Fabric Covered Flower Pots Step by Step
Step 1: Clean the Pot Thoroughly
If the pot is new, wipe away dust and debris. If it is used, clean it well. Old pots can carry mineral buildup, dirt, and even plant pathogens. A properly cleaned pot gives you a better surface for adhesive and a healthier home for future plants. Let the pot dry completely before doing anything else. Completely. Not “kind of dry.” Not “looks dry on one side.” Dry.
Step 2: Measure and Test the Fabric
Wrap the fabric around the pot to estimate the size. Leave extra fabric at the top and bottom so you can fold it neatly over the edges. If your pot narrows toward the base, do a test wrap and mark where the fabric naturally wants to bunch.
For many pots, the easiest method is to cut one piece that wraps all the way around. For more tapered shapes, you may get a smoother finish by tracing the pot and creating a custom pattern before cutting. If you are using patterned fabric, decide where you want the design to land. A giant flower cut in half can look artsy, but it can also look like your scissors gave up halfway through.
Step 3: Cut Slits for a Neater Fit
This is one of the secret weapons of a smooth terra-cotta pot makeover. Small slits along the top and bottom allowance help the fabric fold inward without bunching or puckering. Think of them as little permission slips that tell the fabric to behave.
Step 4: Apply Adhesive in Small Sections
Brush a thin layer of decoupage medium onto one section of the pot. Press the starting edge of the fabric into place. Then continue around the pot, adding adhesive as you go. Work in small sections instead of coating the whole pot at once. This gives you better control and less panic.
Smooth the fabric with your fingers or brush as you move along. Start in the middle and work outward to push out air bubbles. If you find a wrinkle, lift the fabric gently while the adhesive is still wet and smooth it back down.
Step 5: Fold the Top Edge Inward
Once the body of the pot is covered, trim the excess if needed. Then fold the top allowance into the pot in small pleats so it lies flat. Apply more adhesive over the folded area to hold it in place. If you painted the rim beforehand, the contrast can look especially polished.
Step 6: Finish the Bottom Carefully
Flip the pot over and fold the bottom allowance inward. If your pot has a drainage hole, do not permanently seal it shut. Some crafters temporarily cover the hole while working, then uncover it once the pot dries. That is the smarter move unless your goal is to create a tiny root-rot spa.
Step 7: Seal the Entire Exterior
Brush one or more thin coats of decoupage medium over the outside fabric. Let each coat dry before adding the next. This helps secure the edges, adds a cleaner finish, and gives the surface better resistance to light moisture. For outdoor use or higher humidity, a compatible outdoor topcoat can offer extra protection.
Step 8: Let It Cure Before Planting
Yes, waiting is annoying. Yes, it matters. Let the pot dry thoroughly before adding soil, a nursery pot, or a live plant. A rushed finish can lead to shifting fabric, tacky surfaces, or the kind of fingerprints that become a permanent part of your artistic legacy.
Design Ideas to Make Your Fabric Covered Planters Look Custom
Use Fabric by Style
For modern decor, choose clean stripes, muted plaids, or minimalist botanical prints. For cottage or vintage style, try florals, faded gingham, or natural linen. For children’s rooms, go bold with bright colors, animals, stars, or playful patterns.
Mix Fabric and Paint
Painting the rim, saucer, or lower band of the pot adds contrast and makes the project feel more intentional. A white-painted rim with floral fabric feels fresh and classic. A black rim with graphic fabric feels more contemporary.
Try Patchwork
Instead of wrapping the pot with one piece of fabric, use small squares or strips for a patchwork look. This is a fun way to use scraps and gives your pot a handmade charm that feels personal rather than mass-produced.
Add Trim Sparingly
Twine, ric-rac, ribbon, or a narrow painted line can finish the top or bottom edge. Keep it simple. There is a thin line between “tastefully embellished” and “this planter has seen too much.”
Common Mistakes to Avoid
Using Fabric That Is Too Thick
Heavy fabric resists folding and creates lumps at the edges. If you want crisp results, lighter fabric is your friend.
Skipping Pot Prep
Dust, moisture, and mineral residue interfere with adhesion. Clean first. Craft later. Regret less.
Overloading the Glue
More adhesive is not always better. Too much can soak the fabric, blur the pattern, and create a gummy finish. Use thin, even coats.
Ignoring Drainage
A beautiful planter is still a bad planter if it traps water. Make sure the finished setup still allows excess water to escape. A liner pot is often the easiest solution.
Leaving Outdoor Pots Exposed
If you decorate a terra-cotta pot and place it outdoors, protect it from heavy rain and freezing conditions when possible. Moisture and weather can shorten the life of both the clay and the decorative finish.
How to Use DIY Fabric Covered Flower Pots in Your Home
Once you make one, it becomes alarmingly easy to imagine them everywhere.
- Kitchen: Use small pots for herbs on a windowsill.
- Living room: Create coordinated planters that match pillows or curtains.
- Office: Dress up succulent pots for a desk that says, “I answer emails, but I have style.”
- Parties: Use them as centerpieces, favor containers, or table markers.
- Gifts: Add a plant, seed packet, or handwritten tag for a thoughtful handmade present.
Care Tips for Fabric Covered Flower Pots
These decorative planters can last a long time if you treat them with a little respect.
- Use them indoors or in covered outdoor areas when possible.
- Water plants carefully so excess water does not sit against the exterior.
- Empty saucers after watering to reduce lingering moisture.
- Dust gently with a dry cloth instead of soaking the surface.
- Store decorated terra-cotta pots out of freezing weather.
If you are decorating for pure style rather than direct planting, faux plants or potted nursery liners make maintenance almost laughably easy.
Final Thoughts
DIY fabric covered flower pots are one of those crafts that check all the right boxes: inexpensive, practical, creative, and genuinely attractive when finished. They allow you to customize your plant decor, use leftover fabric, and turn a plain planter into something with personality. That personality can be rustic, elegant, playful, modern, or gloriously floral. The point is that it becomes yours.
And that is the real charm of this project. You are not just making a pot prettier. You are creating a small design detail that makes a room feel more considered, a gift feel more personal, and a humble little houseplant feel like it finally got promoted.
So grab a pot, choose a fabric you love, and go make something cheerful. Worst-case scenario, you end up with a craft story. Best-case scenario, you end up with a beautiful planter and the deeply satisfying feeling of having outsmarted bland decor with scissors and glue.
Real-Life Lessons and Experiences From Making DIY Fabric Covered Flower Pots
The first time I made a fabric covered flower pot, I approached it with the confidence of someone who had watched approximately two tutorials and misunderstood all of them. I assumed I could wrap fabric around a pot the way you wrap a sandwich. Neat. Quick. Foolproof. Reader, it was not neat. It was not quick. It was absolutely full of folds that looked less “designer planter” and more “textile emergency.”
But that first attempt taught me the most useful lesson: this project rewards patience far more than perfection. Once I slowed down, worked in smaller glued sections, and paid attention to how the fabric wanted to bend around the curve, the whole thing changed. Instead of wrestling the material, I started guiding it. That is when the project became fun rather than mildly dramatic.
One of the best experiences with this craft is how easily it can match a room. I have seen people use leftover curtain fabric to tie planters into a sunroom, scrap linen to soften a modern shelf, and bold floral cotton to give a tired windowsill a shot of personality. A pot may be small, but it can quietly pull a whole space together. It is the decorative equivalent of a good accessory. Not loud, just smart.
I have also learned that the best projects often come from leftover materials. Tiny fabric scraps that are too good to throw away but too small for a pillow suddenly become perfect for a planter. That makes this project feel practical as well as creative. It is satisfying to take odds and ends from a drawer and turn them into something that looks intentional.
There is also a gift-giving advantage. A handmade flower pot with a small herb, succulent, or flowering plant feels thoughtful without being over-the-top. It works for birthdays, Mother’s Day, teacher gifts, housewarmings, and “I brought you a plant because I panicked and needed a charming present” situations. People tend to appreciate that it looks personal instead of store-bought.
Of course, experience also teaches humility. For example, if you skip full drying time because you are impatient, the pot will let you know. The fabric may slide, the finish may feel tacky, and your fingerprints may become part of the final design whether you wanted them there or not. If you forget about drainage, your pretty planter can become a damp little science experiment. If you use thick fabric, folding the top edge can feel like trying to gift-wrap a bowling ball.
Still, those small mistakes are part of what makes this such a friendly project. It is inexpensive enough to try again, simple enough to improve quickly, and flexible enough that even imperfections often look handmade in a good way. A slightly uneven fold can read as texture. A visible seam can be hidden with trim. A bold pattern can distract from almost anything, which frankly is also a useful life strategy.
What stands out most after making several of these pots is how much joy they add for such a small effort. Plants already make a room feel more alive. When the planter itself is customized, the effect doubles. Suddenly the pot is not just a container. It becomes part of the decor, part of the mood, and part of the little story your home tells. That is a lot to ask from clay, glue, and fabric, yet somehow they deliver.
So if you have been curious about making DIY fabric covered flower pots, experience says this: start simple, use fabric you truly like, give the glue time to dry, and do not panic over tiny flaws. The charm is in the finished look, not in proving you are some mythical crafting wizard. Although if the final pot turns out especially good, you are absolutely allowed to act like one.