Table of Contents >> Show >> Hide
- Before You Start: Materials, Tools, and Smart Safety
- DIY Plan #1: Chunky Animal Tray Puzzle (Beginner-Friendly, Kid-Approved)
- DIY Plan #2: Photo Jigsaw Puzzle (12-Piece Classic You Can Make in an Afternoon)
- DIY Plan #3: Six-Piece Interlocking Burr Puzzle (A 3D Puzzle That Looks Fancy)
- Design Upgrades That Make Any Wooden Puzzle Look More “Pro”
- Conclusion
- Experiences: What It’s Like to Build These Wooden Puzzles (And What You’ll Learn Fast)
Wooden puzzles are the rare DIY project that checks every box: they’re fun to make, satisfying to use, easy to customize, and they turn scrap wood into something people actually keep. (Unlike that “rustic” shelf you built in 2019 that now lives in the garage holding… more regret.)
In this guide, you’ll learn how to make wooden puzzles with three beginner-friendly plansranging from a chunky kid’s tray puzzle to a classic photo jigsaw, plus a 3D interlocking burr puzzle that looks like a tiny wooden brain teaser. Along the way, you’ll get practical tips on wood choice, clean cuts, sanding tricks, and finishes that feel great in the hand.
Before You Start: Materials, Tools, and Smart Safety
Choose the Best Wood for the Puzzle You’re Making
The “right” wood depends on the style of puzzle. Here’s a quick, practical way to choose:
-
Chunky tray puzzles (for kids): 3/4″ hardwood (maple, birch, beech) or high-quality plywood.
Thicker stock makes pieces easier to grab and less likely to snap. - Photo jigsaw puzzles: 1/4″ MDF (super smooth, no grain tearout, great for images), or 1/4″ Baltic birch plywood if you want a wood look.
- 3D interlocking puzzles: Dense hardwood is best (maple, walnut, sapele, oak). You want crisp edges that don’t crush or fuzz.
Tools You’ll Need (Pick What Matches Your Setup)
You can make all three plans with common tools. The more specialized the tool, the easier the cutsbut you’ve got options.
- Nice-to-have for puzzle making: scroll saw (best for curves and small parts)
- Alternatives for curved cuts: jigsaw + sanding, bandsaw, or router + template
- For straight, repeatable joinery: table saw or miter saw (especially for the 3D burr puzzle)
- Must-haves: clamps, drill (for starter holes), sandpaper (80–220 grit), pencil, ruler/square
- Helpful upgrades: spindle sander, palm sander, round-over router bit (1/8″ or 1/4″)
Safety That Actually Matters for Puzzle Projects
Puzzle projects are “small,” which tempts people to get casual. Don’t. Small workpieces put fingers closer to blades, and sanding can create a lot of fine dust fast.
- Control dust: use dust collection when possible and wear a proper dust mask or respirator while sanding.
- Protect your eyes: safety glasses are non-negotiable.
- Keep small parts age-appropriate: if the puzzle is for young kids, avoid tiny pieces and removable knobs that could become a choking hazard.
- Let finishes cure fully: “Dry to the touch” isn’t the same as “cured.” Give it time before handing it off to curious hands.
Finishing 101: Smooth Feel, Safer Handling
A good finish does two things: it makes the puzzle feel great, and it helps it survive real life (aka sticky fingers, coffee tables, and the occasional dramatic puzzle toss).
- Shellac: dries fast, seals paper/images well, and is a classic choice for small projects.
- Water-based polyurethane: durable, clear, and less likely to amber than oil-based finishes.
- Oil/wax blends (mineral oil + beeswax): nice hand-feel, easy to refreshbest for simple toys and “handled” items.
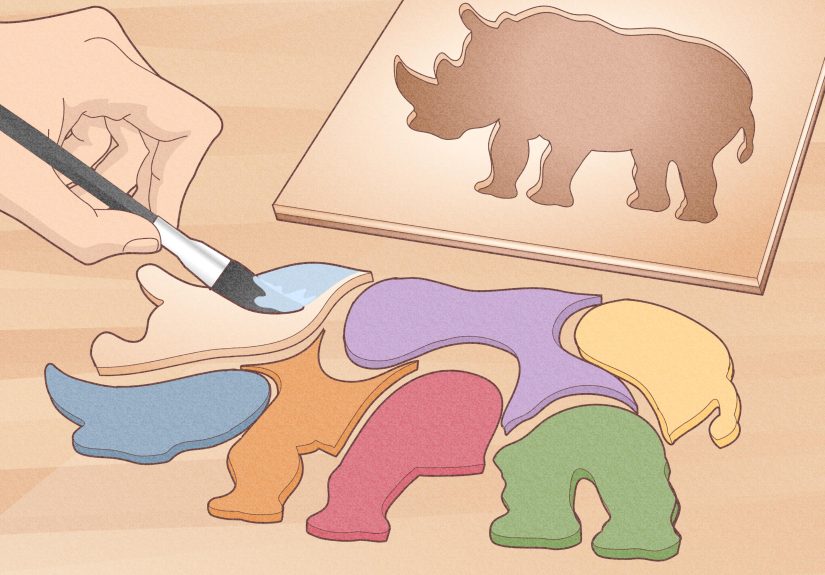
DIY Plan #1: Chunky Animal Tray Puzzle (Beginner-Friendly, Kid-Approved)
This is the easiest wooden puzzle to make because the pieces are big, forgiving, and you can design it with simple shapes. The goal is not “perfect fit.” The goal is “durable and delightful.”
What You’ll Build
- Finished size: about 10″ × 14″ (easy to carry, easy to store)
- Pieces: 6–9 large animal shapes
- Wood: 3/4″ hardwood or plywood for pieces + 1/4″ plywood for the base (optional)
Materials
- 3/4″ board: ~10″ × 14″
- (Optional) 1/4″ plywood backer: ~10″ × 14″
- Wood glue
- Painter’s tape (for clean glue lines)
- Finish of choice
Tools
- Scroll saw, jigsaw, or bandsaw
- Drill (starter holes if needed)
- Sander or sanding blocks
- Clamps
Step-by-Step Instructions
-
Pick a simple theme and draw big shapes.
Choose 6–9 chunky shapes (farm animals, dinosaurs, sea creatures). Keep “skinny” parts thickno tiny legs or whiskers. -
Make a clean layout.
Trace your shapes onto the board with at least 1/4″ between pieces. If you want the tray look, sketch a 1/2″ border around the outside. -
Cut the pieces first.
Cut each animal out. If you’re using a jigsaw, go slow and stay just outside your linethen sand to the line. -
Create the tray base (two options).
- Easy option: Use the original board as the “board” and simply place pieces back into the empty spaces.
- Cleaner option: Glue the whole cutout panel onto a 1/4″ plywood backer so the pieces sit in pockets and can’t fall through.
-
Round every edge that touches hands.
Use a small round-over bit or sand the edges thoroughly. For kid puzzles, soften edges until nothing feels sharpeven corners. -
Sand like you mean it.
Start at 80–120 grit to remove saw marks, then finish at 180–220 grit for a smooth feel. Don’t skip the inside curvesthose are the splinter zones. -
Finish and cure.
Apply a thin, even coat of your finish. If it’s for kids, choose a finish you’re comfortable with for frequent handling, and let it fully cure before use.
Pro Tips for a Better Fit (Without Losing Your Mind)
- Label the back of each piece lightly in pencil as you cut, so you don’t play “which cow goes here?” later.
- Sand in pairs: if two adjacent shapes are tight, sand both edges a little rather than removing a lot from just one.
- Make it smarter, not harder: a “good” kid puzzle has a tiny bit of wiggle room so pieces aren’t frustrating.
DIY Plan #2: Photo Jigsaw Puzzle (12-Piece Classic You Can Make in an Afternoon)
This plan gives you that old-school “picture puzzle” feelexcept sturdier, thicker, and far less likely to explode into a thousand cardboard splinters when someone sneezes nearby.
What You’ll Build
- Finished puzzle size: about 8″ × 10-1/2″
- Pieces: 12 (great beginner difficulty)
- Wood: 1/4″ MDF (recommended) or 1/4″ Baltic birch plywood
Materials
- 1/4″ MDF: at least 8-1/2″ × 11″ (start slightly oversized)
- Printed image (laser print is easiest for clean transfer methods)
- Spray adhesive (or thinned glue as an alternative)
- Aerosol shellac (or another fast sealer coat)
- Optional: thin wood strips for a simple frame
Tools
- Scroll saw
- Fine blade (reverse-tooth or other clean-cut style for reduced tearout)
- Drill + tiny bit (starter holes only if you add interior cuts)
- Sanding supplies
Step-by-Step Instructions
-
Prepare the blank.
Cut MDF to roughly 8-1/2″ × 11″ so you have margin for trimming later. -
Add a simple grid on the back (so pieces are consistent).
Create a 3 × 4 grid with gently curving “tabs.” You can draw it by hand or print a grid.
The key is to keep lines smoothno sharp inside corners. -
Attach the image to the front.
Spray adhesive works well: apply evenly, lay the image down, then press it flat with a roller or a wrapped scrap board.
Avoid bubblesbubbles become “mystery mountains” after the first coat of finish. -
Seal the image before cutting.
Apply several light coats of shellac (or another quick sealer). This stiffens the paper fibers and helps prevent ragged edges while sawing. -
Trim to final size.
Once sealed and dry, trim the puzzle blank to about 8″ × 10-1/2″. -
Cut the puzzle pieces.
Go slow and steady. Smooth, continuous motion beats “micro-corrections” that create bumps.
If your saw has a hold-down foot, adjust it so the work stays stable. -
Light sanding only (protect the image).
Sand edges gently to remove fuzz. Avoid aggressive sanding on the face unless you added a protective topcoat. -
Optional: make a simple frame tray.
Thin rails around the puzzle make it easier to store and keep pieces together. Mitered corners look nice, but square butt joints work too.
Troubleshooting: The 3 Most Common Issues
- Ragged edges: switch to a finer blade, slow down, and make sure the image is sealed.
- Pieces too tight: lightly sand edges; don’t force-fit (MDF edges can mushroom).
- Pieces too loose: next time, reduce blade width or redesign with fewer long, straight cuts.
DIY Plan #3: Six-Piece Interlocking Burr Puzzle (A 3D Puzzle That Looks Fancy)
This is the puzzle that makes people pick it up, squint at it, and say, “Okay… how is this even possible?” It’s made from six pieces of square stock with precisely cut notches that lock together into a clean geometric form.
What You’ll Build
- Finished size: roughly a 3D cube-like form (varies by design)
- Pieces: 6 total, with 3 notch patterns
- Wood: dense hardwood for crisp, durable joinery
Materials
- Hardwood stock milled to 1-1/16″ square
- Cut list: make two 18″ lengths, then cut into 4″ segments (you’ll get extra test pieces)
- Finish of choice
Tools
- Table saw (best) or miter saw + careful hand work
- Clamp setup or jig/cradle to hold small parts securely
- Sanding supplies for inside notch faces
Step-by-Step Instructions
-
Mill the stock accurately.
This puzzle rewards precision. Aim for consistent width and thickness across all pieces. -
Cut your segments.
Cut at least 8 segments at 4″ long (6 for the puzzle, 2 for test cuts). -
Mark a centerline around a test piece.
Wrap the line around all four faces. This becomes your “truth line” for notch depth and alignment. -
Cut the first notch set.
Many burr designs use V-shaped notches made with a blade tilted to 45°. However you cut them, the goal is the same:
the notch cuts should meet cleanly at the centerline. -
Make three piece types.
A common six-piece burr layout uses:- 3 pieces with two notches
- 2 pieces with three notches
- 1 piece with no notches (often the “key” piece in assembly)
-
Bevel the ends (optional but classy).
Many builds bevel both ends of each piece to refine the final shape. If you bevel, do it consistently across all pieces. -
Sand the inside notch faces.
Wrap sandpaper around a flat scrap (or tape it on) so you can clean notch walls without rounding edges. -
Dry fit and tune.
If it won’t assemble, don’t brute force it. Identify the tight contact points and sand minimally.
The best burr puzzles feel snug but not sticky. -
Finish.
Apply a thin clear finish. Avoid heavy, gummy builds that could change the fit.
Assembly Advice (Without Spoiling the Fun)
The “experience” of a burr puzzle is solving itso here’s the best non-spoiler tip: assemble three perpendicular “pairs” first,
then look for the piece that acts like a key. If one step feels impossible, you’re probably one move earlier than you think.
Design Upgrades That Make Any Wooden Puzzle Look More “Pro”
- Add a shallow tray frame: keeps pieces together and makes gifting easier.
- Use contrasting woods: maple + walnut is a classic combo that photographs beautifully.
- Burn a tiny signature/date: a simple wood-burned mark makes it feel like a keepsake.
- Go sensory: vary piece shapes, include textured paint, or use a satin finish for a soft hand-feel.
Conclusion
If you’re new to woodworking, wooden puzzles are one of the smartest places to start. The projects are small, the materials are forgiving,
and each build teaches transferable skillsclean cutting, careful sanding, pattern transfer, and finishing. Start with the chunky tray puzzle,
level up to the photo jigsaw, and when you’re ready to impress people at your next gathering, casually place a six-piece burr puzzle on the table
and watch everyone forget their phones for five straight minutes. That’s real power.
Experiences: What It’s Like to Build These Wooden Puzzles (And What You’ll Learn Fast)
The first “experience” most people have when making a wooden puzzle is realizing that puzzle making is basically woodworking’s version of baking:
the ingredients are simple, but tiny changes in technique can dramatically change the outcome. You’ll start out thinking, “It’s just cutting shapes.”
Then you’ll make your first cut, and your brain immediately adds, “…with a tool that moves very fast, and my fingers are extremely close to it.”
That’s when you begin to respect jigs, clamps, and the magical phrase: slow is smooth, smooth is fast.
With the chunky animal tray puzzle, the most common moment is the “ohhh” momentwhen you drop a piece back into its pocket and it lands with that
satisfying fit. It’s also where you learn the difference between accurate and pleasant. A kid puzzle that fits like a
precision-machined part might look impressive, but it can be frustrating for small hands. Most makers end up preferring a tiny bit of wiggle room.
The experience here teaches you to design for the user, not the ego. And you’ll learn sanding discipline: the edges that feel “fine” to you might feel
scratchy to someone with sensitive hands. After you’ve rounded and polished a few pieces, you’ll start automatically picking up every project and running
your fingers along the edges like a quality inspector. Congratulationsyou’ve become that person.
The photo jigsaw puzzle delivers a different kind of satisfaction: it feels like you’re combining art and craft in one object. The classic experience
is the moment you seal the image and realize you’ve created a real, durable surfaceno longer “paper on wood,” but a unified piece. This is also where
you learn patience in a very specific way. If you rush the image mounting step, you’ll trap a bubble or wrinkle, and that flaw will haunt you forever
because puzzles make people stare. A lot. The second big learning moment comes from blade choice and cut quality. When your edges come off clean,
your pieces look “store-bought,” and you’ll want to show everyone. When the edges are fuzzy, you suddenly become a sanding philosopher, experimenting
with different grits and techniques like you’re writing a thesis titled On the Nature of Ragged MDF.
The six-piece burr puzzle is the one that teaches you precision and humility at the same time. Your first test fit often feels like the puzzle is judging you.
Too tight? It won’t assemble. Too loose? It assembles, but feels cheap and sloppy. The experience here is learning to remove almost nothing at a time.
Lightly sanding the inside faces of notches can feel absurdly subtleuntil you try again and the pieces suddenly slide into place with a satisfying “click.”
That’s the moment many makers get hooked, because it’s proof that careful work produces a tactile payoff you can literally feel. It also changes how you approach
future projects: you start making test cuts, keeping reference pieces, and treating setup as part of the craft rather than a hurdle before the “real work.”
The most universal experience across all three builds is how giftable they are. People react differently to handmade puzzles than they do to most DIY projects.
A shelf is nice, but a puzzle invites interaction. It sits on a coffee table and gets picked up. It becomes a mini tradition: someone tries it, someone else tries it,
and suddenly you’ve made an object that creates a shared moment. And if you choose to customizean image from a family trip, animals a child loves, or a wood species
that matches someone’s homeyou’ll feel the difference between “I made a thing” and “I made something for you.” That’s the best kind of DIY experience:
practical skills, creative expression, and the weirdly powerful joy of watching someone smile while they try to figure out how your wooden brain teaser comes apart.