Table of Contents >> Show >> Hide
- What “Marked as Read When Clicked” Actually Means
- Classic Outlook for Windows (Microsoft 365 / Outlook 2016–2024)
- Option A: Mark as read after you click (with a delay)
- Option B: Mark as read when you move away (selection changes)
- Option C: Only mark as read when you explicitly do it (manual mode)
- Alternative path: File → Options → Advanced
- Pro tip: Apply the behavior consistently (avoid “why is Inbox different from Archive?”)
- New Outlook for Windows (the redesigned app)
- Outlook on the Web (Outlook.com / Outlook Web App)
- Outlook for Mac
- Outlook Mobile (iOS / Android)
- Best-Practice Setups (Pick Your Personality)
- Troubleshooting: When Outlook Won’t Do What You Told It
- Small Habits That Make This Setting 10x More Useful
- Conclusion
- Real-World Experiences: What Changes After You Flip This Setting (Extra )
Outlook has a special talent: the moment you look at an email, it sometimes decides you’ve “handled” it.
Congratulationsyou’re now “caught up,” at least according to the little blue unread dot that just vanished.
If you’ve ever clicked a message by accident and watched it flip to Read like a dramatic soap opera twist,
this guide is for you.
The good news: Outlook gives you control over when a message becomes readimmediately on click,
after a short delay, only when you open it, or never unless you explicitly mark it.
The slightly annoying news: the setting lives in different places depending on which Outlook you use
(classic desktop, new Outlook for Windows, Outlook on the web, Mac, mobile).
What “Marked as Read When Clicked” Actually Means
Most people mean one of these behaviors:
- Selection-based: The email becomes read as soon as you click it in the message list (especially with the Reading Pane on).
- Delay-based: The email becomes read only if you keep it selected for X seconds (a great “don’t punish my twitchy mouse hand” option).
- Open-only: The email stays unread unless you open it in its own window, reply, forward, or manually mark it read.
Your best setup depends on your inbox style: are unread messages your to-do list, or just a notification badge you’d like to stop feeding?
Let’s tune Outlook to match your brainnot the other way around.
Classic Outlook for Windows (Microsoft 365 / Outlook 2016–2024)
If you’re using the “classic” desktop Outlook (the one that’s been around forever and knows too much about PST files),
you’ll usually configure this through Reading Pane options.
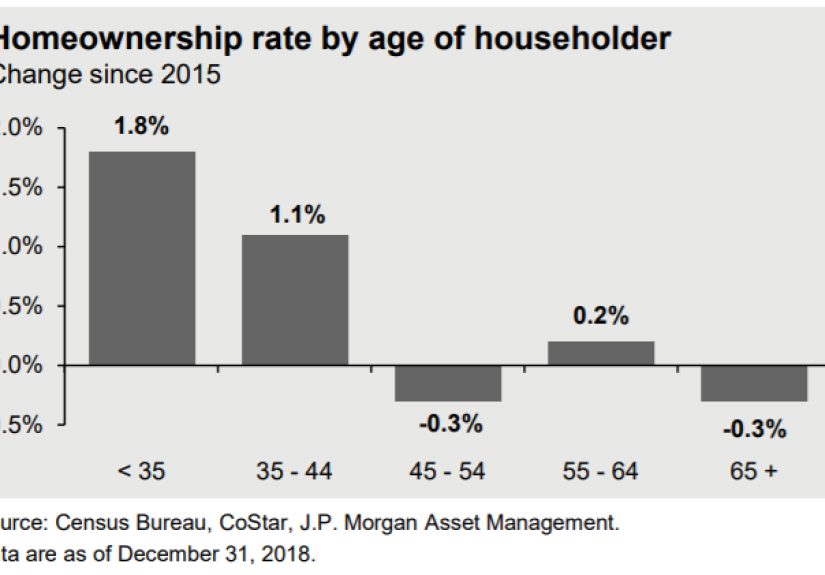
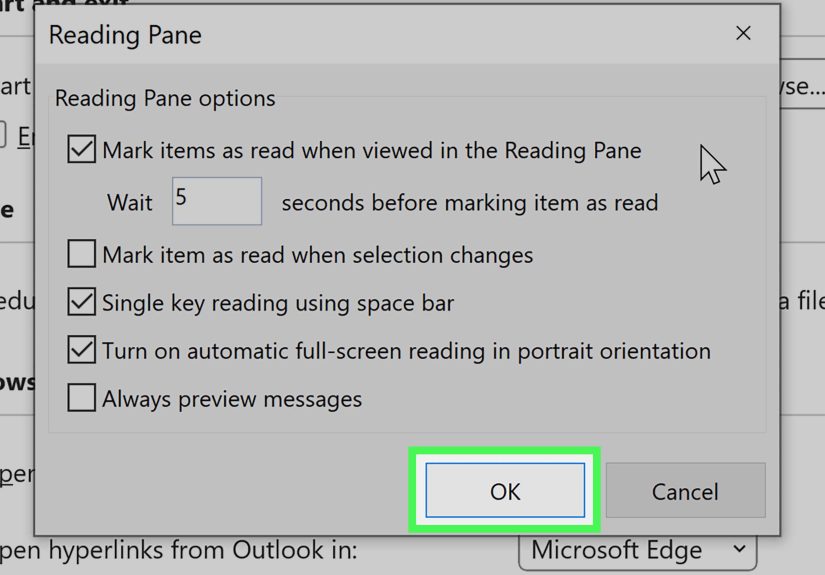
Option A: Mark as read after you click (with a delay)
- Open Outlook and go to the View tab.
- Choose Reading Pane → Options.
- Check Mark items as read when viewed in the Reading Pane.
- Set Wait n seconds before marking item as read (try 3–10 seconds as a practical starting point).
- Click OK.
Why a delay helps: you still get the convenience of auto-read, but accidental clicks don’t instantly erase your “I need to deal with this” cue.
Option B: Mark as read when you move away (selection changes)
In that same Reading Pane Options box, there’s often a setting like:
Mark item as read when the selection changes.
- On: Click message A, then click message Bmessage A gets marked read immediately as you move away.
- Off: Outlook won’t use “you glanced at it” as evidence of completion.
If you want “mark read when clicked,” this is the closest matchbut it’s also the quickest way to accidentally mark things read while scrolling.
Many people prefer turning selection changes off and using a seconds delay instead.
Option C: Only mark as read when you explicitly do it (manual mode)
Want the nuclear option? In Reading Pane options, uncheck:
- Mark items as read when viewed in the Reading Pane
- Mark item as read when the selection changes
Now messages generally stay unread unless you deliberately mark them read, open them in a separate window, or take an action you treat as “done.”
This is a favorite setup for people who use unread as their task list.
Alternative path: File → Options → Advanced
Depending on your Outlook build and ribbon layout, you can also find the same Reading Pane controls here:
File → Options → Advanced → under Outlook panes, click Reading Pane.
If the View-tab route feels like it’s playing hide-and-seek, this path is usually reliable.
Pro tip: Apply the behavior consistently (avoid “why is Inbox different from Archive?”)
Outlook can behave slightly differently by folder depending on view settings and how you’ve customized panes.
If you notice your Inbox behaves one way and your other folders behave another, double-check you’re adjusting the Reading Pane options globally
and not only for a single folder view.
New Outlook for Windows (the redesigned app)
The new Outlook for Windows looks more like Outlook on the weband many settings moved into a web-style configuration panel.
The key area you’re looking for is usually under Message handling or Mail settings.
Typical path: Settings → Mail → Message handling
- Click the Settings gear icon.
- Go to Mail → Message handling (wording can vary slightly by update).
- Find a section like Mark as read.
- Choose your preferred behavior:
- Mark displayed items as read when the selection changes (fastest)
- Mark displayed items as read after X seconds (safer)
- Don’t automatically mark items as read (manual)
- Save changes if prompted.
If you don’t see these exact labels, look for any combination of “mark as read,” “reading pane,” “displayed items,” or “selection changes.”
Microsoft sometimes tweaks the wording, but the three behaviors above are the core set.
Outlook on the Web (Outlook.com / Outlook Web App)
If you live in the browser, you can still control “mark as read when clicked” with Reading Pane settingsoften with more clarity than desktop.
How to change it
- Click the Settings gear icon.
- Open Mail settings.
- Go to Display settings → Reading pane.
- Choose one of the read behaviors:
- Mark the item displayed in the reading pane as read after a number of seconds
- Mark the item as read when the selection changes
- Don’t automatically mark items as read
- Apply/save your changes.
Bonus: browser Outlook often lets you apply Reading Pane layout and behavior to one folder or all foldershandy if you want your Inbox strict,
but your Newsletters folder basically a chill lounge.
Outlook for Mac
Mac Outlook has similar concepts (Reading Pane + read/unread behavior), but the menu path is different.
Look for Preferences and a Reading or Reading Pane section where you can choose whether mail is marked read when viewed.
If you can’t find it quickly, use Outlook’s settings search (if available) and type “read” or “reading pane.”
Apple users deserve better than scavenger hunts.
Outlook Mobile (iOS / Android)
On mobile, messages typically become read when openedthere’s usually less granularity for “wait X seconds.”
What you can customize is how quickly you triage with gestures:
swipe actions can include Mark as read or Mark as unread.
Make “Mark as Read” a swipe option
- Open Outlook mobile.
- Go to Settings.
- Select Swipe Options.
- Assign Mark as Read (or Mark as Unread) to swipe left or right.
This is the mobile equivalent of “I want control,” without needing a tiny checkbox that only appears after you whisper the word “Advanced” three times.
Best-Practice Setups (Pick Your Personality)
1) The “Accidental Click Insurance” setup (recommended for most people)
- Turn off: Mark as read when selection changes
- Turn on: Mark as read when viewed in Reading Pane
- Delay: 3–10 seconds
You still get an auto-clean inbox, but Outlook stops marking messages read just because your mouse grazed them.
2) The “Unread = To-Do List” setup
- Turn off: automatic mark-as-read behaviors
- Use manually: mark read when done (or after replying/processing)
This works beautifully if you treat unread like a task backlog. It also works beautifully if you enjoy seeing 4,218 unread messages.
No judgment. Slight concern. But no judgment.
3) The “Speed Reader” setup
- Turn on: mark as read when selection changes
- Optional: keep the Reading Pane on the right for faster scanning
This is for people who want their inbox to behave like a conveyor belt: click, read, next, done.
Troubleshooting: When Outlook Won’t Do What You Told It
The setting keeps “resetting”
If you’re bouncing between classic Outlook and the new Outlookor between desktop and webeach can maintain its own preferences.
Verify you changed the setting in the exact app you use daily (and not the one you opened once in a panic during a Wi-Fi outage).
It works in Inbox but not in other folders
In some configurations, Reading Pane layout and certain view behaviors can be folder-specific.
Re-check the Reading Pane options while you’re inside the folder that’s misbehaving, and look for options to apply view/layout to other folders.
Messages are marked read too quickly
Increase the wait time. Five seconds is a common default in many setups, but you’re allowed to choose peace.
Try 8–15 seconds if you skim headers first and only sometimes read the body.
“Clicked” doesn’t mean “opened” in my workflow
If you want emails marked read only when opened in their own window, consider:
- Turning off Reading Pane auto-read.
- Using a keyboard shortcut or quick action to mark read when done.
- Opening important mail in a separate window (double-click) so “read” means “I actually opened this intentionally.”
Small Habits That Make This Setting 10x More Useful
Use keyboard shortcuts for deliberate control
If you want “manual mode” without extra clicks, learn two muscle-memory moves:
- Ctrl + Q to mark selected mail as read
- Ctrl + U to mark selected mail as unread
Pair “mark as read” with a real triage system
Marking as read is not the same as processing. If you’re using unread as a priority signal, consider pairing it with:
- Flags for “must-do” items
- Categories for projects/clients
- Focused Inbox (if you like automation) or strict rules (if you like control)
The goal isn’t to hit zero unread. The goal is to make “read/unread” mean what you think it means.
Conclusion
Outlook’s “mark as read when clicked” behavior is one of those tiny settings that can quietly save you hours of re-opening messages,
re-finding “the one I accidentally marked read,” and wondering why your inbox feels like it’s gaslighting you.
Whether you choose instant read-on-click, a protective delay, or full manual control, the best configuration is the one that matches how you work.
Start with the safest default: turn off “selection changes”, turn on mark as read after X seconds,
and pick a delay that fits your reading speed. Then enjoy that rare modern luxury: email software doing what you asked.
Real-World Experiences: What Changes After You Flip This Setting (Extra )
Once you adjust Outlook’s “mark as read” behavior, your inbox doesn’t just look differentit feels different. It’s like moving the
doorbell from “randomly rings whenever someone walks by” to “rings only when someone actually presses it.” Here are some experiences people
commonly run into after they change this setting, plus what to do about them.
The “Oops, I Sneezed and Lost My Unread” moment
Before a delay, it’s easy to misclick while scrolling and instantly lose the unread indicator that was basically your brain’s sticky note.
People often describe this as “I swear it was unread two seconds ago.” With a 5–10 second delay, that moment mostly disappears.
You can still click around to scan subject lines without Outlook declaring the case closed.
The “Unread is My To-Do List” glow-up
If you treat unread messages as tasks, turning off automatic read marking is a game-changer. Suddenly, unread actually means
“not processed,” not “I accidentally glanced at it while looking for something else.” The experience is especially strong for project work:
client questions, approvals, and “can you look at this quickly?” messages stop getting buried. You’ll notice fewer “I forgot to reply”
moments because the unread list stays honest.
The flip side: your unread count may rise at firstbecause you’ve stopped lying to yourself. That’s not bad; it’s visibility.
To keep it from becoming an anxiety number, many people pair this setup with one extra habit: when you’re done with an email, hit
Ctrl + Q (or use a quick action) as your “close the loop” move.
The “I triage fast and don’t want speed bumps” reaction
Some folks love the speed of “selection changes” because it turns the inbox into a rapid scanning tool: click, read, move on.
If that’s you, you may find a delay feels slowlike Outlook is waiting for permission while you’ve already moved to the next message.
The fix is simple: keep selection-change marking on, but use it intentionally. For example, you can scan with arrow keys and the Reading Pane,
then rely on flags or categories for anything that needs action. In this world, unread means “new arrival,” not “unfinished work.”
The “My inbox looks clean, but I’m missing things” surprise
This happens when auto-read is too aggressive. Messages flip to read while you’re skimming, and later you can’t remember which ones needed follow-up.
The experience feels like being organized and disorganized at the same timean impressive, confusing achievement.
If you notice this, it’s a sign you’re using “Read” as a proxy for “Done,” but your workflow actually needs a second signal.
Add one of these:
- Flag emails that require action (even if you mark them read).
- Category emails by project so you can filter later.
- Create a simple Follow Up folder and move action items there.
The “Different Outlooks, different rules” reality check
People often switch between Outlook on the web at work, desktop at home, and mobile everywhere. The experience can be jarring if each version
has different read behavior. One day you’re in manual mode, the next day your phone marks everything read just by opening it, and suddenly
your system feels inconsistent. The practical takeaway: pick one “source of truth” for your workflow (usually desktop or web), set it up the way
you want, then use mobile for quick triage with swipe actions. Consistency beats perfection.
In the end, this is less about a checkbox and more about trust. When Outlook marks something as read at the right moment,
your inbox stops feeling like a slot machine and starts feeling like a system.